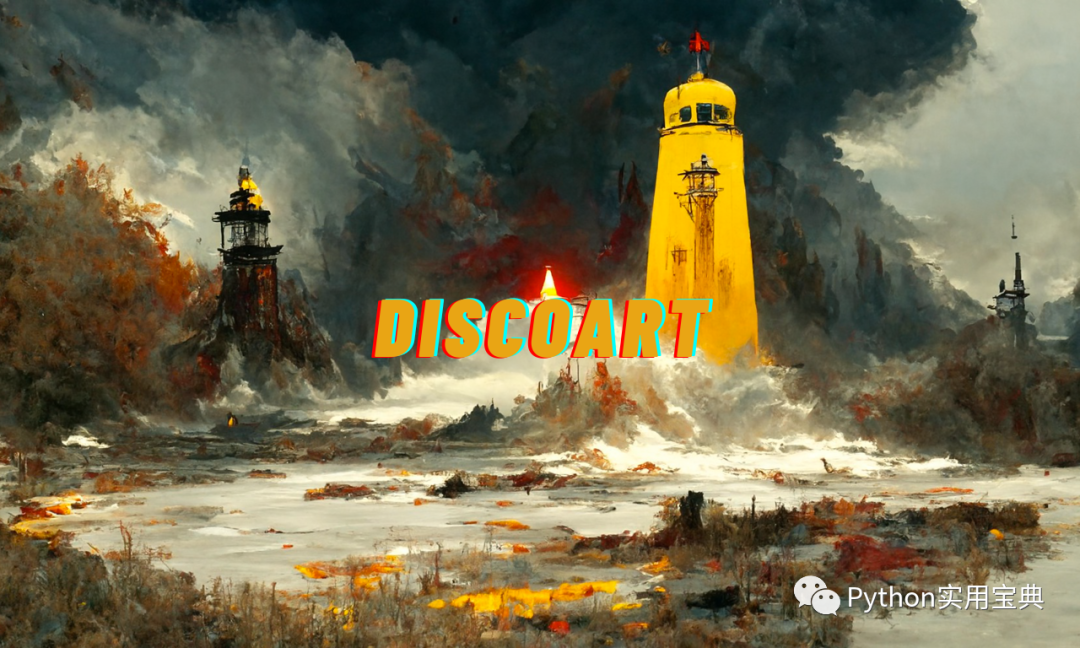
DiscoArt 是一个很牛逼的开源模块,它能根据你给定的关键词自动绘画。
绘制过程是完全可见的,你可以在 jupyter 页面上看见这个绘制的过程:
开始之前,你要确保Python和pip已经成功安装在电脑上,如果没有,可以进行安装。
(可选1) 如果你用Python的目的是数据分析,可以直接安装Anaconda,它内置了Python和pip.
(可选2) 此外,推荐大家用VSCode编辑器,它有许多的优点。
请选择以下任一种方式输入命令安装依赖 :
为了运行 Discoart, 你需要Python 3.7+ 和支持 CUDA 的 PyTorch.
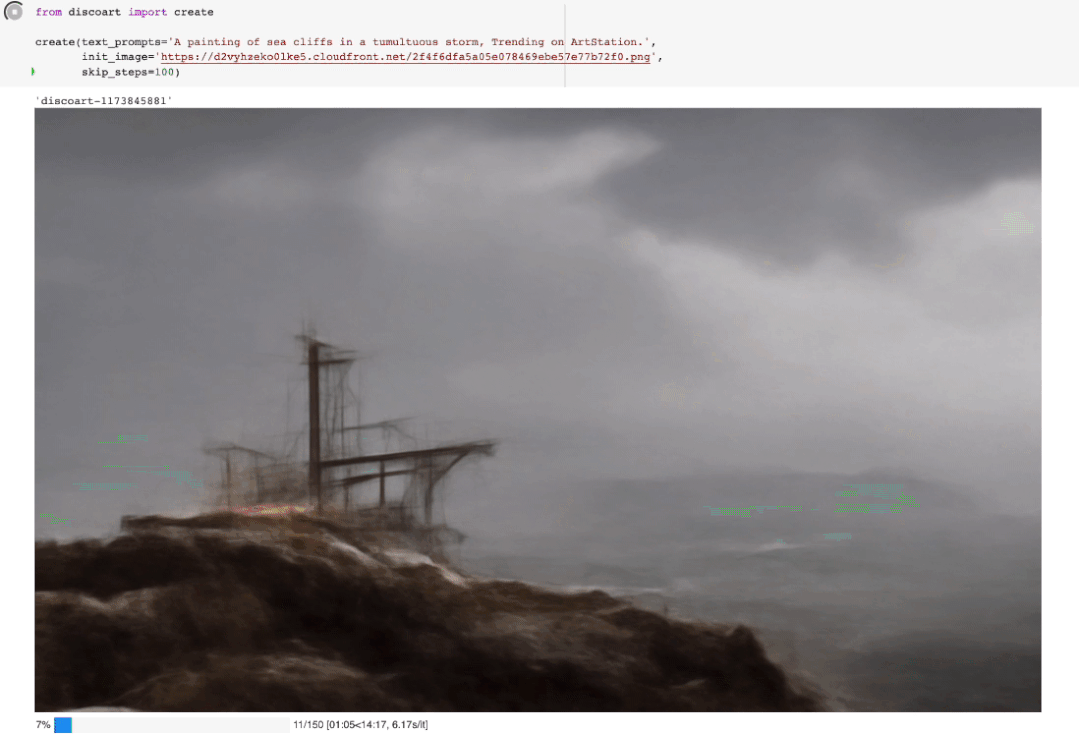
你可以在Jupyter中运行Discoart,这样能方便地实时展示绘制过程:
from discoart import create这样将使用默认的 文本描述 和参数创建图像:
上滑查看更多代码
text_prompts :init_image :width_height : [ 1280 , 768 ]skip_steps : 0 steps : 250 init_scale : 1000 clip_guidance_scale : 5000 tv_scale : 0 range_scale : 150 sat_scale : 0 cutn_batches : 4 diffusion_model : 512 x512_diffusion_uncond_finetune_008100use_secondary_model : Truediffusion_sampling_mode : ddimperlin_init : Falseperlin_mode : mixedseed :eta : 0.8 clamp_grad : Trueclamp_max : 0.05 randomize_class : Trueclip_denoised : Falserand_mag : 0.05 cut_overview : "[12]*400+[4]*600" cut_innercut : "[4]*400+[12]*600" cut_icgray_p : "[0.2]*400+[0]*600" cut_ic_pow : 1 .save_rate : 20 gif_fps : 20 gif_size_ratio : 0.5 n_batches : 4 batch_size : 1 batch_name :clip_models :ViT-B-32 ::openaiViT-B-16 ::openaiRN50 ::openaiclip_models_schedules :use_vertical_symmetry : Falseuse_horizontal_symmetry : Falsetransformation_percent : [0.09 ]on_misspelled_token : ignorediffusion_model_config :cut_schedules_group :name_docarray :skip_event :stop_event :text_clip_on_cpu : Falsetruncate_overlength_prompt : Falseimage_output : Truevisualize_cuts : Falsedisplay_rate : 1 创建出来的就是这个图:
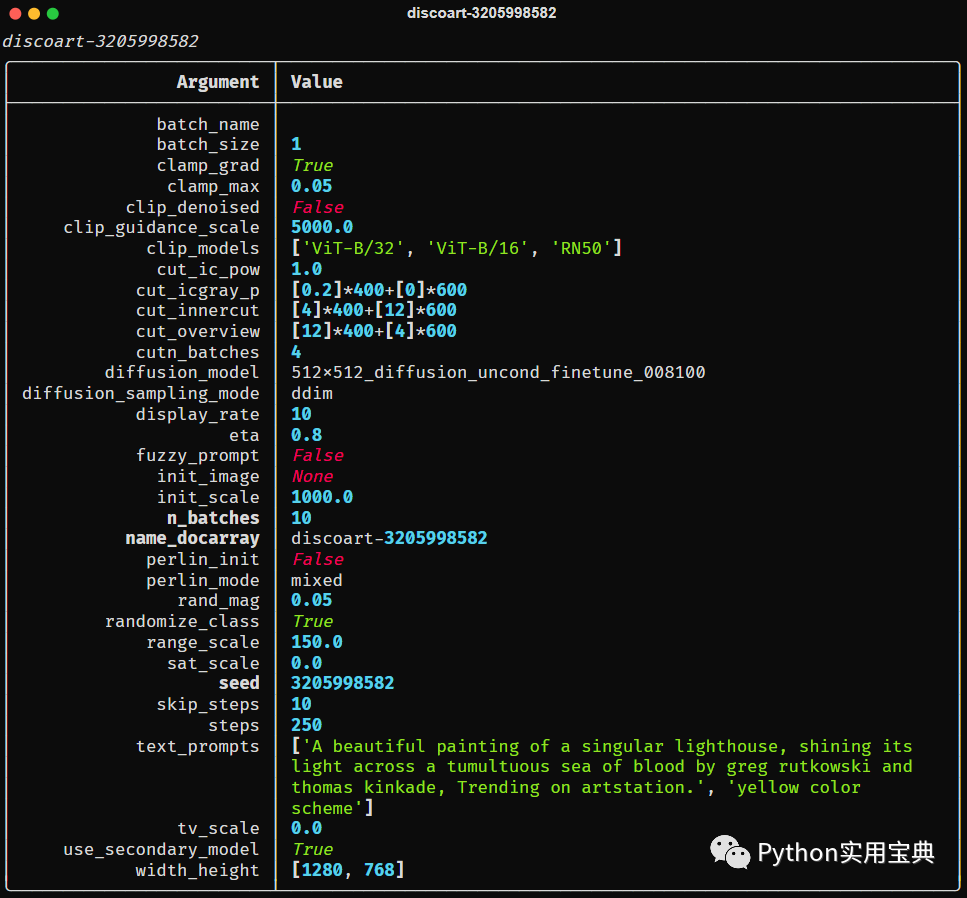
Create 支持的所有参数如下:
上滑查看更多代码
text_prompts :init_image :width_height : [ 1280 , 768 ]skip_steps : 0 steps : 250 init_scale : 1000 clip_guidance_scale : 5000 tv_scale : 0 range_scale : 150 sat_scale : 0 cutn_batches : 4 diffusion_model : 512 x512_diffusion_uncond_finetune_008100use_secondary_model : Truediffusion_sampling_mode : ddimperlin_init : Falseperlin_mode : mixedseed :eta : 0.8 clamp_grad : Trueclamp_max : 0.05 randomize_class : Trueclip_denoised : Falserand_mag : 0.05 cut_overview : "[12]*400+[4]*600" cut_innercut : "[4]*400+[12]*600" cut_icgray_p : "[0.2]*400+[0]*600" cut_ic_pow : 1 .save_rate : 20 gif_fps : 20 gif_size_ratio : 0.5 n_batches : 4 batch_size : 1 batch_name :clip_models :ViT-B-32 ::openaiViT-B-16 ::openaiRN50 ::openaiclip_models_schedules :use_vertical_symmetry : Falseuse_horizontal_symmetry : Falsetransformation_percent : [0.09 ]on_misspelled_token : ignorediffusion_model_config :cut_schedules_group :name_docarray :skip_event :stop_event :text_clip_on_cpu : Falsetruncate_overlength_prompt : Falseimage_output : Truevisualize_cuts : Falsedisplay_rate : 1 你可以这么使用参数:
from discoart import create'A painting of sea cliffs in a tumultuous storm, Trending on ArtStation.' ,'https://d2vyhzeko0lke5.cloudfront.net/2f4f6dfa5a05e078469ebe57e77b72f0.png' ,100 ,
如果你不是用jupyter运行的,你也可以看到中间结果,因为最终结果和中间结果都会被创建在当前工作目录下,即
./{name-docarray}/{i}-done.png name-docarray 是运行时定义的名称,如果没有定义,则会随机生成。
i-* 第几个Batch。
*-done-* 是当前Batch完成后的最终图像。
*-step-* 是某一步的中间图像,实时更新。
*-progress.png 是到目前为止所有中间结果的png图像,实时更新。
*-progress.gif 是到目前为止所有中间结果的动画 gif,实时更新。
da.protobuf.lz4 是到目前为止所有中间结果的压缩 protobuf,实时更新。
如果你想知道你当前绘图的配置,有三种方法:
from discoart import show_config# show the config of the first run 3 ]) # show the config of the fourth run 'discoart-06030a0198843332edc554ffebfbf288' # show the config of the run with a known DocArray ID 要保存 Document/DocumentArray 的配置:
from discoart import save_config'my.yml' ) # save the config of the first run 3 ], 'my.yml' ) # save the config of the fourth run 从配置中导入:
from discoart import create, load_config'my.yml' )此外,你还能直接把配置导出为图像的形式
from discoart.config import save_config_svg