
微前端框架实现原理
本文适合对微前端感兴趣、以及想深入微前端原理学习的小伙伴阅读。
欢迎关注前端早茶,与广东靓仔携手共同进阶~
作者:广东靓仔
一、前言
本文转载于掘金:
https://juejin.cn/post/7004661323124441102
这么多实现方案解决的场景问题还是分为两类:
单实例:当前页面只存在一个子应用,一般使用 qiankun 就行
多实例:当前页面存在多个子应用,可以使用浏览器原生隔离方案,比如 iframe 或者 WebComponent 这些
二、前置工作
yarn eject。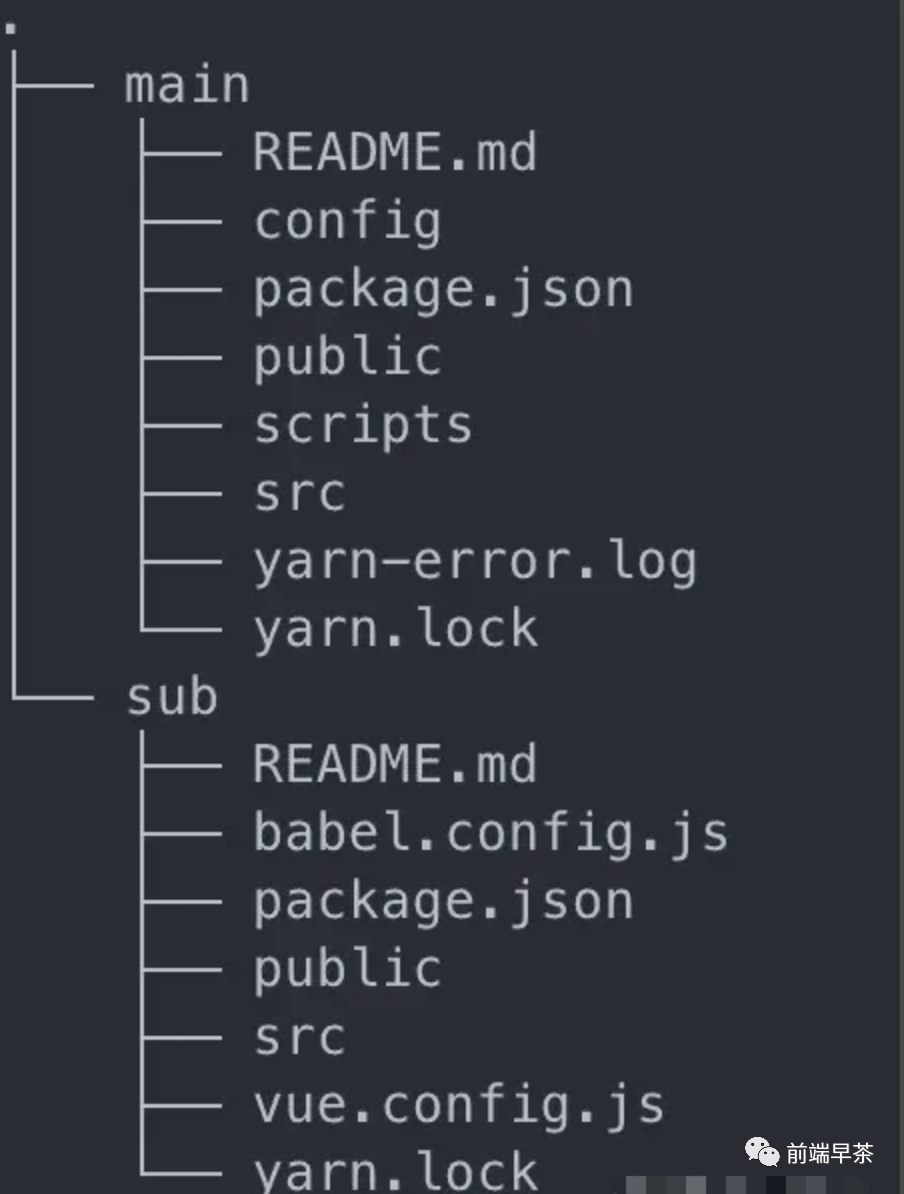
三、正文
主应用:负责整体布局以及子应用的配置及注册这类内容。
应用注册
在有了主应用之后,我们需要先在主应用中注册子应用的信息,内容包含以下几块:
name:子应用名词
entry:子应用的资源入口
container:主应用渲染子应用的节点
activeRule:在哪些路由下渲染该子应用
其实这些信息和我们在项目中注册路由很像,entry 可以看做需要渲染的组件,container 可以看做路由渲染的节点,activeRule 可以看做如何匹配路由的规则。
接下来我们先来实现这个注册子应用的函数:
// src/types.ts
export interface IAppInfo {
  name: string;
  entry: string;
  container: string;
  activeRule: string;
}

// src/start.ts
export const registerMicroApps = (appList: IAppInfo[]) => {
  setAppList(appList);
};

// src/appList/index.ts
let appList: IAppInfo[] = [];

export const setAppList = (list: IAppInfo[]) => {
  appList = list;
};

export const getAppList = () => {
  return appList;
};
只需要将用户传入的 appList 保存起来即可。
路由劫持
hash 模式,也就是 URL 中携带 #histroy 模式,也就是常见的 URL 格式了
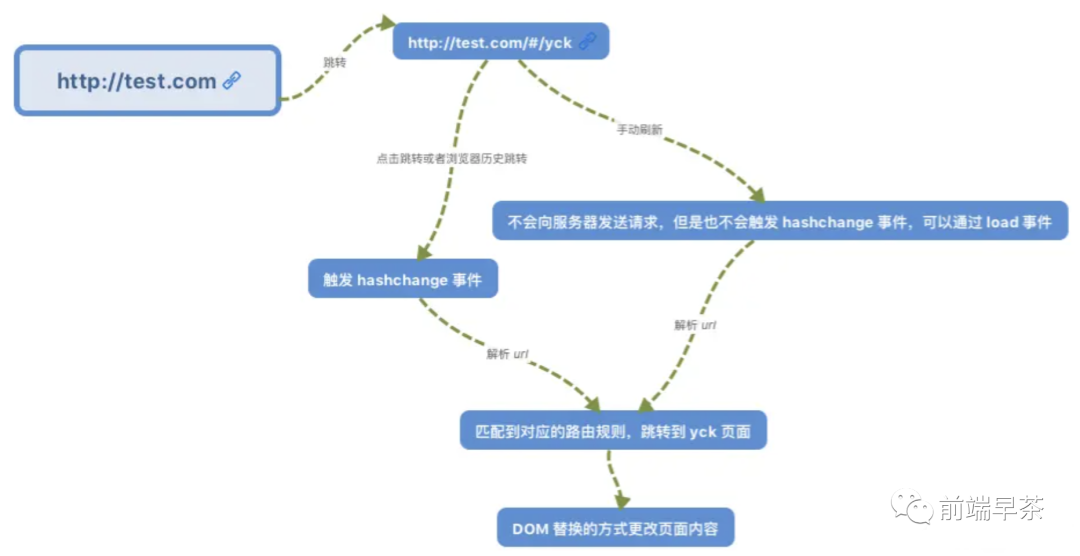
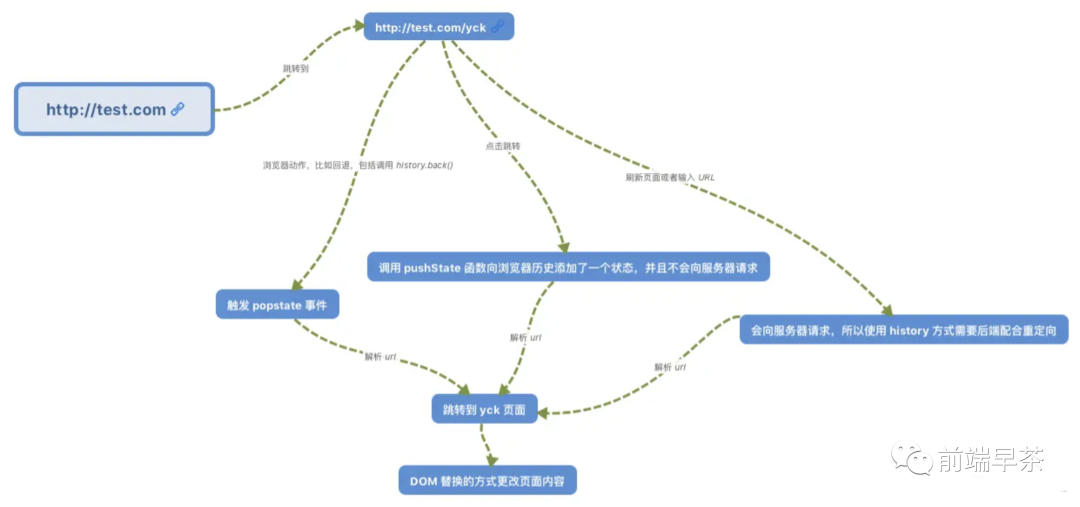
从上述图中我们可以发现,路由变化会涉及到两个事件:
popstatehashchange
因此这两个事件我们肯定是需要去监听的。除此之外,调用 pushState 以及 replaceState 也会造成路由变化,但不会触发事件,因此我们还需要去重写这两个函数。
知道了该监听什么事件以及重写什么函数之后,接下来我们就来实现代码:
// src/route/index.ts

// 保存原有方法
const originalPush = window.history.pushState;
const originalReplace = window.history.replaceState;

export const hijackRoute = () => {
  // 重写方法
  window.history.pushState = (...args) => {
    // 调用原有方法
    originalPush.apply(window.history, args);
    // URL 改变逻辑,实际就是如何处理子应用
    // ...
  };
  window.history.replaceState = (...args) => {
    originalReplace.apply(window.history, args);
    // URL 改变逻辑
    // ...
  };

  // 监听事件,触发 URL 改变逻辑
  window.addEventListener("hashchange", () => {});
  window.addEventListener("popstate", () => {});

  // 重写
  window.addEventListener = hijackEventListener(window.addEventListener);
  window.removeEventListener = hijackEventListener(window.removeEventListener);
};

const capturedListeners: Record<EventType, Function[]> = {
  hashchange: [],
  popstate: [],
};
const hasListeners = (name: EventType, fn: Function) => {
  return capturedListeners[name].filter((listener) => listener === fn).length;
};
const hijackEventListener = (func: Function): any => {
  return function (name: string, fn: Function) {
    // 如果是以下事件,保存回调函数
    if (name === "hashchange" || name === "popstate") {
      if (!hasListeners(name, fn)) {
        capturedListeners[name].push(fn);
        return;
      } else {
        capturedListeners[name] = capturedListeners[name].filter(
          (listener) => listener !== fn
        );
      }
    }
    return func.apply(window, arguments);
  };
};
// 后续渲染子应用后使用,用于执行之前保存的回调函数
export function callCapturedListeners() {
  if (historyEvent) {
    Object.keys(capturedListeners).forEach((eventName) => {
      const listeners = capturedListeners[eventName as EventType]
      if (listeners.length) {
        listeners.forEach((listener) => {
          // @ts-ignore
          listener.call(this, historyEvent)
        })
      }
    })
    historyEvent = null
  }
}
以上代码看着很多行,实际做的事情很简单,总体分为以下几步:
重写
pushState以及replaceState方法,在方法中调用原有方法后执行如何处理子应用的逻辑监听
hashchange及popstate事件,事件触发后执行如何处理子应用的逻辑重写监听 / 移除事件函数,如果应用监听了
hashchange及popstate事件就将回调函数保存起来以备后用
应用生命周期
beforeLoad:挂载子应用前mounted:挂载子应用后unmounted:卸载子应用
bootstrap:首次应用加载触发,常用于配置子应用全局信息mount:应用挂载时触发,常用于渲染子应用unmount:应用卸载时触发,常用于销毁子应用
// src/types.ts
export interface ILifeCycle {
  beforeLoad?: LifeCycle | LifeCycle[];
  mounted?: LifeCycle | LifeCycle[];
  unmounted?: LifeCycle | LifeCycle[];
}

// src/start.ts
// 改写下之前的
export const registerMicroApps = (
  appList: IAppInfo[],
  lifeCycle?: ILifeCycle
) => {
  setAppList(appList);
  lifeCycle && setLifeCycle(lifeCycle);
};

// src/lifeCycle/index.ts
let lifeCycle: ILifeCycle = {};

export const setLifeCycle = (list: ILifeCycle) => {
  lifeCycle = list;
};
因为是主应用的生命周期,所以我们在注册子应用的时候就顺带注册上了。
然后子应用的生命周期:
// src/enums.ts
// 设置子应用状态
export enum AppStatus {
  NOT_LOADED = "NOT_LOADED",
  LOADING = "LOADING",
  LOADED = "LOADED",
  BOOTSTRAPPING = "BOOTSTRAPPING",
  NOT_MOUNTED = "NOT_MOUNTED",
  MOUNTING = "MOUNTING",
  MOUNTED = "MOUNTED",
  UNMOUNTING = "UNMOUNTING",
}
// src/lifeCycle/index.ts
export const runBeforeLoad = async (app: IInternalAppInfo) => {
  app.status = AppStatus.LOADING;
  await runLifeCycle("beforeLoad", app);

  app = await 加载子应用资源;
  app.status = AppStatus.LOADED;
};

export const runBoostrap = async (app: IInternalAppInfo) => {
  if (app.status !== AppStatus.LOADED) {
    return app;
  }
  app.status = AppStatus.BOOTSTRAPPING;
  await app.bootstrap?.(app);
  app.status = AppStatus.NOT_MOUNTED;
};

export const runMounted = async (app: IInternalAppInfo) => {
  app.status = AppStatus.MOUNTING;
  await app.mount?.(app);
  app.status = AppStatus.MOUNTED;
  await runLifeCycle("mounted", app);
};

export const runUnmounted = async (app: IInternalAppInfo) => {
  app.status = AppStatus.UNMOUNTING;
  await app.unmount?.(app);
  app.status = AppStatus.NOT_MOUNTED;
  await runLifeCycle("unmounted", app);
};

const runLifeCycle = async (name: keyof ILifeCycle, app: IAppInfo) => {
  const fn = lifeCycle[name];
  if (fn instanceof Array) {
    await Promise.all(fn.map((item) => item(app)));
  } else {
    await fn?.(app);
  }
};
以上代码看着很多,实际实现也很简单,总结一下就是:
设置子应用状态,用于逻辑判断以及优化。比如说当一个应用状态为非
NOT_LOADED时(每个应用初始都为NOT_LOADED状态),下次渲染该应用时就无需重复加载资源了如需要处理逻辑,比如说
beforeLoad我们需要加载子应用资源执行主 / 子应用生命周期,这里需要注意下执行顺序,可以参考父子组件的生命周期执行顺序
完善路由劫持
判断当前 URL 与之前的 URL 是否一致,如果一致则继续 利用当然 URL 去匹配相应的子应用,此时分为几种情况: 初次启动微前端,此时只需渲染匹配成功的子应用 未切换子应用,此时无需处理子应用 切换子应用,此时需要找出之前渲染过的子应用做卸载处理,然后渲染匹配成功的子应用 保存当前 URL,用于下一次第一步判断
let lastUrl: string | null = null
export const reroute = (url: string) => {
  if (url !== lastUrl) {
    const { actives, unmounts } = 匹配路由,寻找符合条件的子应用
    // 执行生命周期
    Promise.all(
      unmounts
        .map(async (app) => {
          await runUnmounted(app)
        })
        .concat(
          actives.map(async (app) => {
            await runBeforeLoad(app)
            await runBoostrap(app)
            await runMounted(app)
          })
        )
    ).then(() => {
      // 执行路由劫持小节未使用的函数
      callCapturedListeners()
    })
  }
  lastUrl = url || location.href
}
嵌套关系 路径语法
/vue,那么类似 /vue 或者 /vue/xxx 都能匹配上这个路由,除非我们设置 excart 也就是精确匹配。<Route path="/hello/:name"> // 匹配 /hello/michael 和 /hello/ryan
<Route path="/hello(/:name)"> // 匹配 /hello, /hello/michael 和 /hello/ryan
<Route path="/files/*.*"> // 匹配 /files/hello.jpg 和 /files/path/to/hello.jpg
这样看来路由匹配实现起来还是挺麻烦的,那么我们是否有简便的办法来实现该功能呢?答案肯定是有的,我们只要阅读 Route 库源码就能发现它们内部都使用了path-to-regexp这个库,有兴趣的可以阅读下这个库的文档,这里我们只看其中一个 API 的使用就行。

有了解决方案以后,我们就快速实现下路由匹配的函数:
export const getAppListStatus = () => {
  // 需要渲染的应用列表
  const actives: IInternalAppInfo[] = []
  // 需要卸载的应用列表
  const unmounts: IInternalAppInfo[] = []
  // 获取注册的子应用列表
  const list = getAppList() as IInternalAppInfo[]
  list.forEach((app) => {
    // 匹配路由
    const isActive = match(app.activeRule, { end: false })(location.pathname)
    // 判断应用状态
    switch (app.status) {
      case AppStatus.NOT_LOADED:
      case AppStatus.LOADING:
      case AppStatus.LOADED:
      case AppStatus.BOOTSTRAPPING:
      case AppStatus.NOT_MOUNTED:
        isActive && actives.push(app)
        break
      case AppStatus.MOUNTED:
        !isActive && unmounts.push(app)
        break
    }
  })

  return { actives, unmounts }
}
reroute 函数中调用一下,至此路由劫持功能彻底完成了。完善生命周期
registerMicroApps 函数,我们最开始就给这个函数传入了 entry 参数,这就是子应用的资源入口。JS Entry HTML Entry
加载资源
首先我们需要获取 HTML 的内容,这里我们只需调用原生 fetch 就能拿到东西了。
// src/utils
export const fetchResource = async (url: string) => {
  return await fetch(url).then(async (res) => await res.text())
}
// src/loader/index.ts
export const loadHTML = async (app: IInternalAppInfo) => {
  const { container, entry } = app

  const htmlFile = await fetchResource(entry)

  return app
}
切换路由至 /vue 之后,我们可以打印出加载到的 HTML 文件内容。
<!DOCTYPE html>
<html lang="">
  <head>
    <meta charset="utf-8">
    <meta http-equiv="X-UA-Compatible" content="IE=edge">
    <meta name="viewport" content="width=device-width,initial-scale=1.0">
    <link rel="icon" href="/favicon.ico">
    <title>sub</title>
  <link href="/js/app.js" rel="preload" as="script"><link href="/js/chunk-vendors.js" rel="preload" as="script"></head>
  <body>
    <noscript>
      <strong>We're sorry but sub doesn't work properly without JavaScript enabled. Please enable it to continue.</strong>
    </noscript>
    <div id="app"></div>
    <!-- built files will be auto injected -->
  <script type="text/javascript" src="/js/chunk-vendors.js"></script>
  <script type="text/javascript" src="/js/app.js"></script></body>
</html>
// vue.config.js
module.exports = {
  devServer: {
    headers: {
      'Access-Control-Allow-Origin': '*',
    },
  },
}
接下来我们需要先行处理这些资源的路径,将相对路径拼接成正确的绝对路径,然后再去 fetch。
// vue.config.js
// src/utils
export function getCompletionURL(src: string | null, baseURI: string) {
  if (!src) return src
  // 如果 URL 已经是协议开头就直接返回
  if (/^(https|http)/.test(src)) return src
 // 通过原生方法拼接 URL
  return new URL(src, getCompletionBaseURL(baseURI)).toString()
}
// 获取完整的 BaseURL
// 因为用户在注册应用的 entry 里面可能填入 //xxx 或者 https://xxx 这种格式的 URL
export function getCompletionBaseURL(url: string) {
  return url.startsWith('//') ? `${location.protocol}${url}` : url
}
以上代码的功能就不再赘述了,注释已经很详细了,接下来我们需要找到 HTML 文件中的资源然后去 fetch。
既然是找出资源,那么我们就得解析 HTML 内容了:
// src/loader/parse.ts
export const parseHTML = (parent: HTMLElement, app: IInternalAppInfo) => {
  const children = Array.from(parent.children) as HTMLElement[]
  children.length && children.forEach((item) => parseHTML(item, app))

  for (const dom of children) {
    if (/^(link)$/i.test(dom.tagName)) {
      // 处理 link
    } else if (/^(script)$/i.test(dom.tagName)) {
      // 处理 script
    } else if (/^(img)$/i.test(dom.tagName) && dom.hasAttribute('src')) {
      // 处理图片,毕竟图片资源用相对路径肯定也 404 了
      dom.setAttribute(
        'src',
        getCompletionURL(dom.getAttribute('src')!, app.entry)!
      )
    }
  }

  return {  }
}
解析内容这块还是简单的,我们递归寻找元素,将 link、script、img 元素找出来并做对应的处理即可。
首先来看我们如何处理 link:
// src/loader/parse.ts
// 补全 parseHTML 逻辑
if (/^(link)$/i.test(dom.tagName)) {
  const data = parseLink(dom, parent, app)
  data && links.push(data)
}
const parseLink = (
  link: HTMLElement,
  parent: HTMLElement,
  app: IInternalAppInfo
) => {
  const rel = link.getAttribute('rel')
  const href = link.getAttribute('href')
  let comment: Comment | null
  // 判断是不是获取 CSS 资源
  if (rel === 'stylesheet' && href) {
    comment = document.createComment(`link replaced by micro`)
    // @ts-ignore
    comment && parent.replaceChild(comment, script)
    return getCompletionURL(href, app.entry)
  } else if (href) {
    link.setAttribute('href', getCompletionURL(href, app.entry)!)
  }
}
处理 link 标签时,我们只需要处理 CSS 资源,其它 preload / prefetch 的这些资源直接替换 href 就行。
// src/loader/parse.ts
// 补全 parseHTML 逻辑
if (/^(link)$/i.test(dom.tagName)) {
  const data = parseScript(dom, parent, app)
  data.text && inlineScript.push(data.text)
  data.url && scripts.push(data.url)
}
const parseScript = (
  script: HTMLElement,
  parent: HTMLElement,
  app: IInternalAppInfo
) => {
  let comment: Comment | null
  const src = script.getAttribute('src')
  // 有 src 说明是 JS 文件,没 src 说明是 inline script,也就是 JS 代码直接写标签里了
  if (src) {
    comment = document.createComment('script replaced by micro')
  } else if (script.innerHTML) {
    comment = document.createComment('inline script replaced by micro')
  }
  // @ts-ignore
  comment && parent.replaceChild(comment, script)
  return { url: getCompletionURL(src, app.entry), text: script.innerHTML }
}
script 标签时,我们需要区别是 JS 文件还是行内代码,前者还需要 fecth 一次获取内容。parseHTML 中返回所有解析出来的 scripts, links, inlineScript。// src/loader/index.ts
export const loadHTML = async (app: IInternalAppInfo) => {
const { container, entry } = app
const fakeContainer = document.createElement('div')
fakeContainer.innerHTML = htmlFile
const { scripts, links, inlineScript } = parseHTML(fakeContainer, app)
await Promise.all(links.map((link) => fetchResource(link)))
const jsCode = (
await Promise.all(scripts.map((script) => fetchResource(script)))
).concat(inlineScript)
return app
}
loadHTML 改造成这样:export const loadHTML = async (app: IInternalAppInfo) => {
const { container, entry } = app
// template:处理好的 HTML 内容
// getExternalStyleSheets:fetch CSS 文件
// getExternalScripts:fetch JS 文件
const { template, getExternalScripts, getExternalStyleSheets } =
await importEntry(entry)
const dom = document.querySelector(container)
if (!dom) {
throw new Error('容器不存在 ')
}
// 挂载 HTML 到微前端容器上
dom.innerHTML = template
// 加载文件
await getExternalStyleSheets()
const jsCode = await getExternalScripts()
return app
}
运行 JS
当我们拿到所有 JS 内容以后就该运行 JS 了,这步完成以后我们就能在页面上看到子应用被渲染出来了。
这一小节的内容说简单的话可以没几行代码就写完,说复杂的话实现起来会需要考虑很多细节,我们先来实现简单的部分,也就是如何运行 JS。
对于一段 JS 字符串来说,我们想执行的话大致上有两种方式:
eval(js string)new Function(js string)()
这边我们选用第二种方式来实现:
const runJS = (value: string, app: IInternalAppInfo) => {
  const code = `
    ${value}
    return window['${app.name}']
  `
  return new Function(code).call(window, window)
}
name 属性,这个属性其实很重要,我们在之后的场景中也会用到。另外大家给子应用设置 name 的时候别忘了还需要略微改动下打包的配置,将其中一个选项也设置为同样内容。name: vue,那么我们还需要在打包配置中进行如下设置:// vue.config.js
module.exports = {
configureWebpack: {
output: {
// 和 name 一样
library: `vue`
},
},
}
这样配置后,我们就能通过 window.vue 访问到应用的 JS 入口文件 export 出来的内容了:
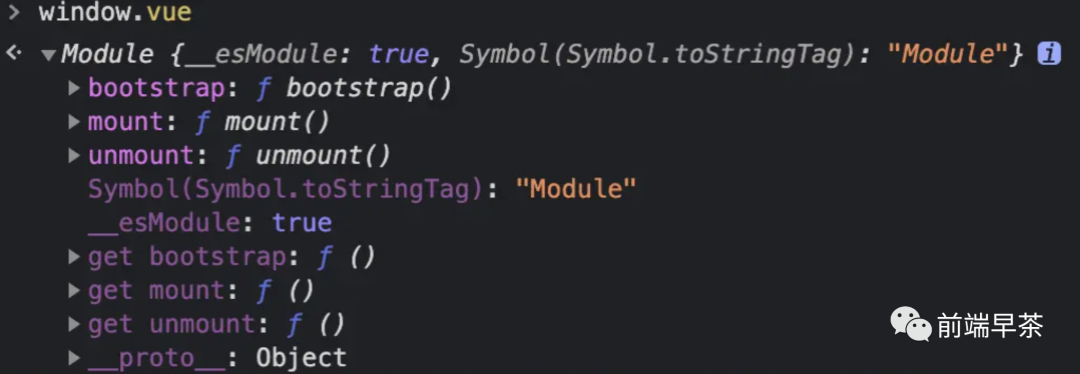
大家可以在上图中看到导出的这些函数都是子应用的生命周期,我们需要拿到这些函数去调用。
最后我们在 loadHTML 中调用一下 runJS 就完事了:
export const loadHTML = async (app: IInternalAppInfo) => {
  const { container, entry } = app

  const { template, getExternalScripts, getExternalStyleSheets } =
    await importEntry(entry)
  const dom = document.querySelector(container)

  if (!dom) {
    throw new Error('容器不存在 ')
  }

  dom.innerHTML = template

  await getExternalStyleSheets()
  const jsCode = await getExternalScripts()

  jsCode.forEach((script) => {
    const lifeCycle = runJS(script, app)
    if (lifeCycle) {
      app.bootstrap = lifeCycle.bootstrap
      app.mount = lifeCycle.mount
      app.unmount = lifeCycle.unmount
    }
  })

  return app
}
完成以上步骤后,我们就能看到子应用被正常渲染出来了!

但是到这一步其实还不算完,我们考虑这样一个问题:子应用改变全局变量怎么办? 我们目前所有应用都可以获取及改变 window 上的内容,那么一旦应用之间出现全局变量冲突就会引发问题,因此我们接下来需要来解决这个事儿。
JS 沙箱
window 上的属性又要能访问 window 上的内容,那么就只能做个假的 window 给子应用了,也就是实现一个 JS 沙箱。快照 Proxy
window 上的所有内容,然后接下来就随便让子应用去玩了,直到卸载子应用时恢复挂载前的 window 即可。这种方案实现容易,唯一缺点就是性能慢点,有兴趣的读者可以直接看看 qiankun 的实现,这里就不再贴代码了。export class ProxySandbox {
proxy: any
running = false
constructor() {
// 创建个假的 window
const fakeWindow = Object.create(null)
const proxy = new Proxy(fakeWindow, {
set: (target: any, p: string, value: any) => {
// 如果当前沙箱在运行,就直接把值设置到 fakeWindow 上
if (this.running) {
target[p] = value
}
return true
},
get(target: any, p: string): any {
// 防止用户逃课
switch (p) {
case 'window':
case 'self':
case 'globalThis':
return proxy
}
// 假如属性不存在 fakeWindow 上,但是存在于 window 上
// 从 window 上取值
if (
!window.hasOwnProperty.call(target, p) &&
window.hasOwnProperty(p)
) {
// @ts-ignore
const value = window[p]
if (typeof value === 'function') return value.bind(window)
return value
}
return target[p]
},
has() {
return true
},
})
this.proxy = proxy
}
// 激活沙箱
active() {
this.running = true
}
// 失活沙箱
inactive() {
this.running = false
}
}
window 出来,如果用户设置值的话就设置在 fakeWindow 上,这样就不会影响全局变量了。如果用户取值的话,就判断属性是存在于 fakeWindow 上还是 window 上。runJS 里的代码以便使用沙箱:const runJS = (value: string, app: IInternalAppInfo) => {
if (!app.proxy) {
app.proxy = new ProxySandbox()
// 将沙箱挂在全局属性上
// @ts-ignore
window.__CURRENT_PROXY__ = app.proxy.proxy
}
// 激活沙箱
app.proxy.active()
// 用沙箱替代全局环境调用 JS
const code = `
return (window => {
${value}
return window['${app.name}']
})(window.__CURRENT_PROXY__)
`
return new Function(code)()
}
至此,我们其实已经完成了整个微前端的核心功能。
接下来我们会来做一些改善型功能。
改善型功能
prefetch
import-html-entry 就能马上做完了:// src/start.ts
export const start = () => {
const list = getAppList()
if (!list.length) {
throw new Error('请先注册应用')
}
hijackRoute()
reroute(window.location.href)
// 判断状态为 NOT_LOADED 的子应用才需要 prefetch
list.forEach((app) => {
if ((app as IInternalAppInfo).status === AppStatus.NOT_LOADED) {
prefetch(app as IInternalAppInfo)
}
})
}
// src/utils.ts
export const prefetch = async (app: IInternalAppInfo) => {
requestIdleCallback(async () => {
const { getExternalScripts, getExternalStyleSheets } = await importEntry(
app.entry
)
requestIdleCallback(getExternalStyleSheets)
requestIdleCallback(getExternalScripts)
})
}
接下来主要来聊下 requestIdleCallback 这个函数。
window.requestIdleCallback() 方法将在浏览器的空闲时段内调用的函数排队。这使开发者能够在主事件循环上执行后台和低优先级工作,而不会影响延迟关键事件,如动画和输入响应。
prefetch,其实这个函数在 React 中也有用到,无非内部实现了一个 polyfill 版本。因为这个 API 有一些问题(最快 50ms 响应一次)尚未解决,但是在我们的场景下不会有问题,所以可以直接使用。资源缓存机制
当我们加载过一次资源后,用户肯定不希望下次再进入该应用的时候还需要再加载一次资源,因此我们需要实现资源的缓存机制。
上一小节我们因为使用到了 import-html-entry,内部自带了缓存机制。如果你想自己实现的话,可以参考内部的实现方式。
简单来说就是搞一个对象缓存下每次请求下来的文件内容,下次请求的时候先判断对象中存不存在值,存在的话直接拿出来用就行。
全局通信及状态
这部分内容在笔者的代码中并未实现,如果你有兴趣自己做的话,笔者可以提供一些思路。
全局通信及状态实际上完全都可以看做是发布订阅模式的一种实现,只要你自己手写过 Event 的话,实现这个应该不是什么难题。
另外你也可以阅读下 qiankun 的全局状态实现,总共也就 100 行代码。
五、总结
在看源码前,我们先去官方文档复习下框架设计理念、源码分层设计 阅读下框架官方开发人员写的相关文章 借助框架的调用栈来进行源码的阅读,通过这个执行流程,我们就完整的对源码进行了一个初步的了解 接下来再对源码执行过程中涉及的所有函数逻辑梳理一遍
关注我,一起携手进阶
欢迎关注前端早茶,与广东靓仔携手共同进阶~