
SpringCloud微服务架构实战:天气预报微服务的实现
天气预报微服务的实现
天气预报微服务包含了数据展示组件。数据展示组件用于将数据模型展示为用户能够理解的UI界面。
在micro-weather-report应用的基础上,我们将对其进行逐步的拆分,形成一个新的微服务msa-weather-report-server应用。
所需环境
为了演示本例子,需要采用如下开发环境。
.JDK8。
. Gradle 4.0。
Spring Boot Web Starter 2.0.0.M4。
Spring Boot Thymeleaf Starter 2.0.0.M4。
-Thymeleaf 3.0.7.RELEASE。
. Bootstrap 4.0.0-beta.2。
修改天气预报服务接口及实现
在
com.waylau.spring.cloud.weather.service包下,我们之前已经定义了该应用的天气预报服务接口WeatherReportService,其方法定义保持不变。
public interface WeatherReportService {
/**
·根据城市工D查询天气信息
*
*@param cityId
*@return
*/
weather getDataByCityId(String cityId);
}
对于该微服务而言,我们并不需要同步天气的业务需求,所以把之前定义的syncDataByCityld方法删除了。
WeatherReportServicelmpl是对WeatherReportService接口的实现,由于之前是依赖于Weath-erDataService来查询数据的,改为微服务架构之后,这里数据的来源将由天气数据API微服务来提供,所以这块代码也要做出相应的调整。
@Service
public class WeatherReportServiceImpl implements WeatherReportService {
aoverride
public Weather getDataByCityId(string cityId){
//TODO改为由天气数据API微服务来提供数据
weather data =new Weather(;
data.setAqi("81");
data.setCity("深圳");
data.setGanmao("各项气象条件适宜,无明显降温过程,发生感冒机率较低。");
data.setWendu("22");
List forecastList = new ArrayList<>();
Forecast forecast =new Forecast(;
forecast.setDate("29日星期天");
forecast.setType("多云");
forecast.setFengxiang("无持续风向");
forecast.setHigh("高温27℃");
forecast.setLow("低温20℃");
forecastList.add(forecast);
forecast =new Forecast();
forecast.setDate("29日星期天");
forecast.setType("多云");
forecast.setFengxiang("无持续风向");
forecast.setHigh("高温27℃");
forecast.setLow("低温20℃");
forecastList.add(forecast);
forecast =new Forecast();
forecast.setDate( "30日星期一");
forecast.setType("多云");
forecast.setFengxiang("无持续风向");
forecast.setHigh("高温27℃");
forecast.setLow("低温20℃");
forecastList.add(forecast);
forecast =new Forecast(;
forecast.setDate("31日星期二");
forecast.setType("多云");
forecast.setEengxiang("无持续风向");
forecast.setHigh("高温27℃");
forecast.setLow("低温20℃");
forecastList.add(forecast);
forecast =new Forecast(;
forecast.setDate("1日星期三");
forecast.setType("多云");
forecast.setFengxiang("无持续风向");
forecast.setHigh("高温27℃");
forecast.setLow("低温20℃");
forecastList.add(forecast);
forecast =new Forecast(;
forecast.setDate("2日星期四");
forecast.setType("多云");
forecast.setFengxiang("无持续风向");
forecast.setHigh("高温27℃");
forecast.setLow("低温20℃");
forecastList.add(forecast);
data. setForecast(forecastList);
return data;
}
}
由于目前暂时还不能从天气数据API微服务获取数据,所以为了让程序能够正常运行下去,我们在代码里面编写了一些仿造的数据,以提供接口返回数据。
除上述WeatherReportServicelmpl、WeatherReportService外,其他服务层的代码都可以删除了。
调整控制层的代码
除了WeatherReportController外,其他控制层的代码都不需要了。
WeatherReportController由于对城市ID列表有依赖,所以这块的代码逻辑需要调整。
@RestController
@RequestMapping("/report")
public class WeatherReportController {
private final static Logger logger = LoggerFactory.getLogger(Weather
ReportController.class);
@Autowired
private WeatherReportService weatherReportService;
@GetMapping("/cityId/{cityld}")
public ModelAndView getReportByCityId(CPathVariable("cityId") String
cityId, Model model) throws Exception{
//TODO改为由城市数据API微服务来提供数据
ListcityList=null;
try
//TODO 调用城市数据API
cityList = new ArrayList<>();
City city=new City(;
city.setCityId("101280601");
city.setCityName("深圳");
cityList.add(city);
city -new City();
city.setcityld("101280301");
city.setCityName("惠州");
cityList.add(city);
}catch(Exception e){
logger.error("获取城市信息异常!",e);
throw new RuntimeException("获取城市信息异常!",e);
}
model.addAttribute("title","老卫的天气预报");
model. addAttribute("cityid", cityId);
model.addAttribute( "cityList", cityList);
model.addAttribute ("report", weatherReportService.getDataByCity
id(cityId));
return new ModelAndView ("weather/report", "reportModel",
model);
}
由于目前暂时还不能从城市数据API微服务获取数据,所以为了让程序能够正常运行下去,我们在代码里面编写了一些仿造的数据,以提供接口返回数据。
删除配置类、天气数据同步任务和工具类
配置类RestConfiguration、QuartzConfiguration及任务类WeatherDataSyncJob、工具类Xml-Builder的代码都可以删除了。
清理值对象
值对象我们需要保留解析天气相关的类及城市信息相关的类,值对象CityList是可以删除的。
需要注意的是,由于天气数据采集微服务并未涉及对XML数据的解析,所以之前在City上添加的相关的JABX注解,都是可以一并删除的。
以下是新的City类。
public class City {
private String cityId;
private string cityName;
private string citycode;
private String province;
//省略getter/setter方法
}
清理测试用例和配置文件
已经删除的服务接口的相关测试用例自然也是要一并删除的。修改build.gradle文件中的依赖,其中Apache Http Client、Quartz、Reids的依赖也一并删除。
资源目录下的citylist.xml文件也不再需要,可以删除了。
测试和运行
运行应用,通过浏览器访问
http:/localhost:8080/report/cityld/101280601页面,就能看到如下的页面效果,如图7-4所示。
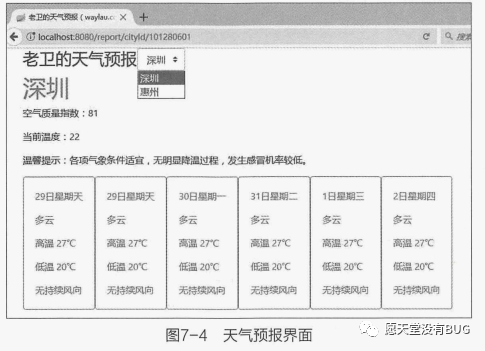
当然,我们的数据都是仿造的,在城市列表里面只能看到两条数据,而且即便选择了其他城市,也只是返回相同的仿造的城市天气信息。
本篇内容给大家讲解的是天气预报微服务的实现
下篇文章给大家讲解城市数据API微服务的实现;
觉得文章不错的朋友可以转发此文关注小编;
感谢大家的支持!!
本文就是愿天堂没有BUG给大家分享的内容,大家有收获的话可以分享下,想学习更多的话可以到微信公众号里找我,我等你哦。