CenterNet测试推理过程
【GiantPandaCV导语】这是CenterNet系列的最后一篇。本文主要讲CenterNet在推理过程中的数据加载和后处理部分代码。最后提供了一个已经配置好的数据集供大家使用。
代码注释在:https://github.com/pprp/SimpleCVReproduction/tree/master/CenterNet
1. eval部分数据加载
由于CenterNet是生成了一个heatmap进行的目标检测,而不是传统的基于anchor的方法,所以训练时候的数据加载和测试时的数据加载结果是不同的。并且在测试的过程中使用到了Test Time Augmentation(TTA),使用到了多尺度测试,翻转等。
在CenterNet中由于不需要非极大抑制,速度比较快。但是CenterNet如果在测试的过程中加入了多尺度测试,那就会调用soft nms将不同尺度的返回的框进行抑制。
class PascalVOC_eval(PascalVOC):
    def __init__(self, data_dir, split, test_scales=(1,), test_flip=False, fix_size=True, **kwargs):
        super(PascalVOC_eval, self).__init__(data_dir, split, **kwargs)
        # test_scale = [0.5,0.75,1,1.25,1.5]
        self.test_flip = test_flip
        self.test_scales = test_scales
        self.fix_size = fix_size

    def __getitem__(self, index):
        img_id = self.images[index]
        img_path = os.path.join(
            self.img_dir, self.coco.loadImgs(ids=[img_id])[0]['file_name'])
        image = cv2.imread(img_path)
        height, width = image.shape[0:2]

        out = {}
        for scale in self.test_scales:
            # 得到多个尺度的图片大小
            new_height = int(height * scale)
            new_width = int(width * scale)

            if self.fix_size:
                # fix size代表根据参数固定图片大小
                img_height, img_width = self.img_size['h'], self.img_size['w']
                center = np.array(
                    [new_width / 2., new_height / 2.], dtype=np.float32)
                scaled_size = max(height, width) * 1.0
                scaled_size = np.array(
                    [scaled_size, scaled_size], dtype=np.float32)
            else:
                # self.padding = 31  # 127 for hourglass
                img_height = (new_height | self.padding) + 1
                img_width = (new_width | self.padding) + 1
                # 按位或运算,找到最接近的[32,64,128,256,512]
                center = np.array(
                    [new_width // 2, new_height // 2], dtype=np.float32)
                scaled_size = np.array(
                    [img_width, img_height], dtype=np.float32)

            img = cv2.resize(image, (new_width, new_height))
            trans_img = get_affine_transform(
                center, scaled_size, 0, [img_width, img_height])
            img = cv2.warpAffine(img, trans_img, (img_width, img_height))

            img = img.astype(np.float32) / 255.
            img -= self.mean
            img /= self.std
            # from [H, W, C] to [1, C, H, W]
            img = img.transpose(2, 0, 1)[None, :, :, :]

            if self.test_flip: # 横向翻转
                img = np.concatenate((img, img[:, :, :, ::-1].copy()), axis=0)

            out[scale] = {'image': img,
                          'center': center,
                          'scale': scaled_size,
                          'fmap_h': img_height // self.down_ratio, # feature map的大小
                          'fmap_w': img_width // self.down_ratio}

        return img_id, out
以上是eval过程的数据加载部分的代码,主要有两个需要关注的点:
如果是多尺度会根据test_scale的值返回不同尺度的结果,每个尺度都有img,center等信息。这部分代码可以和test.py代码的多尺度处理一块理解。 尺度处理部分,有一个padding参数
img_height = (new_height | self.padding) + 1
img_width = (new_width | self.padding) + 1
这部分代码作用就是通过按位或运算,找到最接近的2的倍数-1作为最终的尺度。
'''
>>> 10 | 31
31
>>> 20 | 31
31
>>> 510 | 31
511
>>> 256 | 31
287
>>> 510 | 127
511
>>> 1000 | 127
1023
'''
例如:输入512,多尺度开启:0.5,0.7,1.5,那最终的结果是
512 x 0.5 | 31 = 287
512 x 0.7 | 31 = 383
512 x 1.5 | 31 = 799
2. 推理过程

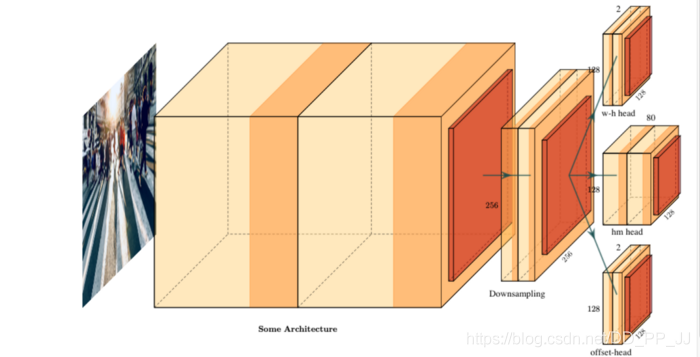
上图是CenterNet的结构图,使用的是PlotNeuralNet工具绘制。在推理阶段,输入图片通过骨干网络进行特征提取,然后对下采样得到的特征图进行预测,得到三个头,分别是offset head、wh head、heatmap head。
推理过程核心工作就是从heatmap提取得到需要的bounding box,具体的提取方法是使用了一个3x3的最大化池化,检查当前热点的值是否比周围8个临近点的值都大。然后取100个这样的点,再做筛选。
以上过程的核心函数是:
output = model(inputs[scale]['image'])[-1]
dets = ctdet_decode(*output, K=cfg.test_topk)
ctdet_decode这个函数功能就是将heatmap转化成bbox:
def ctdet_decode(hmap, regs, w_h_, K=100):
    '''
    hmap提取中心点位置为xs,ys
    regs保存的是偏置,需要加在xs,ys上,代表精确的中心位置
    w_h_保存的是对应目标的宽和高
    '''
    # dets = ctdet_decode(*output, K=cfg.test_topk)
    batch, cat, height, width = hmap.shape
    hmap = torch.sigmoid(hmap) # 归一化到0-1

    # if flip test
    if batch > 1: # batch > 1代表使用了翻转
        # img = np.concatenate((img, img[:, :, :, ::-1].copy()), axis=0)
        hmap = (hmap[0:1] + flip_tensor(hmap[1:2])) / 2
        w_h_ = (w_h_[0:1] + flip_tensor(w_h_[1:2])) / 2
        regs = regs[0:1]
    batch = 1
    # 这里的nms和带anchor的目标检测方法中的不一样,这里使用的是3x3的maxpool筛选
    hmap = _nms(hmap)  # perform nms on heatmaps
    # 找到前K个极大值点代表存在目标
    scores, inds, clses, ys, xs = _topk(hmap, K=K)

    regs = _tranpose_and_gather_feature(regs, inds)

    regs = regs.view(batch, K, 2)

    xs = xs.view(batch, K, 1) + regs[:, :, 0:1]
    ys = ys.view(batch, K, 1) + regs[:, :, 1:2]

    w_h_ = _tranpose_and_gather_feature(w_h_, inds)
    w_h_ = w_h_.view(batch, K, 2)

    clses = clses.view(batch, K, 1).float()
    scores = scores.view(batch, K, 1)

    # xs,ys是中心坐标,w_h_[...,0:1]是w,1:2是h
    bboxes = torch.cat([xs - w_h_[..., 0:1] / 2,
                        ys - w_h_[..., 1:2] / 2,
                        xs + w_h_[..., 0:1] / 2,
                        ys + w_h_[..., 1:2] / 2], dim=2)
    detections = torch.cat([bboxes, scores, clses], dim=2)
    return detections
第一步
将hmap归一化,使用了sigmoid函数
hmap = torch.sigmoid(hmap) # 归一化到0-1
第二步
进入_nms函数:
def _nms(heat, kernel=3):
    hmax = F.max_pool2d(heat, kernel, stride=1, padding=(kernel - 1) // 2)
    keep = (hmax == heat).float() # 找到极大值点
    return heat * keep
hmax代表特征图经过3x3卷积以后的结果,keep为极大点的位置,返回的结果是筛选后的极大值点,其余不符合8-近邻极大值点的都归为0。
这时候通过heatmap得到了满足8近邻极大值点的所有值。
这里的nms曾经在群里讨论过,有群友认为仅通过3x3的并不合理,可以尝试使用3x3,5x5,7x7这样的maxpooling,相当于也进行了多尺度测试,据说能提高一点点mAP。
第三步
进入_topk函数,这里K是一个超参数,CenterNet中设置K=100
def _topk(scores, K=40):
    # score shape : [batch, class , h, w]
    batch, cat, height, width = scores.size()

    # to shape: [batch , class, h * w] 分类别,每个class channel统计最大值
    # topk_scores和topk_inds分别是前K个score和对应的id
    topk_scores, topk_inds = torch.topk(scores.view(batch, cat, -1), K)

    topk_inds = topk_inds % (height * width)
    # 找到横纵坐标
    topk_ys = (topk_inds / width).int().float()
    topk_xs = (topk_inds % width).int().float()

    # to shape: [batch , class * h * w] 这样的结果是不分类别的,全体class中最大的100个
    topk_score, topk_ind = torch.topk(topk_scores.view(batch, -1), K)

    # 所有类别中找到最大值
    topk_clses = (topk_ind / K).int()

    topk_inds = _gather_feature(topk_inds.view(
        batch, -1, 1), topk_ind).view(batch, K)

    topk_ys = _gather_feature(topk_ys.view(
        batch, -1, 1), topk_ind).view(batch, K)

    topk_xs = _gather_feature(topk_xs.view(
        batch, -1, 1), topk_ind).view(batch, K)

    return topk_score, topk_inds, topk_clses, topk_ys, topk_xs
torch.topk的一个demo如下:
>>> x
array([[0.11530714, 0.014376  , 0.23392263, 0.48629663],
       [0.59611302, 0.83697236, 0.27330404, 0.17728915],
       [0.36443852, 0.46562404, 0.73033529, 0.44751189]])
>>> torch.topk(torch.from_numpy(x), 3)
torch.return_types.topk(
    values=tensor([[0.4863, 0.2339, 0.1153],
                   [0.8370, 0.5961, 0.2733],
                   [0.7303, 0.4656, 0.4475]], dtype=torch.float64),
    indices=tensor([[3, 2, 0],
                    [1, 0, 2],
                    [2, 1, 3]]))
topk_scores和topk_inds分别是前K个score和对应的id。
topk_scores 形状【batch, class, K】K代表得分最高的前100个点, 其保存的内容是每个类别前100个最大的score。
topk_inds 形状 【batch, class, K】class代表80个类别channel,其保存的是每个类别对应100个score的下角标。
topk_score 形状 【batch, K】,通过gather feature 方法获取,其保存的是全部类别前100个最大的score。
topk_ind 形状 【batch , K】,代表通过topk调用结果的下角标, 其保存的是全部类别对应的100个score的下角标。
topk_inds、topk_ys、topk_xs三个变量都经过gather feature函数,其主要功能是从对应张量中根据下角标提取结果,具体函数如下:
def _gather_feature(feat, ind, mask=None):
  dim = feat.size(2)
  ind = ind.unsqueeze(2).expand(ind.size(0), ind.size(1), dim)
  feat = feat.gather(1, ind) # 按照dim=1获取ind
  if mask is not None:
    mask = mask.unsqueeze(2).expand_as(feat)
    feat = feat[mask]
    feat = feat.view(-1, dim)
  return feat
以topk_inds为例(K=100,class=80)
feat (topk_inds) 形状为:【batch, 80x100, 1】
ind (topk_ind) 形状为:【batch,100】
ind = ind.unsqueeze(2).expand(ind.size(0), ind.size(1), dim)扩展一个位置,ind形状变为:【batch, 100, 1】
feat = feat.gather(1, ind)按照dim=1获取ind,为了方便理解和回忆,这里举一个例子:
>>> import torch
>>> a = torch.randn(1, 10)
>>> b = torch.tensor([[3,4,5]])
>>> a.gather(1, b)
tensor([[ 0.7257, -0.4977,  1.2522]])
>>> a
tensor([[ 1.0684, -0.9655,  0.7381,  0.7257, -0.4977,  1.2522,  1.5084,  0.2669,
         -0.5471,  0.5998]])
相当于是feat根据ind的角标的值获取到了对应feat位置上的结果。最终feat形状为【batch,100,1】
第四步
经过topk函数,得到了四个返回值,topk_score、topk_inds、topk_ys、topk_xs四个参数的形状都是【batch, 100】,其中topk_inds是每张图片的前100个最大的值对应的index。
regs = _tranpose_and_gather_feature(regs, inds)
w_h_ = _tranpose_and_gather_feature(w_h_, inds)
transpose_and_gather_feat函数功能是将topk得到的index取值,得到对应前100的regs和wh的值。
def _tranpose_and_gather_feature(feat, ind):
  # ind代表的是ground truth中设置的存在目标点的下角标
  feat = feat.permute(0, 2, 3, 1).contiguous()# from [bs c h w] to [bs, h, w, c]
  feat = feat.view(feat.size(0), -1, feat.size(3)) # to [bs, wxh, c]
  feat = _gather_feature(feat, ind) # 从中取得ind对应值
  return feat
到这一步为止,可以将top100的score、wh、regs等值提取,并且得到对应的bbox,最终ctdet_decode返回了detections变量。
3. 数据集
之前在CenterNet系列第一篇PyTorch版CenterNet训练自己的数据集中讲解了如何配置数据集,为了更方便学习和调试这部分代码,笔者从github上找到了一个浣熊数据集,这个数据集仅有200张图片,方便大家快速训练和debug。

链接:https://pan.baidu.com/s/1unK-QZKDDaGwCrHrOFCXEA 提取码:pdcv
以上数据集已经制作好了,只要按照第一篇文章中将DCN、NMS等编译好,就可以直接使用。
4. 参考
https://blog.csdn.net/fsalicealex/article/details/91955759
https://zhuanlan.zhihu.com/p/66048276
https://zhuanlan.zhihu.com/p/85194783
- END -对文章有疑问或者想加入交流群,欢迎添加笔者微信
为了方便各位获取公众号获取资料,可以加入QQ群获取资源,更欢迎分享资源
