iOS 用 RSA 保证下载资源可靠性
前言
有时需要在本地存储资源,并且从服务器下载资源,因为涉及到运行期间的安全性,有必要添加校验的逻辑,因此有了本文的一些思考。
ipa包被篡改的情况
首先思考的是ipa包的安全性问题。通过iTunes,我们可以下载ipa并且解压,修改包中的文件,再压缩成ipa包。
-
1、如果开发者A拿到应用P的ipa包,修改其中的任何文件,都会导致签名失效,ipa包无法安装。(签名存放在.app文件的_CodeSignature文件夹) -
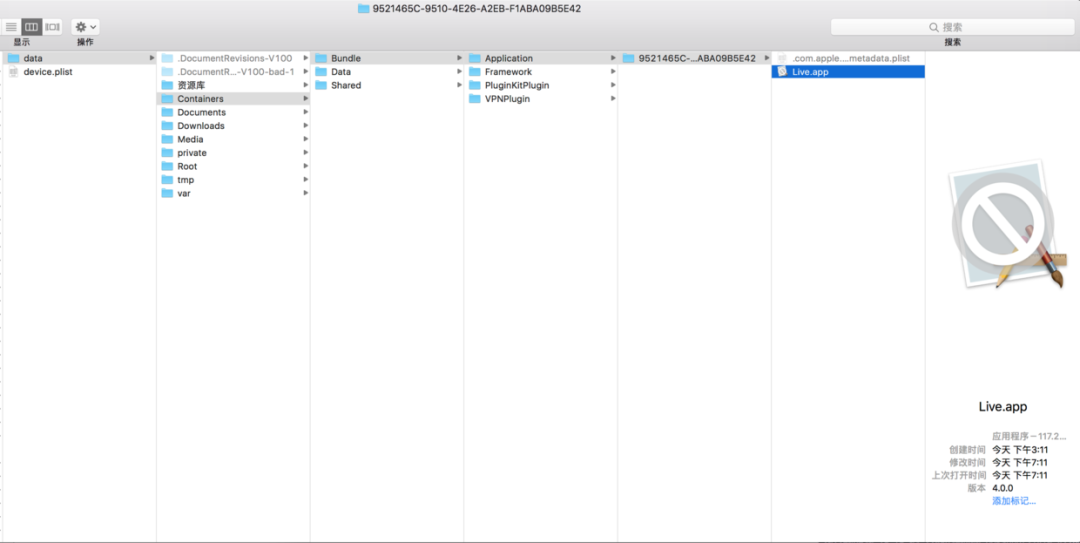
2、如果开发者B拿到应用P的ipa包,安装到自己手机中,再直接修改Bundle/Application 下的配置文件,此时应用P仍旧可以运行。 -
3、如果开发者C拿到应用P的ipa包,修改其中的某些配置文件,用自己的证书重签名并通过其他渠道发布出去,ipa包可以正常安装。
应用在正常使用过程中,app包的文件是无法修改的,只有越狱的机子才会出现情况2;情况3中重签名的ipa包无法上传AppStore。真机app安装目录是 var/mobile/Containers/Bundle/Application 沙盒目录是 var/mobile/Containers/Data/Application 类似的,模拟的安装目录同样在/Bundle下,沙盒在/Data下;
下载资源的验证
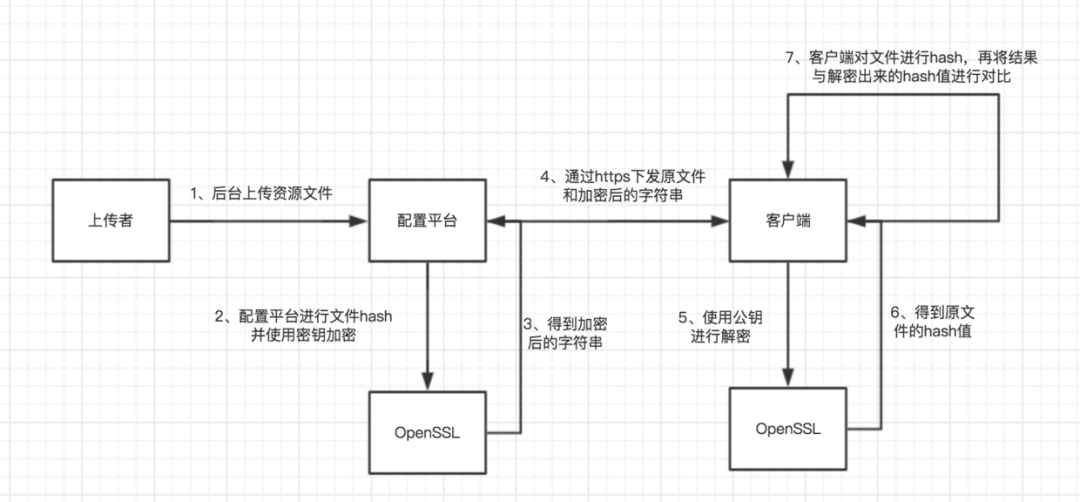
下载的资源存在沙盒目录,在未越狱的情况下,开发者并不能修改其中的文件。但是,下载资源通常使用http/https进行资源下载,通过使用代理的方式,可以修改下载的资源(除非开启了https证书校验)。为了保证下载资源的可靠性,采用了一套基于RSA算法的验证方案,具体的要点有:
1、开发者产生一对密钥:公钥和私钥,私钥保存在配置平台(后台),公钥放到客户端。
2、当文件上传到配置平台后,配置平台对文件进摘要(hash)得到md5str,并私钥对md5str进行签名得到signStr,然后把 文件和signStr下发给客户端。
3、客户端下载文件和signStr,计算文件的摘要(md5)得到md5str,用md5str和公钥验证signStr的有效性。
解释: 非对称加密算法的计算比较复杂 ,所以只对摘要(md5值)进行加密;
具体的流程图如下:
iOS的RSA算法
RSA算法的两种加密方式:
-
公钥加密,私钥解密。(一般用于公钥持有方(客户端)向私钥持有者(后台)发送消息) -
私钥加密,公钥解密。(一般用于签名和验证,私钥加密相当于签名,公钥解密相当于验证)
苹果提供的Security.framework,有以下四个方法:
-
SecKeyEncrypt—encrypts a block of data using the specified key.(使用公钥对数据进行加密) -
SecKeyDecrypt—decrypts a block of data using the specified key. (使用私钥对数据进行解密) -
SecKeyRawSign—signs a block of data using the specified key.(使用私钥对数据签名) -
SecKeyRawVerify—verifies a signature against a block of data and a specified key. (使用公钥对数字签名进行验证)
类比到OpenSSL,其提供了以下四个接口:
int     RSA_public_encrypt(int flen, const unsigned char *from,
                unsigned char *to, RSA *rsa,int padding);
int     RSA_private_encrypt(int flen, const unsigned char *from,
                unsigned char *to, RSA *rsa,int padding);
int     RSA_public_decrypt(int flen, const unsigned char *from,
                unsigned char *to, RSA *rsa,int padding);
int     RSA_private_decrypt(int flen, const unsigned char *from,
                unsigned char *to, RSA *rsa,int padding);
因为RSA算法的计算量较大,一般不会直接使用RSA对数据进行加密,而是对AES的密匙进行加密,再用AES对数据加密。
RSA算法原理 ,这里有一篇详细介绍RSA算法原理的文章。
数字签名的保存
拿到后台下发的签名后,就需要保存签名,可以选择:保存在文件中、保存到NSUserDefault、保存到数据库等。除此之外,是否可以保存在文件属性?
写了一段代码进行测试:
    NSMutableDictionary *changedAttrDict = [[NSMutableDictionary alloc] init];
    [changedAttrDict setObject:@"loying" forKey:NSFileOwnerAccountName];
    [changedAttrDict setObject:@"NSFileGroupOwnerAccountName" forKey:NSFileGroupOwnerAccountName];
    [changedAttrDict setObject:[NSDate dateWithTimeIntervalSinceNow:3600] forKey:NSFileCreationDate];

    NSError *error;

    BOOL ret = [[NSFileManager defaultManager] setAttributes:changedAttrDict ofItemAtPath:encodedDataPath error:&error];
经过测试,NSFileCreationDate这个属性是可以修改的;NSFileGroupOwnerAccountName和NSFileOwnerAccountName不能修改(真机为@"mobile");模拟器不可以修改两个属性,最大的可能性是因为模拟器运行产生的文件,权限不够修改文件属性;createDirectoryAtPath:withIntermediateDirectories:attributes:这个方法同样有这个限制。
写入文件属性还有其他的限制,当文件在不同硬盘格式(HFS+ and FAT32)拷贝的时候,文件附带的属性可能会消失。
NSFileProtectionKey 是后台模式下的文件读写
为了开发方便,可以选择保存到NSUserDefault的方式。
新建NSMutableDictionary,用文件作为key,用FileConfig作为value。FileConfig是验证相关的属性封装,便于后续开发。
1、NSUserDefault所有的属性最终会写入Libary/Preference/下的plist文件中,所以NSUserDefault中不能存储敏感信息。
2、如果遇到错误:Terminating app due to uncaught exception 'NSInvalidArgumentException', reason: 'Attempt to insert non-property list object
那是因为NSUserDefault只能存基本类型,如果dict里面存有自定义类型,需要先转成NSData再存储;(plist里面没有结构信息,只有key-value)
iOS接入步骤
上面介绍了基于RSA的下载资源验证方案,iOS具体的流程如下:
-
后台上传资源文件,配置平台对文件进行hash并用私钥进行签名得到签名串signature; -
把文件和signature打包成zip包,下发到客户端; -
客户端解压zip,得到文件和签名串signature,对文件进行hash,加载本地公钥,把hash值、signature、公钥传给Security.framework; -
用Security.framework提供的 SecKeyRawVerify方法对hash值、signature、公钥进行验证,如果通过则表示文件未修改。
1、zip解压
iOS平台上可以使用MiniZipArchive进行解压。
- (BOOL)unzipFile:(NSString *)file toFilePath:(NSString *)unZipFilePath overWrite:(BOOL)overWrite
{
    MiniZipArchive *za = [[MiniZipArchive alloc] init];
    BOOL success = NO;
    if ([za UnzipOpenFile:file]) {
        success = [za UnzipFileTo:unZipFilePath overWrite:overWrite];
        [za UnzipCloseFile];

    }
    return success;
}
2、公钥和私钥的加载
.der格式和.pem格式:.der格式表示二进制编码,.pem格式表示Base64编码。
iOS的公钥需要用.der格式,私钥需要用.p12格式,这个可以用openssl的指令来转换。(指令见末尾)
加载的时候先用NSData加载密钥,再用下面的:getPrivateKeyRefWithContentsOfFile: password:方法加载密钥;getPublicKeyRefrenceFromeData:方法加载公钥;
//获取私钥
- (SecKeyRef)getPrivateKeyRefWithContentsOfFile:(NSData *)p12Data password:(NSString*)password {
    if (!p12Data) {
        return nil;
    }
    SecKeyRef privateKeyRef = NULL;
    NSMutableDictionary * options = [[NSMutableDictionary alloc] init];
    [options setObject: password forKey:(__bridge id)kSecImportExportPassphrase];
    CFArrayRef items = CFArrayCreate(NULL, 0, 0, NULL);
    OSStatus securityError = SecPKCS12Import((__bridge CFDataRef) p12Data, (__bridge CFDictionaryRef)options, &items);
    if (securityError == noErr && CFArrayGetCount(items) > 0) {
        CFDictionaryRef identityDict = CFArrayGetValueAtIndex(items, 0);
        SecIdentityRef identityApp = (SecIdentityRef)CFDictionaryGetValue(identityDict, kSecImportItemIdentity);
        securityError = SecIdentityCopyPrivateKey(identityApp, &privateKeyRef);
        if (securityError != noErr) {
            privateKeyRef = NULL;
        }
    }
    CFRelease(items);

    return privateKeyRef;
}

- (SecKeyRef)getPublicKeyRefrenceFromeData:(NSData *)certData {
    SecKeyRef publicKeyRef = NULL;
    CFDataRef myCertData = (__bridge CFDataRef)certData;
    SecCertificateRef cert = SecCertificateCreateWithData(NULL, (CFDataRef)myCertData);
    if (cert == nil) {
        NSLog(@"Can not read certificate ");
        return nil;
    }
    SecPolicyRef policy = SecPolicyCreateBasicX509();
    SecCertificateRef certArray[1] = {cert};
    CFArrayRef myCerts = CFArrayCreate(NULL, (void *)(void *)certArray, 1, NULL);
    SecTrustRef trust;
    OSStatus status = SecTrustCreateWithCertificates(myCerts, policy, &trust);
    if (status != noErr) {
        NSLog(@"SecTrustCreateWithCertificates fail. Error Code: %d", (int)status);
        CFRelease(cert);
        CFRelease(policy);
        CFRelease(myCerts);
        return nil;
    }
    SecTrustResultType trustResult;
    status = SecTrustEvaluate(trust, &trustResult);
    if (status != noErr) {
        NSLog(@"SecTrustEvaluate fail. Error Code: %d", (int)status);
        CFRelease(cert);
        CFRelease(policy);
        CFRelease(trust);
        CFRelease(myCerts);
        return nil;
    }
    publicKeyRef = SecTrustCopyPublicKey(trust);

    CFRelease(cert);
    CFRelease(policy);
    CFRelease(trust);
    CFRelease(myCerts);

    return publicKeyRef;
}
3、私钥签名和公钥验证
加载完公钥和私钥之后,用私钥可以对原始数据进行签名,详见PKCSSignBytesSHA256withRSA方法,返回的是签名串;
在用zip解压出来的签名串进行验证的时候,需要用本地的公钥、原始数据和签名串进行验签,详见PKCSVerifyBytesSHA256withRSA方法;
注意的是,因为选择的算法是kSecPaddingPKCS1SHA256,需要对原始数据进行一次SHA256的hash。(kSecPaddingPKCS1SHA256只能用于SecKeyRawSign/SecKeyRawVerify)
BOOL PKCSVerifyBytesSHA256withRSA(NSData* plainData, NSData* signature, SecKeyRef publicKey)
{
    if (!plainData || !signature) { // 保护
        return NO;
    }
    size_t signedHashBytesSize = SecKeyGetBlockSize(publicKey);
    const void* signedHashBytes = [signature bytes];

    size_t hashBytesSize = CC_SHA256_DIGEST_LENGTH;
    uint8_t* hashBytes = malloc(hashBytesSize);
    if (!CC_SHA256([plainData bytes], (CC_LONG)[plainData length], hashBytes)) {
        return NO;
    }

    OSStatus status = SecKeyRawVerify(publicKey,
                                      kSecPaddingPKCS1SHA256,
                                      hashBytes,
                                      hashBytesSize,
                                      signedHashBytes,
                                      signedHashBytesSize);

    return status == errSecSuccess;
}

NSData* PKCSSignBytesSHA256withRSA(NSData* plainData, SecKeyRef privateKey)
{
    size_t signedHashBytesSize = SecKeyGetBlockSize(privateKey);
    uint8_t* signedHashBytes = malloc(signedHashBytesSize);
    memset(signedHashBytes, 0x0, signedHashBytesSize);

    size_t hashBytesSize = CC_SHA256_DIGEST_LENGTH;
    uint8_t* hashBytes = malloc(hashBytesSize);
    if (!CC_SHA256([plainData bytes], (CC_LONG)[plainData length], hashBytes)) {
        return nil;
    }

    SecKeyRawSign(privateKey,
                  kSecPaddingPKCS1SHA256,
                  hashBytes,
                  hashBytesSize,
                  signedHashBytes,
                  &signedHashBytesSize);

    NSData* signedHash = [NSData dataWithBytes:signedHashBytes
                                        length:(NSUInteger)signedHashBytesSize];

    if (hashBytes)
        free(hashBytes);
    if (signedHashBytes)
        free(signedHashBytes);

    return signedHash;
}
4、签名串的保存
签名串可以使用setxattrf写入文件的扩展属性,保证签名串和资源的一一对应。
-(BOOL)setExtendValueWithPath:(NSString *)path key:(NSString *)key value:(NSData *)value {
    ssize_t writelen = setxattr([path fileSystemRepresentation],
                                [key UTF8String],
                                [value bytes],
                                [value length],
                                0,
                                0);
    return writelen == 0;
}
比较奇怪的是,比较写入扩展属性之后的文件大小,并没有发生较大变化。在特意查询文档之后,发现下面一句话:Space consumed for extended attributes is counted towards the disk quotasof the file owner and file group 原来扩展属性并不是写入文件,而是由文件系统来保存。
遇到的问题
1、验证失败,SecKeyRawVerify返回-9809
经常遇到的问题是,配置平台的签名在iOS客户端验证不通过,可以按照下面的流程检测:
-
首先是确保两端的公钥和私钥是一对; -
配置平台签名完之后,用iOS客户端的公钥在本地验证; -
确认两边使用的签名算法设置参数一致; -
iOS客户端用配置平台的私钥进行签名,再用公钥进行验证; -
对比配置平台的签名串和iOS的签名串;
openssl的验证命令openssl dgst \-sign private_key.pem \-sha256 \-out sign sourceopenssl dgst \-verify rsa_public_key.pem \-sha256 \-signature sign source
如果验证通过会有文字提示:Verified OK
2、生成证书失败,openssl X509: 出现 Expecting: TRUSTED CERTIFICATE的错误
参考这些公钥和密钥的openssl生成命令 openssl genrsa \-out private_key.pem 1024openssl req \-new \-key private_key.pem \-out rsaCertReq.csropenssl x509 \-req \-days 3650 \-in rsaCertReq.csr \-signkey private_key.pem \-out rsaCert.crtopenssl x509 \-outform der \-in rsaCert.crt \-out public_key.deropenssl pkcs12 \-export \-out private_key.p12 \-inkey private_key.pem \-in rsaCert.crt
参考自GithubGist
总结
任何手段都无法完全防止恶意的攻击,只能提高门槛。RSA不仅是可以保证资源不被篡改,也可以作为一种验证,检查资源是否因为各种原因出现的文件缺失。
附录
iOS使用Security.framework进行RSA 加密解密签名和验证签名
http://www.cnblogs.com/cocoajin/p/6183443.html
http://blog.methodname.com/da-zao-yin-xing-ji-jia-mi/
Signing and Verifying on iOS using RSA
https://stackoverflow.com/questions/21724337/signing-and-verifying-on-ios-using-rsa
xattr manpages
http://manpages.ubuntu.com/manpages/xenial/man7/xattr.7.html
demo地址
https://github.com/loyinglin/LearnRSA
转自:掘金 落影
https://juejin.cn/post/6969379271248707621
-End-
最近有一些小伙伴,让我帮忙找一些 面试题 资料,于是我翻遍了收藏的 5T 资料后,汇总整理出来,可以说是程序员面试必备!所有资料都整理到网盘了,欢迎下载!

面试题】即可获取
