
聊一聊如何在Vue中使用事件总线( Event Bus)进行组件间通信

事件总线模式允许不同的组件之间进行通信。它要求一个中央枢纽,组件可以通过它发送和接收事件,从而使组件之间的数据交换和交互更加顺畅。本文探讨了它的使用方法,以便开发人员能够充分利用它在Vue开发中的潜力。
跨通信是应用程序中组件之间的交互。这有助于应用程序的不同部分之间的顺畅协作。其重要性体现在以下几个方面:
数据共享:跨组件通信确保组件之间的数据高效交换。
处理事件:它帮助它们更新状态并触发必要的事件。它确保组件对事件做出相应的反应。
简化开发和可重用性:当组件互相交互时,它们可以独立工作。因此,管理代码并在整个应用程序中重用组件变得更加容易。
提升用户体验:有效的沟通有助于流畅而互动的用户体验。
可扩展性:跨组件通信帮助开发人员管理他们的应用程序。它将应用程序拆分为更小、可管理的部分。随着时间的推移,这种可扩展性对于应用程序的演进和扩展至关重要。
Vue中事件总线的概述
Vue中的事件总线是一种类似于信使的机制,用于帮助组件之间进行通信。就像朋友之间互发消息一样,即使彼此不认识也能进行交流。通过全局事件总线,组件可以在没有紧密连接的情况下进行交互,这使得它具有灵活性和高效性。你可以设置事件总线,然后在需要的时候组件可以发出事件。其他组件可以监听这些事件并做出相应的反应。它有助于保持代码的组织性,并促进Vue应用中组件之间的协作。
事件总线具有一些方法,用于促进组件间的交互通信。它们包括:$on(eventName, callback) 监听事件, $emit(eventName, data) 触发带有可选数据负载的事件,以及 $off(eventName, callback) 移除事件监听器。在Vue中, $once 方法是另一个事件总线方法,允许组件仅监听一次事件。它的功能类似于 $on 方法,但不同之处在于在事件触发一次后自动移除事件监听器。
搭建一个Vue项目
我们将从创建一个Vue应用程序开始,然后继续设置事件总线以进行跨组件通信。
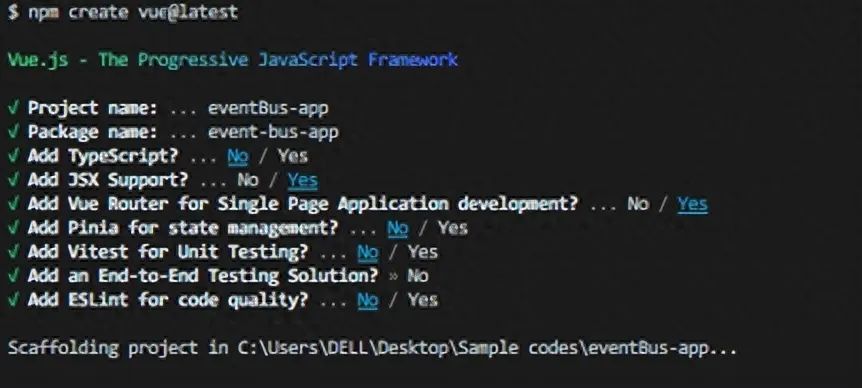
接下来,在目录中运行以下命令来创建一个新的Vue项目。
npm create vue@latest按照向导的指示,根据项目需求选择适合你的设置的正确工具。
一旦设置完成,通过运行以下命令进入项目目录:
cd eventBus-app
npm install
npm run dev
现在,您可以运行开发服务器来查看您的Vue应用程序的运行情况,打开你的浏览器,访问提供的本地开发URL:http://127.0.0.1:5173/
设置事件总线
在Vue中,设置事件总线是一个简单的过程,允许组件之间进行通信而无需直接依赖。
要创建事件总线实例,我们首先定义一个专门处理事件的新Vue实例。这可以在一个单独的JavaScript文件或主Vue应用程序文件中完成。
首先,由于我们正在使用Vue 3,我们必须更新事件总线设置,以使用mitt库进行事件处理:
打开终端并使用以下命令安装mitt库:
npm install mitt或者
yarn add mitt接下来,在src文件夹中创建一个名为 eventBus.js 的单独的js文件。
// eventBus.js file for Vue3

import mitt from 'mitt';

// Create a new event bus using mitt
const Event Bus = mitt();

export default eventBus;
通过导入Vue并创建一个新实例,我们现在拥有了一个事件总线,可以方便组件之间的通信。
注意:如果您使用的是Vue 2,不需要使用mitt库;您可以按照下面的配置继续进行:eventBus.js
// eventBus.js file for Vue2

import Vue from 'vue';

// Create a new Vue instance to act as the Event Bus
const eventBus = new Vue();

export default eventBus;
发出和监听事件
一旦事件总线实例设置完成,组件就可以开始发出事件并监听它们。组件使用Vue中可用的 $emit 方法来发出事件。该方法的第一个参数是事件名称,第二个参数是可选的负载,如果需要传递数据与事件一起使用。
// ComponentA.vue

<template>
 <div>
   <button @click="handleClick">Say Hello</button>
 </div>
</template>

<script setup>
import eventBus from "../eventBus";

const handleClick = () => {
 // Emitting an event with the name 'sayHello'
 eventBus.emit("sayHello", "Hello from Component A!");
};
</script>
在接收端,其他组件可以监听发出的事件,并在事件发生时执行相应的操作。这是通过使用 $on 方法实现的,该方法监听特定的事件名称。
// ComponentB.vue

<template>
 <div>
   <p>{{ message }}</p>
 </div>
</template>

<script setup>
import { onMounted, ref } from "vue";
import eventBus from "../eventBus";

const message = ref("")

onMounted(() => {
 // Listening for the 'sayHello' event from the 'eventBus'
 eventBus.on("sayHello", (data) => {
   // Handling the event and accessing the payload data
   message.value = data
 });
});
</script>
使用事件总线传递数据
使用事件总线传递数据涉及到事件负载的使用和复杂数据结构的共享。让我们通过代码示例来说明这些概念:
使用事件负载(Event Payloads)
事件负载允许组件在发出事件时传递附加数据。当从一个组件向另一个组件发送特定信息时,这非常有用。上面的示例中已经说明了这个工作原理。发射器 ComponentA 发出一个带有负载为“Hello from Component A!”的 sayHello 事件。监听器 ComponentB 监听该事件,并使用事件发送的负载更新其 message 值。这基本上就是事件负载的工作原理。
共享复杂数据结构
事件总线还可以在组件之间共享更复杂的数据结构,例如对象或数组。这使得组件可以交换结构化数据,而无需紧密耦合。以下是共享复杂数据结构的示例:
让我们更新我们的初始组件A(发射器),使用更复杂的有效载荷数据。
// ComponentA

<template>
 <div>
   <button @click="fetchUserDetail">Fetch User</button>
 </div>
</template>

<script setup>
import { reactive, ref } from "vue";
import eventBus from "../eventBus";

const userDetails = reactive({
 name: "Hannah",
 dob: "23-Nov",
 favColor: "Gray",
});

const fetchUserDetail = () => {
 eventBus.emit("getUserDetails", userDetails);
};
</script>
接收组件(监听器)实现了一个事件处理程序并访问共享数据是:
// ComponentB

<template>
 <div>
   <p>{{ user.name }}</p>
   <p>{{ user.dob }}</p>
   <p>{{ user.favColor }}</p>
 </div>
</template>

<script setup>
import { onMounted, reactive, ref } from "vue";
import eventBus from "../eventBus";

const user = ref({})

onMounted(() => {
 eventBus.on("getUserDetails", (userData) => {
   user.value = userData
 });
});
</script>
最佳实践和技巧
保持事件名称一致性:保持事件名称一致性至关重要,以确保清晰明了,避免混淆。通过使用有意义且描述性的事件名称,您可以轻松识别每个事件的目的及其相应的功能。例如,上述使用了 sayHello 和 getUserDetails ,它们具有自我描述性,人们可以轻松说明它们的功能。
处理异步事件:在处理事件总线中的异步操作时,适当地处理它们非常重要。例如,如果一个事件涉及数据获取或API调用,请使用async/await或Promises来有效地管理异步代码流程。
// emitter

onMounted(async () => {
 const data = await fetchData(); // Some asynchronous data fetching function
 eventBus.emit("data-fetched", data);
});
// listener
onMounted(() => {
eventBus.on("data-fetched", async (data) => {
// Handle the asynchronously received data here
await processData(data); // Some asynchronous data processing function
});
});
避免事件冲突:当两个或多个组件使用相同的事件名称时,可能会发生事件冲突。这可能导致意外的行为或冲突。为了避免这种情况,可以根据组件名称或特定目的对事件进行命名空间划分。
// In Component A

<script setup>
import eventBus from "../eventBus";

const handleClick = () => {
 // Emitting an event with the name 'sayHello'
 eventBus.emit("componentA-sayHello", "Hello from Component A!");
};
</script>
// In Component B
onMounted(() => {
eventBus.on('componentA-sayHello', (data) => {
message.value = data;
});
}通过在事件名称前加上特定组件的标识符,可以最大程度地减少事件冲突的风险。
事件总线与Props相比
事件总线和Props是Vue中常用的两种组件间通信的方法。让我们来探索它们的区别。
事件总线
事件总线允许不直接相关的组件之间进行通信,无需通过父组件传递数据。它作为一个中央事件中心,用于发射和监听自定义事件。
示例
在A组件中:
<template>
 <button @click="send">Emit Event</button>
</template>


<script setup>
import eventBus from "../eventBus";
import {ref } from "vue";

const send = () => {
 eventBus.emit('sendFile', { message: 'File Sent' });
},
</script>
在B组件中:
<template>
 <div>
   <p>{{ message }}</p>
 </div>
</template>

<script setup>
import eventBus from "../eventBus";
import { onMounted, ref } from "vue";

const message = ref("")

onMounted(()=> {
   eventBus.on('custom-event', (data) => {
     message.value = data.message;
   })
}),
</script>
Props(属性)
Props涉及通过属性将数据从父组件传递给子组件。
示例:
在ParentComponent中:
// Parent Component

<template>
 <child-component :message="message" />
</template>

<script setup>
import ChildComponent from './ChildComponent';
import { ref } from "vue";

const message = ref("Happy Holidays")
</script>
在ChildComponent中:
<template>
 <div>
   <p>{{ message }}</p>
 </div>
</template>

<script setup>
defineProps({
 message: {
   type: String,
   required: true
 }
})
</script>
比较事件总线与Vuex
事件总线和Vuex在范围和用例上有所不同。事件总线适用于局部通信,而Vuex是一个用于在多个组件之间共享全局数据的状态管理解决方案。
事件总线(本地通信):
上面已经演示了事件总线的示例。当只有少数组件需要通信且数据交换不复杂时,它是合适的。
Vuex(全局状态管理):
Vuex 允许集中式状态管理,这意味着数据可以在整个应用程序中被多个组件共享和访问。
示例
在 store.js (Vuex设置)中:
import { createStore } from 'vuex';

export default createStore({
   state() {
       return {
           message: 'Hello from Vuex store',
       };
   },
   mutations: {
       setMsg: (state, msg) => state.message = msg
   },
   actions: {},
   getters: {
       getMsg: (state) => state.message,
   },
});
在A组件中:
<template>
 <div>
   <p>{{ message }}</p>
 </div>
</template>

<script setup>
import { computed, onMounted, reactive, ref } from "vue";
import { useStore } from 'vuex';

const store = useStore();

const message = computed(() => {
 return store.getters['getMsg'];
});
</script>

<style></style>
在B组件中:
<template>
 <div>
   <button @click="updateMsg">Update Message</button>
 </div>
</template>

<script setup>
import { useStore } from "vuex";

const store = useStore();

const updateMsg = () => {
 store.commit("setMsg", "Hello World");
};
</script>
事件总线和Vuex都有各自的优势,应根据应用程序的具体通信需求来选择。事件总线适用于简单和局部化的通信,而Vuex则推荐用于管理跨多个组件的复杂全局状态。
结束
Vue中的事件总线促进了高效的跨组件通信,增强了模块化和可重用性。它的好处包括简化的数据共享、灵活性和可维护性。通过遵循最佳实践,开发人员可以确保有组织的事件系统和顺畅的通信。事件总线赋予了Vue应用程序强大的能力,简化了开发过程,丰富了用户体验。
由于文章内容篇幅有限,今天的内容就分享到这里,文章结尾,我想提醒您,文章的创作不易,如果您喜欢我的分享,请别忘了点赞和转发,让更多有需要的人看到。同时,如果您想获取更多前端技术的知识,欢迎关注我,您的支持将是我分享最大的动力。我会持续输出更多内容,敬请期待。