再谈协程之CoroutineContext我能玩一年

点击上方蓝字关注我,知识会给你力量

Kotlin Coroutines的核心是CoroutineContext接口。所有的coroutine生成器函数,比如launch和async都有相同的第一个参数,即context: CoroutineContext。所有协程构建器都被定义为CoroutineScope接口的扩展函数,该接口有一个抽象的只读属性coroutineContext:CoroutineContext。
❝每个coroutine builder都是CoroutineScope的扩展,并继承其coroutineContext以自动传递和取消上下文元素。
❞
-
launch
fun CoroutineScope.launch(
  context: CoroutineContext = EmptyCoroutineContext,
  start: CoroutineStart = CoroutineStart.DEFAULT,
  block: suspend CoroutineScope.() -> Unit
): Job (source)
-
async
fun <T> CoroutineScope.async(
  context: CoroutineContext = EmptyCoroutineContext,
  start: CoroutineStart = CoroutineStart.DEFAULT,
  block: suspend CoroutineScope.() -> T
): Deferred<T> (source)
CoroutineContext是Kotlin coroutines的一个基本构建模块。因此,为了实现线程、生命周期、异常和调试的正确行为,能够操纵它是至关重要的。
CoroutineContext创建了一组用来定义协程行为的元素,它是一个数据结构,封装了协程执行的关键信息,它主要包含下面这些部分:
-
Job:协程的生命周期的句柄 -
协程调度器(CoroutineDispatcher) -
CoroutineName:协程的名字 -
CoroutineExceptionHandler:协程的异常处理
❝当协程中发生异常时,如果异常没有被处理,同时CoroutineExceptionHandler也没有被设置,那么异常会被分发到JVM的ExceptionHandler中,在Android中,如果你没设置全局的ExceptionHandler,那么App将会Crash。
❞
CoroutineContext的数据结构
我们可以来看一眼CoroutineContext的数据结构。

❝CoroutineContext是一个元素实例的索引集,从数据结构上来看,它是set和map的混合体。这个集合中的每个元素都有一个唯一的Key,Key是通过引用来比较的。
❞
CoroutineContext接口的API一开始可能看起来很晦涩,但实际上它只是一个类型安全的异构map,从CoroutineContext.Key实例(根据类的文档,通过引用而不是值进行比较,也就是说,只有同一个对象的key才是相同的)到CoroutineContext.Element实例(这个Map由不同类型的Element组成,Element的索引为Key)。
为了理解为什么必须重新定义一个新的接口,而不是简单地使用一个标准的Map,我们可以参考下面这样一个类似的等效申明。
typealias CoroutineContext = Map<CoroutineContext.Key<*>, CoroutineContext.Element>
在这个情况下,get方法就无法从所使用的Key中推断出获取的元素类型,尽管这些信息在Key的泛型中实际上是可用的。
fun get(key: CoroutineContext.Key<*>): CoroutineContext.Element?
因此,每当从Map中获取一个元素时,它需要被转换为实际类型。而在CoroutineContext类中,更加通用的get方法实际上是根据作为参数传递的Key的泛型来定义返回的Element类型。
fun <E : Element> get(key: Key<E>): E?
这样,元素就可以安全地被获取,而不需要进行类型转换,因为它们的类型是在使用的Key中指定的。所以,在真实的CoroutineContext中,get函数,通过Key获取CoroutineContext中的Element类型元素。调用者可以通过CoroutineContext[Key]这种方式来获取Key类型的元素,类似从List中取出索引为index的某个元素——List[index]。
由于Key在CoroutineContext中是静态的,所以多个实例共享一个key,所以在这个「Map」里,多个同类型的元素只会存在一个,这样所有的实例都会是唯一的了。
例如我们要获取协程的CoroutineName,就可以通过下面的方式。
coroutineContext[CoroutineName]
❝coroutineContext这个属性是Kotlin在编译期生成的参数,编译期会将当前的CoroutineContext传给每个suspend函数,这样在CoroutineScope中就可以直接获取当前的协程信息。
❞
但是这里有点奇怪,为了找到一个CoroutineName,我们只用了CoroutineName。这不是一个类型,也不是一个类,而是个伴生对象。这是Kotlin的一个特点,一个类的名字本身就可以作为其伴生对象的引用,所以coroutineContext[CoroutineName]只是coroutineContext[CoroutineName.Key]的一个简写方式。
所以,实际上最原始的写法应该是这样。
coroutineContext[object : CoroutineContext.Key<CoroutineName> {}]
而在CoroutineName的类中,我们发现了这样的代码。
public companion object Key : CoroutineContext.Key<CoroutineName>
正是这个伴生对象,让我们可以很方便的引用。
coroutineContext[CoroutineName.Key] ------> coroutineContext[CoroutineName]
这个技巧在协程库中使用的非常多。
「+」操作符
CoroutineContext没有实现一个集合接口,所以它没有典型的集合相关的操作符。但它重载了一个重要的操作符,即「加号」操作符。
加号运算符将CoroutineContext实例相互结合。它会合并它们所包含的元素,用操作符右边的上下文中的元素覆盖左边的上下文中的元素,很像Map上的行为。
❝[加号运算符]返回一个包含来自这个上下文的元素和其他上下文的元素的上下文。这个上下文中与另一个上下文中Key值相同的元素会被删除。
❞
CoroutineContext.Element接口实际上继承了CoroutineContext。这很方便,因为它意味着CoroutineContext.Element实例可以简单地被视为包含单一元素的CoroutineContext,也就是它们自己。
❝Coroutine上下文的一个元素本身就是一个只包含自身的上下文。
❞
有了这个「+」运算符,就可以被用来轻松地将元素以及元素与元素之间结合成一个新的上下文。需要注意的是它们的组合顺序,因为+运算符是不对称的。
❝在一个上下文不需要容纳任何元素的情况下,可以使用EmptyCoroutineContext对象。可以预期的是,将这个对象添加到任何其他的上下文中,对该上下文是没有任何影响的。
❞
例如下面这个例子。
(Dispatchers.Main, “name”) + (Dispatchers.IO) = (Dispatchers.IO, “name”)
❝要注意的是,一个新的协程上下文,除了继承父协程的上下文之外,一定有一个新创建的Job对象,用于控制该协程的生命周期。
❞
CoroutineContext通过这种方式来添加元素的好处是,添加元素后,生成的CombinedContext,它也继承自CoroutineContext,从而在使用协程构造器函数,例如launch时,可以传入单个的CoroutineContext,也可以通过「+」来传入多个CoroutineContext的组合,而不用使用list参数或者vararg参数。
从上面的图中我们可以看出,CoroutineContext实际上是不可变的,每次执行「+」操作后,都会生成新的CombinedContext(它也是CoroutineContext的实现),而CombinedContext,才是CoroutineContext的真正实现者。
CombinedContext
我们来看下CombinedContext的申明。
internal class CombinedContext(
    private val left: CoroutineContext,
    private val element: Element
) : CoroutineContext, Serializable {
left、element,老司机一看就知道了,赤裸裸的链表。
❝从继承上来看,CombinedContext、CoroutineContext、Element,三者都是CoroutineContext。
❞
由于在Kotlin中,CoroutineContext的Element是有限的几种,所以这种数据结构的性能是比较符合预期的。
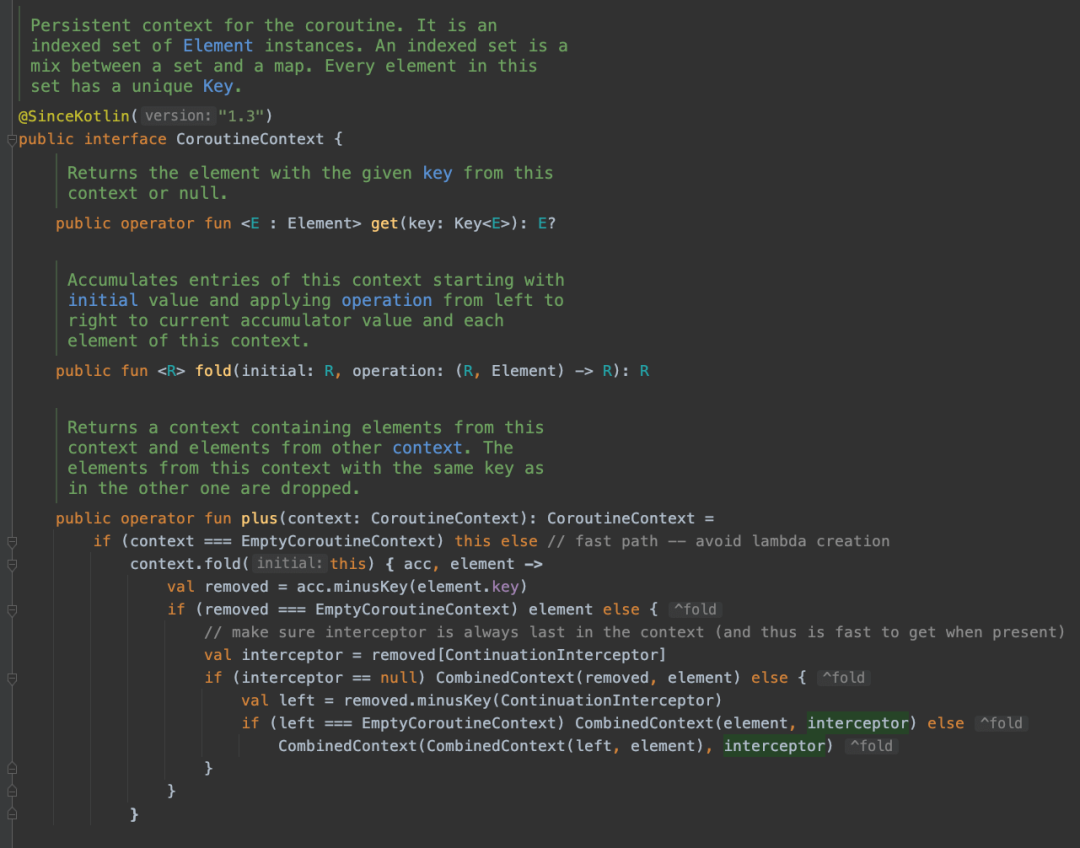
通过CombinedContext我们来看下前面的plus操作符,具体在干什么,总结下代码。
首先,plus之后,不出意外的话,会返回CombinedContext,只其中会包含plus两边的对象,这里有两种可能,一种是A + B的时候,B中有和A相同的Key,那么A中的对应Key会被删掉,使用B中的Key,否则的话,就直接链起来。
所以,在CombinedContext中对Element进行查找,就变成了,如果CombinedContext中的element(也就是当前的节点)包含了对应的Key,那么就返回,否则就从left中继续递归这个过程,所以,在CombinedContext中,遍历的顺序是从右往左进行递归。
另外,所有Element中,有一个比较特殊的类型——ContinuationInterceptor,这个对象永远会放置在最后面,这样是为了方便遍历,真是天选之子。
Elements
正如前面所解释的,CoroutineContext本质上是一个Map,它总是持有一个预定义的Set。由于所有的Key都必须实现CoroutineContext.Key接口,通过搜索CoroutineContext.Key实现的代码,并检查它们与哪个元素类相关联,就很容易找到公共元素的列表。Elements的实现类基本就是下面这几种:ContinuationInterceptor、Job、CoroutineExceptionHandler和CoroutineName,也就是说CoroutineContext本质上只会有这几种类型的元素。
-
ContinuationInterceptor被调用于continuations,以管理底层执行线程。在实践中,ContinuationInterceptor总是继承CoroutineDispatcher基类。 -
Job持有了一个正在执行的coroutine的生命周期和任务层次结构的句柄。 -
CoroutineExceptionHandler被那些不传播异常的coroutine构建器(即launch和actor)使用,以便确定在遇到异常时该怎么做。 -
CoroutineName通常用于调试。
每个Key被定义为其相关元素接口或类的伴生对象。这样,Key可以通过使用元素类型的名称直接被引用。例如,coroutineContext[Job]将返回coroutineContext所持有的Job的实例,如果不包含任何实例,则返回null。
如果不考虑可扩展性,CoroutineContext甚至可以简单地被定义为一个类。
class CoroutineContext(
  val continuationInterceptor: ContinuationInterceptor?,
  val job: Job?,
  val coroutineExceptionHandler: CoroutineExceptionHandler,
  val name: CoroutineName?
)
协程作用域构建器
每个CoroutineScope都会有一个coroutineContext属性,通过它,我们可以获取当前coroutine的Element Set。
public interface CoroutineScope {
    /**
     * The context of this scope.
     * Context is encapsulated by the scope and used for implementation of coroutine builders that are extensions on the scope.
     * Accessing this property in general code is not recommended for any purposes except accessing the [Job] instance for advanced usages.
     *
     * By convention, should contain an instance of a [job][Job] to enforce structured concurrency.
     */
    public val coroutineContext: CoroutineContext
}

lifecycleScope.launch {
    println("My context is: $coroutineContext")
}
当我们想启动一个coroutine时,我们需要在一个CoroutineScope实例上调用一个构建器函数。在构建器函数中,我们实际上可以看到三个上下文在起作用。
-
CoroutineScope接收器是由它提供CoroutineContext的方式来定义的,这是继承的上下文。 -
构建器函数在其第一个参数中接收一个CoroutineContext实例,我们将其称为上下文参数。 -
构建器函数中的暂停块参数有一个CoroutineScope接收器,它本身也提供一个CoroutineContext,这就是Coroutine的上下文。
看一下launch和async的源码,它们都以相同的语句开始。
val newContext = newCoroutineContext(context)
CoroutineScope上的newCoroutineContext扩展函数处理继承的上下文与上下文参数的合并,以及提供默认值和做一些额外的配置。合并被写成coroutineContext + context ,其中coroutineContext是继承的上下文,context是上下文参数。考虑到前面解释的关于CoroutineContext.plus操作符的内容,右边的操作符优先,因此来自context参数的属性将覆盖继承的context中的属性。其结果就是我们所说的父级上下文。
❝parent context = default values + inherited context + context argument
❞
作为接收器传递给suspending函数的CoroutineScope实例实际上是coroutine本身,总是继承AbstractCoroutine,它实现了CoroutineScope并且也是一个Job。coroutine上下文由该类提供,并将返回之前获得的父级上下文,它将自己添加到该类中,有效地覆盖了Job。
❝coroutine context = parent context + coroutine job
❞
CoroutineContext默认值
CoroutineContext的四个基本元素中,有些元素是有默认值的,例如CoroutineDispatcher的默认值是Dispatchers.Default,CoroutineName的默认值是Coroutine。
当一个正在被coroutine使用的上下文中缺少某个元素时,它会使用一个默认值。
-
ContinuationInterceptor的默认值是Dispatchers.Default。这在newCoroutineContext中有记录。因此,如果继承的上下文和上下文参数都没有dispatcher,那么就会使用默认的dispatcher。在这种情况下,coroutine context也将继承默认的dispatcher。 -
如果上下文没有Job,那么被创建的coroutine就没有父级。 -
如果上下文没有CoroutineExceptionHandler ,那么就会使用全局异常处理程序(但没有在上下文中)。这最终会调用handleCoroutineExceptionImpl,它首先使用java ServiceLoader来加载CoroutineExceptionHandler的所有实现,然后将异常传播给当前线程的未捕获异常处理程序。在Android上,一个名为AndroidExceptionPreHandler的特殊异常处理程序被自动执行,用来向Thread上隐藏的uncaughtExceptionPreHandler属性报告异常,但它会在导致应用程序崩溃之后,将异常记录到终端日志。 -
coroutine的默认名称是 "coroutine",用CoroutineName这个Key,来从上下文中获取命名。
看看之前提出的假设将CoroutineScope作为一个类的方式,可以通过添加在默认值的方式来实现它。
val defaultExceptionHandler = CoroutineExceptionHandler { ctx, t ->
  ServiceLoader.load(
    serviceClass,
    serviceClass.classLoader
  ).forEach{
    it.handleException(ctx, t)
  }
  Thread.currentThread().let {
    it.uncaughtExceptionHandler.uncaughtException(it, exception)
  }
}

class CoroutineContext(
  val continuationInterceptor: ContinuationInterceptor =
    Dispatchers.Default,
  val parentJob: Job? =
    null,
  val coroutineExceptionHandler: CoroutineExceptionHandler =
    defaultExceptionHandler,
  val name: CoroutineName =
    CoroutineName("coroutine")
)
示例
通过一些例子,让我们看看在一些coroutine表达式中产生的上下文,最重要的是分析它们继承了哪些dispatchers和parent job。
Global Scope Context
GlobalScope.launch {
  /* ... */
}
如果我们查看GlobalScope的源代码,我们会发现它对coroutineContext的实现总是返回一个EmptyCoroutineContext。因此,在这个coroutine中使用的最终的上下文,将使用所有的默认值。
例如,上面的语句与下面的语句是相同的,只不过下面的代码中明确指定了默认的dispatcher。
GlobalScope.launch(Dispatchers.Default) {
  /* ... */
}
Fully Qualified Context
反过来说,我们可以将所有的参数都传递自己的设置,覆盖原有的默认实现。
coroutineScope.launch(
  Dispatchers.Main +
    Job() +
    CoroutineName("HelloCoroutine") +
    CoroutineExceptionHandler { _, _ -> /* ... */ }
) {
  /* ... */
}
继承的上下文中的任何元素实际上都会被覆盖,这样的好处是,无论在哪个CoroutineScope上调用该语句都有相同的行为。
CoroutineScope Context
在Android的Coroutines UI编程指南中,我们在结构化并发、生命周期和coroutine父子层次结构部分找到了以下例子,展示了如何在一个Activity中实现CoroutineScope。
abstract class ScopedAppActivity: AppCompatActivity() {
  private val scope = MainScope()

  override fun onDestroy() {
    super.onDestroy()
    scope.cancel()
  }
  /* ... */
}
在这个例子中,MainScope辅助工厂函数被用来创建一个具有预定义的UI dispatcher和supervisor job的作用域。这是一个设计上的选择,这样在这个作用域上调用的所有coroutine构建器将使用Main dispatcher而不是Default。
在作用域的上下文中定义元素,是在使用上下文的地方,覆盖库的默认值的一种方式。该作用域还提供了一个job,因此从该作用域启动的所有coroutine都有同一个父级。这样,就有一个单一的点来取消它们,它与Activity的生命周期绑定。
Overriding Parent Job
我们可以让一些上下文元素从scope中继承,其他的则在上下文参数中添加,这样就可以把两者结合起来。例如,当使用NonCancellable job时,它通常是作为参数传递的上下文中的唯一元素。
withContext(NonCancellable) {
    /* ... */
}
在此块中执行的代码将从其调用的上下文中继承dispatcher,但它将通过使用NonCancellable作为父代来覆盖该上下文的Job。这样一来,这个coroutine将始终处于活动状态。
Binding to Parent Job
当使用launch和async时,它们作为CoroutineScope的扩展函数,scope中的Elements(包括job)都会自动继承。然而,当使用CompletableDeferred时(这是一个有用的工具),可以将基于回调的API绑定到coroutine,它的parent job需要手动提供。
val call: Call
val deferred = CompletableDeferred<Response>()
call.enqueue(object: Callback {
  override fun onResponse(call: Call, response: Response) {
    completableDeferred.complete(response)
  }

  override fun onFailure(call: Call, e: IOException) {
    completableDeferred.completeExceptionally(e)
  }
})
deferred.await()
这种类型的架构,使得等待调用的结果变得更加容易。然而,由于协程的结构化并发,如果不能被取消,deferred可能会导致内存泄露。所以,确保CompletableDeferred被正确取消的最简单的方法是将它与它的parent job绑定。
val deferred = CompletableDeferred<Response>(coroutineContext[Job])
Accessing Context Elements
当前上下文中的元素可以通过使用top-level suspending的coroutineContext函数的只读属性来获取。
println("Running in ${coroutineContext[CoroutineName]}")
例如,上面的语句可以用来打印当前coroutine的名称。
如果我们愿意,我们实际上可以从单个元素重建一个与当前上下文相同的协程上下文。
val inheritedContext = sequenceOf(
  Job,
  ContinuationInterceptor,
  CoroutineExceptionHandler,
  CoroutineName
).mapNotNull { key -> coroutineContext[key] }
  .fold(EmptyCoroutineContext) { ctx: CoroutineContext, elt ->
    ctx + elt
  }
launch(inheritedContext) {
  /* ... */
}
尽管对于理解上下文的构成很有趣,但这个例子在实践中完全没有用处。我们可以通过将启动的上下文参数保留为默认的空值来获得完全相同的行为。
Nested Context
最后一个例子很重要,因为它呈现了最新版本的coroutines中的行为变化,其中,构建器函数成为CoroutineScope的扩展。
GlobalScope.launch(Dispatchers.Main) {
  val deferred = async {
    /* ... */
  }
  /* ... */
}
鉴于async是在作用域上调用的(而不是一个顶级函数),它将继承作用域的dispatcher,这里被指定为Dispatchers.Main,而不是使用默认的dispatcher。在以前的coroutines版本中,async中的代码将在Dispatchers.Default提供的工作线程上运行,但现在它将在UI线程上运行,这可能导致应用程序阻塞甚至崩溃。
解决办法就是更明确地说明在async中使用的dispatcher。
launch(Dispatchers.Main) {
  val deferred = async(Dispatchers.Default) {
    /* ... */
  }
  /* ... */
}
Coroutine API Design
协程API旨在灵活且富有表现力。通过使用简单的 + 运算符组合上下文,语言设计者可以在启动协程时轻松定义协程的属性,并从执行上下文继承这些属性。这使开发人员可以完全控制他们的协程,同时保持语法流畅。
参考链接:https://proandroiddev.com/demystifying-coroutinecontext-1ce5b68407ad
向大家推荐下我的网站 https://xuyisheng.top/ 点击原文一键直达
专注 Android-Kotlin-Flutter 欢迎大家访问
往期推荐
更文不易,点个“三连”支持一下👇
