网络推理 | PyTorch vs LibTorch:谁更快?
点击上方“机器学习与生成对抗网络”,关注星标
获取有趣、好玩的前沿干货!
作者:知乎—Gemfield 侵删
在Gemfield:部署PyTorch模型到终端(https://zhuanlan.zhihu.com/p/54665674)一文中,我们知道在实际部署PyTorch训练的模型时,一般都是要把模型转换到对应的推理框架上。其中最常见的就是使用TorchScript,如此以来模型就可在LibTorch C++生态中使用了,从而彻底卸掉了Python环境的负担和掣肘。
PyTorch vs LibTorch的时候,性能测试报告中的时间数据可靠吗? PyTorch vs LibTorch的时候,这两者基于的代码版本一样吗? PyTorch vs LibTorch的时候,硬件、Nvidia驱动、软件栈一样吗? PyTorch vs LibTorch的时候,推理进程对系统资源的占用情况一样吗? PyTorch vs LibTorch的时候,网络对于不同的input size有什么不一样的推理速度吗? PyTorch vs LibTorch的时候,有什么profiler工具吗? PyTorch vs LibTorch的时候,有什么特别的环境变量设置的不一样吗? PyTorch vs LibTorch的时候,程序所链接的共享库一样吗? PyTorch vs LibTorch的时候,这两者所使用的编译选项一样吗? 在解决类似的LibTorch性能问题时,我们能为大家提供什么便利呢?
01
start_time = time.time()outputs = civilnet(img)print('gemfield model_time: ',time.time()-start_time)
torch.cuda.synchronize()start_time = time.time()outputs = civilnet(img)torch.cuda.synchronize()print('gemfield model_time: ',time.time()-start_time)
#include <chrono>#include <c10/cuda/CUDAStream.h>#include <ATen/cuda/CUDAContext.h>...start = std::chrono::system_clock::now();output = civilnet->forward(inputs).toTensor();at::cuda::CUDAStream stream = at::cuda::getCurrentCUDAStream();AT_CUDA_CHECK(cudaStreamSynchronize(stream));forward_duration = std::chrono::system_clock::now() - start;msg = gemfield_org::format(" time: %f", forward_duration.count() );std::cout<<"civilnet->forward(inputs).toTensor() "<<msg<<std::endl;
export CUDA_LAUNCH_BLOCKING = 1
02
03
宿主机OS:Ubuntu 20.04 软件环境:MLab HomePod 1.0 CPU:Intel(R) Core(TM) i9-9820X CPU @ 3.30GHz GPU:NVIDIA GTX 2080ti GPU驱动:NVIDIA-SMI 450.102.04 Driver Version: 450.102.04 CUDA Version: 11.0
04
CPU利用率 内存 GPU利用率 显存 该进程的线程数

模型1

civilnet = torch.jit.load("resnet50.pt")
05
在不同的尺寸上,Gemfield观察到LibTorch的速度比PyTorch都要慢; 输出尺寸越大,LibTorch比PyTorch要慢的越多。
06
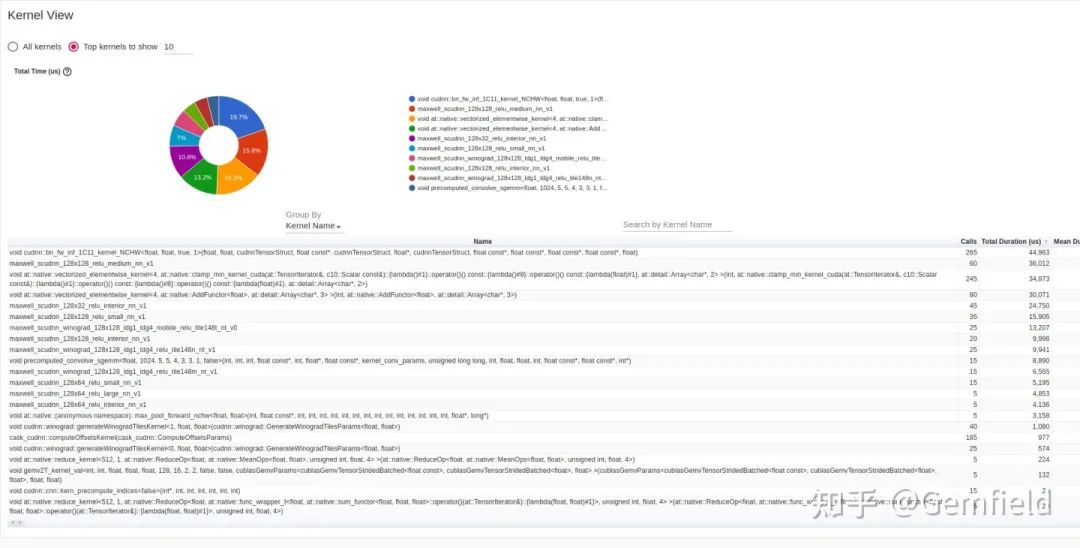
with torch.profiler.profile(activities=[torch.profiler.ProfilerActivity.CPU,torch.profiler.ProfilerActivity.CUDA],# In this example with wait=1, warmup=1, active=2,# profiler will skip the first step/iteration,# start warming up on the second, record# the third and the forth iterations, by gemfield.schedule=torch.profiler.schedule(wait=1,warmup=1,active=2),on_trace_ready=torch.profiler.tensorboard_trace_handler('./gemfield')) as p:for iter in range(N):your_code_here# send a signal to the profiler that the next iteration has startedp.step()
//文件名很重要torch::autograd::profiler::RecordProfile guard("gemfield/gemfield.pt.trace.json");
写出的文件可以使用tensorboard打开:
gemfield@ThinkPad-X1C:~$ tensorboard --logdir gemfieldTensorFlow installation not found - running with reduced feature set.I0409 21:30:59.472155 140264193779264 plugin.py:85] Monitor runs beginI0409 21:30:59.472792 140264193779264 plugin.py:100] Find run gemfield under /home/gemfield/gemfieldI0409 21:30:59.477127 140264193779264 plugin.py:281] Load run gemfieldI0409 21:30:59.792165 140264193779264 plugin.py:285] Run gemfield loadedI0409 21:30:59.799130 140264185386560 plugin.py:117] Add run gemfieldServing TensorBoard on localhost; to expose to the network, use a proxy or pass --bind_allTensorBoard 2.3.0 at http://localhost:6006/ (Press CTRL+C to quit)

overview

operator

GPU kernel

trace
07
OMP_NUM_THREADS at::init_num_threads()
#从4到16export OMP_NUM_THREADS = 8
at::init_num_threads();//从4到16at::set_num_threads(16);//从4到16at::set_num_interop_threads(16);std::cout<<"civilnet thread num: "<<at::get_num_threads()<<" | "<<at::get_num_interop_threads()<<std::endl;
在Gemfield当前的版本中,这个线程数从4到16都不影响网络都推理速度。排除此项。
cudnn.benchmark = False & cudnn.deterministic=True 的时候,会使用cudnn的默认算法实现; cudnn.benchmark = False/True & cudnn.deterministic=False 的时候,cudnn会选择自认为的最优算法。
#include <ATen/ATen.h>#include <ATen/Parallel.h>......std::cout<<"userEnabledCuDNN: "<<at::globalContext().userEnabledCuDNN()<<std::endl;std::cout<<"userEnabledMkldnn: "<<at::globalContext().userEnabledMkldnn()<<std::endl;std::cout<<"benchmarkCuDNN: "<<at::globalContext().benchmarkCuDNN()<<std::endl;std::cout<<"deterministicCuDNN: "<<at::globalContext().deterministicCuDNN()<<std::endl;at::globalContext().setUserEnabledCuDNN(true);at::globalContext().setUserEnabledMkldnn(true);at::globalContext().setBenchmarkCuDNN(true);at::globalContext().setDeterministicCuDNN(true);
08
intel mkl:pytorch为conda安装的动态库,LibTorch(libdeepvac版)为静态库:
Found a library with BLAS API (mkl). Full path: ($PREFIX/lib/libmkl_intel_lp64.so$PREFIX/lib/libmkl_gnu_thread.so;$PREFIX/lib/libmkl_core.so;-fopenmp;/usr/lib/x86_64-linux-gnu/libpthread.so;/usr/lib/x86_64-linux-gnu/libm.so;/usr/lib/x86_64-linux-gnu/libdl.so)
libcudnn:pytorch为libcudnn_static.a静态库,LibTorch(libdeepvac版)为动态库。
cmake -DUSE_MKL=ON -DUSE_CUDA=ON -DCMAKE_BUILD_TYPE=Release -DCMAKE_PREFIX_PATH="/opt/public/airlock/opencv4deepvac;/opt/conda/lib/python3.8/site-packages/torch/" -DCMAKE_INSTALL_PREFIX=../install ..由于这样操作还引入了下面小节中的变量,所以这里就不总结了,我们继续......
09
是否使用KINETO; nvcc flag少了一个参数:-Xfatbin;-compress-all; CAFFE2_USE_MSVC_STATIC_RUNTIME: OFF/ON 是否使用了magma_v2; USE_OBSERVERS : ON/OFF USE_DISTRIBUTED : ON/OFF
cmake -DUSE_MKL=ON -DUSE_CUDA=ON -DCMAKE_BUILD_TYPE=Release -DCMAKE_PREFIX_PATH="/opt/public/airlock/opencv4deepvac;/opt/conda/lib/python3.8/site-packages/torch/" -DCMAKE_INSTALL_PREFIX=../install ..如此以来,PyTorch代码和libtorch代码所使用的底层库都一模一样(包括其当初的编译选项),这样如果还出现性能差异的话,我只能把它归咎为libtorch c++ frontend层面的bug了。
10
部署MLab HomePod(https://github.com/DeepVAC/MLab); HomePod上安装DeepVAC Python包(https://github.com/DeepVAC/deepvac):pip install deepvac; 下载预训练的ResNet50模型(比如:https://download.pytorch.org/models/resnet50-0676ba61.pth): HomePod上运行benchmark命令:
python -m deepvac.syszux_resnet benchmark <pretrained_model.pth> <your_img.jpg>上述命令默认会使用CUDA设备,如果CUDA找不到(本来就没有,或者设置相关环境变量),就会使用CPU;
为LibTorch生成TorchScript模型:
python -m deepvac.syszux_resnet test <pretrained_model.pth> <your_img_directory>部署MLab HomePod; HomePod上克隆libdeepvac项目:
git clone https://github.com/DeepVAC/libdeepvac
编译:https://github.com/DeepVAC/libdeepvac#benchmark HomePod上运行benchmark程序:
#CUDA./bin/test_resnet_benchmark cuda:0 <gemfield_script.pt> <your_img.jpg>#CPU./bin/test_resnet_benchmark cpu <gemfield_script.pt> <your_img.jpg>
猜您喜欢:
附下载 |《TensorFlow 2.0 深度学习算法实战》
评论
