用vue实现一个仿简书的轮播图效果

来源 | https://bougieblog.cn/
先展示最终效果:

解决思路:
vue的理念是以数据驱动视图,所以拒绝通过改变元素的margin-top来实现滚动效果。
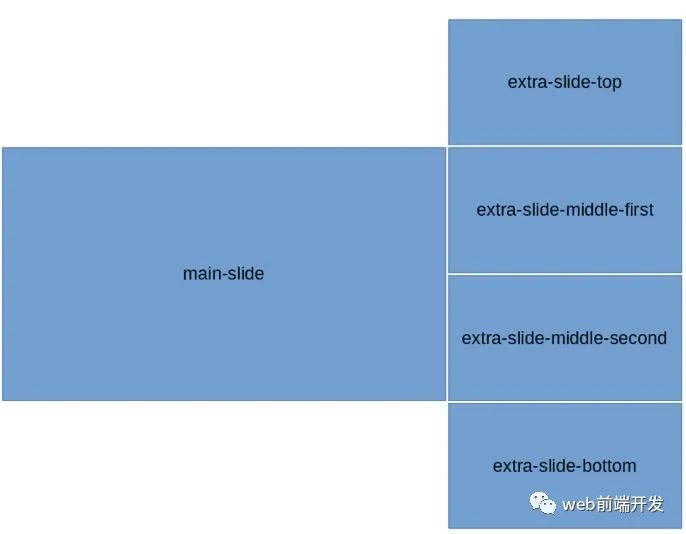
写好css样式,只需改变每张图片的class即可实现轮播效果。可以将轮播图看成两个,如图所示:

代码实现:
各个slide的样式:
$width: 800px; // 容器宽度$height: 300px; // 容器高度$bWidth: 500px; // 大图片宽度$sWidth: $width - $bWidth; // 小图片宽度$sHeight: $height / 2; // 小图片高度#slider-wrapper{width: $width;height: $height;margin: 0 auto;cursor: pointer;background: #ddd;border-radius: 5px;box-shadow: 0 1px 6px rgba(0,0,0,0.117647), 0 1px 4px rgba(0,0,0,0.117647);display: flex;overflow: hidden;div{display: inline-block;}}.main-slide{width: $bWidth;height: $height;float: left;transition: all .4s ease;}.extra-slide{width: $sWidth;position: relative;.extra-slide-item{position: absolute;width: $sWidth;height: $sHeight;left: 0;transition: .4s ease-out;}.extra-slide-top{top: -$sHeight;}.extra-slide-middle-first{top: 0;z-index: 2}.extra-slide-middle-second{top: $sHeight;z-index: 2}.extra-slide-bottom{top: $height}.extra-slide-hide{display: none!important;}}
scripts部分,设置一个nowIndex,定时改变nowIndex。所有图片的class根据这个nowIndex来变化,这里使用了es6的map类型:
import slideConfig from './slideConfig'const slideLength = slideConfig.lengthexport default {name: 'slider',data: function() {return {slideConfig: slideConfig,slideInterval: null,nowIndex: 0}},methods: {resetIndex(i) {return i > slideLength - 1 ? i - slideLength : i},slideClass(i) {let nowIndex = this.nowIndexlet map = new Map([[this.resetIndex(nowIndex), 'extra-slide-top'],[this.resetIndex(nowIndex + 1), 'extra-slide-middle-first'],[this.resetIndex(nowIndex + 2), 'extra-slide-middle-second'],[this.resetIndex(nowIndex + 3), 'extra-slide-bottom']])return map.get(i) ? map.get(i) : 'extra-slide-hide'},start() {this.slideInterval = setInterval(() => {this.nowIndex = this.nowIndex > slideLength - 2 ? 0 : this.nowIndex + 1console.log(this.nowIndex)}, 2000)},stop() {clearInterval(this.slideInterval)this.slideInterval = null}},mounted() {this.start()},destroyed() {this.stop()}}
slideConfig,这里可以写成组件的props:
const prefix = '/src/assets/'const slideConfig = [{src: prefix + 's1.jpg',title: '图1',desc: '说明1'}, {src: prefix + 's2.jpg',title: '图2',desc: '说明2'}, {src: prefix + 's3.jpg',title: '图3',desc: '说明3'}, {src: prefix + 's4.jpg',title: '图4',desc: '说明4'}, {src: prefix + 's5.jpg',title: '图5',desc: '说明5'}, {src: prefix + 's6.jpg',title: '图6',desc: '说明6'}]export default slideConfig
gitHub传送门:https://github.com/bougieL/jianshuslider

专注分享当下最实用的前端技术。关注前端达人,与达人一起学习进步!
长按关注"前端达人"

评论
