Spring Security 最佳实践
阅读本文大概需要 10 分钟。
来自:juejin.cn/post/7026734817853210661
Spring Security简介 Spring Security 认证流程 Spring Security 项目搭建 导入依赖 访问页面 自定义用户名和密码 UserDetailsService详解 PasswordEncoder密码解析器详解 登录配置 角色权限 403 权限不足页面处理 RememberMe(记住我) Spring Security 注解 Spring Security中CSRF 什么是CSRF?
Spring Security简介
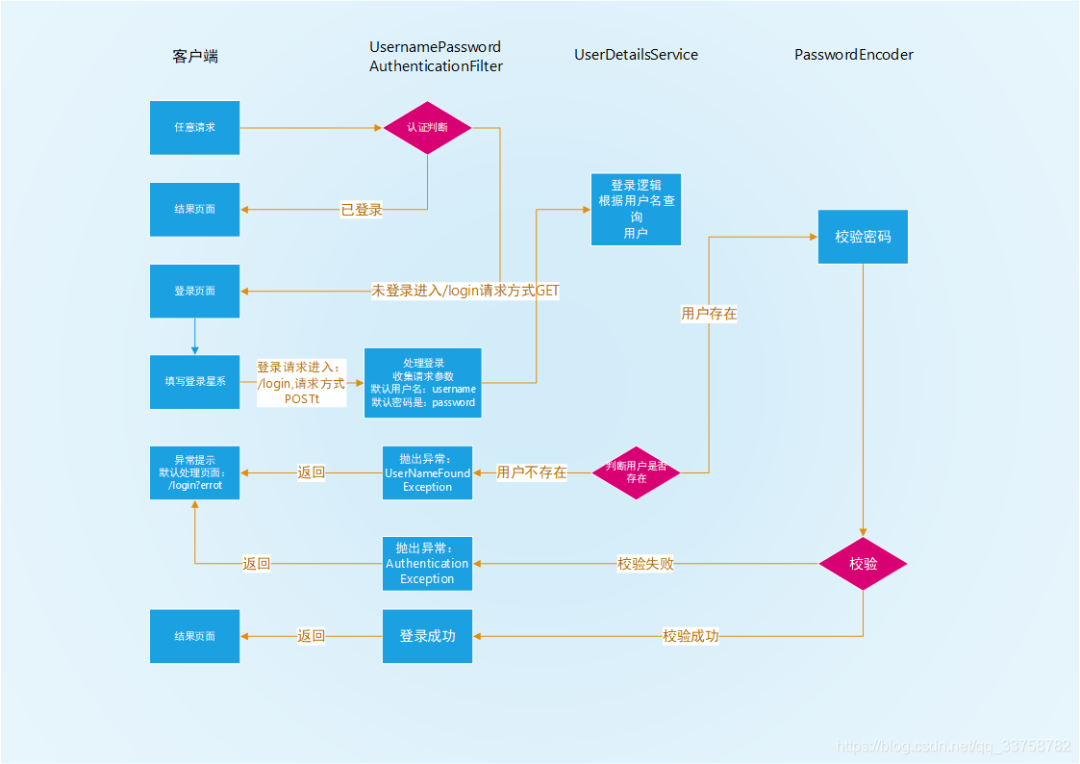
Spring Security 认证流程
 SpringSecurity认证执行流程
Spring Security 项目搭建
导入依赖
<dependency>
    <groupId>org.springframework.boot</groupId>
    <artifactId>spring-boot-starter-security</artifactId>
</dependency>
访问页面
http://localhost:8080/ 进入Spring Security内置登录页面自定义用户名和密码
# 静态用户,一般只在内部网络认证中使用,如:内部服务器1,访问服务器2
spring:
  security:
    user:
      name: test  # 通过配置文件,设置静态用户名
      password: test # 配置文件,设置静态登录密码
UserDetailsService详解
@Component
public class UserSecurity implements UserDetailsService {

    @Autowired
    private UserService userService;

    @Override
    public UserDetails loadUserByUsername(String userName) throws UsernameNotFoundException {

        User user = userService.login(userName);
        System.out.println(user);
        if (null==user){
            throw new UsernameNotFoundException("用户名错误");
        }
        org.springframework.security.core.userdetails.User result =
                new org.springframework.security.core.userdetails.User(
                        userName,user.getPassword(), AuthorityUtils.createAuthorityList()
                );
        return result;
    }

}
PasswordEncoder密码解析器详解
PasswordEncoder
自定义密码解析器
编写类,实现PasswordEncoder 接口
/**
 * 凭证匹配器,用于做认证流程的凭证校验使用的类型
 * 其中有2个核心方法
 * 1. encode - 把明文密码,加密成密文密码
 * 2. matches - 校验明文和密文是否匹配
 * */
public class MyMD5PasswordEncoder implements PasswordEncoder {

    /**
     * 加密
     * @param charSequence  明文字符串
     * @return
     */
    @Override
    public String encode(CharSequence charSequence) {
        try {
            MessageDigest digest = MessageDigest.getInstance("MD5");
            return toHexString(digest.digest(charSequence.toString().getBytes()));
        } catch (NoSuchAlgorithmException e) {
            e.printStackTrace();
            return "";
        }
    }

    /**
     * 密码校验
     * @param charSequence 明文,页面收集密码
     * @param s 密文 ,数据库中存放密码
     * @return
     */
    @Override
    public boolean matches(CharSequence charSequence, String s) {
        return s.equals(encode(charSequence));
    }

     /**
     * @param tmp 转16进制字节数组
     * @return 饭回16进制字符串
     */
    private String toHexString(byte [] tmp){
        StringBuilder builder = new StringBuilder();
        for (byte b :tmp){
            String s = Integer.toHexString(b & 0xFF);
            if (s.length()==1){
                builder.append("0");
            }
            builder.append(s);
        }

        return builder.toString();

    }
}
/**
  * 加密
  * @return 加密对象
  * 如需使用自定义密码凭证匹配器 返回自定义加密对象
  * 例如: return new MD5PasswordEncoder();
  */
@Bean
public PasswordEncoder passwordEncoder() {
    return new BCryptPasswordEncoder(); //Spring Security 自带
}
登录配置
方式一 转发
http.formLogin()
    .usernameParameter("name") // 设置请求参数中,用户名参数名称。 默认username
    .passwordParameter("pswd") // 设置请求参数中,密码参数名称。 默认password
    .loginPage("/toLogin") // 当用户未登录的时候,跳转的登录页面地址是什么? 默认 /login
    .loginProcessingUrl("/login") // 用户登录逻辑请求地址是什么。 默认是 /login
    .failureForwardUrl("/failure"); // 登录失败后,请求转发的位置。Security请求转发使用Post请求。默认转发到:loginPage?error
    .successForwardUrl("/toMain"); // 用户登录成功后,请求转发到的位置。Security请求转发使用POST请求。
方式二 :重定向
http.formLogin()
    .usernameParameter("name") // 设置请求参数中,用户名参数名称。 默认username
    .passwordParameter("pswd") // 设置请求参数中,密码参数名称。 默认password
    .loginPage("/toLogin") // 当用户未登录的时候,跳转的登录页面地址是什么? 默认 /login
    .loginProcessingUrl("/login") // 用户登录逻辑请求地址是什么。 默认是 /login
 .defaultSuccessUrl("/toMain",true); //用户登录成功后,响应重定向到的位置。GET请求。必须配置绝对地址。
  .failureUrl("/failure"); // 登录失败后,重定向的位置。
方式三:自定义登录处理器
/*自定义登录失败处理器*/
public class MyAuthenticationFailureHandler implements AuthenticationFailureHandler {
    private  String url;
    private boolean isRedirect;


    public MyAuthenticationFailureHandler(String url, boolean isRedirect) {
        this.url = url;
        this.isRedirect = isRedirect;
    }

    @Override
    public void onAuthenticationFailure(HttpServletRequest httpServletRequest, HttpServletResponse httpServletResponse, AuthenticationException e) throws IOException, ServletException {
        if (isRedirect){
            httpServletResponse.sendRedirect(url);
        }else {
            httpServletRequest.getRequestDispatcher(url).forward(httpServletRequest,httpServletResponse);
        }
    }

//get set 方法 省略
自定义登录成功逻辑处理器
/**
 * 自定义登录成功后处理器
 * 转发重定向,有代码逻辑实现
 * */
public class MyAuthenticationSuccessHandler implements AuthenticationSuccessHandler {
    private String url;
    private boolean isRedirect;

    public MyAuthenticationSuccessHandler(String url, boolean isRedirect) {
        this.url = url;
        this.isRedirect = isRedirect;
    }

    /**
     * @param request 请求对象 request.getRequestDispatcher.forward()
     * @param response 响应对象 response.sendRedirect()
     * @param authentication 用户认证成功后的对象。其中报换用户名权限结合,内容是
     *                       自定义UserDetailsService
     * */
    @Override
    public void onAuthenticationSuccess(HttpServletRequest request, HttpServletResponse response, Authentication authentication) throws IOException, ServletException {
        if (isRedirect){
            response.sendRedirect(url);
        }else {
            request.getRequestDispatcher(url).forward(request,response);
        }
    }

//get set 方法 省略
http.formLogin()
    .usernameParameter("name") // 设置请求参数中,用户名参数名称。 默认username
    .passwordParameter("pswd") // 设置请求参数中,密码参数名称。 默认password
    .loginPage("/toLogin") // 当用户未登录的时候,跳转的登录页面地址是什么? 默认 /login
    .loginProcessingUrl("/login") // 用户登录逻辑请求地址是什么。 默认是 /login
登录相关配置类
@Configuration
@EnableWebSecurity
public class SecurityConfig extends WebSecurityConfigurerAdapter {

    @Autowired
    private  UserSecurity userSecurity;
    @Autowired
    private PersistentTokenRepository persistentTokenRepository;


    /**
     * 加密
     * @return 加密对象
     * 如需使用自定义加密逻辑 返回自定义加密对象
     * return new MD5PasswordEncoder(); return new SimplePasswordEncoder();
     */
    @Bean
    public PasswordEncoder passwordEncoder() {
        return new BCryptPasswordEncoder(); //Spring Security 自带
    }

    @Override
    protected void configure(HttpSecurity http) throws Exception {
        // 配置登录请求相关内容。
        http.formLogin()
            .loginPage("/toLogin") // 当用户未登录的时候,跳转的登录页面地址是什么? 默认 /login
            .usernameParameter("name") // 设置请求参数中,用户名参数名称。 默认username
            .passwordParameter("pswd") // 设置请求参数中,密码参数名称。 默认password
            .loginProcessingUrl("/login") //设置登录 提交表单数据访问请求地址
            .defaultSuccessUrl("/toMain")
            .failureUrl("/toLogin");
         //.successForwardUrl("/toMain")
         //.failureForwardUrl("/toLogin");
            //.successHandler(new LoginSuccessHandler("/toMain", true)) //自定义登录成功处理器
                //.failureHandler(new LoginErrorHandler("/toLogin", true));

        http.authorizeRequests()
            //.antMatchers("/toLogin").anonymous() //只能匿名用户访问
            .antMatchers("/toLogin", "/register", "/login", "/favicon.ico").permitAll() // /toLogin请求地址,可以随便访问。
            .antMatchers("/**/*.js").permitAll() // 授予所有目录下的所有.js文件可访问权限
            .regexMatchers(".*[.]css").permitAll() // 授予所有目录下的所有.css文件可访问权限
            .anyRequest().authenticated(); // 任意的请求,都必须认证后才能访问。


        // 配置退出登录
        http.logout()
                .invalidateHttpSession(true) // 回收HttpSession对象。退出之前调用HttpSession.invalidate() 默认 true
                .clearAuthentication(true) // 退出之前,清空Security记录的用户登录标记。 默认 true
                // .addLogoutHandler() // 增加退出处理器。
                .logoutSuccessUrl("/") // 配置退出后,进入的请求地址。 默认是loginPage?logout
                .logoutUrl("/logout"); // 配置退出登录的路径地址。和页面请求地址一致即可。

        // 关闭CSRF安全协议。
        // 关闭是为了保证完整流程的可用。
        http.csrf().disable();
    }


   @Bean
   public PersistentTokenRepository persistentTokenRepository(DataSource dataSource){
        JdbcTokenRepositoryImpl jdbcTokenRepository = new JdbcTokenRepositoryImpl();
        jdbcTokenRepository.setDataSource(dataSource);
        //jdbcTokenRepository.setCreateTableOnStartup(true);
        return jdbcTokenRepository;
    }
}
角色权限
❝ 「hasAuthority(String)」 判断角色是否具有特定权限 ❞
http.authorizeRequests().antMatchers("/main1.html").hasAuthority("admin")
❝ 「hasAnyAuthority(String ...)」 如果用户具备给定权限中某一个,就允许访问 ❞
http.authorizeRequests().antMatchers("/admin/read").hasAnyAuthority("xxx","xxx")
❝ 「hasRole(String)」 如果用户具备给定角色就允许访问。否则出现403 ❞
//请求地址为/admin/read的请求,必须登录用户拥有'管理员'角色才可访问
http.authorizeRequests().antMatchers("/admin/read").hasRole("管理员")
❝ 「hasAnyRole(String ...)」 如果用户具备给定角色的任意一个,就允许被访问 ❞
//用户拥有角色是管理员 或 访客 可以访问 /guest/read
http.authorizeRequests().antMatchers("/guest/read").hasAnyRole("管理员", "访客")
❝ 「hasIpAddress(String)」 请求是指定的IP就运行访问 ❞
//ip 是127.0.0.1 的请求 可以访问/ip
http.authorizeRequests().antMatchers("/ip").hasIpAddress("127.0.0.1")
403 权限不足页面处理
/**
 * @describe  403 权限不足
 * @author: AnyWhere
 * @date 2021/4/18 20:57
 */
@Component
public class MyAccessDeniedHandler implements AccessDeniedHandler {
    @Override
    public void handle(HttpServletRequest request, HttpServletResponse response, AccessDeniedException e)
            throws IOException, ServletException {

        response.setStatus(HttpServletResponse.SC_OK);

        response.setContentType("text/html;charset=UTF-8");

        response.getWriter().write(
                "<html>" +
                        "<body>" +
                        "<div style='width:800px;text-align:center;margin:auto;font-size:24px'>" +
                        "权限不足,请联系管理员" +
                        "</div>" +
                        "</body>" +
                        "</html>"

        );

        response.getWriter().flush();//刷新缓冲区
    }
}
// 配置403访问错误处理器。
http.exceptionHandling().accessDeniedHandler(myAccessDeniedHandler);/
RememberMe(记住我)
@Configuration
@EnableWebSecurity
public class SecurityConfig extends WebSecurityConfigurerAdapter {
  @Override
  protected void configure(HttpSecurity http) throws Exception {
    //配置记住密码
    http.rememberMe()
        .rememberMeParameter("remember-me") // 修改请求参数名。 默认是remember-me
        .tokenValiditySeconds(14*24*60*60) // 设置记住我有效时间。单位是秒。默认是14天
        .rememberMeCookieName("remember-me") // 修改remember me的cookie名称。默认是remember-me
        .tokenRepository(persistentTokenRepository) // 配置用户登录标记的持久化工具对象。
        .userDetailsService(userSecurity); // 配置自定义的UserDetailsService接口实现类对象

  }
  @Bean
  public PersistentTokenRepository persistentTokenRepository(DataSource dataSource){
     JdbcTokenRepositoryImpl jdbcTokenRepository = new JdbcTokenRepositoryImpl();
     jdbcTokenRepository.setDataSource(dataSource);
     //jdbcTokenRepository.setCreateTableOnStartup(true);
     return jdbcTokenRepository;
  }
}
Spring Security 注解
@Secured
❝ 角色校验 ,请求到来访问控制单元方法时必须包含XX角色才能访问 角色必须添加ROLE_前缀 ❞
  @Secured({"ROLE_管理员","ROLE_访客"})
  @RequestMapping("/toMain")
  public String toMain(){
      return "main";
  }
@EnableGlobalMethodSecurity(securedEnabled = true)
@PreAuthorize
❝ 权限检验,请求到来访问控制单元之前必须包含xx权限才能访问,控制单元方法执行前进行角色校验 ❞
   /**
     * [ROLE_管理员, admin:read, admin:write, all:login, all:logout, all:error, all:toMain]
     * @PreAuthorize   角色 、权限 校验 方法执行前进行角色校验
     *
     *  hasAnyAuthority()
     *  hasAuthority()
     *
     *  hasPermission()
     *
     *
     *  hasRole()
     *  hasAnyRole()
     * */

    @PreAuthorize("hasAnyRole('ROLE_管理员','ROLE_访客')")
    @RequestMapping("/toMain")
    @PreAuthorize("hasAuthority('admin:write')")
    public String toMain(){
        return "main";
    }
@PreAuthorize和@PostAuthorize 需要在配置类中配置注解@EnableGlobalMethodSecurity 才能生效@EnableGlobalMethodSecurity(prePostEnabled = true)
@PostAuthorize
❝ 权限检验,请求到来访问控制单元之后必须包含xx权限才能访问 ,控制单元方法执行完后进行角色校验 ❞
   /**
     * [ROLE_管理员, admin:read, admin:write, all:login, all:logout, all:error, all:toMain]
     * @PostAuthorize  角色 、权限 校验 方法执行后进行角色校验
     *
     *  hasAnyAuthority()
     *  hasAuthority()
     *  hasPermission()
     *  hasRole()
     *  hasAnyRole()
     * */
    @PostAuthorize("hasRole('ROLE_管理员')")
    @RequestMapping("/toMain")
    @PreAuthorize("hasAuthority('admin:write')")
    public String toMain(){
        return "main";
    }
Spring Security 整合Thymeleaf 进行权限校验
<dependency>
      <groupId>org.springframework.boot</groupId>
      <artifactId>spring-boot-starter-thymeleaf</artifactId>
</dependency>

<dependency>
     <groupId>org.thymeleaf.extras</groupId>
     <artifactId>thymeleaf-extras-springsecurity5</artifactId>
</dependency>
Spring Security中CSRF
什么是CSRF?
互联网初中高级大厂面试题(9个G) 内容包含Java基础、JavaWeb、MySQL性能优化、JVM、锁、百万并发、消息队列、高性能缓存、反射、Spring全家桶原理、微服务、Zookeeper......等技术栈!
⬇戳阅读原文领取! 朕已阅


