【Vite】1371- 手把手开发 Vite 插件
前言
大家好,我是易师傅,在现如今 vite 工具快开始盛行之下,我们是不是可以去做一件有意义的事呢,比如写一个 vite 插件,你觉得怎么样?
刚好我们可以趁 vite 插件 生态还未很成熟阶段,做一个让自己顺心,让领导赏心,让社区开心的插件,与之携手共进。
如果大家对 vite 感兴趣可以去看看专栏: 《Vite 从入门到精通》:juejin.cn/column/7074954144817086472[1]
通过本文你可以学到
如何创建一个 vite 插件模板vite 插件的 各个钩子作用vite 插件的 钩子执行顺序如何写一个自己的插件
了解 vite 插件
1. 什么是 vite 插件
vite 其实就是一个由原生 ES Module 驱动的新型 Web 开发前端构建工具。
vite 插件 就可以很好的扩展 vite 自身不能做到的事情,比如 文件图片的压缩、 对 commonjs 的支持、 打包进度条 等等。
2. 为什么要写 vite 插件
相信在座的每位同学,到现在对 webpack 的相关配置以及常用插件都了如指掌了吧;
vite 作为一个新型的前端构建工具,它还很年轻,也有很多扩展性,那么为什么我们不趁现在与它一起携手前进呢?做一些于你于我于大家更有意义的事呢?
快速体验
要想写一个插件,那必须从创建一个项目开始,下面的 vite 插件通用模板 大家以后写插件可以直接clone使用;
插件通用模板 github:体验入口:github.com/jeddygong/vite-templates/tree/master/vite-plugin-template[2]
插件 github:体验入口:github.com/jeddygong/vite-plugin-progress[3]
建议包管理器使用优先级:pnpm > yarn > npm > cnpm
长话短说,直接开干 ~
创建 vite 插件通用模板
1. 初始化
1.1 创建一个文件夹并且初始化:初始化按照提示操作即可
mkdir vite-plugin-progress && cd vite-plugin-progress && pnpm init
复制代码
1.2 安装 typescript
pnpm i typescript @types/node -D
复制代码
1.3 配置 tsconfig.json
{
  "compilerOptions": {
    "module": "ESNext",
    "target": "esnext",
    "moduleResolution": "node",
    "strict": true,
    "declaration": true,
    "noUnusedLocals": true,
    "esModuleInterop": true,
    "outDir": "dist",
    "lib": ["ESNext"],
    "sourceMap": false,
    "noEmitOnError": true,
    "noImplicitAny": false
  },
  "include": [
    "src/*",
    "*.d.ts"
  ],
  "exclude": [
    "node_modules",
    "examples",
    "dist"
  ]
}
复制代码
1.4 安装 vite
// 进入 package.json
{
    ...
    "devDependencies": {
        "vite": "*"
    }
    ...
}
复制代码
2. 配置 eslint 和 prettier(可选)
安装 eslint
pnpm i eslint @typescript-eslint/parser @typescript-eslint/eslint-plugin --save-dev
配置
.eslintrc:配置连接[4]安装
prettier(可选)
pnpm i prettier eslint-config-prettier eslint-plugin-prettier --save-dev
配置 .prettierrc:配置连接[5]
3. 新增 src/index.ts 入口
import type { PluginOption } from 'vite';

export default function vitePluginTemplate(): PluginOption {
  return {
    // 插件名称
    name: 'vite-plugin-template',

    // pre 会较于 post 先执行
    enforce: 'pre', // post

    // 指明它们仅在 'build' 或 'serve' 模式时调用
    apply: 'build', // apply 亦可以是一个函数

    config(config, { command }) {
      console.log('这里是config钩子');
    },

    configResolved(resolvedConfig) {
      console.log('这里是configResolved钩子');
    },

    configureServer(server) {
      console.log('这里是configureServer钩子');
    },

    transformIndexHtml(html) {
      console.log('这里是transformIndexHtml钩子');
    },
  }
}
复制代码
其中的 vite 插件函数钩子会在下面详细详解 ~
到这里,那么我们的基本模版就建好了,但是我们现在思考一下,我们应该怎么去运行这个插件呢?
那么我们就需要创建一些 examples 例子来运行这个代码了;
4. 创建 examples 目录
我这里创建了三套项目 demo,大家直接 copy 就行了,这里就不详细介绍了
vite-react:github.com/jeddygong/vite-templates/tree/master/vite-plugin-template/examples/vite-react[6] vite-vue2:github.com/jeddygong/vite-templates/tree/master/vite-plugin-template/examples/vite-vue2[7] vite-vue3:github.com/jeddygong/vite-templates/tree/master/vite-plugin-template/examples/vite-vue3[8]
如果你的插件需要多跑一些 demo,自行创建项目即可;
那么下面我们就需要配置 examples 下的项目与当前根目录的插件做一个联调了(下面以 examples/vite-vue3 为例)。
5. 配置 examples/vite-vue3 项目
修改 examples/vite-vue3/package.json
{
    ...
    "devDependencies": {
        ...
        "vite": "link:../../node_modules/vite",
        "vite-plugin-template": "link:../../"
    }
}
上面意思就是说:
要把
examples/vite-vue3项目中的 vite 版本与根目录vite-plugin-template的版本一致;同时要把
examples/vite-vue3项目中的vite-plugin-template指向你当前根目录所开发的插件;
引入插件: examples/vite-vue3/vite.config.ts
import template from 'vite-plugin-template';

export default defineConfig({
    ...
    plugins: [vue(), template()],
    ...
});
安装: cd examples/vite-vue3 && pnpm install
cd examples/vite-vue3 && pnpm install
注意:
examples/vite-vue2和examples/vite-react的配置与这一致
思考:
到这里,我们再思考一下,我们把 examples/vite-vue3 中的项目配置好了,但是我们应该怎么去运行呢?
直接去 examples/vite-vue3 目录下运行 pnpm run build 或者 pnpm run dev ?
这样显然是不能运行成功的,因为我们的根目录下的 src/index.ts 是没法直接运行的,所以我们需要把 .ts 文件转义成 .js 文件;
那么我们怎么处理呢?
那么我们不得不去试着用用一个轻小且无需配置的工具 tsup 了。
6. 安装 tsup 配置运行命令
tsup 是一个轻小且无需配置的,由 esbuild 支持的构建工具;
同时它可以直接把 .ts、.tsx 转成不同格式 esm、cjs、iife 的工具;
安装 tsup
pnpm i tsup -D
在根目录下的 package.json中配置
{
  ...
  "scripts": {
    "dev": "pnpm run build -- --watch --ignore-watch examples",
    "build": "tsup src/index.ts --dts --format cjs,esm",
    "example:react": "cd examples/vite-react && pnpm run build",
    "example:vue2": "cd examples/vite-vue2 && pnpm run build",
    "example:vue3": "cd examples/vite-vue3 && pnpm run build"
  },
  ...
}
7. 开发环境运行
开发环境运行:实时监听文件修改后重新打包(热更新)
pnpm run dev
运行 examples中的任意一个项目(以 vite-vue3 为例)
pnpm run example:vue3
注意:
如果你的插件只会在 build 时运行,那就设置
"example:vue3": "cd examples/vite-vue3 && pnpm run build";反之就运行
pnpm run dev
输出:

到这里你就可以 边开发边运行 了,尤雨溪看了都说爽歪歪 ~
8. 发布
安装 `bumpp` 添加版本控制与 tag
pnpm i bumpp -D
复制代码
配置 `package.json`
{
  ...
  "scripts": {
    ...
    "prepublishOnly": "pnpm run build",
    "release": "npx bumpp --push --tag --commit && pnpm publish",
  },
  ...
}
复制代码
开发完插件后运行发布
# 第一步
pnpm run prepublishOnly

# 第二步
pnpm run release
复制代码
那么到这里,我们的 vite 插件模板 就已经写好了,大家可以直接克隆 vite-plugin-template 模板[9] 使用;
如果你对 vite 的插件钩子 和 实现一个真正的 vite 插件 感兴趣可以继续往下面看;
vite 的插件钩子 hooks 们
1. vite 独有的钩子
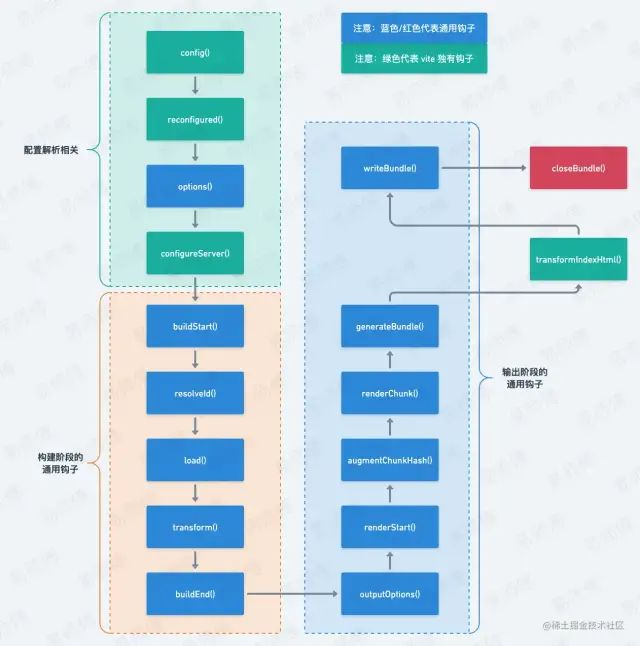
enforce:值可以是pre或post,pre会较于post先执行;apply:值可以是build或serve亦可以是一个函数,指明它们仅在build或serve模式时调用;config(config, env):可以在 vite 被解析之前修改 vite 的相关配置。钩子接收原始用户配置 config 和一个描述配置环境的变量env;configResolved(resolvedConfig):在解析 vite 配置后调用。使用这个钩子读取和存储最终解析的配置。当插件需要根据运行的命令做一些不同的事情时,它很有用。configureServer(server):主要用来配置开发服务器,为 dev-server (connect 应用程序) 添加自定义的中间件;transformIndexHtml(html):转换 index.html 的专用钩子。钩子接收当前的 HTML 字符串和转换上下文;handleHotUpdate(ctx):执行自定义HMR更新,可以通过ws往客户端发送自定义的事件;
2. vite 与 rollup 的通用钩子之构建阶段
options(options):在服务器启动时被调用:获取、操纵Rollup选项,严格意义上来讲,它执行于属于构建阶段之前;buildStart(options):在每次开始构建时调用;resolveId(source, importer, options):在每个传入模块请求时被调用,创建自定义确认函数,可以用来定位第三方依赖;load(id):在每个传入模块请求时被调用,可以自定义加载器,可用来返回自定义的内容;transform(code, id):在每个传入模块请求时被调用,主要是用来转换单个模块;buildEnd():在构建阶段结束后被调用,此处构建结束只是代表所有模块转义完成;
3. vite 与 rollup 的通用钩子之输出阶段
outputOptions(options):接受输出参数;renderStart(outputOptions, inputOptions):每次 bundle.generate 和 bundle.write 调用时都会被触发;augmentChunkHash(chunkInfo):用来给 chunk 增加 hash;renderChunk(code, chunk, options):转译单个的chunk时触发。rollup 输出每一个chunk文件的时候都会调用;generateBundle(options, bundle, isWrite):在调用 bundle.write 之前立即触发这个 hook;writeBundle(options, bundle):在调用 bundle.write后,所有的chunk都写入文件后,最后会调用一次 writeBundle;closeBundle():在服务器关闭时被调用
4. 插件钩子函数 hooks 的执行顺序(如下图)

5. 插件的执行顺序
别名处理Alias 用户插件设置 enforce: 'pre'vite 核心插件 用户插件未设置 enforcevite 构建插件 用户插件设置 enforce: 'post'vite 构建后置插件(minify, manifest, reporting)
手撸一个 vite 插件
下面以 vite 打包进度条 插件为例;

插件地址:github[10] 如果您觉得不错欢迎 star ⭐️
该插件已被 vite 官方收集至官方文档:链接地址[11]
因为文章的重点不在于这个插件的详细实现过程,所以本文只会贴上源代码供大家参考,详细介绍会在下一篇文章中讲解,请大家拭目以待吧!
`inde.ts`
import type { PluginOption } from 'vite';
import colors from 'picocolors';
import progress from 'progress';
import rd from 'rd';
import { isExists, getCacheData, setCacheData } from './cache';

type Omit<T, K extends keyof T> = Pick<T, Exclude<keyof T, K>>;
type Merge<M, N> = Omit<M, Extract<keyof M, keyof N>> & N;

type PluginOptions = Merge<
    ProgressBar.ProgressBarOptions,
    {
        /**
         * total number of ticks to complete
         * @default 100
         */
        total?: number;

        /**
         * The format of the progress bar
         */
        format?: string;
    }
>;

export default function viteProgressBar(options?: PluginOptions): PluginOption {

    const { cacheTransformCount, cacheChunkCount } = getCacheData()

    let bar: progress;
    const stream = options?.stream || process.stderr;
    let outDir: string;
    let transformCount = 0
    let chunkCount = 0
    let transformed = 0
    let fileCount = 0
    let lastPercent = 0
    let percent = 0

    return {
        name: 'vite-plugin-progress',

        enforce: 'pre',

        apply: 'build',

        config(config, { command }) {
            if (command === 'build') {
                config.logLevel = 'silent';
                outDir = config.build?.outDir || 'dist';

                options = {
                    width: 40,
                    complete: '\u2588',
                    incomplete: '\u2591',
                    ...options
                };
                options.total = options?.total || 100;

                const transforming = isExists ? `${colors.magenta('Transforms:')} :transformCur/:transformTotal | ` : ''
                const chunks = isExists ? `${colors.magenta('Chunks:')} :chunkCur/:chunkTotal | ` : ''
                const barText = `${colors.cyan(`[:bar]`)}`

                const barFormat =
                    options.format ||
                    `${colors.green('Bouilding')} ${barText} :percent | ${transforming}${chunks}Time: :elapseds`

                delete options.format;
                bar = new progress(barFormat, options as ProgressBar.ProgressBarOptions);


                // not cache: Loop files in src directory
                if (!isExists) {
                    const readDir = rd.readSync('src');
                    const reg = /\.(vue|ts|js|jsx|tsx|css|scss||sass|styl|less)$/gi;
                    readDir.forEach((item) => reg.test(item) && fileCount++);
                }
            }
        },

        transform(code, id) {
            transformCount++

            // not cache
            if(!isExists) {
                const reg = /node_modules/gi;

                if (!reg.test(id) && percent < 0.25) {
                    transformed++
                    percent = +(transformed / (fileCount * 2)).toFixed(2)
                    percent < 0.8 && (lastPercent = percent)
                  }

                if (percent >= 0.25 && lastPercent <= 0.65) {
                    lastPercent = +(lastPercent + 0.001).toFixed(4)
                }
            }

            // go cache
            if (isExists) runCachedData()

            bar.update(lastPercent, {
                transformTotal: cacheTransformCount,
                transformCur: transformCount,
                chunkTotal: cacheChunkCount,
                chunkCur: 0,
            })

            return {
                code,
                map: null
            };
        },

        renderChunk() {
            chunkCount++

            if (lastPercent <= 0.95)
                isExists ? runCachedData() : (lastPercent = +(lastPercent + 0.005).toFixed(4))

            bar.update(lastPercent, {
                transformTotal: cacheTransformCount,
                transformCur: transformCount,
                chunkTotal: cacheChunkCount,
                chunkCur: chunkCount,
            })

            return null
        },

        closeBundle() {
            // close progress
            bar.update(1)
            bar.terminate()

            // set cache data
            setCacheData({
                cacheTransformCount: transformCount,
                cacheChunkCount: chunkCount,
            })

            // out successful message
            stream.write(
                `${colors.cyan(colors.bold(`Build successful. Please see ${outDir} directory`))}`
            );
            stream.write('\n');
            stream.write('\n');
        }
    };

    /**
     * run cache data of progress
     */
    function runCachedData() {

        if (transformCount === 1) {
            stream.write('\n');

            bar.tick({
                transformTotal: cacheTransformCount,
                transformCur: transformCount,
                chunkTotal: cacheChunkCount,
                chunkCur: 0,
            })
        }

        transformed++
        percent = lastPercent = +(transformed / (cacheTransformCount + cacheChunkCount)).toFixed(2)
    }
}

复制代码
`cache.ts`
import fs from 'fs';
import path from 'path';

const dirPath = path.join(process.cwd(), 'node_modules', '.progress');
const filePath = path.join(dirPath, 'index.json');

export interface ICacheData {
    /**
     * Transform all count
     */
    cacheTransformCount: number;

    /**
     * chunk all count
     */
    cacheChunkCount: number
}

/**
 * It has been cached
 * @return boolean
 */
export const isExists = fs.existsSync(filePath) || false;

/**
 * Get cached data
 * @returns ICacheData
 */
export const getCacheData = (): ICacheData => {
    if (!isExists) return {
        cacheTransformCount: 0,
        cacheChunkCount: 0
    };

    return JSON.parse(fs.readFileSync(filePath, 'utf8'));
};

/**
 * Set the data to be cached
 * @returns
 */
export const setCacheData = (data: ICacheData) => {
    !isExists && fs.mkdirSync(dirPath);
    fs.writeFileSync(filePath, JSON.stringify(data));
};

复制代码
最后
该系列会是一个持续更新系列,关于整个《Vite 从入门到精通》专栏[12],我主要会从如下图几个方面讲解,请大家拭目以待吧!!!

宝贝们,都看到这里了,要不点个赞呗 👍
关于本文
来自:易师傅
https://juejin.cn/post/7103165205483356168
