如何实现登录、URL 和页面按钮的访问控制
来源:社会主义接班人
cnblogs.com/5ishare/p/10461073.html
一、引入依赖
二、增加 Shiro 配置
三、自定义 Realm
四、登录认证
五、Controller 层访问控制
六、前端页面层访问控制
七、小结
用户权限管理一般是对用户页面、按钮的访问权限管理。Shiro 框架是一个强大且易用的 Java 安全框架,执行身份验证、授权、密码和会话管理,对于 Shiro 的介绍这里就不多说。本篇博客主要是了解 Shiro 的基础使用方法,在权限管理系统中集成 Shiro 实现登录、url 和页面按钮的访问控制。
一、引入依赖
使用 SpringBoot 集成 Shiro 时,在 pom.xml 中可以引入 shiro-spring-boot-web-starter。由于使用的是 thymeleaf 框架,thymeleaf 与 Shiro 结合需要 引入 thymeleaf-extras-shiro。
<!-- https://mvnrepository.com/artifact/org.apache.shiro/shiro-spring-boot-web-starter -->
        <dependency>
            <groupId>org.apache.shiro</groupId>
            <artifactId>shiro-spring-boot-web-starter</artifactId>
            <version>1.4.0</version>
        </dependency>
        <!-- https://mvnrepository.com/artifact/com.github.theborakompanioni/thymeleaf-extras-shiro -->
        <dependency>
            <groupId>com.github.theborakompanioni</groupId>
            <artifactId>thymeleaf-extras-shiro</artifactId>
            <version>2.0.0</version>
        </dependency>
二、增加 Shiro 配置
有哪些 url 是需要拦截的,哪些是不需要拦截的,登录页面、登录成功页面的 url、自定义的 Realm 等这些信息需要设置到 Shiro 中,所以创建 Configuration 文件 ShiroConfig。
package com.example.config;


import org.apache.shiro.mgt.SecurityManager;
import org.apache.shiro.spring.web.ShiroFilterFactoryBean;
import org.apache.shiro.web.mgt.DefaultWebSecurityManager;
import org.springframework.beans.factory.annotation.Qualifier;
import org.springframework.context.annotation.Bean;
import org.springframework.context.annotation.Configuration;

import at.pollux.thymeleaf.shiro.dialect.ShiroDialect;

import java.util.LinkedHashMap;
import java.util.Map;


@Configuration
public class ShiroConfig {
    @Bean("shiroFilterFactoryBean")
    public ShiroFilterFactoryBean shiroFilterFactoryBean(SecurityManager securityManager) {
        System.out.println("ShiroConfiguration.shirFilter()");
        ShiroFilterFactoryBean shiroFilterFactoryBean = new ShiroFilterFactoryBean();
        shiroFilterFactoryBean.setSecurityManager(securityManager);
        //拦截器.
        Map<String,String> filterChainDefinitionMap = new LinkedHashMap<String,String>();
        // 配置不会被拦截的链接 顺序判断
        filterChainDefinitionMap.put("/static/**", "anon");
        //配置退出 过滤器,其中的具体的退出代码Shiro已经替我们实现了
        filterChainDefinitionMap.put("/logout", "logout");
        //<!-- 过滤链定义,从上向下顺序执行,一般将/**放在最为下边 -->:这是一个坑呢,一不小心代码就不好使了;
        //<!-- authc:所有url都必须认证通过才可以访问; anon:所有url都都可以匿名访问-->
        filterChainDefinitionMap.put("/**", "authc");
        // 如果不设置默认会自动寻找Web工程根目录下的"/login.jsp"页面
        shiroFilterFactoryBean.setLoginUrl("/login");
        // 登录成功后要跳转的链接
        shiroFilterFactoryBean.setSuccessUrl("/index");

        //未授权界面;
        shiroFilterFactoryBean.setUnauthorizedUrl("/403");
        shiroFilterFactoryBean.setFilterChainDefinitionMap(filterChainDefinitionMap);
        return shiroFilterFactoryBean;
    }

    @Bean()    //创建DefaultWebSecurityManager
    public DefaultWebSecurityManager getDefaultWebSecurityManager(@Qualifier("userRealm")MyShiroRealm userRealm){
        DefaultWebSecurityManager defaultWebSecurityManager = new DefaultWebSecurityManager();
        defaultWebSecurityManager.setRealm(userRealm);
        return defaultWebSecurityManager;

    }
    //创建Realm
    @Bean()
    public MyShiroRealm getUserRealm(){
        return new MyShiroRealm();

    }

    @Bean
    public ShiroDialect shiroDialect() {
        return new ShiroDialect();
    }
}
ShiroDialect 这个 bean 对象是在 thymeleaf 与 Shiro 结合,前端 html 访问 Shiro 时使用。
三、自定义 Realm
在自定义的 Realm 中继承了 AuthorizingRealm 抽象类,重写了两个方法:doGetAuthorizationInfo 和 doGetAuthenticationInfo。doGetAuthorizationInfo 主要是用来处理权限配置,doGetAuthenticationInfo 主要处理身份认证。
这里在 doGetAuthorizationInfo 中,将 role 表的 id 和 permission 表的 code 分别设置到 SimpleAuthorizationInfo 对象中的 role 和 permission 中。
还有一个地方需要注意:@Component("authorizer"),刚开始我没设置,但报错提示需要一个 authorizer 的 bean,查看 AuthorizingRealm 可以发现它 implements 了 Authorizer,所以在自定义的 realm 上添加 @Component("authorizer") 就可以了。
package com.example.config;
import org.apache.shiro.authc.AuthenticationException;
import org.apache.shiro.authc.AuthenticationInfo;
import org.apache.shiro.authc.AuthenticationToken;
import org.apache.shiro.authc.SimpleAuthenticationInfo;
import org.apache.shiro.authz.AuthorizationInfo;
import org.apache.shiro.authz.SimpleAuthorizationInfo;
import org.apache.shiro.realm.AuthorizingRealm;
import org.apache.shiro.subject.PrincipalCollection;
import org.springframework.beans.factory.annotation.Autowired;
import org.springframework.stereotype.Component;
import com.example.pojo.Permission;
import com.example.pojo.Role;
import com.example.pojo.User;
import com.example.service.RoleService;
import com.example.service.UserService;

@Component("authorizer")
public class MyShiroRealm extends AuthorizingRealm {

    @Autowired
    private UserService userService;

    @Autowired
    private RoleService roleService;

    @Override
    protected AuthorizationInfo doGetAuthorizationInfo(PrincipalCollection principals) {
        System.out.println("权限配置-->MyShiroRealm.doGetAuthorizationInfo()");
        SimpleAuthorizationInfo authorizationInfo = new SimpleAuthorizationInfo();
        User user  = (User)principals.getPrimaryPrincipal();
        System.out.println("User:"+user.toString()+" roles count:"+user.getRoles().size());
        for(Role role:user.getRoles()){
            authorizationInfo.addRole(role.getId());
            role=roleService.getRoleById(role.getId());
            System.out.println("Role:"+role.toString());
            for(Permission p:role.getPermissions()){
                System.out.println("Permission:"+p.toString());
                authorizationInfo.addStringPermission(p.getCode());
            }
        }
        System.out.println("权限配置-->authorizationInfo"+authorizationInfo.toString());
        return authorizationInfo;
    }

    /*主要是用来进行身份认证的,也就是说验证用户输入的账号和密码是否正确。*/
    @Override
    protected AuthenticationInfo doGetAuthenticationInfo(AuthenticationToken token)
            throws AuthenticationException {
        System.out.println("MyShiroRealm.doGetAuthenticationInfo()");
        //获取用户的输入的账号.
        String username = (String)token.getPrincipal();
        System.out.println(token.getCredentials());
        //通过username从数据库中查找 User对象,如果找到,没找到.
        //实际项目中,这里可以根据实际情况做缓存,如果不做,Shiro自己也是有时间间隔机制,2分钟内不会重复执行该方法
        User user = userService.getUserById(username);
        System.out.println("----->>userInfo="+user);
        if(user == null){
            return null;
        }
        SimpleAuthenticationInfo authenticationInfo = new SimpleAuthenticationInfo(
                user, //用户名
                "123456", //密码
                getName()  //realm name
        );
        return authenticationInfo;
    }

}
四、登录认证
登录页面
这里做了一个非常丑的登录页面,主要是自己懒,不想在网上复制粘贴找登录页面了。
<!DOCTYPE html>
<head>
    <meta charset="utf-8">
    <title></title>
    <meta >
    <meta http-equiv="X-UA-Compatible" content="IE=edge,chrome=1">
    <meta >
    <meta >
    <meta >
    <meta >
</head>

<form action="/login" method="post">
      <label>用户名:</label><input type="text"  ><br>
      <label >密码:</label><input type="text"  ><br>
      <button type="submit">登录</button><button type="reset">取消</button>
</form>
</body>
</html>
处理登录请求
在 LoginController 中通过登录名、密码获取到 token 实现登录。
package com.example.controller;
import org.apache.shiro.SecurityUtils;
import org.apache.shiro.authc.IncorrectCredentialsException;
import org.apache.shiro.authc.UnknownAccountException;
import org.apache.shiro.authc.UsernamePasswordToken;
import org.apache.shiro.subject.Subject;
import org.springframework.stereotype.Controller;
import org.springframework.ui.Model;
import org.springframework.web.bind.annotation.RequestMapping;
import org.springframework.web.bind.annotation.RequestMethod;

@Controller
public class LoginController {

    //退出的时候是get请求,主要是用于退出
    @RequestMapping(value = "/login",method = RequestMethod.GET)
    public String login(){
        return "login";
    }

    //post登录
    @RequestMapping(value = "/login",method = RequestMethod.POST)
    public String login(Model model,String id,String pwd){
        //添加用户认证信息
        Subject subject = SecurityUtils.getSubject();
        UsernamePasswordToken usernamePasswordToken = new UsernamePasswordToken(
                id,
                "123456");
        try {
                subject.login(usernamePasswordToken);
                return "home";
            }
        catch (UnknownAccountException e) {
            //用户名不存在
            model.addAttribute("msg","用户名不存在");
            return "login";
            }catch (IncorrectCredentialsException e) {
                //密码错误
                model.addAttribute("msg","密码错误");
                return "login";
                }

    }
    @RequestMapping(value = "/index")
    public String index(){
        return "home";
    }

}
五、Controller 层访问控制
首先来数据库的数据,两张图是用户角色、和角色权限的数据。


设置权限
这里在用户页面点击编辑按钮时设置需要有 id=002 的角色,在点击选择角色按钮时需要有 code=002 的权限。
@RequestMapping(value = "/edit",method = RequestMethod.GET)
    @RequiresRoles("002")//权限管理;
    public String editGet(Model model,@RequestParam(value="id") String id) {
        model.addAttribute("id", id);
        return "/user/edit";
    }
@RequestMapping(value = "/selrole",method = RequestMethod.GET)
    @RequiresPermissions("002")//权限管理;
    public String selctRole(Model model,@RequestParam("id") String id,@RequestParam("type") Integer type) {
        model.addAttribute("id",id);
        model.addAttribute("type", type);
        return "/user/selrole";
    }
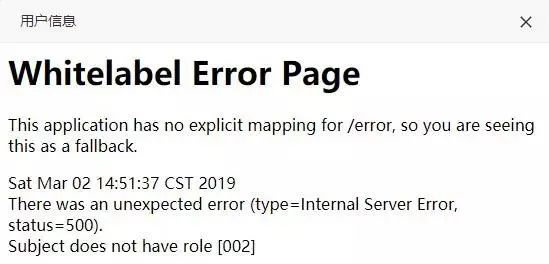
当使用用户 001 登录时,点击编辑,弹出框如下,提示没有 002 的角色

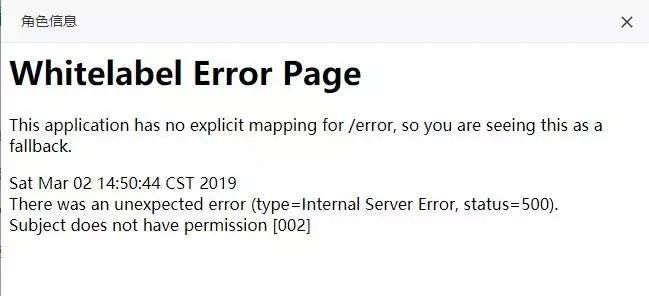
点击选择角色按钮时提示没有 002 的权限。

当使用用户 002 登录时,点击编辑按钮,显示正常,点击选择角色也是提示没 002 的权限,因为权限只有 001。
六、前端页面层访问控制
有时为了不想像上面那样弹出错误页面,需要在按钮显示上进行不可见,这样用户也不会点击到。前面已经引入了依赖并配置了 bean,这里测试下在 html 中使用 shiro。
首先设置 html 标签引入 shiro
<html xmlns:th="http://www.thymeleaf.org"
      xmlns:shiro="http://www.pollix.at/thymeleaf/shiro">
控制按钮可见
这里使用 shiro:hasAnyRoles="002,003" 判断用户角色是否是 002 或 003,是则显示不是则不显示。
    <div class="layui-inline">
        <a shiro:hasAnyRoles="002,003" class="layui-btn layui-btn-normal newsAdd_btn" onclick="addUser('')">添加用户</a>
    </div>
    <div class="layui-inline">
        <a shiro:hasAnyRoles="002,003" class="layui-btn layui-btn-danger batchDel" onclick="getDatas();">批量删除</a>
    </div>
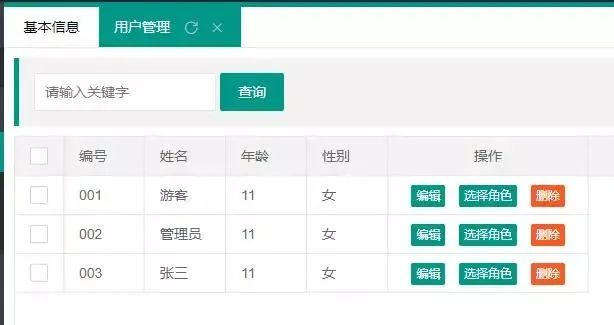
当 001 用户登录时,添加用户、批量删除按钮都不显示,只显示查询按钮。

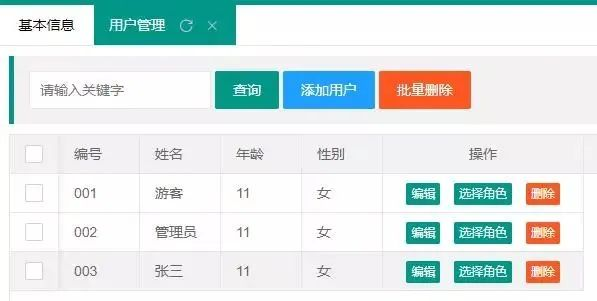
当 002 用户登录时,添加用户、批量删除按钮都显示

七、小结
这里只是实现了 Shiro 的简单的功能,Shiro 还有很多很强大的功能,比如 session 管理等,而且目前权限管理模块还有很多需要优化的功能,左侧导航栏的动态加载和权限控制、Shiro 与 Redis 结合实现 session 共享、Shiro 与 Cas 结合实现单点登录等。后续可以把项目做为开源项目,慢慢完善集成更多模块例如:Swagger2、Redis、Druid、RabbitMQ 等供初学者参考。
怎么接私活?这个渠道你100%有用!请收藏!
喜欢文章,点个在看

