Spring Cloud OAuth2实现Resource Server中API鉴权
点击上方蓝色字体,选择“标星公众号”
优质文章,第一时间送达
本文是在《Spring Cloud OAuth2实现用户认证中心学习笔记》的基础上扩展的,本文的代码也是与其代码配套使用。
1、在上文的AuthenticationServer项目中增加UserDetailsController用于获取当前用户信息
1、在SpringCloudOAuth2Server项目中创建一个包com.wongoing.oauth2.controller
2、在com.wongoing.oauth2.controller包下创建一个类UserDetailsController.java,代码如下:
package com.wongoing.oauth2.controller;

import java.security.Principal;

import org.springframework.web.bind.annotation.RequestMapping;
import org.springframework.web.bind.annotation.RequestMethod;
import org.springframework.web.bind.annotation.RestController;

/**
 * 功能说明:用户信息API
 * 修改说明:
 * @author zheng
 * @date 2021-1-22 15:18:20
 * @version 0.1
 */
@RestController
@RequestMapping("/users")
public class UserDetailsController {
 /**
  * 功能说明:获取当前用户信息
  * 修改说明:
  * @author zheng
  * @date 2021-1-22 15:18:04
  * @param principal
  * @return
  */
 @RequestMapping(value = "/current", method = RequestMethod.GET)
 public Principal getUser(Principal principal) {
  return principal;
 }
}
2、为上文的AuthenticationServer项目启动类增加@EnableResourceServer注解
因为上面/users/current也相当于一个资源,要走认证中心则需要把当前项目也配置为Resource Server。
启动类是com.wongoing.SpringCloudOAuth2ServerApplication.java,增加@EnableResourceServer注解后代码如下:
package com.wongoing;

import org.springframework.boot.SpringApplication;
import org.springframework.boot.autoconfigure.SpringBootApplication;
import org.springframework.security.oauth2.config.annotation.web.configuration.EnableResourceServer;

@SpringBootApplication
@EnableResourceServer
public class SpringCloudOAuth2ServerApplication {

 public static void main(String[] args) {
  SpringApplication.run(SpringCloudOAuth2ServerApplication.class, args);
 }

}
3、创建Resource Server工程
1、在Spring Tool Suite4中点击File->New->Spring Starter Project,如下图: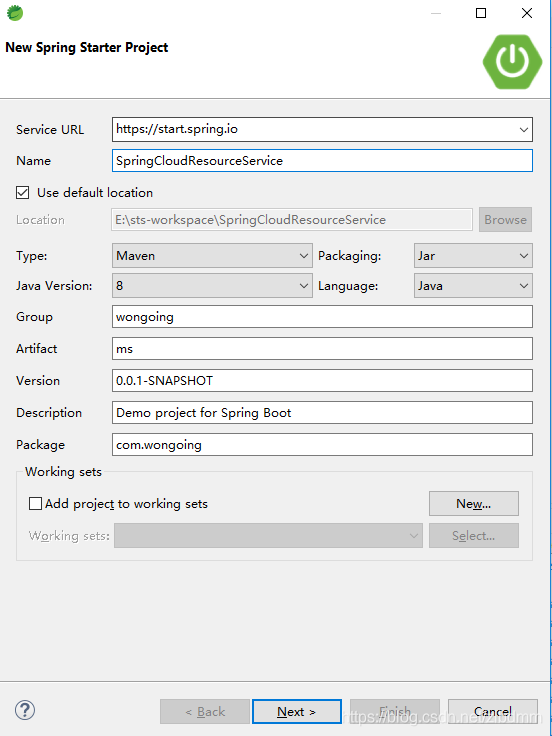
Name输入SpringCloudResourceService
Group输入wongoing
Artifact输入ms
Package输入com.wongoing
2、点击"Next"按钮,如下图: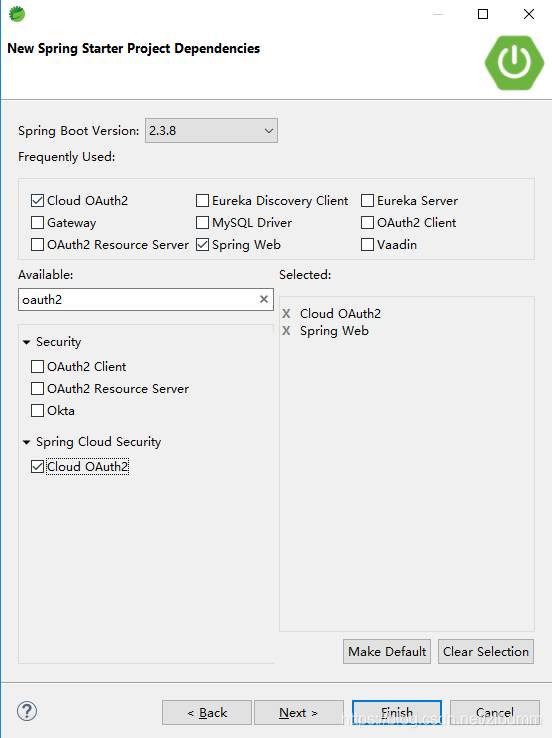
这里选择了Cloud OAuth2和Spring Web。
3、点击“Finish"按钮完成项目创建,创建完毕后pom.xml内容如下:
"1.0" encoding="UTF-8"?>
"http://maven.apache.org/POM/4.0.0" xmlns:xsi="http://www.w3.org/2001/XMLSchema-instance"
 xsi:schemaLocation="http://maven.apache.org/POM/4.0.0 https://maven.apache.org/xsd/maven-4.0.0.xsd">
 4.0.0

  org.springframework.boot
  spring-boot-starter-parent
  2.3.8.RELEASE


 wongoing
 ms
 0.0.1-SNAPSHOT
 SpringCloudResourceService
 Demo project for Spring Boot

  1.8
  Hoxton.SR9


   org.springframework.boot
   spring-boot-starter-web


   org.springframework.cloud
   spring-cloud-starter-oauth2


   org.springframework.boot
   spring-boot-starter-test
   test


     org.junit.vintage
     junit-vintage-engine


    org.springframework.cloud
    spring-cloud-dependencies
    ${spring-cloud.version}
    <type>pomtype>
    import


    org.springframework.boot
    spring-boot-maven-plugin
4、修改spring配置
对项目中的application.properties文件进行重命名为application.yml,配置的内容如下:
server:
  port: 9001

spring:
  application:
    name: resource-service

security:
  oauth2:
    resource:
      user-info-uri: http://localhost:8080/users/current
5、创建需要鉴权访问的API接口(Resource)
1、在当前项目中创建一个包com.wongoing.controller
2、在com.wongoing.controller包下创建一个控制器类TestController.java,代码如下:
package com.wongoing.controller;

import org.springframework.beans.factory.annotation.Value;
import org.springframework.web.bind.annotation.GetMapping;
import org.springframework.web.bind.annotation.RequestMapping;
import org.springframework.web.bind.annotation.RestController;

@RestController
@RequestMapping("/test")
public class TestController {

 @Value("${server.port}")
 private String port;

 @GetMapping("/serverport")
 public String getPort() {
  return "当前服务器端口:" + this.port;
 }

 @RequestMapping("/1")
 public String test1() {
  return "这是测试接口1";
 }

 @RequestMapping("/2")
 public String test2() {
  return "这是测试接口2";
 }
}
上面的控制器类定义了3个API接口,我们想实现ADMIN角色的用户可以访问所有这3个接口,USER角色的用户只能访问第一个接口。
6、实现ResourceServer
1、在项目中创建一个包com.wongoing.oauth2.config
6.1 自定义路径拦截处理类实现FilterInvocationSecurityMetadataSource接口
我这里用的类名是com.wongoing.oauth2.config.TheFilterSecurityMetadataSource.java,代码如下:
package com.wongoing.oauth2.config;

import java.util.ArrayList;
import java.util.Arrays;
import java.util.Collection;
import java.util.Collections;
import java.util.HashMap;
import java.util.List;
import java.util.Map;

import org.springframework.security.access.ConfigAttribute;
import org.springframework.security.access.SecurityConfig;
import org.springframework.security.web.FilterInvocation;
import org.springframework.security.web.access.intercept.FilterInvocationSecurityMetadataSource;
import org.springframework.security.web.util.matcher.AntPathRequestMatcher;
import org.springframework.stereotype.Component;

/**
 * 功能说明:路径拦截处理类
 * 修改说明:
 * @author zheng
 * @date 2021-1-22 9:52:27
 * @version 0.1
 */
@Component
public class TheFilterSecurityMetadataSource implements FilterInvocationSecurityMetadataSource {

 //定义角色的权限列表,实际应该从数据库取,这里为了简化程序先写死
 private Map> rolePermissions = new HashMap>() {{
  put("ADMIN", new ArrayList() {{ add("/test/serverport"); add("/test/1"); add("/test/2");}});  //ADMIN角色有3个API的访问权限
  put("USER", new ArrayList() {{ add("/test/serverport"); }});          //USER只有/test/serverport这1个API的访问权限
 }};


 @Override
 public Collection getAttributes(Object object) throws IllegalArgumentException {
  FilterInvocation fi = (FilterInvocation)object;  //当前请求对象
  if (this.isMatcherAllowedRequest(fi)) {
   return null;  //return null 表示允许访问,不做拦截
  }
  List configAttributes = this.getMatcherConfigAttribute(fi.getRequestUrl());
  return configAttributes.size() > 0 ? configAttributes : this.deniedRequest();  //返回当前路径所需角色,如果没有则拒绝访问
 }

 @Override
 public Collection getAllConfigAttributes() {
  // TODO Auto-generated method stub
  return null;
 }

 @Override
 public boolean supports(Class clazz) {
  // TODO Auto-generated method stub
  return FilterInvocation.class.isAssignableFrom(clazz);
 }

 /**
  * 功能说明:获取当前路径所需要的角色
  * 修改说明:
  * @author zheng
  * @date 2021-1-22 10:02:55
  * @param url 当前路径
  * @return 所需角色集合
  */
 private List getMatcherConfigAttribute(String url) {

  List roles = new ArrayList();
  for (String role : this.rolePermissions.keySet()) {
   List uriList = this.rolePermissions.get(role);
   for (String uri : uriList) {
    if (url.contains(uri)) {
     roles.add(new SecurityConfig(role));
     break;
    }
   }
  }

  return roles;
 }

 /**
  * 功能说明:判断当前请求是否在允许请求的范围内
  * 修改说明:
  * @author zheng
  * @date 2021-1-22 10:12:16
  * @param fi 当前请求
  * @return 是否再范围中
  */
 private boolean isMatcherAllowedRequest(FilterInvocation fi) {
  boolean result = this.allowedRequest().stream().map(AntPathRequestMatcher::new)
        .filter(requestMatcher -> requestMatcher.matches(fi.getHttpRequest()))
        .toArray().length > 0;
  return result;
 }

 /**
  * 功能说明:定义允许请求的列表
  * 修改说明:
  * @author zheng
  * @date 2021-1-22 10:09:56
  * @return
  */
 public List allowedRequest() {
  return Arrays.asList("/login", "/hello");
 }

 /**
  * 功能说明:默认拒绝访问配置
  * 修改说明:
  * @author zheng
  * @date 2021-1-22 10:09:32
  * @return
  */
 public List deniedRequest() {
  return Collections.singletonList(new SecurityConfig("ROLE_DENIED"));  //默认需要的角色
 }
}
6.2 自定义权限决策处理类实现AccessDecisionManager接口
我这里用的类名是com.wongoing.oauth2.config.TheAccessDecisionManager.java,代码如下:
package com.wongoing.oauth2.config;

import java.util.Collection;
import java.util.List;
import java.util.stream.Collectors;

import org.springframework.security.access.AccessDecisionManager;
import org.springframework.security.access.AccessDeniedException;
import org.springframework.security.access.ConfigAttribute;
import org.springframework.security.authentication.InsufficientAuthenticationException;
import org.springframework.security.core.Authentication;
import org.springframework.security.core.GrantedAuthority;
import org.springframework.stereotype.Component;

/**
 * 功能说明:权限决策处理类
 * 修改说明:
 * @author zheng
 * @date 2021-1-22 9:53:58
 * @version 0.1
 */
@Component
public class TheAccessDecisionManager implements AccessDecisionManager {

 /**
  * 决定
  */
 @Override
 public void decide(Authentication authentication, Object object, Collection configAttributes)
   throws AccessDeniedException, InsufficientAuthenticationException {
  if (authentication == null) {
   throw new AccessDeniedException("permission denied");
  }
  //当前用户拥有的角色集合
  List roleCodes = authentication.getAuthorities().stream().map(GrantedAuthority::getAuthority).collect(Collectors.toList());

  //访问路径所需要的角色集合
  List configRoleCodes = configAttributes.stream().map(ConfigAttribute::getAttribute).collect(Collectors.toList());
  for (String roleCode : roleCodes) {
   if (configRoleCodes.contains(roleCode)) {
    return;
   }
  }
  throw new AccessDeniedException("permission denied");
 }

 @Override
 public boolean supports(ConfigAttribute attribute) {
  // TODO Auto-generated method stub
  return false;
 }

 @Override
 public boolean supports(Class clazz) {
  // TODO Auto-generated method stub
  return false;
 }

}
6.3 定义ResourceServer配置类继承ResourceServerConfigurerAdapter
我这里的类名是com.wongoing.oauth2.config.ResourceServerConfig.java,代码如下:
package com.wongoing.oauth2.config;

import org.springframework.beans.factory.annotation.Autowired;
import org.springframework.beans.factory.annotation.Qualifier;
import org.springframework.context.annotation.Configuration;
import org.springframework.context.annotation.Primary;
import org.springframework.security.access.AccessDecisionManager;
import org.springframework.security.config.annotation.ObjectPostProcessor;
import org.springframework.security.config.annotation.method.configuration.EnableGlobalMethodSecurity;
import org.springframework.security.config.annotation.web.builders.HttpSecurity;
import org.springframework.security.oauth2.config.annotation.web.configuration.EnableResourceServer;
import org.springframework.security.oauth2.config.annotation.web.configuration.ResourceServerConfigurerAdapter;
import org.springframework.security.oauth2.config.annotation.web.configurers.ResourceServerSecurityConfigurer;
import org.springframework.security.web.access.intercept.FilterInvocationSecurityMetadataSource;
import org.springframework.security.web.access.intercept.FilterSecurityInterceptor;

/**
 * 功能说明:资源服务器配置类
 * 修改说明:
 * @author zheng
 * @date 2021-1-22 9:28:28
 * @version 0.1
 */
@Configuration
@EnableResourceServer
@EnableGlobalMethodSecurity(prePostEnabled = true)
public class ResourceServerConfig extends ResourceServerConfigurerAdapter {

 @Autowired
 private AccessDecisionManager accessDecisionManager;

 @Autowired
 private FilterInvocationSecurityMetadataSource filterSecurityMetadataSource;


 @Override
 public void configure(HttpSecurity http) throws Exception {
  http.formLogin().loginPage("/login").defaultSuccessUrl("/", true)
   .and()
   .exceptionHandling().accessDeniedPage("/error")
   .and()
   .csrf().disable()
   .authorizeRequests()
   // 对用户注册的URL地址开放
   .antMatchers("/users/register").permitAll()
   //其余接口没有角色限制,但需要经过认证,只要携带token就可以方形
   .anyRequest()
   .authenticated()
   .withObjectPostProcessor(new ObjectPostProcessor() {

    @Override
    public  O postProcess(O object) {
     object.setAccessDecisionManager(accessDecisionManager);   //权限决策处理类
     object.setSecurityMetadataSource(filterSecurityMetadataSource); //路径(资源)拦截处理
     return object;
    }

   });
 }
}
7、API鉴权测试
根据《Spring Cloud OAuth2实现用户认证中心学习笔记》中的UserDetailsServiceBean.java中代码可以看出我这里模拟数据库中有2个用户分别是admin和zheng,其中admin的角色是ADMIN,zheng的角色是USER。
/**
 * 功能说明:通过@PostConstruct定义Bean初始化方法
 * 修改说明:
 * @author zheng
 * @date 2021-1-19 16:39:55
 */
@PostConstruct
public void init() {
 //生成测试数据
 this.users = new HashMap() {{
  put("admin", new User(1L, "admin", passwordEncoder.encode("456"), new ArrayList() {{ add(new Role(1L, "ADMIN")); }}));
  put("zheng", new User(2L, "zheng", passwordEncoder.encode("789"), new ArrayList() {{ add(new Role(2L, "USER")); }}));
 }};
}
7.1 测试ADMIN角色的权限
1、先在postman中通过以下访问路径获取admin用户的access_token
http://localhost:8080/oauth/token?grant_type=password&client_id=webApp&client_secret=123&username=admin&password=456
如下图: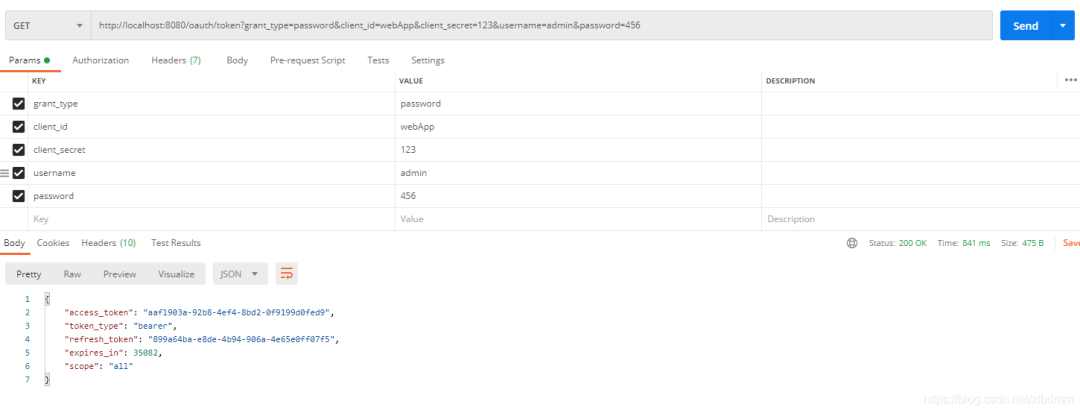
这里获得的admin用户的access_token的值是
aaf1903a-92b8-4ef4-8bd2-0f9199d0fed9
2、使用上面的access_token在postman中测试第1个接口/test/serverport
测试地址如下:
http://localhost:9001/test/serverport?access_token=aaf1903a-92b8-4ef4-8bd2-0f9199d0fed9
如下图: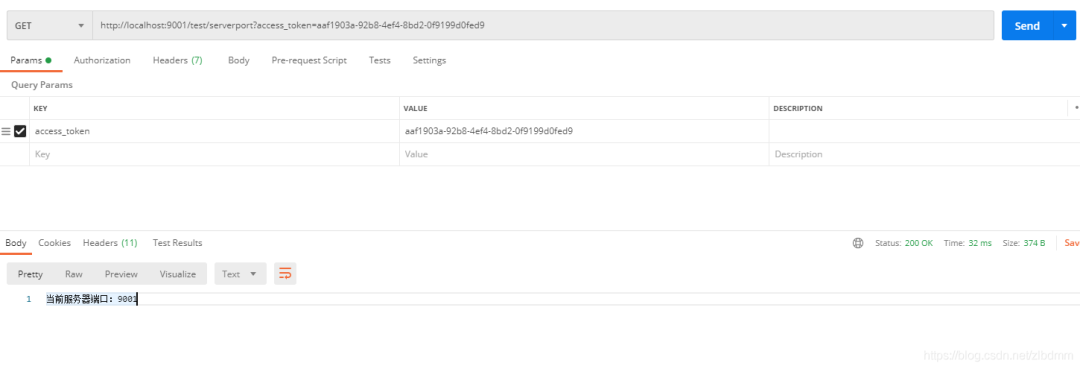
可以看到admin获得的access_token访问这个接口是成功的。
3、使用上面的access_token在postman中测试第2个接口/test/1
测试地址如下:
http://localhost:9001/test/1?access_token=aaf1903a-92b8-4ef4-8bd2-0f9199d0fed9
结果如下图: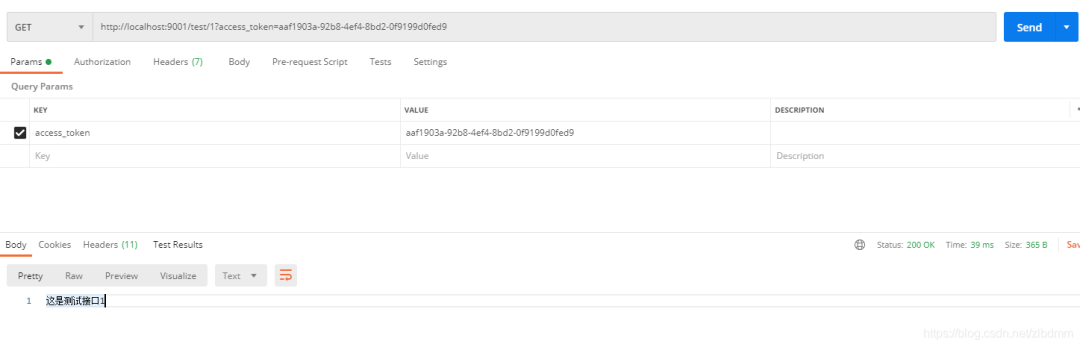
可以看到admin获得的access_token访问这个接口也是成功的。
4、使用上面的access_token在postman中测试第3个接口/test/2
测试地址如下:
http://localhost:9001/test/2?access_token=aaf1903a-92b8-4ef4-8bd2-0f9199d0fed9
结果如下图: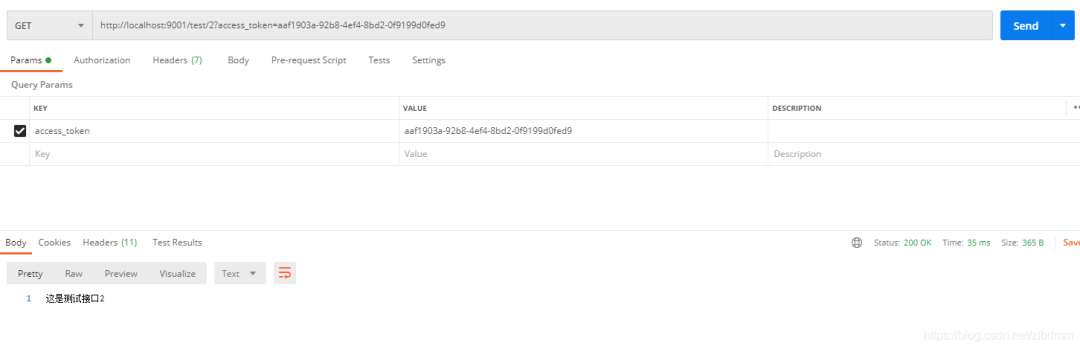
可以看到admin获得的access_token访问这个3接口都是成功的。
7.2 测试USER角色的权限
1、先在postman中通过以下访问路径获取zheng用户的access_token
http://localhost:8080/oauth/token?grant_type=password&client_id=webApp&client_secret=123&username=zheng&password=789
如下图:
这里获得的zheng用户的access_token的值是
bea23144-1ddd-4bcd-8ffe-e4b71a9d791c
2、使用上面的access_token在postman中测试第1个接口/test/serverport
测试地址如下:
http://localhost:9001/test/serverport?access_token=bea23144-1ddd-4bcd-8ffe-e4b71a9d791c
如下图: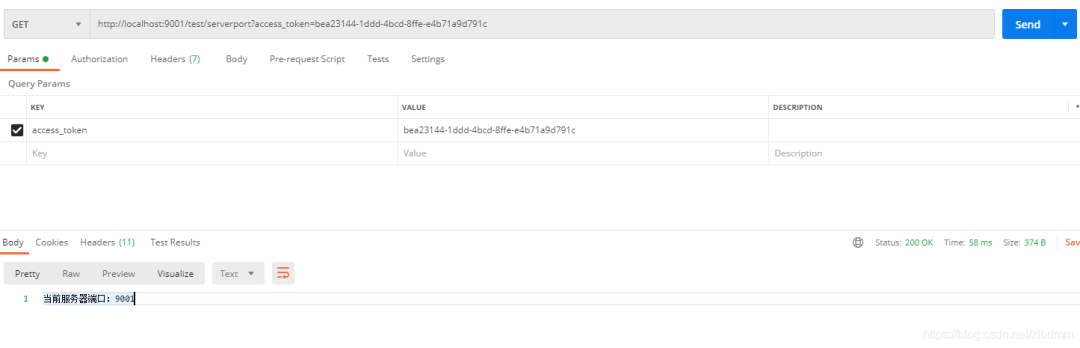
可以看到zheng获得的access_token访问这个接口是成功的。
3、使用上面的access_token在postman中测试第2个接口/test/1
测试地址如下:
http://localhost:9001/test/1?access_token=bea23144-1ddd-4bcd-8ffe-e4b71a9d791c
结果如下图: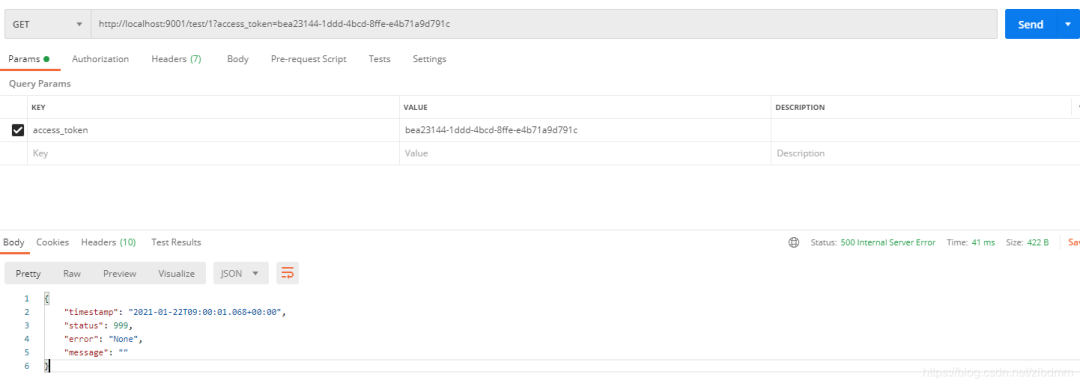
可以看到zheng获得的access_token访问这个接口是失败的,说明权限不够。
4、使用上面的access_token在postman中测试第3个接口/test/2
测试地址如下:
http://localhost:9001/test/2?access_token=bea23144-1ddd-4bcd-8ffe-e4b71a9d791c
结果如下图: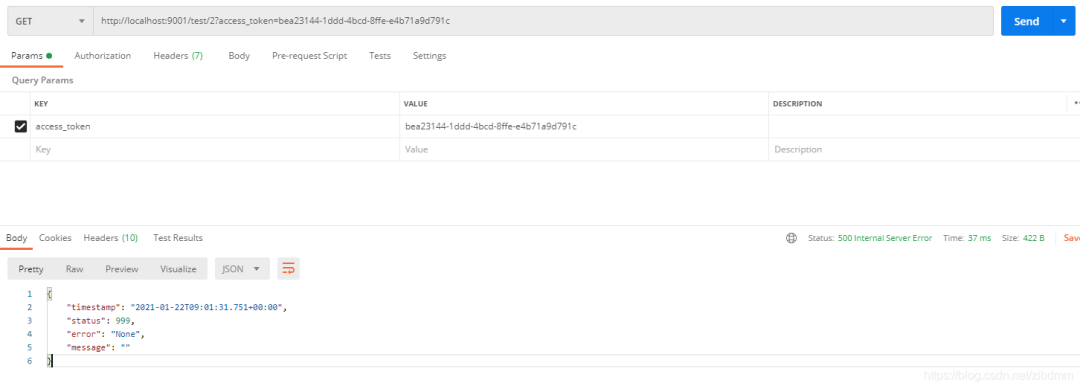
可以看到zheng获得的access_token访问这个接口是失败的,说明权限不够。
8、总结
通过这2篇文章,我们实现了基于Spring Cloud OAuth2的用户认证与API鉴权功能,希望对各位学习的朋友能有所帮助。
《Spring Cloud OAuth2实现用户认证中心学习笔记》
版权声明:本文为博主原创文章,遵循 CC 4.0 BY-SA 版权协议,转载请附上原文出处链接和本声明。
本文链接:
https://blog.csdn.net/zlbdmm/article/details/112985445
锋哥最新SpringCloud分布式电商秒杀课程发布
👇👇👇
👆长按上方微信二维码 2 秒
感谢点赞支持下哈