深入理解 Golang Map
Map 是一种常见的数据结构,通常用于存储无序的键值对。在主流的编程语言中,默认就自带它的实现。
但是, Map 在编程语言内部是如何实现的呢?
同时我们可能还有以下一系列疑问:
如何判断 Map 中是否包含某个 key ?
Map 是如何实现增删改查的?
Map 的扩容时机是什么?扩容策略是什么?
Map 是线程安全的吗?
Map 概述
我们知道 Map 有以下几个基本特点:
Map 是一个无序的 key/value 集合;
Map 中所有的 key 都是不同的;
通过给定的 key ,可以在常数时间复杂度内查找、更新或删除相应的 value。
哈希算法
处理哈希冲突
扩容策略
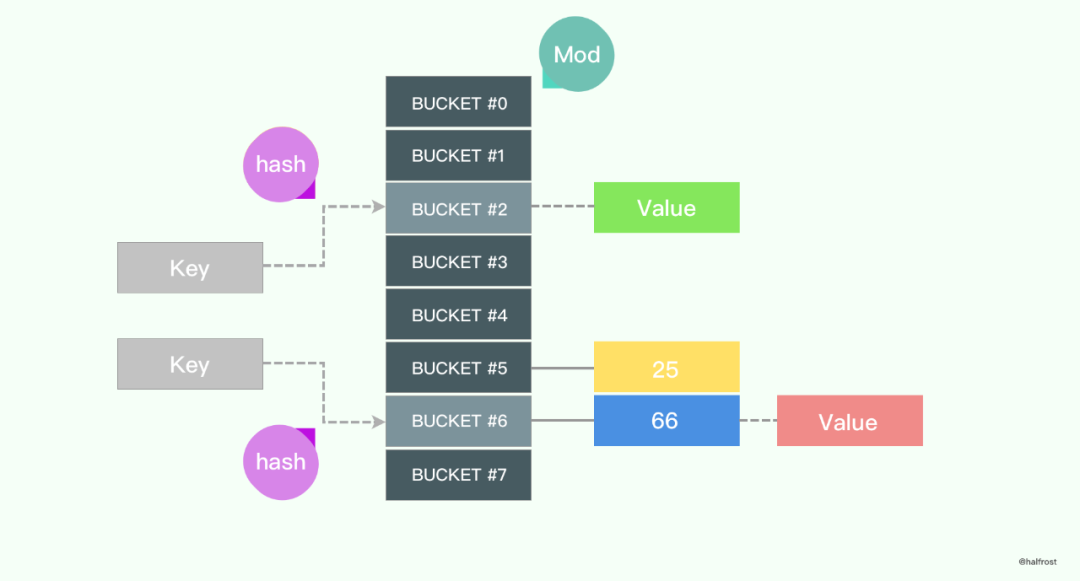
下图是一个典型的通过给定 key 在 Map 中查找 value 的过程:
对于给定的 key,先进行哈希运算得到哈希值,然后按 Map 长度取模,将 key 映射到指定的位置,最后取得相应的 value。

哈希算法
什么是哈希算法?
哈希算法又称 Hash 算法/哈希函数/散列算法,是一种将任意长度的输入数据转换成较小的、固定长度的输出数据(哈希值/散列值)的方法。
哈希算法有以下特点:
如果两个哈希值不同,那么这两个哈希值对应的原始输入肯定不同;
如果两个哈希值相同,那么这两个哈希值对应的原始输入可能相同,也可能不同(这种情况称为"哈希冲突/哈希碰撞/散列碰撞")。
Map 中为什么需要哈希算法?
Map 中使用哈希算法是为了实现快速查找和定位。
常见的哈希算法
下图列举了一些常见的哈希算法。

一些经典的哈希算法:
MD4(RFC 1320) 是 MIT 的 Ronald L. Rivest 在 1990 年设计的。
MD5(RFC 1321) 是 Rivest 于1991年对 MD4 的改进版本。MD5 比 MD4 复杂,速度慢一点,但更安全。
SHA-1(RFC 3174) 是由 NSA(美国国家安全局) 和 NIST(美国国家标准技术研究所)基于 MD4 的原理设计的。
一些现代的哈希算法:
Jenkins hash function 和 SpookyHash
这两种哈希算法都是由 Bob Jenkins 设计的。MurmurHash
MurmurHash 是 Austin Appleby 在2008年发布的一种非加密型哈希算法。
当前的版本是 MurmurHash3,在 Redis、Memcached、Cassandra、HBase、Lucene 等软件中有着广泛应用。CityHash 和 FramHash
CityHash 是 2011年 Google 发布的一种非加密型哈希算法。2014 年 Google 又发布了 FarmHash,它从 CityHash 继承了许多技巧和技术。
xxHash
xxHash 是由 Yann Collet 设计的非加密哈希算法。它最初用于 LZ4 压缩算法,用于检查签名。它被广泛使用在 PrestoDB、RocksDB、MySQL、ArangoDB、PGroonga、Spark 等数据库中,还用在了 Cocos2D、Dolphin、Cxbx-reloaded 等游戏框架中。
下图是不同哈希算法的性能对比,测试环境是 Open-Source SMHasher program by Austin Appleby ,在 Windows 7 上通过 Visual C 编译,只有一个线程,CPU 内核是 Core 2 Duo @3.0GHz。
其中,第一栏是哈希算法名称,第二栏是速度的对比,第三栏是哈希质量。从表中数据看,质量最高、速度最快的是 xxHash。

Golang 使用的哈希算法
Golang 选择哈希算法时,根据 CPU 是否支持 AES 指令集进行判断 ,如果 CPU 支持 AES 指令集,则使用 Aes Hash,否则使用 memhash。
AES Hash
AES 指令集全称是高级加密标准指令集(或称英特尔高级加密标准新指令,简称AES-NI),是一个 x86指令集架构的扩展,用于 Intel 和 AMD 处理器。
利用 AES 指令集实现哈希算法性能很优秀,因为它能提供硬件加速。
查看 CPU 是否支持 AES 指令集:
$ cat /proc/cpuinfo | grep aes
flags           : fpu vme de pse tsc msr pae mce cx8 apic sep mtrr pge mca cmov pat pse36 clflush mmx fxsr sse sse2 ss syscall nx pdpe1gb rdtscp lm constant_tsc rep_good nopl eagerfpu pni pclmulqdq ssse3 fma cx16 pcid sse4_1 sse4_2 x2apic movbe popcnt tsc_deadline_timer aes xsave avx f16c rdrand hypervisor lahf_lm abm 3dnowprefetch fsgsbase bmi1 hle avx2 smep bmi2 erms invpcid rtm rdseed adx smap xsaveopt
相关代码:
runtime/alg.go
asm_amd64.s
asm_arm64.s
memhash
网上没有找到这个哈希算法的作者信息,只在 Golang 的源码中有这几行注释,说它的灵感来源于 xxhash 和 cityhash。
// Hashing algorithm inspired by
//   xxhash: https://code.google.com/p/xxhash/
// cityhash: https://code.google.com/p/cityhash/
相关代码:
runtime/hash64.go
runtime/hash32.go
处理哈希冲突
通常情况下,哈希算法的输入范围一定会远远大于输出范围,所以当输入的 key 足够多时一定会遇到冲突,这时就需要一些方法来解决哈希冲突问题。
最常见的处理哈希冲突方法是链地址法和开放地址法。Golang 及多数编程语言都使用链地址法处理哈希冲突。
链地址法
链地址法是处理哈希冲突最常见的方法,它的实现比开放地址法稍微复杂一些,但平均查找长度较短,用于存储节点的内存是动态申请的,可以节省较多内存。
链地址法一般使用数组加上链表实现,有些语言会引入红黑树以优化性能。

链地址法写入数据
如上图所示,要将一个键值对 (Key6, Value6) 写入哈希表,需要经过两个步骤:
键值对中的键 Key6 先经过 Hash 算法计算,返回的哈希值定位到一个桶,选择桶的方式是对哈希值取模:
index := hash("Key6") % array.len
选择了 2 号桶之后,遍历当前桶中的链表,在遍历链表的过程中会遇到以下两种情况:
1. 找到键相同的键值对,则更新键对应的值;
2. 没有找到键相同的键值对,则在链表的末尾追加新键值对。
链地址法读取数据

如上图所示,查找 Key11 时,需要经过两个步骤:
键 Key11 经过哈希算法计算,返回的哈希值定位到 4 号桶;
遍历 4 号桶中的链表,然而遍历到链表末尾也未找到期望的 Key11,所以 Map 中没有 Key11 对应的值。
开放地址法
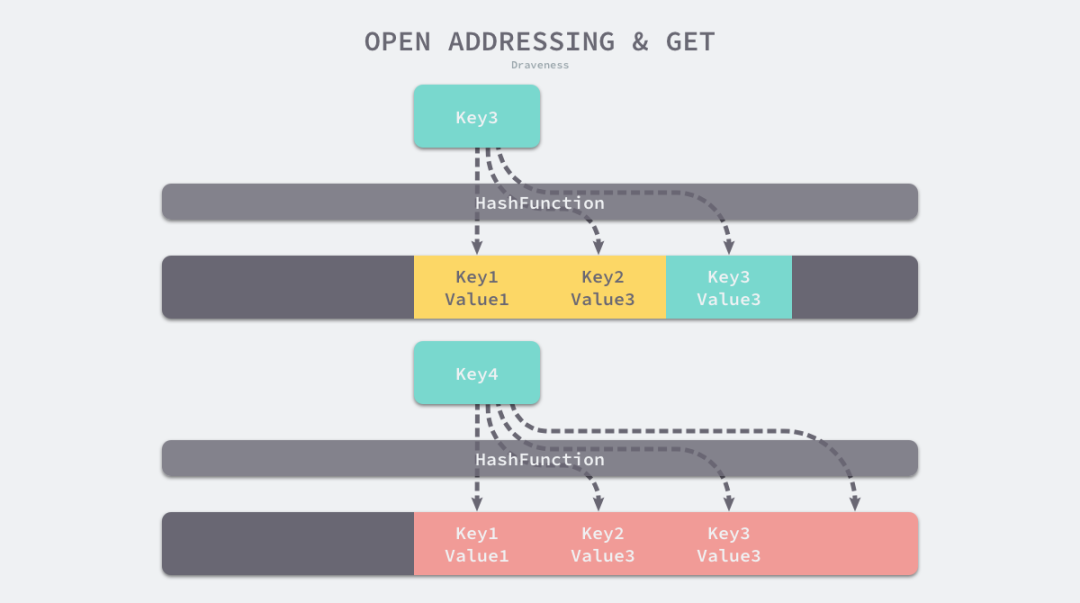
开放地址方法的核心思想是:对数组中的元素依次探测和比较,以判断目标键值对是否存在于 Map 中。
如果我们使用开放地址法来实现哈希表,那么支撑 Map 的数据结构就是数组。不过因为数组的长度有限,存储 (Key3, Value3) 这个键值对时会从如下的索引开始遍历:
index := hash("Key3") % array.len

当我们向当前 Map 写入新数据时发生了冲突,就将键值对写入到下一个不为空的位置。
如上图所示,当 Key3 的索引与已存在的 Key1 和 Key2 发生冲突时,Key3 会被写入 Key2 后面的空闲内存中。

当我们读取 Key3 对应的值时,先对 Key3 进行哈希计算并取模,帮我们找到 Key1,因为 Key1 与我们期望的键 Key3 不匹配,所以会继续查找后面的元素,直到内存为空或者找到目标元素。
开放地址法中对性能影响最大的是装载因子,它是数组中元素的数量与数组大小的比值。
随着装载因子的增加,线性探测的平均用时会逐渐增加,这会影响 Map 的读写性能。当装载率超过 70% 之后,Map 的性能会急剧下降。而一旦装载率达到 100%,查找任意 Key 都需要遍历整个 Map,所以在实现 Map 时要时刻关注装载因子的变化。
扩容策略
随着 Map 中元素的增加,发生哈希冲突的概率会增加,Map 的读写性能也会下降,所以我们需要更多的桶和更大的内存来保证 Map 的读写性能。
在实际应用中,当装载因子超过某个阈值时,会动态地增加 Map 长度,实现自动扩容。
每当 Map 长度发生变化后,所有 key 在 Map 中对应的索引需要重新计算。如果一个一个计算原 Map 中的 key 的索引并插入到新 Map 中,这种一次性扩容方式是达不到生产环境的要求的,因为时间复杂度太高了O(n),在数据量大的情况下性能会很差。
在实际应用中,Map 扩容都是分多次、渐进式地完成,而不是一性次完成扩容。
Golang Map的具体实现
下面我们来探索一下 Golang 是如何实现 Map 的。
Golang Map 的具体实现在 /src/runtime/map.go 文件中。
常量定义
const (
    // 一个桶里最多可以装载的键值对数量:8对
    bucketCntBits = 3
    bucketCnt     = 1 << bucketCntBits

    // 触发扩容操作的装载因子临界值是:13 / 2 = 6.5
    loadFactorNum = 13
    loadFactorDen = 2

    // 为保持内联,key 和 value 的最大长度都是 128 字节,如果超过了 128 字节,就存储它的指针
    maxKeySize  = 128
    maxElemSize = 128

    // 数据偏移
    dataOffset = unsafe.Offsetof(struct {
        b bmap
        v int64
    }{}.v)

    // tophash 的一些特殊值
    emptyRest      = 0 // this cell is empty, and there are no more non-empty cells at higher indexes or overflows.
    emptyOne       = 1 // this cell is empty
    evacuatedX     = 2 // key/elem is valid.  Entry has been evacuated to first half of larger table.
    evacuatedY     = 3 // same as above, but evacuated to second half of larger table.
    evacuatedEmpty = 4 // cell is empty, bucket is evacuated.
    minTopHash     = 5 // minimum tophash for a normal filled cell.

    // 其他标记
    iterator     = 1 // there may be an iterator using buckets
    oldIterator  = 2 // there may be an iterator using oldbuckets
    hashWriting  = 4 // a goroutine is writing to the map
    sameSizeGrow = 8 // the current map growth is to a new map of the same size

    // 迭代检查桶 id 的哨兵
    noCheck = 1<<(8*sys.PtrSize) - 1
)
Golang 触发扩容操作的装载因子临界值 6.5 是怎么得来的?
这个值太大会导致溢出桶(overflow buckets)过多,查找效率降低,过小则会浪费存储空间。
据 Google 开发人员称,这个值是一个测试程序测量出来的一个经验值。

%overflow :溢出率,平均每个桶(bucket)有多少键值对 key/value 时会溢出。
bytes/entry :存储一个键值对 key/value 时, 所需的额外存储空间(字节)。
hitprobe :查找一个存在的 key 时,所需的平均查找次数。
missprobe :查找一个不存在的 key 时,所需的平均查找次数。
经过这几组测试数据,最终选定 6.5 作为临界的装载因子。
map header 定义
// A header for a Go map.
type hmap struct {
    // Note: the format of the hmap is also encoded in cmd/compile/internal/gc/reflect.go.
    // Make sure this stays in sync with the compiler's definition.
    count     int    // map 长度
    flags     uint8
    B         uint8  // log 以 2 为底,桶个数的对数,即最多能存储 6.5 * 2^B 个元素
    noverflow uint16 // 溢出桶个数的近似数
    hash0     uint32 // 哈希种子

    buckets    unsafe.Pointer // 有 2^B 个桶的数组. count=0 时,这个数组为 nil.
    oldbuckets unsafe.Pointer // 旧桶数组
    nevacuate  uintptr        // 扩容迁移过程的计数器

    extra *mapextra // 可选字段
}
在 Golang 的 map header 结构中,包含 2 个指向桶数组的指针,buckets 指向新的桶数组,oldbuckets 指向旧的桶数组。
oldbuckets 在哈希表扩容时用于保存旧桶数据,它的大小是当前 buckets 的一半。
hmap 的最后一个字段是一个指向 mapextra 结构的指针,它的定义如下:
// mapextra holds fields that are not present on all maps.
type mapextra struct {
    // If both key and elem do not contain pointers and are inline, then we mark bucket
    // type as containing no pointers. This avoids scanning such maps.
    // However, bmap.overflow is a pointer. In order to keep overflow buckets
    // alive, we store pointers to all overflow buckets in hmap.extra.overflow and hmap.extra.oldoverflow.
    // overflow and oldoverflow are only used if key and elem do not contain pointers.
    // overflow contains overflow buckets for hmap.buckets.
    // oldoverflow contains overflow buckets for hmap.oldbuckets.
    // The indirection allows to store a pointer to the slice in hiter.
    overflow    *[]*bmap
    oldoverflow *[]*bmap

    // nextOverflow holds a pointer to a free overflow bucket.
    nextOverflow *bmap
}

如上图所示 Map 里的桶就是 bmap,每一个 bmap 能存储 8 个键值对。
当 Map 中存储的数据过多,单个桶装满时就会使用 extra.overflow 中的桶存储溢出的数据。上图中黄色的 bmap 是正常桶,绿色的 bmap 是溢出桶。
桶的结构体 bmap 定义
// A bucket for a Go map.
type bmap struct {
    // tophash generally contains the top byte of the hash value
    // for each key in this bucket. If tophash[0] < minTopHash,
    // tophash[0] is a bucket evacuation state instead.
    tophash [bucketCnt]uint8
    // Followed by bucketCnt keys and then bucketCnt elems.
    // NOTE: packing all the keys together and then all the elems together makes the
    // code a bit more complicated than alternating key/elem/key/elem/... but it allows
    // us to eliminate padding which would be needed for, e.g., map[int64]int8.
    // Followed by an overflow pointer.
}
bmap 结构体其实不止包含 tophash 字段,由于 Map 中可能存储不同类型的键值对,并且 Golang 不支持泛型,所以键值对占据的内存空间大小只能在编译时进行推导,这些额外字段在运行时都是通过计算内存地址的方式直接访问的,所以 bmap 的定义中就没有包含这些额外的字段。
Golang 会在编译期间的 /src/cmd/compile/internal/gc/reflect.go 重建 bmap 的结构:
type bmap struct {
    topbits  [8]uint8
    keys     [8]keytype
    values   [8]valuetype
    pad      uintptr
    overflow uintptr
}
编译期间还会生成 maptype 结构体, 它定义在 runtime/type.go 文件中:
type maptype struct {
    typ    _type
    key    *_type
    elem   *_type
    bucket *_type // internal type representing a hash bucket
    // function for hashing keys (ptr to key, seed) -> hash
    hasher     func(unsafe.Pointer, uintptr) uintptr
    keysize    uint8  // size of key slot
    elemsize   uint8  // size of elem slot
    bucketsize uint16 // size of bucket
    flags      uint32
}
下面我们来看一下整体的 Map 结构图

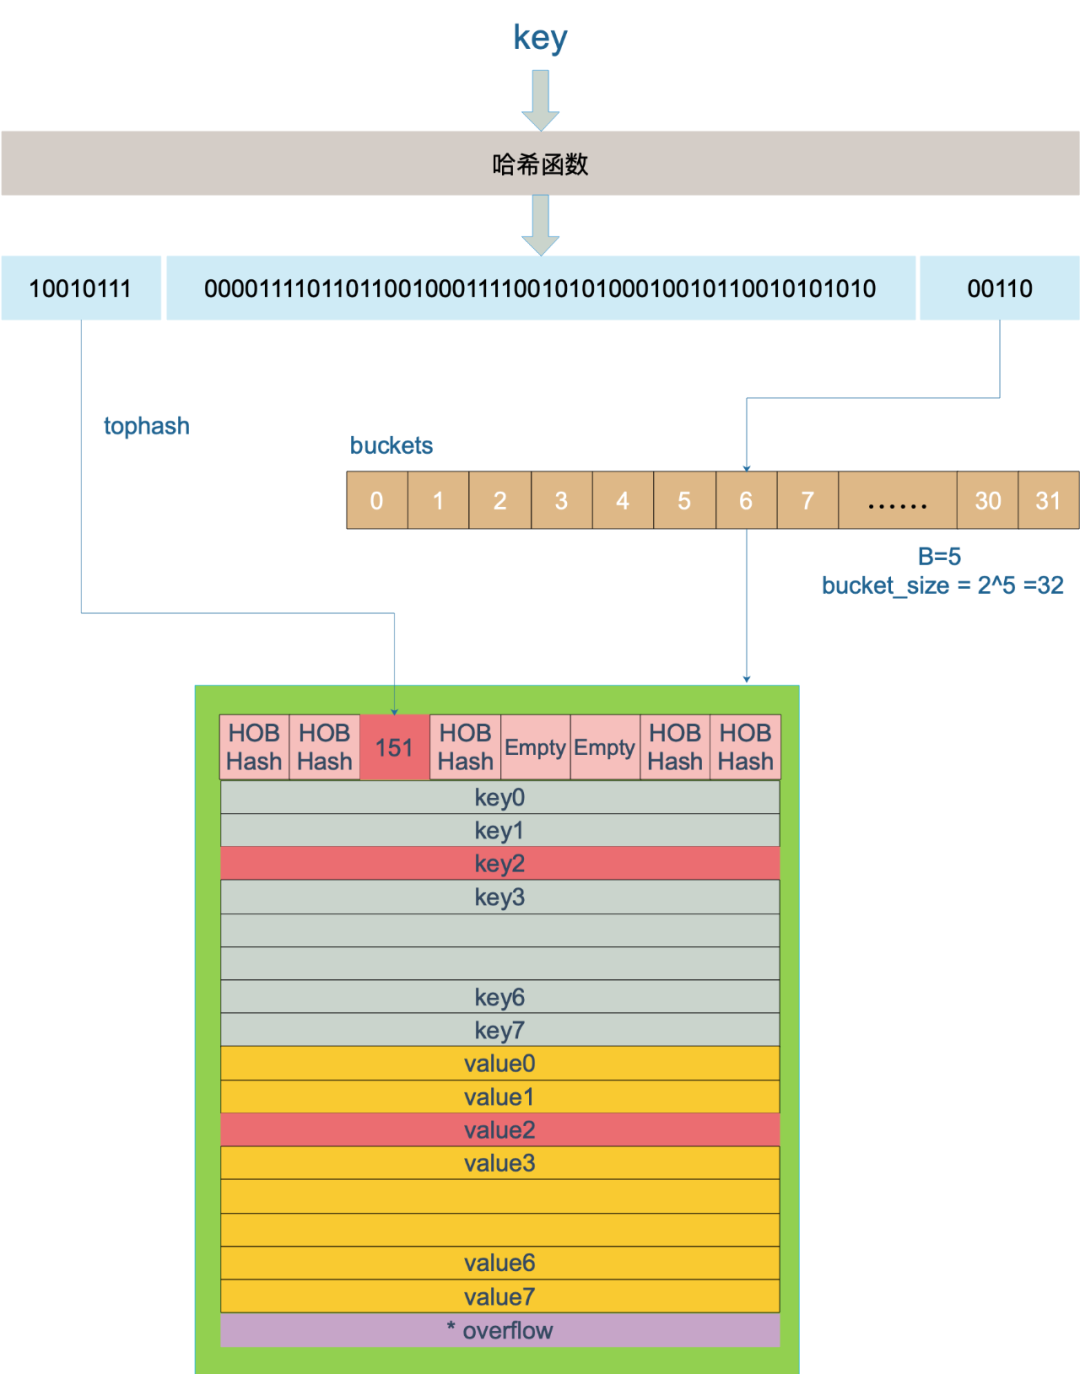
bmap 是存放 key/value 的地方,我们把视角拉近,仔细看看 bmap 的内部组成。

上图是桶的内存模型,HOB Hash 指的是 tophash。注意到 key 和 value 是各自放在一起的,并不是 key/value/key/value/... 这样的形式。
这种形式的好处是在某些情况下可以省略掉 padding 字段,节省内存。
例如,有这样一个类型的 map:
map[int64]int8
如果按照 key/value/key/value/... 这样的形式存储,为了内存对齐,在每一对 key/value 后面都要额外 padding 7 个字节;
而将所有的 key,value 分别绑定到一起,这种形式 key/key/.../value/value/...,则只需要在最后添加 padding。
新建 Map
新建 Map 实际上底层调用的是 makemap 函数,主要工作就是分配内存并初始化 hmap 结构体的各种字段,例如计算 B 的大小,设置哈希种子 hash0 等等。
在 B 不为 0 的情况下,会调用 makeBucketArray 函数初始化桶。
当 B < 4 的时候,初始化 hmap 只会生成 8 个桶,不生成溢出桶,因为数据少几乎不可能用到溢出桶;
当 B >= 4 的时候,会额外创建 2^(B−4) 个溢出桶。
key 经过 Hash 计算后得到 64 位哈希值(64位机器);
用哈希值最后 B 个 bit 位计算它落在哪个桶;
用哈希值高 8 位计算它在桶中的索引位置。
还记得前面提到过的 B 吗?如果 B = 5,那么桶的总数是 2^5 = 32。
例如,现在有一个 key 经过 Hash 计算后,得到的哈希值是:
10010111 | 000011110110110010001111001010100010010110010101010 │ 01010
取最后的 5 个 bit 位,也就是 01010,值为 10,定位到第 10 号桶。这个操作实际上就是取余操作,但是取余开销大,所以代码实现上用位操作代替。
再用哈希值的高 8 位,找到此 key 在当前桶(10号桶)中的索引位置。如果当前桶内还没有 key,新加入的 key 会放入第一个空位。
当两个不同的 key 落在同一个桶中,也就发生了哈希冲突。解决哈希冲突的方式是用链地址法:在当前桶中从前往后找,直到找到到第一个空位。

以上图为例,查找 key 的过程是:
上图假定 B = 5,所以桶总数是 2^5 = 32;
计算出待查找 key 的哈希值;
使用低 5 位 00110,找到对应的 6 号桶;
使用高 8 位 10010111(对应十进制 151),在 6 号桶中寻找 tophash 值(HOB hash)为 151 的 key,找到了 2 号槽位。
如果在当前6号桶中没找到 key,并且溢出桶不为空,则还要继续去溢出桶中寻找,直到找到 key 或者遍历完所有槽位。
源码中查找 key 的函数是 mapaccess 系列函数,我们看看 mapaccess1 函数。
func mapaccess1(t *maptype, h *hmap, key unsafe.Pointer) unsafe.Pointer {
    if raceenabled && h != nil {
        // 获取 caller 的 程序计数器 program counter
        callerpc := getcallerpc()
        // 获取 mapaccess1 的程序计数器 program counter
        pc := funcPC(mapaccess1)
        racereadpc(unsafe.Pointer(h), callerpc, pc)
        raceReadObjectPC(t.key, key, callerpc, pc)
    }
    if msanenabled && h != nil {
        msanread(key, t.key.size)
    }
    // h 为空,返回零值
    if h == nil || h.count == 0 {
        if t.hashMightPanic() {
            t.hasher(key, 0) // see issue 23734
        }
        return unsafe.Pointer(&zeroVal[0])
    }
    // 多线程读写,直接抛出异常
    if h.flags&hashWriting != 0 {
        throw("concurrent map read and map write")
    }
    // 计算 key 的哈希值
    hash := t.hasher(key, uintptr(h.hash0))
    // 低位掩码,hash&m 即可算出 key 在哪个桶
    m := bucketMask(h.B)
    // b 就是桶的地址
    b := (*bmap)(add(h.buckets, (hash&m)*uintptr(t.bucketsize)))
    // oldbuckets 不为 nil,说明发生了扩容
    if c := h.oldbuckets; c != nil {
        // 当前扩容不是等量扩容
        if !h.sameSizeGrow() {
            // 如果 oldbuckets 未迁移完成 则找找 oldbuckets 中对应的 bucket(低 B-1 位)
            // 否则为 buckets 中的 bucket(低 B 位)
            // 把 mask 缩小 1 倍
            // There used to be half as many buckets; mask down one more power of two.
            m >>= 1
        }
        // 计算 key 在旧桶中的位置
        oldb := (*bmap)(add(c, (hash&m)*uintptr(t.bucketsize)))
        // 如果没有迁移到新桶,那就在旧桶中寻找
        if !evacuated(oldb) {
            b = oldb
        }
    }
    // 取出 hash 值的高 8 位
    top := tophash(hash)
bucketloop:
    for ; b != nil; b = b.overflow(t) {
        for i := uintptr(0); i < bucketCnt; i++ {
            // 如果 hash 的高 8 位和当前 key 不同,就找下一个
            // 这样比较很高效,因为只需要比较高 8 位,不用比较所有的 hash 值
            // 如果高 8 位不同,则 hash 值肯定不同;如果高 8 位相同,则要比较整个 hash 值
            if b.tophash[i] != top {
                if b.tophash[i] == emptyRest {
                    break bucketloop
                }
                continue
            }
            // tophash 匹配,定位到 key 的位置
            k := add(unsafe.Pointer(b), dataOffset+i*uintptr(t.keysize))
            if t.indirectkey() {
                k = *((*unsafe.Pointer)(k))
            }
            // key 相等
            if t.key.equal(key, k) {
                // 定位到 value 的位置
                e := add(unsafe.Pointer(b), dataOffset+bucketCnt*uintptr(t.keysize)+i*uintptr(t.elemsize))
                if t.indirectelem() {
                    e = *((*unsafe.Pointer)(e))
                }
                return e
            }
        }
    }
    // 返回零值
    return unsafe.Pointer(&zeroVal[0])
}
这里说一下定位 key 和 value 的方法:
// key 定位公式
k := add(unsafe.Pointer(b), dataOffset+i*uintptr(t.keysize))

// value 定位公式
v := add(unsafe.Pointer(b), dataOffset+bucketCnt*uintptr(t.keysize)+i*uintptr(t.valuesize))
b 是 bmap 的地址,这里 bmap 还是源码里定义的结构体,只包含一个 tophash 数组。dataOffset 是 key 相对于 bmap 起始地址的偏移:
dataOffset = unsafe.Offsetof(struct {
    b bmap
    v int64
}{}.v)
桶里 key 的起始地址是:unsafe.Pointer(b) + dataOffset;
第 i 个 key 的地址就要在此基础上跨过 i 个 key 的大小;
value 的地址是在所有 key 之后,因此第 i 个 value 的地址还需要加上所有 key 的偏移。
插入 Key
插入 key 的过程和查找 key 的过程大体一致。
源码中插入相关的是 mapassign 函数。
// Like mapaccess, but allocates a slot for the key if it is not present in the map.
func mapassign(t *maptype, h *hmap, key unsafe.Pointer) unsafe.Pointer {
    if h == nil {
        panic(plainError("assignment to entry in nil map"))
    }
    if raceenabled {
        // 获取 caller 的 程序计数器 program counter
        callerpc := getcallerpc()
        // 获取 mapassign 的程序计数器 program counter
        pc := funcPC(mapassign)
        racewritepc(unsafe.Pointer(h), callerpc, pc)
        raceReadObjectPC(t.key, key, callerpc, pc)
    }
    if msanenabled {
        msanread(key, t.key.size)
    }
    // 如果多线程读写,直接抛出异常
    if h.flags&hashWriting != 0 {
        throw("concurrent map writes")
    }
    // 计算 key 值的 hash 值
    hash := t.hasher(key, uintptr(h.hash0))

    // Set hashWriting after calling t.hasher, since t.hasher may panic,
    // in which case we have not actually done a write.
    h.flags ^= hashWriting

    // 如果 hmap 的桶的个数为0,那么就新建一个桶
    if h.buckets == nil {
        h.buckets = newobject(t.bucket) // newarray(t.bucket, 1)
    }

again:
    // 计算 key 所在的桶
    bucket := hash & bucketMask(h.B)
    // 如果还在扩容中,继续扩容
    if h.growing() {
        growWork(t, h, bucket)
    }
    // b 就是 bucket 的地址
    b := (*bmap)(unsafe.Pointer(uintptr(h.buckets) + bucket*uintptr(t.bucketsize)))
    // hash 值的高 8 位
    top := tophash(hash)

    var inserti *uint8
    var insertk unsafe.Pointer
    var elem unsafe.Pointer
bucketloop:
    for {
        // 遍历当前桶所有键值,查找 key 对应的 value
        for i := uintptr(0); i < bucketCnt; i++ {
            if b.tophash[i] != top {
                if isEmpty(b.tophash[i]) && inserti == nil {
                    // 如果往后找都没有找到,这里先记录一个标记,方便找不到以后插入到这里
                    inserti = &b.tophash[i]
                    // 计算出偏移 i 个 key 值的位置
                    insertk = add(unsafe.Pointer(b), dataOffset+i*uintptr(t.keysize))
                    // 计算 value 所在的位置,当前桶的首地址 + 8个 key 值所占的大小 + i 个 value 值所占的大小
                    elem = add(unsafe.Pointer(b), dataOffset+bucketCnt*uintptr(t.keysize)+i*uintptr(t.elemsize))
                }
                if b.tophash[i] == emptyRest {
                    break bucketloop
                }
                continue
            }
            // 计算 key 的位置
            k := add(unsafe.Pointer(b), dataOffset+i*uintptr(t.keysize))
            if t.indirectkey() {
                k = *((*unsafe.Pointer)(k))
            }
            // 比较 key 值是否相等
            if !t.key.equal(key, k) {
                continue
            }
            // already have a mapping for key. Update it.
            if t.needkeyupdate() {
                typedmemmove(t.key, k, key)
            }
            // 计算 value 所在的位置
            elem = add(unsafe.Pointer(b), dataOffset+bucketCnt*uintptr(t.keysize)+i*uintptr(t.elemsize))
            goto done
        }
        ovf := b.overflow(t)
        if ovf == nil {
            break
        }
        b = ovf
    }

    // Did not find mapping for key. Allocate new cell & add entry.

    // If we hit the max load factor or we have too many overflow buckets,
    // and we're not already in the middle of growing, start growing.
    if !h.growing() && (overLoadFactor(h.count+1, h.B) || tooManyOverflowBuckets(h.noverflow, h.B)) {
        hashGrow(t, h)
        goto again // Growing the table invalidates everything, so try again
    }

    // 如果找不到一个空的位置可以插入 key 值
    if inserti == nil {
        // 意味着当前桶已经全部满了,那么就生成一个新的
        // all current buckets are full, allocate a new one.
        newb := h.newoverflow(t, b)
        inserti = &newb.tophash[0]
        insertk = add(unsafe.Pointer(newb), dataOffset)
        elem = add(insertk, bucketCnt*uintptr(t.keysize))
    }

    // store new key/elem at insert position
    if t.indirectkey() {
        kmem := newobject(t.key)
        *(*unsafe.Pointer)(insertk) = kmem
        insertk = kmem
    }
    if t.indirectelem() {
        vmem := newobject(t.elem)
        *(*unsafe.Pointer)(elem) = vmem
    }
    typedmemmove(t.key, insertk, key)
    *inserti = top
    h.count++

done:
    if h.flags&hashWriting == 0 {
        throw("concurrent map writes")
    }
    h.flags &^= hashWriting
    if t.indirectelem() {
        elem = *((*unsafe.Pointer)(elem))
    }
    return elem
}
插入 key 的过程和查找 key 有几点不同:
如果找到了待插入的 key ,则直接更新对应的 value 值;
会在 oldbucket 中查找 key,但不会在 oldbucket 中插入 key。
如果在 bmap 中没有找到待插入的 key ,这时分两种情况:
情况一:bmap 中还有空位,在遍历 bmap 的时候预先标记可插入的空位,如果查找结束也没有找到 key,就把 key 放到预先标记的空位上。 情况二:bmap中没有空位了,此时检查一次是否达到最大装载因子。如果达到了,立即进行扩容操作。扩容以后在新桶里面插入 key。如果没有达到最大装载因子,则新生成一个 bmap,并且把前一个 bmap 的 overflow 指针指向新的 bmap。
删除 Key
源码中删除相关的是 mapdelete 函数。
func mapdelete(t *maptype, h *hmap, key unsafe.Pointer) {
    if raceenabled && h != nil {
        callerpc := getcallerpc()
        pc := funcPC(mapdelete)
        racewritepc(unsafe.Pointer(h), callerpc, pc)
        raceReadObjectPC(t.key, key, callerpc, pc)
    }
    if msanenabled && h != nil {
        msanread(key, t.key.size)
    }
    if h == nil || h.count == 0 {
        if t.hashMightPanic() {
            t.hasher(key, 0) // see issue 23734
        }
        return
    }
    // 如果多线程读写,直接抛出异常
    if h.flags&hashWriting != 0 {
        throw("concurrent map writes")
    }

    // 计算 key 的 hash 值
    hash := t.hasher(key, uintptr(h.hash0))

    // Set hashWriting after calling t.hasher, since t.hasher may panic,
    // in which case we have not actually done a write (delete).
    h.flags ^= hashWriting

    bucket := hash & bucketMask(h.B)
    // 如果还在扩容中,继续扩容
    if h.growing() {
        growWork(t, h, bucket)
    }
    // 找到桶位置
    b := (*bmap)(add(h.buckets, bucket*uintptr(t.bucketsize)))
    bOrig := b
    top := tophash(hash)
search:
    for ; b != nil; b = b.overflow(t) {
        // 遍历当前桶
        for i := uintptr(0); i < bucketCnt; i++ {
            if b.tophash[i] != top {
                if b.tophash[i] == emptyRest {
                    break search
                }
                continue
            }
            k := add(unsafe.Pointer(b), dataOffset+i*uintptr(t.keysize))
            k2 := k
            if t.indirectkey() {
                k2 = *((*unsafe.Pointer)(k2))
            }
            if !t.key.equal(key, k2) {
                continue
            }
            // 找到了 key,开始清除 key 和对应的 value
            // Only clear key if there are pointers in it.
            if t.indirectkey() {
                // 如果是指向 key 的指针,把指针置空
                *(*unsafe.Pointer)(k) = nil
            } else if t.key.ptrdata != 0 {
                // 清除 key 的内存
                memclrHasPointers(k, t.key.size)
            }
            // 清除 value,根据 value 类型置空指针或清除值对应的内存
            e := add(unsafe.Pointer(b), dataOffset+bucketCnt*uintptr(t.keysize)+i*uintptr(t.elemsize))
            if t.indirectelem() {
                *(*unsafe.Pointer)(e) = nil
            } else if t.elem.ptrdata != 0 {
                memclrHasPointers(e, t.elem.size)
            } else {
                memclrNoHeapPointers(e, t.elem.size)
            }
            // 标记当前桶的当前槽位为空
            b.tophash[i] = emptyOne
            // If the bucket now ends in a bunch of emptyOne states,
            // change those to emptyRest states.
            // It would be nice to make this a separate function, but
            // for loops are not currently inlineable.
            if i == bucketCnt-1 {
                if b.overflow(t) != nil && b.overflow(t).tophash[0] != emptyRest {
                    goto notLast
                }
            } else {
                if b.tophash[i+1] != emptyRest {
                    goto notLast
                }
            }
            for {
                b.tophash[i] = emptyRest
                if i == 0 {
                    if b == bOrig {
                        break // beginning of initial bucket, we're done.
                    }
                    // Find previous bucket, continue at its last entry.
                    c := b
                    for b = bOrig; b.overflow(t) != c; b = b.overflow(t) {
                    }
                    i = bucketCnt - 1
                } else {
                    i--
                }
                if b.tophash[i] != emptyOne {
                    break
                }
            }
        notLast:
            h.count--
            break search
        }
    }

    if h.flags&hashWriting == 0 {
        throw("concurrent map writes")
    }
    h.flags &^= hashWriting
}
删除 key 的流程和查找 key 流程也差不多:
找到对应的 key 以后,清除相应的 key 和 value 。如果是指针类型,就把指针置为 nil;如果是值就清空值对应的内存;
清除 tophash 里的值,并做一些标记;
最后把 hmap 的计数减1;
如果是在扩容过程中,会在扩容完成后在新的 bmap 里面执行删除操作。
扩容
为什么要扩容?
因为,随着 Map 中添加的 key 越来越多,key 发生哈希冲突的概率也越来越大。桶中的 8 个槽位会被逐渐塞满,查找、插入、删除 key 的效率也会越来越低,因此需要在 Map 达到一定装载率后进行扩容,保证 Map 的读写性能。
Golang 衡量装载率的指标是装载因子,它的计算方式是:
loadFactor := count / (2^B)
其中:
count 表示 Map 中的元素个数
2^B 表示桶数量
什么时候扩容?
插入 key 时会在以下两种情况触发哈希的扩容:
装载因子超过 6.5,翻倍扩容;
使用了太多溢出桶,等量扩容;
B < 15 时,溢出桶数量 >= 2^B
B >= 15 时,溢出桶数量 >= 2^15
// mapassign 中触发扩容的时机
// If we hit the max load factor or we have too many overflow buckets,
// and we're not already in the middle of growing, start growing.
if !h.growing() && (overLoadFactor(h.count+1, h.B) || tooManyOverflowBuckets(h.noverflow, h.B)) {
    hashGrow(t, h)
    goto again // Growing the table invalidates everything, so try again
}

// overLoadFactor reports whether count items placed in 1<<B buckets is over loadFactor.
func overLoadFactor(count int, B uint8) bool {
    return count > bucketCnt && uintptr(count) > loadFactorNum*(bucketShift(B)/loadFactorDen)
}

// tooManyOverflowBuckets reports whether noverflow buckets is too many for a map with 1<<B buckets.
// Note that most of these overflow buckets must be in sparse use;
// if use was dense, then we'd have already triggered regular map growth.
func tooManyOverflowBuckets(noverflow uint16, B uint8) bool {
    // If the threshold is too low, we do extraneous work.
    // If the threshold is too high, maps that grow and shrink can hold on to lots of unused memory.
    // "too many" means (approximately) as many overflow buckets as regular buckets.
    // See incrnoverflow for more details.
    if B > 15 {
        B = 15
    }
    // The compiler doesn't see here that B < 16; mask B to generate shorter shift code.
    return noverflow >= uint16(1)<<(B&15)
}
什么时候采用翻倍扩容策略?
触发扩容的第 1 种情况,随着 Map 中不断插入新元素,装载因子不断升高直至超过 6.5 ,这时候就需要翻倍扩容。
翻倍扩容后,分配的新桶数量是旧桶的 2 倍。
什么时候采用等量扩容策略?
触发扩容的第 2 种情况,是在装载因子较小的情况下, Map 的读写效率也较低。这种现象是 Map 元素少,但溢出桶数量很多, 这个时候需要等量扩容。
可能造成这种情况的原因是:不停地插入元素、删除元素:
先插入很多元素,导致创建了很多桶,但装载因子未达到临界值,不触发扩容;
之后,删除元素降低元素总数量;
再插入很多元素,导致创建很多溢出桶。
等量扩容后,分配的新桶数量跟旧桶数量相同,但新桶中存储的数据更加紧密。
扩容相关的方法是 hashGrow(),但是需要注意,它只是分配了新桶,实际上并没有真正地“迁移数据”。
func hashGrow(t *maptype, h *hmap) {
    // If we've hit the load factor, get bigger.
    // Otherwise, there are too many overflow buckets,
    // so keep the same number of buckets and "grow" laterally.
    bigger := uint8(1)
    // 装载率未超阈值,bigger=0,即采用等量扩容策略
    if !overLoadFactor(h.count+1, h.B) {
        bigger = 0
        h.flags |= sameSizeGrow
    }
    oldbuckets := h.buckets
    // 申请新桶
    newbuckets, nextOverflow := makeBucketArray(t, h.B+bigger, nil)

    flags := h.flags &^ (iterator | oldIterator)
    if h.flags&iterator != 0 {
        flags |= oldIterator
    }
    // bigger=1 即采用翻倍扩容策略,B+1 相当于原来 2 倍的空间
    // commit the grow (atomic wrt gc)
    h.B += bigger
    h.flags = flags
    h.oldbuckets = oldbuckets
    h.buckets = newbuckets
    // 迁移进度为 0
    h.nevacuate = 0
    h.noverflow = 0

    if h.extra != nil && h.extra.overflow != nil {
        // Promote current overflow buckets to the old generation.
        if h.extra.oldoverflow != nil {
            throw("oldoverflow is not nil")
        }
        h.extra.oldoverflow = h.extra.overflow
        h.extra.overflow = nil
    }
    if nextOverflow != nil {
        if h.extra == nil {
            h.extra = new(mapextra)
        }
        h.extra.nextOverflow = nextOverflow
    }

    // 真正的数据迁移工作是由 growWork() 和 evacuate() 这两个方法渐进式地完成的
    // the actual copying of the hash table data is done incrementally
    // by growWork() and evacuate().
}
迁移
在扩容相关的 hashGrow() 方法中,最后一段注释中提到, Map 扩容后真正的数据迁移工作是由 growWork() 和 evacuate() 这两个方法渐进式地完成的,而触发数据迁移的时机是插入 Key 和 删除 Key。
首先,我们来看看执行迁移工作的方法 growWork() 。
func growWork(t *maptype, h *hmap, bucket uintptr) {
    // 迁移当前正在访问的旧桶
    // make sure we evacuate the oldbucket corresponding
    // to the bucket we're about to use
    evacuate(t, h, bucket&h.oldbucketmask())

    // 为加速迁移进度,如果当前仍在扩容中,再迁移一个桶
    // evacuate one more oldbucket to make progress on growing
    if h.growing() {
        evacuate(t, h, h.nevacuate)
    }
}
接下来,我们看看负责迁移数据的方法 evacuate()。
func evacuate(t *maptype, h *hmap, oldbucket uintptr) {
    // 定位旧桶地址
    b := (*bmap)(add(h.oldbuckets, oldbucket*uintptr(t.bucketsize)))
    newbit := h.noldbuckets()
    // 如果旧桶未迁移过
    if !evacuated(b) {
        // TODO: reuse overflow buckets instead of using new ones, if there
        // is no iterator using the old buckets.  (If !oldIterator.)

        // xy contains the x and y (low and high) evacuation destinations.
        var xy [2]evacDst
        x := &xy[0]
        x.b = (*bmap)(add(h.buckets, oldbucket*uintptr(t.bucketsize)))
        x.k = add(unsafe.Pointer(x.b), dataOffset)
        x.e = add(x.k, bucketCnt*uintptr(t.keysize))

        // 如果不是等量扩容,桶序号会变化
        if !h.sameSizeGrow() {
            // Only calculate y pointers if we're growing bigger.
            // Otherwise GC can see bad pointers.
            y := &xy[1]
            y.b = (*bmap)(add(h.buckets, (oldbucket+newbit)*uintptr(t.bucketsize)))
            y.k = add(unsafe.Pointer(y.b), dataOffset)
            y.e = add(y.k, bucketCnt*uintptr(t.keysize))
        }

        // 遍历所有的桶,包括溢出桶
        for ; b != nil; b = b.overflow(t) {
            k := add(unsafe.Pointer(b), dataOffset)
            e := add(k, bucketCnt*uintptr(t.keysize))
            // 遍历桶中的所有槽位
            for i := 0; i < bucketCnt; i, k, e = i+1, add(k, uintptr(t.keysize)), add(e, uintptr(t.elemsize)) {
                // 当前槽位的 tophash 值
                top := b.tophash[i]
                // 如果槽位为空,即没有 key,就把它标记为被"迁移"过
                if isEmpty(top) {
                    b.tophash[i] = evacuatedEmpty
                    continue
                }
                if top < minTopHash {
                    throw("bad map state")
                }
                k2 := k
                if t.indirectkey() {
                    k2 = *((*unsafe.Pointer)(k2))
                }
                var useY uint8
                if !h.sameSizeGrow() {
                    // Compute hash to make our evacuation decision (whether we need
                    // to send this key/elem to bucket x or bucket y).
                    hash := t.hasher(k2, uintptr(h.hash0))
                    if h.flags&iterator != 0 && !t.reflexivekey() && !t.key.equal(k2, k2) {
                        // If key != key (NaNs), then the hash could be (and probably
                        // will be) entirely different from the old hash. Moreover,
                        // it isn't reproducible. Reproducibility is required in the
                        // presence of iterators, as our evacuation decision must
                        // match whatever decision the iterator made.
                        // Fortunately, we have the freedom to send these keys either
                        // way. Also, tophash is meaningless for these kinds of keys.
                        // We let the low bit of tophash drive the evacuation decision.
                        // We recompute a new random tophash for the next level so
                        // these keys will get evenly distributed across all buckets
                        // after multiple grows.
                        useY = top & 1
                        top = tophash(hash)
                    } else {
                        if hash&newbit != 0 {
                            useY = 1
                        }
                    }
                }

                if evacuatedX+1 != evacuatedY || evacuatedX^1 != evacuatedY {
                    throw("bad evacuatedN")
                }

                // 迁移后的 tophash 和新地址
                b.tophash[i] = evacuatedX + useY // evacuatedX + 1 == evacuatedY
                dst := &xy[useY]                 // evacuation destination

                if dst.i == bucketCnt {
                    dst.b = h.newoverflow(t, dst.b)
                    dst.i = 0
                    dst.k = add(unsafe.Pointer(dst.b), dataOffset)
                    dst.e = add(dst.k, bucketCnt*uintptr(t.keysize))
                }
                dst.b.tophash[dst.i&(bucketCnt-1)] = top // mask dst.i as an optimization, to avoid a bounds check
                // 复制旧 key
                if t.indirectkey() {
                    *(*unsafe.Pointer)(dst.k) = k2 // copy pointer
                } else {
                    typedmemmove(t.key, dst.k, k) // copy elem
                }
                // 复制旧 value
                if t.indirectelem() {
                    *(*unsafe.Pointer)(dst.e) = *(*unsafe.Pointer)(e)
                } else {
                    typedmemmove(t.elem, dst.e, e)
                }
                // 定位到下一个槽位
                // 如果是等量扩容,会让原先分布松散的 key 都集中到一起,变得更加紧凑,提高查找效率
                dst.i++
                // These updates might push these pointers past the end of the
                // key or elem arrays.  That's ok, as we have the overflow pointer
                // at the end of the bucket to protect against pointing past the
                // end of the bucket.
                dst.k = add(dst.k, uintptr(t.keysize))
                dst.e = add(dst.e, uintptr(t.elemsize))
            }
        }
        // 清除掉多余的溢出桶和 key/value,有助于gc
        // Unlink the overflow buckets & clear key/elem to help GC.
        if h.flags&oldIterator == 0 && t.bucket.ptrdata != 0 {
            b := add(h.oldbuckets, oldbucket*uintptr(t.bucketsize))
            // Preserve b.tophash because the evacuation
            // state is maintained there.
            ptr := add(b, dataOffset)
            n := uintptr(t.bucketsize) - dataOffset
            memclrHasPointers(ptr, n)
        }
    }

    if oldbucket == h.nevacuate {
        advanceEvacuationMark(h, t, newbit)
    }
}
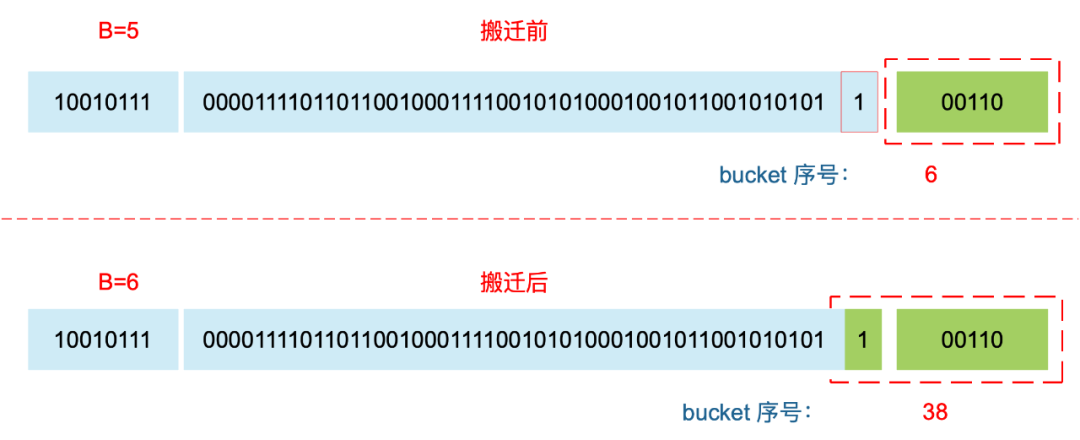
对于翻倍扩容,需要重新计算 key 的哈希值,才能确定它到底落在哪个桶。例如,原来 B = 5,计算出 key 的哈希值后,只用看它的低 5 位,就能确定它落在哪个 桶。扩容后,B 变成了 6,因此需要多看一位,它的低 6 位决定了 key 落在哪个桶,这也被称为 rehash。
因此,某个 key 在迁移前后,所在桶的序号可能和原来相同,也可能在原来基础上加上 2^B(原来的 B 值),这取决于哈希值 第 6 bit 位是 0 还是 1。

关于 Golang Map 的线程安全
Golang 标准包里的 Map 非线程安全, 它支持并发读取同一个 Map, 但不支持并发写同一个 Map,goroutine 并发写同一个 Map 会引发报错:
fatal error: concurrent map writes
为什么不支持?
官方的解释[1] 是经过长时间的讨论, 绝大多数 Map 的使用场景并不需要线程安全。在那些极少数需要 Map 支持线程安全的场景中,Map 被用来存储海量共享数据,这种情况下必须加锁来确保数据一致,而加锁显然会影响性能和安全性。
如果非要并发写 Map 呢?
方法1:自己在 gorutine 写 Map 时加锁(sync.RWMutex)
方法2:使用官方的 sync.Map 包
方法3:有人实现了效率更高(锁粒度更小)的支持并发的 concurrent-map[2]
官方的 sync.Map 包:
原理:
sync.Map 里有两个 Map ,一个是专门用于读的 read map,另一个是提供读写的 dirty map;优先读 read map,若不存在则加锁穿透读 dirty map,同时记录一个未从 read map 读到数据的计数,当计数到达一定值,就用 dirty map 覆盖 read map。优点:
官方出品,通过空间换时间,读写分离;缺点:
不适用于大量写的场景,会导致 read map 读不到数据而进一步加锁读取,同时 dirty map 也会一直晋升为 read map,整体性能较差。适用场景:
大量读,少量写。
哈希算法选用高效的 memhash 算法 和 CPU AES指令集。AES 指令集充分利用 CPU 硬件特性,计算哈希值的效率高;
key/value 在内存中的存储方式是一组 key 连续存储,一组 value 连续存储,而不是key、value成对存储。这种形式方便内存对齐,在数据量较大时可节约因内存对齐造成的浪费;
key 和 value 超过128字节后使用指针存储;
tophash 数组的设计加速了 key 的查找过程,tophash 也被复用来标记扩容操作时的状态;
用位运算转换求余操作,m % n ,当 n = 1 << B 的时候,可以转换成 m & (1 << B - 1) ;
渐进式扩容提高效率;
等量扩容,紧凑操作。
Golang Map 一些待优化的地方
在扩容迁移过程中,不会重用溢出桶,而是直接申请一个新桶。这里可优化成优先重用没有指针指向的溢出桶,当没有可用的溢出桶时,再去申请新桶。关于这一点, Go 作者已经写在 TODO[3] 里面了。
当前版本中没有 shrink 操作,Map 只能增长而不能收缩。runtime: maps do not shrink after elements removal (delete)[4]
参考资料
如何设计并实现一个线程安全的 Map[5]
Go 语言设计与实现 - 哈希表[6]
深度解密Go语言之map[7]
map 的底层实现原理是什么.md[8]
[1] 官方的解释: https://golang.org/doc/faq#atomic_maps
[2] concurrent-map: https://github.com/orcaman/concurrent-map
[3] TODO: https://golang.org/src/runtime/map.go#L1132
[4] https://github.com/golang/go/issues/20135
[5] 如何设计并实现一个线程安全的 Map: https://halfrost.com/go_map_chapter_one/
[6] Go 语言设计与实现 - 哈希表: https://draveness.me/golang/docs/part2-foundation/ch03-datastructure/golang-hashmap/
[7] 深度解密Go语言之map: https://www.cnblogs.com/qcrao-2018/p/10903807.html
[8] map 的底层实现原理是什么.md: https://github.com/golang-design/Go-Questions/tree/master/content/map
推荐阅读
