
Redis哨兵模式

1. 搭建redis主从集群
1.1 创建3个redis实例
关于redis的搭建,可以参考历史文章
https://mp.weixin.qq.com/s/RaWy0sqRxcAti1qbv-GbZQ
如果有编译好的二进制文件,则直接部署redis实例即可。
创建三个redis实例所需的目录,生产环境需独立部署在不同主机上,提高稳定性
mkdir -p /data/rediscd /data/redis/mkdir redis6379 redis6380 redis6381cd redis6379vim redis.conf# 添加如下配置bind 0.0.0.0protected-mode noport 6379tcp-backlog 511timeout 30tcp-keepalive 300daemonize yessupervised nopidfile /data/redis/redis6379/redis_6379.pidloglevel noticelogfile "/data/redis/redis6379/redis6379.log"databases 16stop-writes-on-bgsave-error yesrdbcompression yesrdbchecksum yesdbfilename dump.rdbdir /data/redis/redis6379masterauth 123456slave-serve-stale-data yesslave-read-only yes# 将配置文件拷贝到其他2个实例的目录下cp redis.conf ../redis6380.confcp redis.conf ../redis6381.confsed -i "s#6379#6380#g" ../redis6380/redis.confsed -i "s#6379#6381#g" ../redis6381/redis.conf# redis实例不建议使用root账号启动,单独创建一个redis用户,并修改redis相关目录的权限useradd redischown -R redis:redis /data/redissu - redis# 启动三个redis实例redis-server /data/redis/redis6379/redis.confredis-server /data/redis/redis6380/redis.confredis-server /data/redis/redis6381/redis.conf

1.2 配置主从同步
进入2个实例,配置同步,配置完成后去主节点检查一下是否正常
[redis@test redis6379]$ redis-cli -p 6380 -a "123456"Warning: Using a password with '-a' option on the command line interface may not be safe.127.0.0.1:6380> slaveof 127.0.0.1 6379OK127.0.0.1:6380> exit[redis@test redis6379]$ redis-cli -p 6381 -a "123456"Warning: Using a password with '-a' option on the command line interface may not be safe.127.0.0.1:6381> slaveof 127.0.0.1 6379OK127.0.0.1:6381> exit[redis@test redis6379]$ redis-cli -p 6379 -a "123456"Warning: Using a password with '-a' option on the command line interface may not be safe.127.0.0.1:6379> info replication# Replicationrole:masterconnected_slaves:2slave0:ip=127.0.0.1,port=6380,state=online,offset=42,lag=0slave1:ip=127.0.0.1,port=6381,state=online,offset=42,lag=1master_replid:b8a19f5afae13d3da38b359244dc0f560df03176master_replid2:0000000000000000000000000000000000000000master_repl_offset:42second_repl_offset:-1repl_backlog_active:1repl_backlog_size:1048576repl_backlog_first_byte_offset:1repl_backlog_histlen:42127.0.0.1:6379>
可见 当前主从同步已建立。
2. 哨兵模式搭建
2.1 创建3个哨兵实例
mkdir -p /data/redis/redis_sentinel/cd /data/redis/redis_sentinel/mkdir sentinel26379 sentinel26380 sentinel26381cd sentinel26379# 初始化配置文件如下vim redis_sentinel_26379.confbind 0.0.0.0port 26379daemonize yesdir "/data/redis/redis_sentinel/sentinel26379"pidfile "/data/redis/redis_sentinel/sentinel26379/redis_sentinel26379.pid"logfile "/data/redis/redis_sentinel/sentinel26379/redis_sentinel26379.log"# Generated by CONFIG REWRITEsentinel deny-scripts-reconfig yessentinel monitor testdb 127.0.0.1 6379 2sentinel down-after-milliseconds testdb 5000sentinel auth-pass testdb 123456# 配置文件拷贝至另2个实例cp redis_sentinel_26379.conf ../sentinel26380/redis_sentinel_26380.confsed -i "s#26379#26380#g" ../sentinel26380/redis_sentinel_26380.confcp redis_sentinel_26379.conf ../sentinel26381/redis_sentinel_26381.confsed -i "s#26379#26381#g" ../sentinel26381/redis_sentinel_26381.conf
配置文件主要参数说明:
| 参数名 | 说明 |
| bind | 绑定的可以访问的主机IP,0.0.0.0 代表不限制 |
| port | 哨兵实例的端口 |
| sentinel monitor testdb 127.0.0.1 6379 1 | testdb任意定义,哨兵集群名称,127.0.0.1 6379 redis实例主节点 ;1 代表当1个哨兵实例判断主库不可用则进行转移,生产环境节点数要配置多一点 |
| sentinel down-after-milliseconds testdb 5000 | testdb同上,down-after-milliseconds代表 master 最长响应时间,超过这个时间就主观判断它下线,5000 代表5000ms,即5s |
| sentinel auth-pass testdb 123456 | 123456 是redis实例的登录密码 |
2.2 启动哨兵实例
redis-sentinel /data/redis/redis_sentinel/sentinel26379/redis_sentinel_26379.confredis-sentinel /data/redis/redis_sentinel/sentinel26380/redis_sentinel_26380.confredis-sentinel /data/redis/redis_sentinel/sentinel26381/redis_sentinel_26381.conf
启动后配置文件会自动新增如下红框中的内容

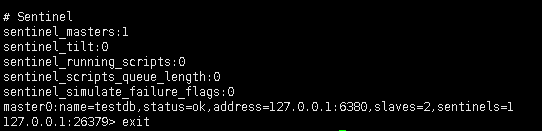
登录哨兵实例查看
redis-cli -p 26379
2.3 测试
测试将主节点down机
redis-cli -p 6379 -a 123456 shutdown再查看哨兵找那个的master结果,如下:
日志信息如下:
1895:X 29 Apr 23:57:31.778 # +sdown master testdb 127.0.0.1 63791895:X 29 Apr 23:57:31.779 # +odown master testdb 127.0.0.1 6379 #quorum 1/11895:X 29 Apr 23:57:31.779 # +new-epoch 11895:X 29 Apr 23:57:31.779 # +try-failover master testdb 127.0.0.1 63791895:X 29 Apr 23:57:31.795 # +vote-for-leader 4928b4d4dfd762cd50fa540b7a0903d2be3b0f95 11895:X 29 Apr 23:57:31.796 # +elected-leader master testdb 127.0.0.1 63791895:X 29 Apr 23:57:31.796 # +failover-state-select-slave master testdb 127.0.0.1 63791895:X 29 Apr 23:57:31.862 # +selected-slave slave 127.0.0.1:6380 127.0.0.1 6380 @ testdb 127.0.0.1 63791895:X 29 Apr 23:57:31.862 * +failover-state-send-slaveof-noone slave 127.0.0.1:6380 127.0.0.1 6380 @ testdb 127.0.0.1 63791895:X 29 Apr 23:57:31.991 * +failover-state-wait-promotion slave 127.0.0.1:6380 127.0.0.1 6380 @ testdb 127.0.0.1 63791895:X 29 Apr 23:57:32.223 # +promoted-slave slave 127.0.0.1:6380 127.0.0.1 6380 @ testdb 127.0.0.1 63791895:X 29 Apr 23:57:32.223 # +failover-state-reconf-slaves master testdb 127.0.0.1 63791895:X 29 Apr 23:57:32.273 * +slave-reconf-sent slave 127.0.0.1:6381 127.0.0.1 6381 @ testdb 127.0.0.1 63791895:X 29 Apr 23:57:33.231 * +slave-reconf-inprog slave 127.0.0.1:6381 127.0.0.1 6381 @ testdb 127.0.0.1 63791895:X 29 Apr 23:57:33.231 * +slave-reconf-done slave 127.0.0.1:6381 127.0.0.1 6381 @ testdb 127.0.0.1 63791895:X 29 Apr 23:57:33.296 # +failover-end master testdb 127.0.0.1 63791895:X 29 Apr 23:57:33.296 # +switch-master testdb 127.0.0.1 6379 127.0.0.1 63801895:X 29 Apr 23:57:33.297 * +slave slave 127.0.0.1:6381 127.0.0.1 6381 @ testdb 127.0.0.1 63801895:X 29 Apr 23:57:33.297 * +slave slave 127.0.0.1:6379 127.0.0.1 6379 @ testdb 127.0.0.1 63801895:X 29 Apr 23:57:38.356 # +sdown slave 127.0.0.1:6379 127.0.0.1 6379 @ testdb 127.0.0.1 6380
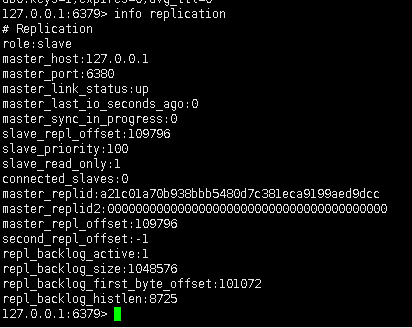
再把6379端口启动,可以看到节点自动加入集群,且作为从节点
关于Redis比较经典书籍推荐如下:

2. mysql8.0新增用户及加密规则修改的那些事
3. 比hive快10倍的大数据查询利器-- presto
4. 监控利器出鞘:Prometheus+Grafana监控MySQL、Redis数据库
5. PostgreSQL主从复制--物理复制
6. MySQL传统点位复制在线转为GTID模式复制


评论