咦?什么是模块联邦?哦!有点意思!

特性
webpack 5引入联邦模式是为了更好的共享代码。在此之前,我们共享代码一般用npm发包来解决。npm发包需要经历构建,发布,引用三阶段,而联邦模块可以直接引用其他应用代码,实现热插拔效果。对比npm的方式更加简洁、快速、方便。
欢迎关注《前端阳光》,加入技术交流群,加入内推群
使用方法
1、引入远程js
2、webpack配置
3、模块使用
引入远程JS
假设我们有app1,app2两个应用,端口分别为3001,3002。app1应用要想引用app2里面的js,直接用script标签即可。
例如app1应用里面index.html引入app2应用remoteEntry.js
 <head>
    <script src="http://localhost:3002/remoteEntry.js"></script>
  </head>
webpack配置
app1的webpack配置:
const ModuleFederationPlugin = require("webpack/lib/container/ModuleFederationPlugin");

module.exports = {
  //....
  plugins: [
    new ModuleFederationPlugin({
      name: "app1",
      library: { type: "var", name: "app1" },
      remotes: {
        app2: "app2",
      },
      shared: ["react", "react-dom"],
    }),
  ],
};
对于app2的webpack配置如下
  plugins: [
    new ModuleFederationPlugin({
      name: "app2",
      library: { type: "var", name: "app2" },
      filename: "remoteEntry.js",
      exposes: {
        "./Button": "./src/Button",
      },
      shared: ["react", "react-dom"],
    })
  ],
可以看到app1和app2的配置基本相同,除了app2 多了filename和exposes以外。
参数解释
name 应用名,全局唯一,不可冲突。

library。UMD标准导出,和name保持一致即可。

remotes 声明需要引用的远程应用。如上图app1配置了需要的远程应用app2.

filename 远程应用时被其他应用引入的js文件名称。对应上面的remoteEntry.js

exposes 远程应用暴露出的模块名。

shared 依赖的包。


1、如果配置了这个属性。webpack在加载的时候会先判断本地应用是否存在对应的包,如果不存在,则加载远程应用的依赖包。

2、以app2来说,因为它是一个远程应用,配置了["react", "react-dom"] ,而它被app1所消费,所以webpack会先查找app1是否存在这两个包,如果不存在就使用app2自带包。app1里面同样申明了这两个参数,因为app1是本地应用,所以会直接用app1的依赖。
模块使用
对于app1/App.js代码使用app2的组件,代码如下:
import React from "react";

const RemoteButton = React.lazy(() => import("app2/Button"));

const App = () => (
  <div>
    <h1>Basic Host-Remote</h1>
    <h2>App 1</h2>
    <React.Suspense fallback="Loading Button">
      <RemoteButton />
    </React.Suspense>
  </div>
);

export default App;
具体这一行
const RemoteButton = React.lazy(() => import("app2/Button"));
使用方式为:import('远程应用名/暴露的模块名'),对应webpack配置里面的name和expose。使用方式和引入一个普通异步组件无差别。
适用范围
由于share这个属性的存在,所以本地应用和远程应用的技术栈和版本必须兼容,统一用同一套。比如js用react,css用sass等。
联邦模块和微前端的关系:因为expose这个属性即可以暴露单个组件,也可以把整个应用暴露出去。同时由于share属性存在,技术栈必须一致。所以加上路由,可以用来实现single-spa这种模式的微前端。
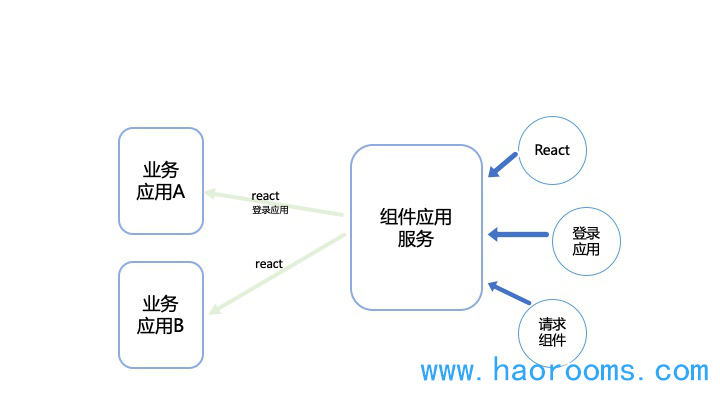
使用场景:新建专门的组件应用服务来管理所有组件和应用,其他业务层只需要根据自己业务所需载入对应的组件和功能模块即可。模块管理统一管理,代码质量高,搭建速度快。特别适用矩阵app,或者可视化页面搭建等场景。

应用
1、next项目应用 next项目1的next.config.js
webpack: (config, options) => {
    const { buildId, dev, isServer, defaultLoaders, webpack } = options;
    const mfConf = {
      mergeRuntime: true, //experimental
      name: "next1",
      library: { type: config.output.libraryTarget, name: "next1" },
      filename: "static/runtime/remoteEntry.js",
      exposes: {
        "./exposedTitle": "./components/exposedTitle",
      },
      remotes: {
        next2: isServer
          ? path.resolve(
              __dirname,
              "../next2/.next/server/static/runtime/remoteEntry.js"
            )
          : "next2",
      },
    };
    if (!isServer) {
      config.output.publicPath = "http://localhost:3000/_next/";
    }
    withModuleFederation(config, options, mfConf);
    return config;
  }
next项目2的next.config.js
webpack: (config, options) => {
    const { buildId, dev, isServer, defaultLoaders, webpack } = options;
    const mfConf = {
      mergeRuntime: true, //experimental
      name: "next2",
      library: { type: config.output.libraryTarget, name: "next2" },
      filename: "static/runtime/remoteEntry.js",
      remotes: {
        next1: isServer
          ? path.resolve(
              __dirname,
              "../next1/.next/server/static/runtime/remoteEntry.js"
            )
          : "next1",
      },
      exposes: {
        "./nav": "./components/nav",
      },
      shared: ["lodash"],
    };

    withModuleFederation(config, options, mfConf);

    if (!isServer) {
      config.output.publicPath = "http://localhost:3001/_next/";
    }

    return config;
  }
ps注意,还要配置
future: { webpack5: true },
vue3中应用
案例1 home项目
new ModuleFederationPlugin({
  name: "home",
  filename: "remoteEntry.js",
  remotes: {
    home: "home@http://localhost:3002/remoteEntry.js",
  },
  exposes: {
    "./Content": "./src/components/Content",
    "./Button": "./src/components/Button",
  },
}),
案例2 layout项目
 new ModuleFederationPlugin({
      name: "layout",
      filename: "remoteEntry.js",
      remotes: {
        home: "home@http://localhost:3002/remoteEntry.js",
      },
      exposes: {},
    }),
layout中可以用home项目中的组件
import { createApp, defineAsyncComponent } from "vue";
import Layout from "./Layout.vue";

const Content = defineAsyncComponent(() => import("home/Content"));
const Button = defineAsyncComponent(() => import("home/Button"));

const app = createApp(Layout);

app.component("content-element", Content);
app.component("button-element", Button);
欢迎关注《前端阳光》,加入技术交流群,加入内推群
原文:https://www.haorooms.com/post/webpack5_new_featrue
