
用 PyQt 打造具有专业外观的GUI(下篇)

QMainWindow在其之上创建GUI。此类允许您创建主窗口样式的应用程序。QMainWindow具有其自己的预定义布局。这种布局将允许您将以下图形组件添加到主窗口:窗口顶部的菜单栏 窗口四个侧面中任意一个的一个或多个工具栏 窗口底部的状态栏 窗口四个侧面中任何一个的一个或多个停靠小部件(但不占用工具栏区域) 窗口正中央的中央小部件
QTextEdit对象作为编辑器的中央窗口小部件。QWidget对象作为中央窗口小部件,然后创建一个布局,其中包含应用程序GUI所需的特定窗口小部件排列。最后一步是将该布局设置为中央窗口小部件的布局。QMainWindow提供的布局足以创建任何类型的GUI应用程序。这种布局将有效地管理窗口上小部件的行为,因此您不必为此担心。QDialog来处理对话框的创建。QMainWindow不同,QDialog没有预定义或默认的顶层布局。这是因为对话框可以多种多样,并且包含各种小部件排列和组合。.setLayout()。QDialog对象设置顶层布局:import sys
from PyQt5.QtWidgets import (
QApplication,
QDialog,
QDialogButtonBox,
QFormLayout,
QLineEdit,
QVBoxLayout,
)
class Dialog(QDialog):
def __init__(self):
super().__init__()
self.setWindowTitle("QDialog's Top-Level Layout Example")
dlgLayout = QVBoxLayout()
# Create a form layout and add widgets
formLayout = QFormLayout()
formLayout.addRow("Name:", QLineEdit())
formLayout.addRow("Job:", QLineEdit())
formLayout.addRow("Email:", QLineEdit())
# Add a button box
btnBox = QDialogButtonBox()
btnBox.setStandardButtons(
QDialogButtonBox.Ok | QDialogButtonBox.Cancel
)
# Set the layout on the dialog
dlgLayout.addLayout(formLayout)
dlgLayout.addWidget(btnBox)
self.setLayout(dlgLayout)
if __name__ == "__main__":
app = QApplication(sys.argv)
dlg = Dialog()
dlg.show()
sys.exit(app.exec_())
QDialog,因此您具有对话框样式的应用程序。在第16行上,您将创建将用作对话框顶级布局的布局。在第18至21行上,您将创建一个表单布局以在表单中安排一些小部件。QDialogButtonBox对象。您通常会使用QDialogButtonBox处理对话框上的按钮。在此示例中,使用两个按钮,即“确定”按钮和“取消”按钮。这些按钮将不具有任何功能,仅用于使对话框更加逼真。.setLayout()将顶级布局设置为对话框的布局。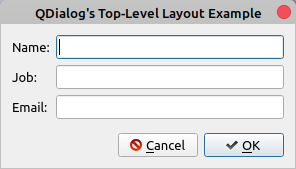
.sizeHint()包含小部件的建议大小.minimumSizeHint()包含小部件可保持可用状态的最小尺寸.sizePolicy()保留布局中小部件的默认行为
QSpacerItem。此类允许您向框布局中添加空格(或空白框)。QSpacerItem。而是,在框布局对象上调用以下某些方法:.addSpacing(i)将固定大小i的不可拉伸空间(或空框)添加到布局中。我必须是一个整数,以像素为单位表示空间的大小。.addStretch(i)将最小尺寸为0且拉伸因子为i的可拉伸空间添加到框布局中。我必须是整数。.insertSpacing(index,size)在位置index处插入大小为size的不可拉伸空间。如果index为负,则在框布局的末尾添加空格。insertStretch(index,Stretch)在位置index处插入一个可拉伸的空间,最小大小为0,拉伸因子为拉伸。如果index为负,则在框布局的末尾添加空格。
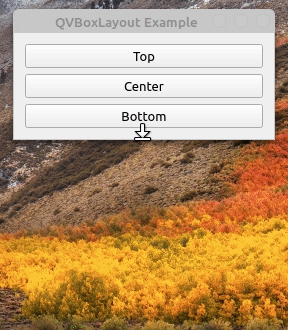
QSpacerItem对象来更改此行为。Window的初始化程序:class Window(QWidget):
def __init__(self):
super().__init__()
self.setWindowTitle("QVBoxLayout Example")
self.resize(270, 110)
# Create a QVBoxLayout instance
layout = QVBoxLayout()
# Add widgets to the layout
layout.addWidget(QPushButton("Top"))
layout.addWidget(QPushButton("Center"))
layout.addWidget(QPushButton("Bottom"))
layout.addStretch()
# Set the layout on the application's window
self.setLayout(layout)
.addStretch()将可拉伸的QSpacerItem对象添加到布局的末尾。如果再次运行该应用程序,则会出现以下现象:
QSpacerItem对象,而不会影响其余小部件的位置或大小。您可以使用此空间管理技术和其他空间管理技术来使您的GUI应用程序看起来良好且美观。setSpacing(spacing)将小部件之间的垂直和水平间距都设置为间距。setVerticalSpacing(spacing)仅将布局中的小部件之间的垂直间距设置为间距。setHorizontalSpacing(spacing)仅将布局中的小部件之间的水平间距设置为间距。
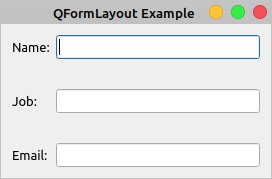
Window的初始化程序的示例,如下所示:class Window(QWidget):
def __init__(self):
super().__init__()
self.setWindowTitle("QFormLayout Example")
self.resize(270, 110)
# Create a QHBoxLayout instance
layout = QFormLayout()
# Add widgets to the layout
layout.setVerticalSpacing(30)
layout.addRow("Name:", QLineEdit())
layout.addRow("Job:", QLineEdit())
emailLabel = QLabel("Email:")
layout.addRow(emailLabel, QLineEdit())
# Set the layout on the application's window
self.setLayout(layout)
在GUI上正确放置小部件的好处是什么 如何使用PyQt的内置布局管理器以编程方式排列小部件 针对您的特定用例使用哪个布局管理器 如何在PyQt中布置主窗口样式和对话框样式的应用程序
更多阅读
特别推荐
点击下方阅读原文加入社区会员
评论