高性能 Go 代码工坊(Part3)
3. 性能评估和分析
在上一节中,我们研究了对单个函数进行基准测试,这对你提前知道瓶颈在哪里很有用。但是,通常你会怀疑人生:
Why is this program taking so long to run?
为什么该程序需要这么长时间才能运行?
分析整个程序,这对于回答诸如此类的高级问题很有用。在本部分中,我们将使用 Go 内置的性能分析工具从内部调查程序的运行情况。
3.1. pprof
今天我们要谈论的第一个工具是 pprof。pprof[1] 源自 Google Perf Tools[2] 工具套件,从最早的公开版本就开始集成到 Go runtime 中。
pprof 包含两个部分:
• 每个 Go 程序都内置了 runtime/pprof 包•go tool pprof 检查分析文件。
3.2. 分析文件类型
pprof 支持多种类型的分析,今天我们将讨论其中的三种:
•CPU 性能分析• 内存性能分析• 阻塞性能分析• 互斥锁性能分析
3.2.1. CPU 性能分析
CPU 性能分析是最常见的性能分析,也是最明显的。
启用 CPU 性能分析后,运行时将每 10 毫秒中断一次,并记录当前正在运行的 goroutine 的堆栈跟踪。
一旦分析文件完成,我们就可以分析它来确定最热的代码路径。
函数在分析文件中出现的次数越多,该代码路径占用的时间占总运行时间的百分比就越多。
3.2.2. 内存性能分析
内存分析在堆分配时记录堆栈跟踪。
假定堆栈分配是空闲的,并且在内存分析文件中未跟踪。
内存分析,和 CPU 分析一样也是基于采样,默认情况下,内存分析每 1000 次分配就会采用一次。这个速率可以改变。
由于内存分析是基于采样的,而且它跟踪未使用的分配,因此使用内存分析来确定应用程序的整体内存使用情况是很困难的。
个人观点:我不认为内存分析有助于发现内存泄漏。有更好的方法来确定你的应用程序使用了多少内存。稍后我们将在 PPT 中讨论这些问题。
3.2.3. 阻塞分析
阻塞分析在 Go 中是非常独特的。
阻塞分析和 CPU 分析很像,但它记录 goroutine 花在等待共享资源上的时间。
这对于确定应用程序中的并发瓶颈可能是有用的。
阻塞分析可以显示大量 goroutine 何时可以取得结果,但被阻塞。阻塞包括:
• 在非缓冲信道上发送或接收。• 发送数据到一个满了的信道,从一个空的信道接收数据。• 试图给另一个 goroutine 锁住的 sync.mutex 上锁。
阻塞分析是一种非常专业的工具,在你确信已经消除了所有 CPU 和内存使用瓶颈之前,不应该使用它。
3.2.4. 互斥性能分析
互斥锁分析与阻塞分析类似,但只专门针对导致互斥锁争夺导致延迟的操作。
我对这种类型的分析没有很多经验,但是我搞了个 PPT 来演示它。我们将很快看到该示例。
3.3. 一次只有一个分析
性能分析不是免费的。
分析对程序性能有一定的影响,特别是如果增加分析的采样率。
大多数工具不会阻止你同时启用多个分析。
Do not enable more than one kind of profile at a time.
If you enable multiple profile’s at the same time, they will observe their own interactions and throw off your results.
一次不要启用多次分析。
如果你同时启用多个分析,他们将互相影响,会导致分析就不准确了。
3.4. 收集分析
Go 运行时的分析接口存在于 runtime/pprof 包中。runtime/pprof 是非常低级别的工具,由于历史原因,不同类型的分析的接口并不统一。
正如我们在上一节中看到的, pprof profiling 是在 testing 包中构建的,但有时它不方便,或者说很难将你要分析的代码放在 testing.B 基准测试的上下文中,必须直接使用运行 runtime/pprof API。
几年前,我编写了一个 [small package][0],以便更容易地对现有应用程序进行分析。
import "github.com/pkg/profile"func main() {defer profile.Start().Stop()// ...}
在本节中,我们将使用 profile 包。晚些时候,我们将直接使用 runtime/pprof 接口。
3.5. 使用 pprof 分析
既然我们已经讨论了 pprof 可以测量些什么,以及如何生成分析文件,那么让我们讨论一下如何使用 pprof 来分析文件。
分析由 go pprof 子命令驱动
go tool pprof /path/to/your/profile
该工具提供了分析数据的几种不同表现形式:文本、图形、甚至火焰图。
If you’ve been using Go for a while, you might have been told that
pproftakes two arguments. Since Go 1.9 the profile file contains all the information needed to render the profile. You do no longer need the binary which produced the profile. 🎉
如果你使用 Go 已有一段时间,可能知道
pprof有两个参数。从 Go 1.9 开始,分析文件包含渲染分析文件所需的所有信息。你不再需要生成分析的二进制文件。🎉
3.5.1. 进一步阅读
•Profiling Go programs[3] (Go Blog)•Debugging performance issues in Go programs[4]
3.5.2. CPU 分析 (实践)
让我们编写一个计算单词数的程序:
package mainimport ("fmt""io""log""os""unicode""github.com/pkg/profile")func readbyte(r io.Reader) (rune, error) {var buf [1]byte_, err := r.Read(buf[:])return rune(buf[0]), err}func main() {defer profile.Start().Stop()f, err := os.Open(os.Args[1])if err != nil {log.Fatalf("could not open file %q: %v", os.Args[1], err)}words := 0inword := falsefor {r, err := readbyte(f)if err == io.EOF {break}if err != nil {log.Fatalf("could not read file %q: %v", os.Args[1], err)}if unicode.IsSpace(r) && inword {words++inword = false}inword = unicode.IsLetter(r)}fmt.Printf("%q: %d words\n", os.Args[1], words)}
让我们来看看 Herman Melville 的经典之作 Moby Dick[5] 中有多少字。
% go build && time ./words moby.txt"moby.txt": 181275 wordsreal 0m2.110suser 0m1.264ssys 0m0.944s
让我们将其与 unix 的 wc -w 进行比较
% time wc -w moby.txt215829 moby.txtreal 0m0.012suser 0m0.009ssys 0m0.002s
结果是不一样的。wc 大约高出 19%,因为它认为的单词数量和我的简单程序不同。这并不重要 —— 两个程序都将整个文件作为输入,并在一次传递中计算从单词到非单词的转换次数。
让我们研究为什么使用 pprof 这些程序有不同的运行时间。
3.5.3. 添加 CPU 分析
首先,编辑 main.go 并启用分析
import ("github.com/pkg/profile")func main() {defer profile.Start().Stop()// ...
现在,当我们运行程序时,将创建一个 cpu.pprof 文件
% go run main.go moby.txt2018/08/25 14:09:01 profile: cpu profiling enabled, /var/folders/by/3gf34_z95zg05cyj744_vhx40000gn/T/profile239941020/cpu.pprof"moby.txt": 181275 words2018/08/25 14:09:03 profile: cpu profiling disabled, /var/folders/by/3gf34_z95zg05cyj744_vhx40000gn/T/profile239941020/cpu.pprof
现在我们有了分析文件,可以使用 go tool pprof 去分析
% go tool pprof /var/folders/by/3gf34_z95zg05cyj744_vhx40000gn/T/profile239941020/cpu.pprofType: cpuTime: Aug 25, 2018 at 2:09pm (AEST)Duration: 2.05s, Total samples = 1.36s (66.29%)Entering interactive mode (type "help" for commands, "o" for options)(pprof) topShowing nodes accounting for 1.42s, 100% of 1.42s totalflat flat% sum% cum cum%1.41s 99.30% 99.30% 1.41s 99.30% syscall.Syscall0.01s 0.7% 100% 1.42s 100% main.readbyte0 0% 100% 1.41s 99.30% internal/poll.(*FD).Read0 0% 100% 1.42s 100% main.main0 0% 100% 1.41s 99.30% os.(*File).Read0 0% 100% 1.41s 99.30% os.(*File).read0 0% 100% 1.42s 100% runtime.main0 0% 100% 1.41s 99.30% syscall.Read0 0% 100% 1.41s 99.30% syscall.read
top 命令是你将使用最多的命令。我们可以看到,此程序在 syscall.Syscall 上花费的时间有 99%。以及一小部分时间花在 main.readbyte 。
我们还可以使用 web 命令可视化此调用。这将从分析文件数据生成定向图。图像引擎使用来自 Graphviz 的 dot 命令。
但是,在 Go 1.10(可能是 1.11)中,Go 提供了本地支持 http sever 的 pprof 版本。
% go tool pprof -http=:8080 /var/folders/by/3gf34_z95zg05cyj744_vhx40000gn/T/profile239941020/cpu.pprof
将打开网络浏览器;
• 图形模式• 火焰图模式
在图中,CPU 开销最大的方框是 sys call.Syscall,占程序中花费的总时间的 99.3%。导致 syscall.Syscall 的一串方框代表了直接调用方 —— 如果多个代码路径在同一个函数上汇聚,则可以不止一个。箭头的大小表示在一个方框中的子节点花了多少时间,我们看到从 main.readbyte 开始,它们图中占 1.41 秒中的部分花费的时间趋近于零。
问题:有人能猜到为什么我们的版本比 wc 慢了那么多吗?
3.5.4. 改进我们的版本
我们的程序之所以慢不是因为 Go 的 syscall.Syscall 慢。这是因为 syscalls 一般都是开销很大的操作(而且随着 Spectre 家族越来越多的漏洞被发现,开销成本也越来越高)。
每次调用 readbyte 都会导致产生缓冲区大小为 1 的 syscall.Read。所以程序执行的系统调用的数量等于输入的大小。我们可以看到在 pprof 图中,读取输入的开销占大头。
func main() {defer profile.Start(profile.MemProfile, profile.MemProfileRate(1)).Stop()// defer profile.Start(profile.MemProfile).Stop()f, err := os.Open(os.Args[1])if err != nil {log.Fatalf("could not open file %q: %v", os.Args[1], err)}b := bufio.NewReader(f)words := 0inword := falsefor {r, err := readbyte(b)if err == io.EOF {break}if err != nil {log.Fatalf("could not read file %q: %v", os.Args[1], err)}if unicode.IsSpace(r) && inword {words++inword = false}inword = unicode.IsLetter(r)}fmt.Printf("%q: %d words\n", os.Args[1], words)}
通过在输入文件和 readbyte 之间插入 bufio.Reader
将修改后程序的时间与 wc 进行比较看看有多接近?来个性能分析,看看还有什么。
3.5.5. 内存分析
新 words 性能分析表明,在 readbyte 函数内有东西在分配。我们可以用 pprof 来分析一下。
defer profile.Start(profile.MemProfile).Stop()
然后照常运行程序
% go run main2.go moby.txt2018/08/25 14:41:15 profile: memory profiling enabled (rate 4096), /var/folders/by/3gf34_z95zg05cyj744_vhx40000gn/T/profile312088211/mem.pprof"moby.txt": 181275 words2018/08/25 14:41:15 profile: memory profiling disabled, /var/folders/by/3gf34_z95zg05cyj744_vhx40000gn/T/profile312088211/mem.pprof

正如我们怀疑的那样,分配来自 readbyte —— 这并不复杂,readbyte 有三行长:
使用 pprof 确定分配来自哪里。
func readbyte(r io.Reader) (rune, error) {var buf [1]byte_, err := r.Read(buf[:])return rune(buf[0]), err}
1. 分配在第 2 行
我们将在下一节中更详细地讨论为什么会发生这种情况,但目前我们看到的每个对 readbyte 的调用都是分配一个新的 1 字节长数组,并且该数组在堆上分配。
我们可以用什么方法避免这种情况?请尝试使用它们并使用 CPU 和内存分析来证明这一点。
Alloc objects vs. inuse objects
内存分析文件分为两种, go tool pprof 对应的 flags 来命名
•-alloc_objects 报告进行每个分配的调用站点。•-inuse_objects 报告在配置文件结束时,如果它是可到达的,则报告分配的调用站点。
为了演示这一点,这里有一个人为程序,它将以控制的方式分配一堆内存。
const count = 100000var y []bytefunc main() {defer profile.Start(profile.MemProfile, profile.MemProfileRate(1)).Stop()y = allocate()runtime.GC()}// allocate allocates count byte slices and returns the first slice allocated.func allocate() []byte {var x [][]bytefor i := 0; i < count; i++ {x = append(x, makeByteSlice())}return x[0]}// makeByteSlice returns a byte slice of a random length in the range [0, 16384).func makeByteSlice() []byte {return make([]byte, rand.Intn(2^14))}
该程序是使用 profile 包进行注释,我们将内存分析速率设置为 1,即记录每个分配的堆栈跟踪。这样做会使程序慢很多,但你马上就会明白为什么。
% go run main.go2018/08/25 15:22:05 profile: memory profiling enabled (rate 1), /var/folders/by/3gf34_z95zg05cyj744_vhx40000gn/T/profile730812803/mem.pprof2018/08/25 15:22:05 profile: memory profiling disabled, /var/folders/by/3gf34_z95zg05cyj744_vhx40000gn/T/profile730812803/mem.pprof
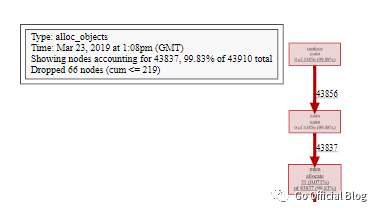
让我们看一下已分配对象的图,这是默认值,并显示在分析文件中导致每个对象分配的调用图。

不足为奇的是,超过 99% 的分配都在 makeByteSlice。现在,让我们使用 -inuse_objects 查看同一分析。
% go tool pprof -http=:8080 /var/folders/by/3gf34_z95zg05cyj744_vhx40000gn/T/profile891268605/mem.pprof
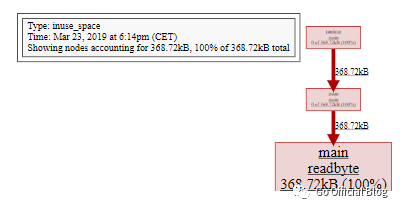
我们看到的不是在分析期间分配的对象,而是在分析文件被采样时仍在使用的对象 , 这忽略垃圾回收器回收的对象的堆栈跟踪。
3.5.6. 阻塞分析
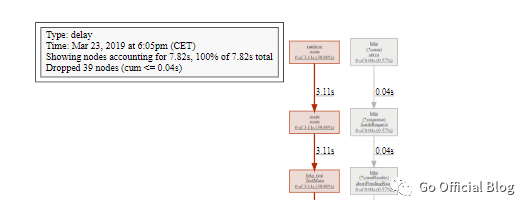
最后一个分析文件类型是阻塞分析。我们将使用来自 net/http 包的 ClientServer 基准。
% go test -run=XXX -bench=ClientServer$ -blockprofile=/tmp/block.p net/http% go tool pprof -http=:8080 /tmp/block.p

3.5.7. 线程创建分析
Go 1.11 添加了对分析操作系统线程创建的支持。
向 godoc 添加线程创建分析,并观察分析 godoc -http=:8080 -index 的结果。
3.5.8. 帧指针
Go 1.7 已经发布,并且与 amd64 的新编译器一起发布的,编译器现在默认启用帧指针。
帧指针是始终指向当前堆栈帧顶部的寄存器。
帧指针使诸如 gdb (1) 和 perf (1) 等工具能够理解 Go 调用堆栈。
在本研讨会中,我们不会介绍这些工具,但你可以阅读和观看我关于介绍 Go 程序的七种不同方式的演示。
•Seven ways to profile a Go program[6] (slides)•Seven ways to profile a Go program[7] (video, 30 mins)•Seven ways to profile a Go program[8] (webcast, 60 mins)
3.5.9. 练习
• 从一段你熟悉的代码生成分析文件。如果没有代码示例,可以尝试对 godoc 进行分析
% go get golang.org/x/tools/cmd/godoc% cd $GOPATH/src/golang.org/x/tools/cmd/godoc% vim main.go
• 如果要在一台机器上生成分析文件,并在另一台计算机上检查分析文件,你将如何操作?
引用链接
[1] pprof: https://github.com/google/pprof[2] Google Perf Tools: https://github.com/gperftools/gperftools[3] Profiling Go programs: http://blog.golang.org/profiling-go-programs[4] Debugging performance issues in Go programs: https://software.intel.com/en-us/blogs/2014/05/10/debugging-performance-issues-in-go-programs[5] Moby Dick: https://www.gutenberg.org/ebooks/2701[6] Seven ways to profile a Go program: https://talks.godoc.org/github.com/davecheney/presentations/seven.slide[7] Seven ways to profile a Go program: https://www.youtube.com/watch?v=2h_NFBFrciI[8] Seven ways to profile a Go program: https://www.bigmarker.com/remote-meetup-go/Seven-ways-to-profile-a-Go-program
