设计模式也可以这么简单

作者:hongjie 来源:https://javadoop.com/post/design-pattern
面向接口编程,而不是面向实现。这个很重要,也是优雅的、可扩展的代码的第一步,这就不需要多说了吧。
职责单一原则。每个类都应该只有一个单一的功能,并且该功能应该由这个类完全封装起来。
对修改关闭,对扩展开放。对修改关闭是说,我们辛辛苦苦加班写出来的代码,该实现的功能和该修复的 bug 都完成了,别人可不能说改就改;对扩展开放就比较好理解了,也就是说在我们写好的代码基础上,很容易实现扩展。
创建型模式
简单工厂模式
public classFoodFactory{

    publicstatic Food makeFood(String name) {
        if (name.equals("noodle")) {
            Food noodle = new LanZhouNoodle();
            noodle.addSpicy("more");
            return noodle;
        } else if (name.equals("chicken")) {
            Food chicken = new HuangMenChicken();
            chicken.addCondiment("potato");
            return chicken;
        } else {
            return null;
        }
    }
}
我们强调职责单一原则,一个类只提供一种功能,FoodFactory 的功能就是只要负责生产各种 Food。
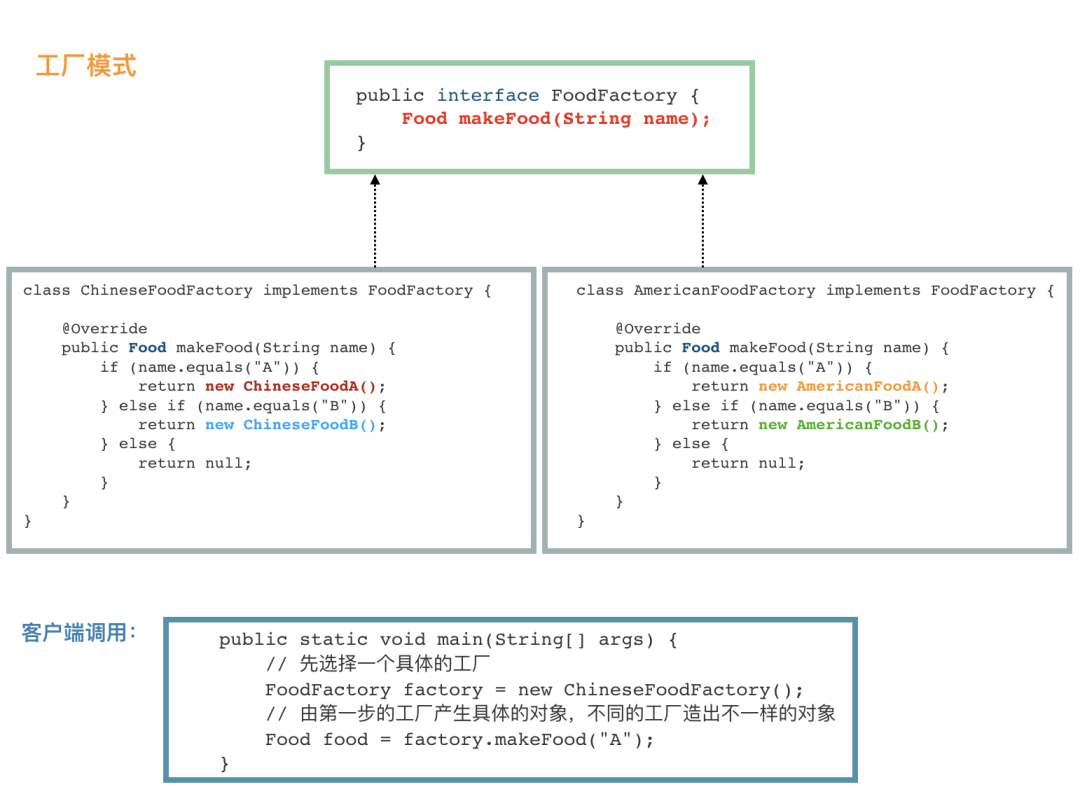
工厂模式
public interfaceFoodFactory{
    Food makeFood(String name);
}
public classChineseFoodFactoryimplementsFoodFactory{

    @Override
    public Food makeFood(String name) {
        if (name.equals("A")) {
            return new ChineseFoodA();
        } else if (name.equals("B")) {
            return new ChineseFoodB();
        } else {
            return null;
        }
    }
}
public classAmericanFoodFactoryimplementsFoodFactory{

    @Override
    public Food makeFood(String name) {
        if (name.equals("A")) {
            return new AmericanFoodA();
        } else if (name.equals("B")) {
            return new AmericanFoodB();
        } else {
            return null;
        }
    }
}
public classAPP{
    publicstaticvoidmain(String[] args) {
        // 先选择一个具体的工厂
        FoodFactory factory = new ChineseFoodFactory();
        // 由第一步的工厂产生具体的对象,不同的工厂造出不一样的对象
        Food food = factory.makeFood("A");
    }
}
抽象工厂模式
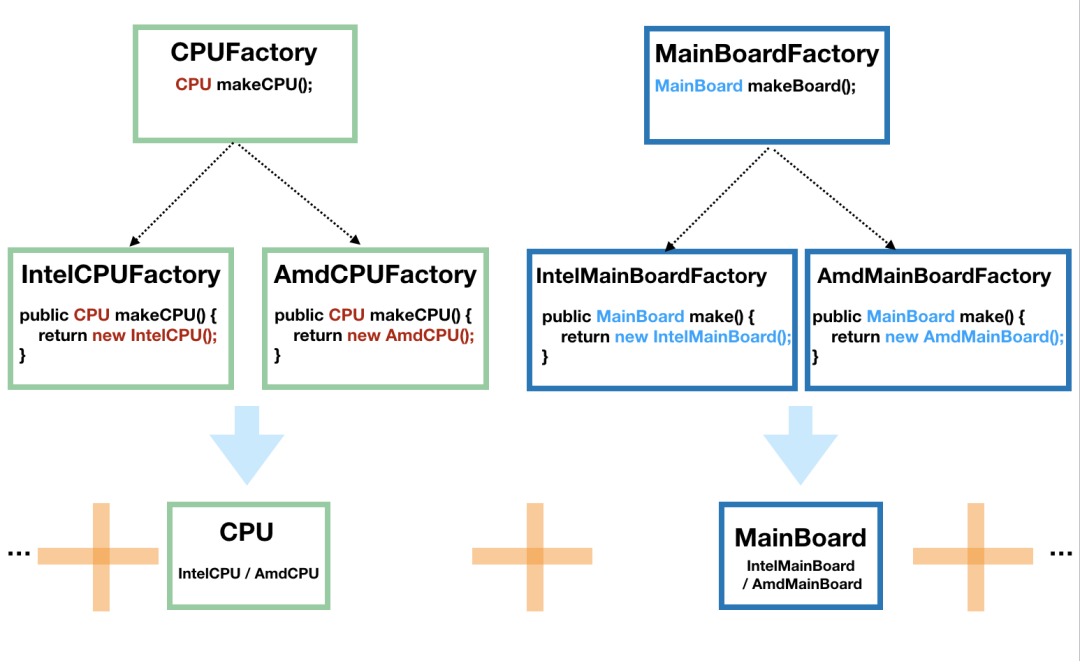
// 得到 Intel 的 CPU
CPUFactory cpuFactory = new IntelCPUFactory();
CPU cpu = intelCPUFactory.makeCPU();

// 得到 AMD 的主板
MainBoardFactory mainBoardFactory = new AmdMainBoardFactory();
MainBoard mainBoard = mainBoardFactory.make();

// 组装 CPU 和主板
Computer computer = new Computer(cpu, mainBoard);
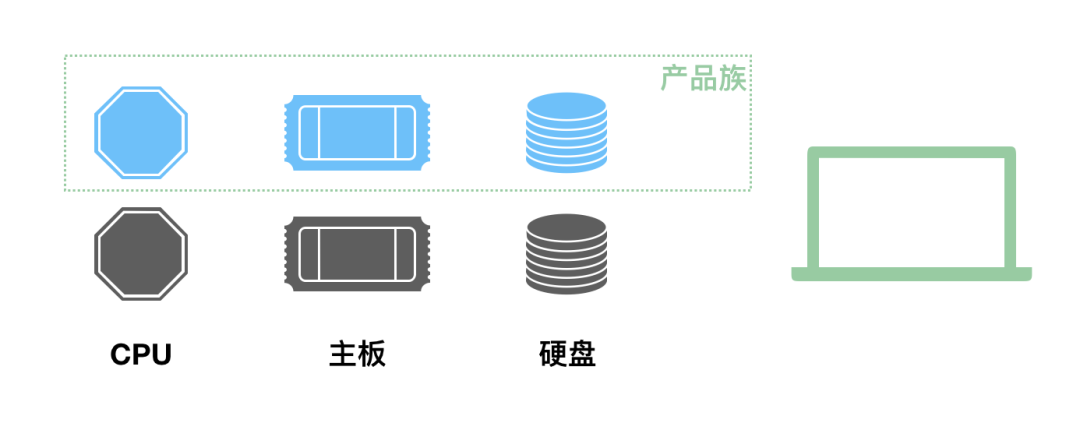

publicstaticvoidmain(String[] args) {
    // 第一步就要选定一个“大厂”
    ComputerFactory cf = new AmdFactory();
    // 从这个大厂造 CPU
    CPU cpu = cf.makeCPU();
    // 从这个大厂造主板
    MainBoard board = cf.makeMainBoard();
      // 从这个大厂造硬盘
      HardDisk hardDisk = cf.makeHardDisk();

    // 将同一个厂子出来的 CPU、主板、硬盘组装在一起
    Computer result = new Computer(cpu, board, hardDisk);
}
单例模式
public classSingleton{
    // 首先,将 new Singleton() 堵死
    privateSingleton() {};
    // 创建私有静态实例,意味着这个类第一次使用的时候就会进行创建
    private static Singleton instance = new Singleton();

    publicstatic Singleton getInstance() {
        return instance;
    }
    // 瞎写一个静态方法。这里想说的是,如果我们只是要调用 Singleton.getDate(...),
    // 本来是不想要生成 Singleton 实例的,不过没办法,已经生成了
    publicstatic Date getDate(String mode) {return new Date();}
}
很多人都能说出饿汉模式的缺点,可是我觉得生产过程中,很少碰到这种情况:你定义了一个单例的类,不需要其实例,可是你却把一个或几个你会用到的静态方法塞到这个类中。
public classSingleton{
    // 首先,也是先堵死 new Singleton() 这条路
    privateSingleton() {}
    // 和饿汉模式相比,这边不需要先实例化出来,注意这里的 volatile,它是必须的
    private static volatile Singleton instance = null;

    publicstatic Singleton getInstance() {
        if (instance == null) {
            // 加锁
            synchronized (Singleton.class) {
                // 这一次判断也是必须的,不然会有并发问题
                if (instance == null) {
                    instance = new Singleton();
                }
            }
        }
        return instance;
    }
}
双重检查,指的是两次检查 instance 是否为 null。 volatile 在这里是需要的,希望能引起读者的关注。 很多人不知道怎么写,直接就在 getInstance() 方法签名上加上 synchronized,这就不多说了,性能太差。
public classSingleton3{

    privateSingleton3() {}
    // 主要是使用了 嵌套类可以访问外部类的静态属性和静态方法 的特性
    private static classHolder{
        private static Singleton3 instance = new Singleton3();
    }
    publicstatic Singleton3 getInstance() {
        return Holder.instance;
    }
}
注意,很多人都会把这个嵌套类说成是静态内部类,严格地说,内部类和嵌套类是不一样的,它们能访问的外部类权限也是不一样的。
建造者模式
Food food = new FoodBuilder().a().b().c().build();
Food food = Food.builder().a().b().c().build();
classUser{
    // 下面是“一堆”的属性
    private String name;
    private String password;
    private String nickName;
    private int age;

    // 构造方法私有化,不然客户端就会直接调用构造方法了
    privateUser(String name, String password, String nickName, int age) {
        this.name = name;
        this.password = password;
        this.nickName = nickName;
        this.age = age;
    }
    // 静态方法,用于生成一个 Builder,这个不一定要有,不过写这个方法是一个很好的习惯,
    // 有些代码要求别人写 new User.UserBuilder().a()...build() 看上去就没那么好
    publicstatic UserBuilder builder() {
        return new UserBuilder();
    }

    public static classUserBuilder{
        // 下面是和 User 一模一样的一堆属性
        private String  name;
        private String password;
        private String nickName;
        private int age;

        privateUserBuilder() {
        }

        // 链式调用设置各个属性值,返回 this,即 UserBuilder
        public UserBuilder name(String name) {
            this.name = name;
            return this;
        }

        public UserBuilder password(String password) {
            this.password = password;
            return this;
        }

        public UserBuilder nickName(String nickName) {
            this.nickName = nickName;
            return this;
        }

        public UserBuilder age(int age) {
            this.age = age;
            return this;
        }

        // build() 方法负责将 UserBuilder 中设置好的属性“复制”到 User 中。
        // 当然,可以在 “复制” 之前做点检验
        public User build() {
            if (name == null || password == null) {
                throw new RuntimeException("用户名和密码必填");
            }
            if (age <= 0 || age >= 150) {
                throw new RuntimeException("年龄不合法");
            }
            // 还可以做赋予”默认值“的功能
              if (nickName == null) {
                nickName = name;
            }
            return new User(name, password, nickName, age);
        }
    }
}
public classAPP{
    publicstaticvoidmain(String[] args) {
        User d = User.builder()
                .name("foo")
                .password("pAss12345")
                .age(25)
                .build();
    }
}
题外话,强烈建议读者使用 lombok,用了 lombok 以后,上面的一大堆代码会变成如下这样:
@Builder
classUser{
    private String  name;
    private String password;
    private String nickName;
    private int age;
}
怎么样,省下来的时间是不是又可以干点别的了。
User user = new User().setName("").setPassword("").setAge(20);
很多人是这么用的,但是笔者觉得其实这种写法非常地不优雅,不是很推荐使用。
原型模式
protectednative Object clone() throws CloneNotSupportedException;
java 的克隆是浅克隆,碰到对象引用的时候,克隆出来的对象和原对象中的引用将指向同一个对象。通常实现深克隆的方法是将对象进行序列化,然后再进行反序列化。
创建型模式总结
结构型模式
代理模式
理解代理这个词,这个模式其实就简单了。
public interfaceFoodService{
    Food makeChicken();
    Food makeNoodle();
}

public classFoodServiceImplimplementsFoodService{
    public Food makeChicken() {
          Food f = new Chicken()
        f.setChicken("1kg");
          f.setSpicy("1g");
          f.setSalt("3g");
        return f;
    }
    public Food makeNoodle() {
        Food f = new Noodle();
        f.setNoodle("500g");
        f.setSalt("5g");
        return f;
    }
}

// 代理要表现得“就像是”真实实现类,所以需要实现 FoodService
public classFoodServiceProxyimplementsFoodService{

    // 内部一定要有一个真实的实现类,当然也可以通过构造方法注入
    private FoodService foodService = new FoodServiceImpl();

    public Food makeChicken() {
        System.out.println("我们马上要开始制作鸡肉了");

        // 如果我们定义这句为核心代码的话,那么,核心代码是真实实现类做的,
        // 代理只是在核心代码前后做些“无足轻重”的事情
        Food food = foodService.makeChicken();

        System.out.println("鸡肉制作完成啦,加点胡椒粉"); // 增强
          food.addCondiment("pepper");

        return food;
    }
    public Food makeNoodle() {
        System.out.println("准备制作拉面~");
        Food food = foodService.makeNoodle();
        System.out.println("制作完成啦")
        return food;
    }
}
// 这里用代理类来实例化
FoodService foodService = new FoodServiceProxy();
foodService.makeChicken();

适配器模式
默认适配器模式
public interfaceFileAlterationListener{
    voidonStart(final FileAlterationObserver observer);
    voidonDirectoryCreate(final File directory);
    voidonDirectoryChange(final File directory);
    voidonDirectoryDelete(final File directory);
    voidonFileCreate(final File file);
    voidonFileChange(final File file);
    voidonFileDelete(final File file);
    voidonStop(final FileAlterationObserver observer);
}
public classFileAlterationListenerAdaptorimplementsFileAlterationListener{

    publicvoidonStart(final FileAlterationObserver observer) {
    }

    publicvoidonDirectoryCreate(final File directory) {
    }

    publicvoidonDirectoryChange(final File directory) {
    }

    publicvoidonDirectoryDelete(final File directory) {
    }

    publicvoidonFileCreate(final File file) {
    }

    publicvoidonFileChange(final File file) {
    }

    publicvoidonFileDelete(final File file) {
    }

    publicvoidonStop(final FileAlterationObserver observer) {
    }
}
public classFileMonitorextendsFileAlterationListenerAdaptor{
    publicvoidonFileCreate(final File file) {
        // 文件创建
        doSomething();
    }

    publicvoidonFileDelete(final File file) {
        // 文件删除
        doSomething();
    }
}
对象适配器模式
public interfaceDuck{
    publicvoidquack(); // 鸭的呱呱叫
    publicvoidfly(); // 飞
}

public interfaceCock{
    publicvoidgobble(); // 鸡的咕咕叫
    publicvoidfly(); // 飞
}

public classWildCockimplementsCock{
    publicvoidgobble() {
        System.out.println("咕咕叫");
    }
    publicvoidfly() {
        System.out.println("鸡也会飞哦");
    }
}
// 毫无疑问,首先,这个适配器肯定需要 implements Duck,这样才能当做鸭来用
public classCockAdapterimplementsDuck{

    Cock cock;
    // 构造方法中需要一个鸡的实例,此类就是将这只鸡适配成鸭来用
      publicCockAdapter(Cock cock) {
        this.cock = cock;
    }

    // 实现鸭的呱呱叫方法
    @Override
      publicvoidquack() {
        // 内部其实是一只鸡的咕咕叫
        cock.gobble();
    }

      @Override
      publicvoidfly() {
        cock.fly();
    }
}
publicstaticvoidmain(String[] args) {
    // 有一只野鸡
      Cock wildCock = new WildCock();
      // 成功将野鸡适配成鸭
      Duck duck = new CockAdapter(wildCock);
      ...
}
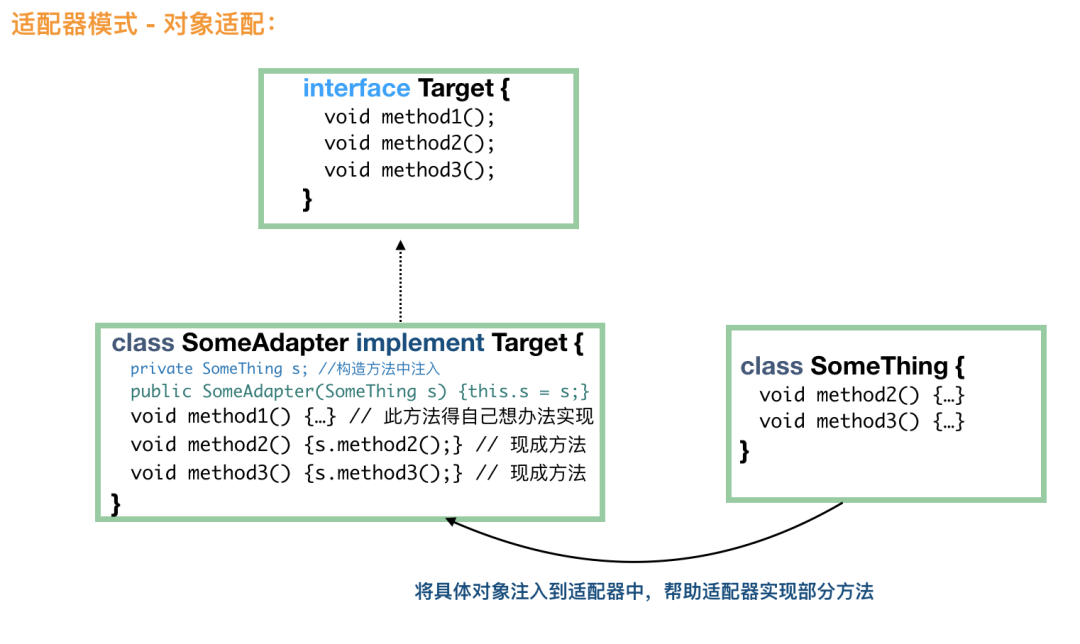
类适配器模式
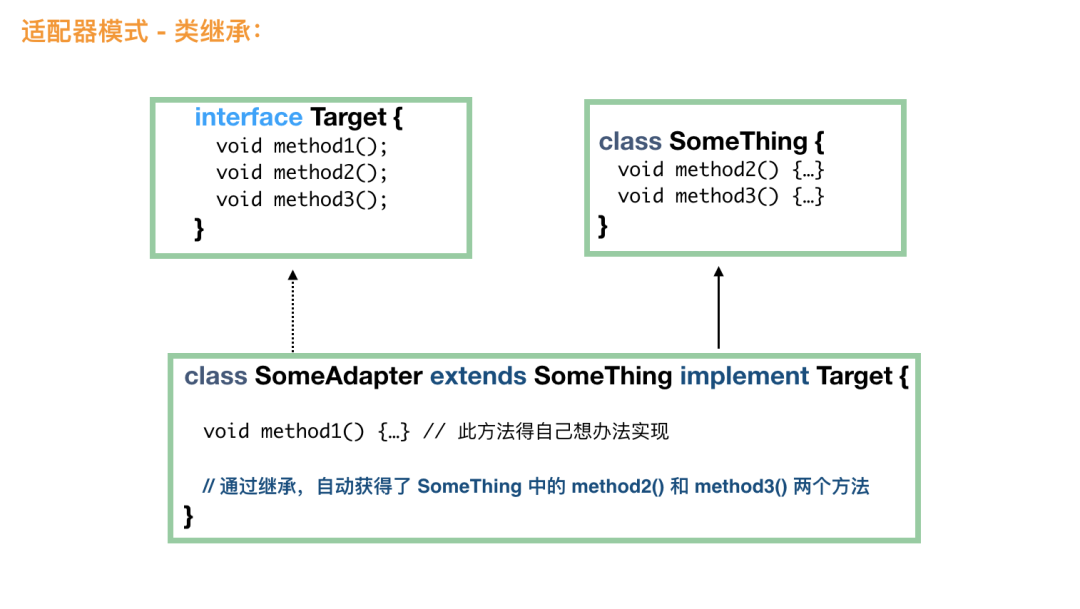
Target t = new SomeAdapter(); 就可以了。适配器模式总结
类适配和对象适配的异同
一个采用继承,一个采用组合;
类适配属于静态实现,对象适配属于组合的动态实现,对象适配需要多实例化一个对象。
总体来说,对象适配用得比较多。
适配器模式和代理模式的异同
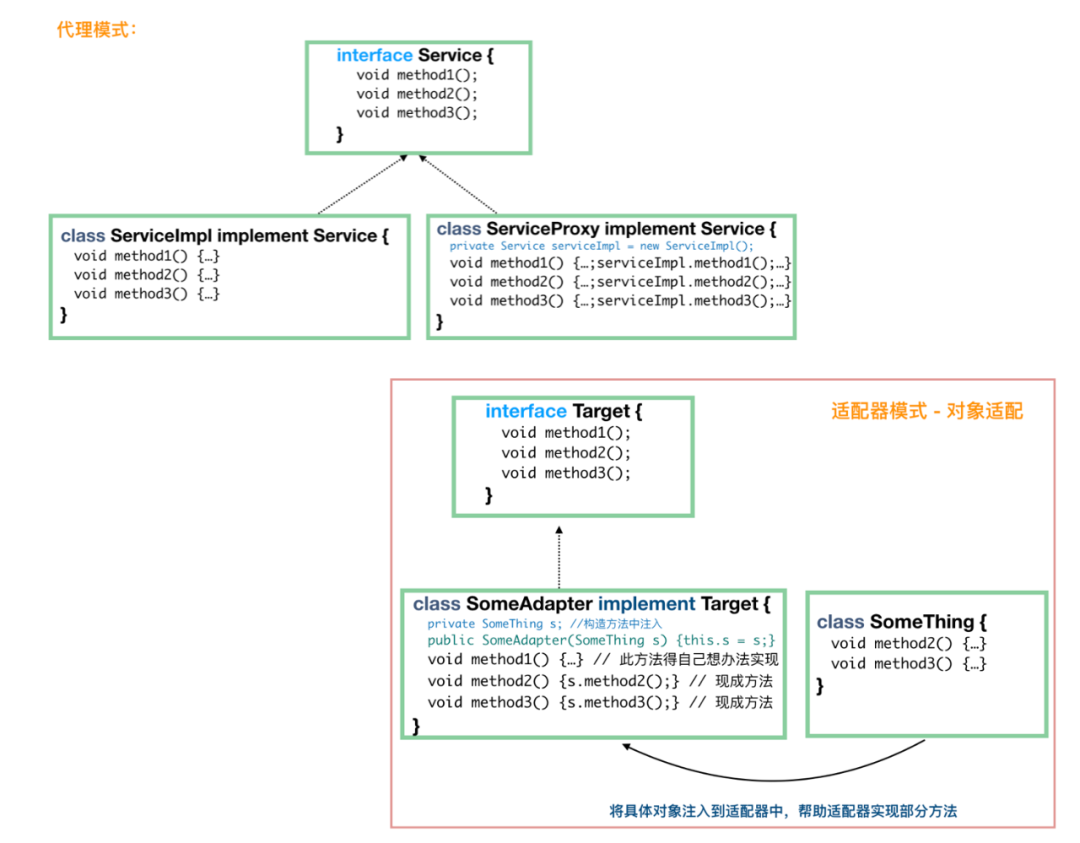
比较这两种模式,其实是比较对象适配器模式和代理模式,在代码结构上,它们很相似,都需要一个具体的实现类的实例。但是它们的目的不一样,代理模式做的是增强原方法的活;适配器做的是适配的活,为的是提供“把鸡包装成鸭,然后当做鸭来使用”,而鸡和鸭它们之间原本没有继承关系。
桥梁模式
public interfaceDrawAPI{
   publicvoiddraw(int radius, int x, int y);
}
public classRedPenimplementsDrawAPI{
    @Override
    publicvoiddraw(int radius, int x, int y) {
        System.out.println("用红色笔画图,radius:" + radius + ", x:" + x + ", y:" + y);
    }
}
public classGreenPenimplementsDrawAPI{
    @Override
    publicvoiddraw(int radius, int x, int y) {
        System.out.println("用绿色笔画图,radius:" + radius + ", x:" + x + ", y:" + y);
    }
}
public classBluePenimplementsDrawAPI{
    @Override
    publicvoiddraw(int radius, int x, int y) {
        System.out.println("用蓝色笔画图,radius:" + radius + ", x:" + x + ", y:" + y);
    }
}
public abstract classShape{
    protected DrawAPI drawAPI;
    protectedShape(DrawAPI drawAPI) {
        this.drawAPI = drawAPI;
    }
    publicabstractvoiddraw();
}
// 圆形
public classCircleextendsShape{
    private int radius;
    publicCircle(int radius, DrawAPI drawAPI) {
        super(drawAPI);
        this.radius = radius;
    }
    publicvoiddraw() {
        drawAPI.draw(radius, 0, 0);
    }
}
// 长方形
public classRectangleextendsShape{
    private int x;
    private int y;
    publicRectangle(int x, int y, DrawAPI drawAPI) {
        super(drawAPI);
        this.x = x;
        this.y = y;
    }
    publicvoiddraw() {
        drawAPI.draw(0, x, y);
    }
}
publicstaticvoidmain(String[] args) {
    Shape greenCircle = new Circle(10, new GreenPen());
    Shape redRectangle = new Rectangle(4, 8, new RedPen());
    greenCircle.draw();
    redRectangle.draw();
}

本节引用了这里的例子,并对其进行了修改。
装饰模式
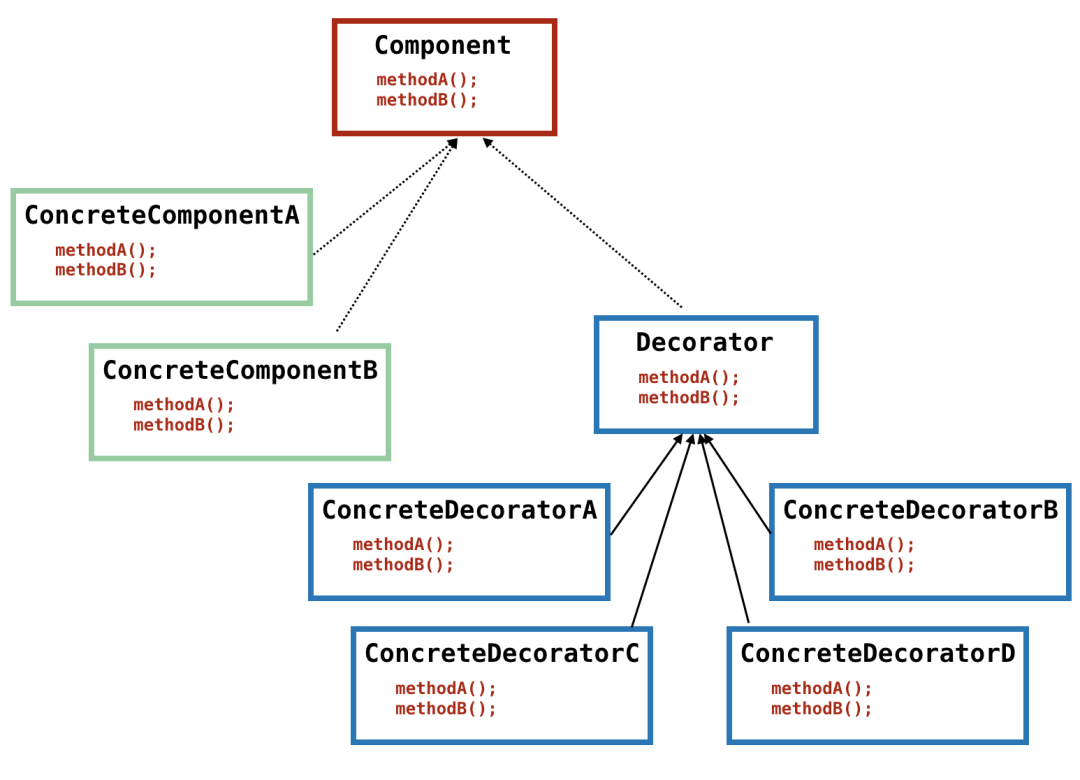
Component 其实已经有了 ConcreteComponentA 和 ConcreteComponentB 两个实现类了,但是,如果我们要增强这两个实现类的话,我们就可以采用装饰模式,用具体的装饰器来装饰实现类,以达到增强的目的。从名字来简单解释下装饰器。既然说是装饰,那么往往就是添加小功能这种,而且,我们要满足可以添加多个小功能。最简单的,代理模式就可以实现功能的增强,但是代理不容易实现多个功能的增强,当然你可以说用代理包装代理的多层包装方式,但是那样的话代码就复杂了。
注意这段话中混杂在各个名词中的 Component 和 Decorator,别搞混了。
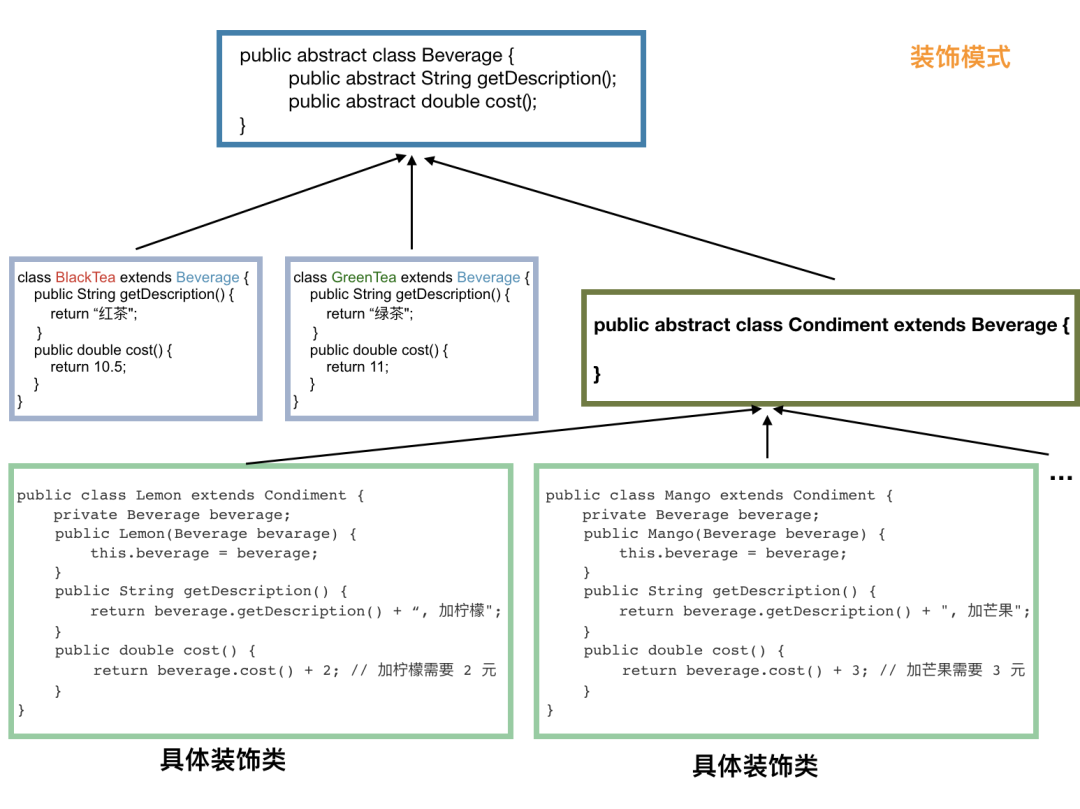
public abstract classBeverage{
      // 返回描述
      publicabstract String getDescription();
      // 返回价格
      publicabstractdoublecost();
}
public classBlackTeaextendsBeverage{
      public String getDescription() {
        return "红茶";
    }
      publicdoublecost() {
        return 10;
    }
}
public classGreenTeaextendsBeverage{
    public String getDescription() {
        return "绿茶";
    }
      publicdoublecost() {
        return 11;
    }
}
...// 咖啡省略
// 调料
public abstract classCondimentextendsBeverage{

}
public classLemonextendsCondiment{
    private Beverage bevarage;
    // 这里很关键,需要传入具体的饮料,如需要传入没有被装饰的红茶或绿茶,
    // 当然也可以传入已经装饰好的芒果绿茶,这样可以做芒果柠檬绿茶
    publicLemon(Beverage bevarage) {
        this.bevarage = bevarage;
    }
    public String getDescription() {
        // 装饰
        return bevarage.getDescription() + ", 加柠檬";
    }
    publicdoublecost() {
        // 装饰
        return beverage.cost() + 2; // 加柠檬需要 2 元
    }
}

public classMangoextendsCondiment{
    private Beverage bevarage;
    publicMango(Beverage bevarage) {
        this.bevarage = bevarage;
    }
    public String getDescription() {
        return bevarage.getDescription() + ", 加芒果";
    }
    publicdoublecost() {
        return beverage.cost() + 3; // 加芒果需要 3 元
    }
}
...// 给每一种调料都加一个类
publicstaticvoidmain(String[] args) {
    // 首先,我们需要一个基础饮料,红茶、绿茶或咖啡
    Beverage beverage = new GreenTea();
    // 开始装饰
    beverage = new Lemon(beverage); // 先加一份柠檬
    beverage = new Mongo(beverage); // 再加一份芒果

    System.out.println(beverage.getDescription() + " 价格:¥" + beverage.cost());
    //"绿茶, 加柠檬, 加芒果 价格:¥16"
}
Beverage beverage = new Mongo(new Pearl(new Lemon(new Lemon(new BlackTea()))));

InputStream inputStream = new LineNumberInputStream(new BufferedInputStream(new FileInputStream("")));
DataInputStream is = new DataInputStream(
                              new BufferedInputStream(
                                  new FileInputStream("")));
所以说嘛,要找到纯的严格符合设计模式的代码还是比较难的。
门面模式
public interfaceShape{
   voiddraw();
}
public classCircleimplementsShape{
    @Override
    publicvoiddraw() {
       System.out.println("Circle::draw()");
    }
}

public classRectangleimplementsShape{
    @Override
    publicvoiddraw() {
       System.out.println("Rectangle::draw()");
    }
}
publicstaticvoidmain(String[] args) {
    // 画一个圆形
      Shape circle = new Circle();
      circle.draw();

      // 画一个长方形
      Shape rectangle = new Rectangle();
      rectangle.draw();
}
public classShapeMaker{
   private Shape circle;
   private Shape rectangle;
   private Shape square;

   publicShapeMaker() {
      circle = new Circle();
      rectangle = new Rectangle();
      square = new Square();
   }

  /**
   * 下面定义一堆方法,具体应该调用什么方法,由这个门面来决定
   */

   publicvoiddrawCircle(){
      circle.draw();
   }
   publicvoiddrawRectangle(){
      rectangle.draw();
   }
   publicvoiddrawSquare(){
      square.draw();
   }
}
publicstaticvoidmain(String[] args) {
  ShapeMaker shapeMaker = new ShapeMaker();

  // 客户端调用现在更加清晰了
  shapeMaker.drawCircle();
  shapeMaker.drawRectangle();
  shapeMaker.drawSquare();
}
组合模式
public classEmployee{
private String name;
private String dept;
private int salary;
private Listsubordinates; // 下属
publicEmployee(String name,String dept, int sal) {
this.name = name;
this.dept = dept;
this.salary = sal;
subordinates = new ArrayList();
}
publicvoidadd(Employee e) {
subordinates.add(e);
}
publicvoidremove(Employee e) {
subordinates.remove(e);
}
public ListgetSubordinates() {
return subordinates;
}
public String toString(){
return ("Employee :[ Name : " + name + ", dept : " + dept + ", salary :" + salary+" ]");
}
}
享元模式
结构型模式总结
行为型模式
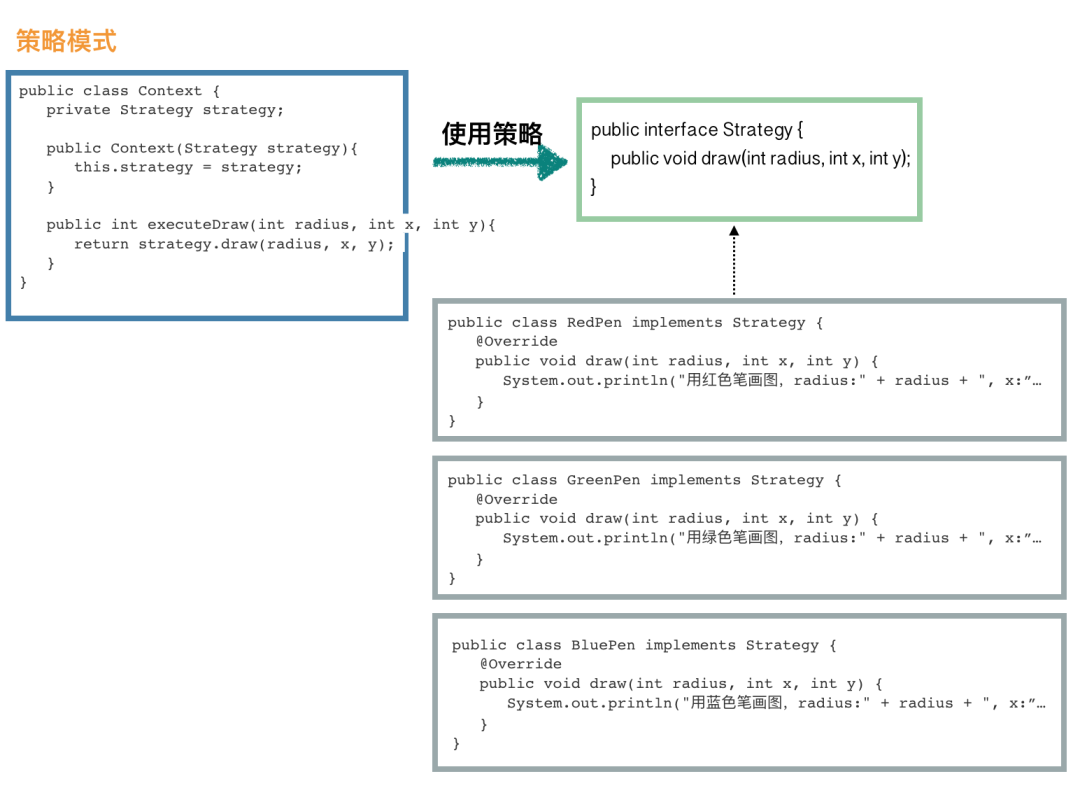
策略模式
public interfaceStrategy{
   publicvoiddraw(int radius, int x, int y);
}
public classRedPenimplementsStrategy{
   @Override
   publicvoiddraw(int radius, int x, int y) {
      System.out.println("用红色笔画图,radius:" + radius + ", x:" + x + ", y:" + y);
   }
}
public classGreenPenimplementsStrategy{
   @Override
   publicvoiddraw(int radius, int x, int y) {
      System.out.println("用绿色笔画图,radius:" + radius + ", x:" + x + ", y:" + y);
   }
}
public classBluePenimplementsStrategy{
   @Override
   publicvoiddraw(int radius, int x, int y) {
      System.out.println("用蓝色笔画图,radius:" + radius + ", x:" + x + ", y:" + y);
   }
}
public classContext{
   private Strategy strategy;

   publicContext(Strategy strategy){
      this.strategy = strategy;
   }

   publicintexecuteDraw(int radius, int x, int y){
      return strategy.draw(radius, x, y);
   }
}
publicstaticvoidmain(String[] args) {
    Context context = new Context(new BluePen()); // 使用绿色笔来画
      context.executeDraw(10, 0, 0);
}

观察者模式
public classSubject{
private Listobservers = new ArrayList ();
private int state;
publicintgetState() {
return state;
}
publicvoidsetState(int state) {
this.state = state;
// 数据已变更,通知观察者们
notifyAllObservers();
}
// 注册观察者
publicvoidattach(Observer observer) {
observers.add(observer);
}
// 通知观察者们
publicvoidnotifyAllObservers() {
for (Observer observer : observers) {
observer.update();
}
}
}
public abstract classObserver{
    protected Subject subject;
    publicabstractvoidupdate();
}
public classBinaryObserverextendsObserver{
    // 在构造方法中进行订阅主题
    publicBinaryObserver(Subject subject) {
        this.subject = subject;
        // 通常在构造方法中将 this 发布出去的操作一定要小心
        this.subject.attach(this);
    }
    // 该方法由主题类在数据变更的时候进行调用
    @Override
    publicvoidupdate() {
        String result = Integer.toBinaryString(subject.getState());
        System.out.println("订阅的数据发生变化,新的数据处理为二进制值为:" + result);
    }
}

public classHexaObserverextendsObserver{
    publicHexaObserver(Subject subject) {
        this.subject = subject;
        this.subject.attach(this);
    }
    @Override
    publicvoidupdate() {
        String result = Integer.toHexString(subject.getState()).toUpperCase();
        System.out.println("订阅的数据发生变化,新的数据处理为十六进制值为:" + result);
    }
}
publicstaticvoidmain(String[] args) {
    // 先定义一个主题
    Subject subject1 = new Subject();
    // 定义观察者
    new BinaryObserver(subject1);
    new HexaObserver(subject1);

    // 模拟数据变更,这个时候,观察者们的 update 方法将会被调用
    subject.setState(11);
}
订阅的数据发生变化,新的数据处理为二进制值为:1011
订阅的数据发生变化,新的数据处理为十六进制值为:B
责任链模式
如果产品给你这个需求的话,我想大部分人一开始肯定想的就是,用一个 List 来存放所有的规则,然后 foreach 执行一下每个规则就好了。不过,读者也先别急,看看责任链模式和我们说的这个有什么不一样?
public abstract classRuleHandler{
    // 后继节点
    protected RuleHandler successor;

    publicabstractvoidapply(Context context);

    publicvoidsetSuccessor(RuleHandler successor) {
        this.successor = successor;
    }

    public RuleHandler getSuccessor() {
        return successor;
    }
}
public classNewUserRuleHandlerextendsRuleHandler{
    publicvoidapply(Context context) {
        if (context.isNewUser()) {
            // 如果有后继节点的话,传递下去
            if (this.getSuccessor() != null) {
                this.getSuccessor().apply(context);
            }
        } else {
            throw new RuntimeException("该活动仅限新用户参与");
        }
    }
}
public classLocationRuleHandlerextendsRuleHandler{
    publicvoidapply(Context context) {
        boolean allowed = activityService.isSupportedLocation(context.getLocation);
        if (allowed) {
            if (this.getSuccessor() != null) {
                this.getSuccessor().apply(context);
            }
        } else {
            throw new RuntimeException("非常抱歉,您所在的地区无法参与本次活动");
        }
    }
}
public classLimitRuleHandlerextendsRuleHandler{
    publicvoidapply(Context context) {
        int remainedTimes = activityService.queryRemainedTimes(context); // 查询剩余奖品
        if (remainedTimes > 0) {
            if (this.getSuccessor() != null) {
                this.getSuccessor().apply(userInfo);
            }
        } else {
            throw new RuntimeException("您来得太晚了,奖品被领完了");
        }
    }
}
publicstaticvoidmain(String[] args) {
    RuleHandler newUserHandler = new NewUserRuleHandler();
    RuleHandler locationHandler = new LocationRuleHandler();
    RuleHandler limitHandler = new LimitRuleHandler();

    // 假设本次活动仅校验地区和奖品数量,不校验新老用户
    locationHandler.setSuccessor(limitHandler);

    locationHandler.apply(context);
}
模板方法模式
public abstract classAbstractTemplate{
    // 这就是模板方法
    publicvoidtemplateMethod() {
        init();
        apply(); // 这个是重点
        end(); // 可以作为钩子方法
    }

    protectedvoidinit() {
        System.out.println("init 抽象层已经实现,子类也可以选择覆写");
    }

    // 留给子类实现
    protectedabstractvoidapply();

    protectedvoidend() {
    }
}
public classConcreteTemplateextendsAbstractTemplate{
    publicvoidapply() {
        System.out.println("子类实现抽象方法 apply");
    }

    publicvoidend() {
        System.out.println("我们可以把 method3 当做钩子方法来使用,需要的时候覆写就可以了");
    }
}
publicstaticvoidmain(String[] args) {
    AbstractTemplate t = new ConcreteTemplate();
    // 调用模板方法
    t.templateMethod();
}
状态模式
public interfaceState{
    publicvoiddoAction(Context context);
}
public classDeductStateimplementsState{

    publicvoiddoAction(Context context) {
        System.out.println("商品卖出,准备减库存");
        context.setState(this);

        //... 执行减库存的具体操作
    }

    public String toString() {
        return "Deduct State";
    }
}
public classRevertStateimplementsState{

    publicvoiddoAction(Context context) {
        System.out.println("给此商品补库存");
        context.setState(this);

        //... 执行加库存的具体操作
    }

    public String toString() {
        return "Revert State";
    }
}
public classContext{
    private State state;
      private String name;
      publicContext(String name) {
        this.name = name;
    }

      publicvoidsetState(State state) {
        this.state = state;
    }
      publicvoidgetState() {
        return this.state;
    }
}
publicstaticvoidmain(String[] args) {
    // 我们需要操作的是 iPhone X
    Context context = new Context("iPhone X");

    // 看看怎么进行补库存操作
      State revertState = new RevertState();
      revertState.doAction(context);

    // 同样的,减库存操作也非常简单
      State deductState = new DeductState();
      deductState.doAction(context);

      // 如果需要我们可以获取当前的状态
    // context.getState().toString();
}
行为型模式总结
总结
更多精彩?
在公众号【程序员编程】对话框输入以下关键词 查看更多优质内容! 大数据 | Java | 1024 | 电子书 | 速查表 Python进阶 | 面试 | 手册 | 成神 | 思想 | 小程序 命令行 | 人工智能 | 软件测试 | Web前端 | Python 获取更多学习资料
视频 | 面试 | 技术 | 电子书
评论
