爬虫:使用 MySQL 维护 IP 代理池
点击蓝色“Python交流圈”关注我丫
加个“星标”,每天一起进步一点点

来源: 夏悠然然
https://blog.csdn.net/qq_42730750/article/details/108026476
【导语】:做爬虫的时候,难免会快速多次地访问某个网站,触发网站的反爬虫机制,就会“封IP”。解决方法之一就是用代理池,本文就向大家介绍使用Mysql维护一个代理池的方法。
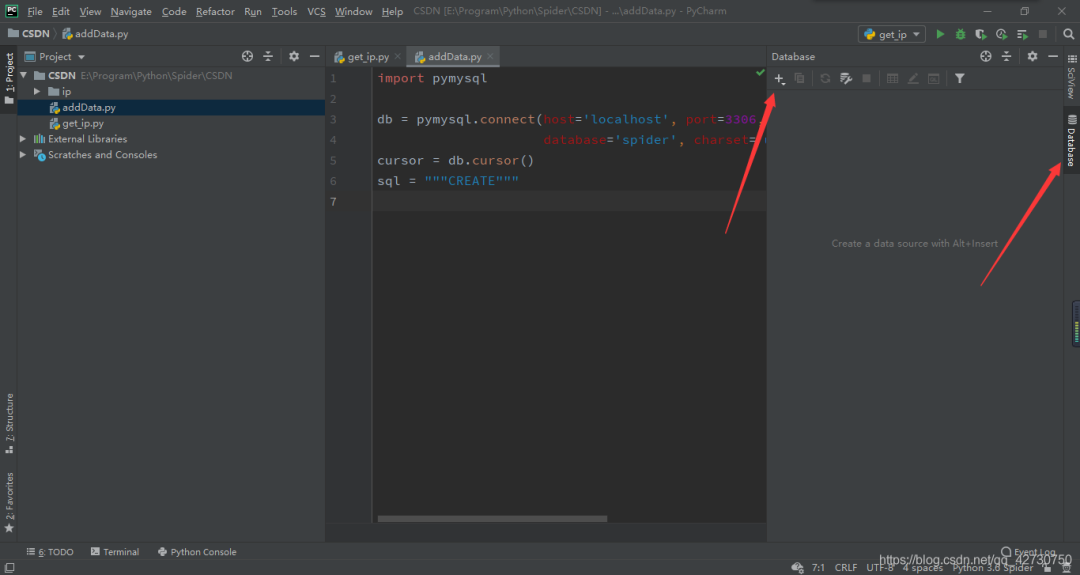
1. 配置PyCharm
为了方便写SQL代码及实时关注数据库的信息,我们先配置一下PyCharm。
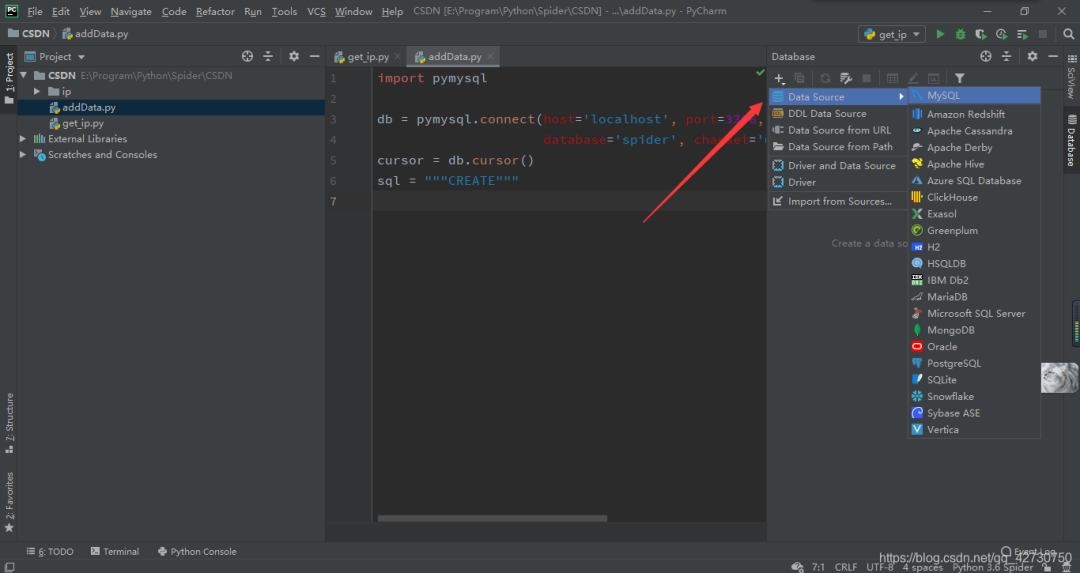
找到PyCharm右边栏的Database,点击它,然后它的界面会弹出来,点击+号,选择数据库。
如图示操作,找到我们的小鲸鱼MySQL,点击进入。
通过这个界面就可以配置MySQL了,这里有几个填写的我已经作了标注,简单介绍一下:
Name: 本次的配置的名字,这里我填的是spider,也可以使用默认名@localhost。
Host: 数据库的IP地址,因为我的MySQL在本地,所以这里我填的就是localhost。
User: 数据库的用户名。
Password: 数据库的密码。
Database: 数据库的名字,我这里提前建了一个名为spider的数据库。
URL: 这里我们在后面加上?serverTimezone=UTC,否则的话等会儿我们连接时会出现Server returns invalid timezone. Go to ‘Advanced’ tab and set‘serverTimezone’ property manually.错误,或者按照错误提示,去Advanced选项配置一下Advanced。
配置完后就点击Test Connection按钮,如果提示缺少驱动文件,直接在弹出的对话框点击下载即可,不出意外的话,就会在下面出现连接成功的信息。

插入数据后,按图示操作刷新一下,然后双击数据表,就可以看到数据表中的信息了,美滋滋ヾ(@▽@)ノ。


2. 函数介绍
这里我们通过pymysql库来操作MySQL数据库,我的数据库版本是8.0.16,还是去年安装的,这里不再叙述其安装步骤了,问问度娘。
维护我们代理IP池的大致流程就是:先建立一个数据表ipproxy,包含有ip字段、score字段,因为有些IP有时候可以用,有时候不可以,所以这里对每个要存入数据库的IP设置一个分数,我这里设置的最高分是5,也就是质量最高。如果我们在使用过程中发现IP不能用了,就将其分数减1;如果可以用,且分数小于5,就加1,然后定期清理分数为0的IP。

3. 代码实现
这里只贴出了增加的数据库操作代码及修改后的IP测试代码。
import pymysqlimport requestsfrom bs4 import BeautifulSoupimport pickleimport aiohttpimport asyncioimport timeimport randomasync def test_newip(ip_, url, ip_ok):headers = {'User-Agent': 'Mozilla/5.0 (Windows NT 10.0; Win64; x64) ''AppleWebKit/537.36 (KHTML, like Gecko) Chrome/71.0.3578.98 Safari/537.36'}conn = aiohttp.TCPConnector(verify_ssl=False)async with aiohttp.ClientSession(connector=conn) as session:print('正在测试ip: ' + ip_)try:proxy_ip = 'http://' + ip_async with session.get(url=url, headers=headers, proxy=proxy_ip, timeout=15) as response:if response.status == 200:print('代理可用: ' + ip_)ip_ok.append((ip_, 5))else:print('请求响应码不合法 ' + ip_)except:ip_ok.append((ip_, 4))print('代理请求失败', ip_)async def test_mysqlip(ip_, url, ip_ok):headers = {'User-Agent': 'Mozilla/5.0 (Windows NT 10.0; Win64; x64) ''AppleWebKit/537.36 (KHTML, like Gecko) Chrome/71.0.3578.98 Safari/537.36'}conn = aiohttp.TCPConnector(verify_ssl=False)async with aiohttp.ClientSession(connector=conn) as session:print('正在测试ip: ' + ip_[0])try:proxy_ip = 'http://' + ip_[0]async with session.get(url=url, headers=headers, proxy=proxy_ip, timeout=15) as response:if response.status == 200:print('ip可用: ' + ip_[0])new_score = 5 if ip_[1] == 5 else ip_[1] + 1ip_ok.append((ip_[0], new_score))else:print('请求响应码不合法 ' + ip_[0])except:new_score = 0 if ip_[1] == 0 else ip_[1] - 1ip_ok.append((ip_[0], new_score))print('代理请求失败', ip_[0])def get_mysqlip():db = pymysql.connect(host='localhost', port=3306, user='用户名', password='密码',database='数据库名', charset='utf8')cursor = db.cursor()sql = 'select ip, score from ipproxy'try:cursor.execute(sql)mysql_ip = list(cursor.fetchall())return mysql_ipexcept Exception as err:print('查询错误!!!')print(err)def update_ipscore(ip_list):db = pymysql.connect(host='localhost', port=3306, user='用户名', password='密码',database='数据库名', charset='utf8')cursor = db.cursor()for ip_ in ip_list:sql = 'update ipproxy set score=%s where ip=%s'cursor.execute(sql, (ip_[1], ip_[0]))db.commit()cursor.close()db.close()def delete_ip():db = pymysql.connect(host='localhost', port=3306, user='用户名', password='密码',database='数据库名', charset='utf8')cursor = db.cursor()sql = 'delete from ipproxy where score=0'try:cursor.execute(sql)except Exception as err:print('删除错误!!!')print(err)db.commit()cursor.close()db.close()def delete_ideticalip():db = pymysql.connect(host='localhost', port=3306, user='用户名', password='密码',database='数据库名', charset='utf8')cursor = db.cursor()sql = 'delete from ipproxy where ip in (select ip from (select ip from ipproxy group by ip having count(*)>1) s1)' \'and id not in (select id from (select id from ipproxy group by ip having count(*)>1) s2)'try:cursor.execute(sql)except Exception as err:print('删除错误!!!')print(err)db.commit()cursor.close()db.close()def insert_ip(ip_list):# 新爬取的ip直接插入数据库db = pymysql.connect(host='localhost', port=3306, user='用户名', password='密码',database='数据库名', charset='utf8')cursor = db.cursor()sql = 'create table if not exists ipproxy(' \'id int not null primary key auto_increment, ' \'ip char(21) not null , ' \'score int not null ) default charset utf8'cursor.execute(sql)try:sql = 'insert into ipproxy (ip, score) values (%s, %s)'cursor.executemany(sql, ip_list)# cursor.execute('drop table ipproxy')except Exception as err:print('插入错误!!!')print(err)db.commit()cursor.close()db.close()def insret_mysqlip(urls):ip_list1 = get_66ip()ip_list2 = get_kaixinip()ip_list3 = get_goubanjiaip()ip_list = list(set(ip_list1 + ip_list2 + ip_list3))print('已做去重处理!')ip_ok = []print('开始测试新爬取的ip: ')try:loop = asyncio.get_event_loop()for i in range(0, len(ip_list), 10):proxies_ip = ip_list[i: i + 10]tasks = [test_newip(proxy_ip, random.choice(urls), ip_ok) for proxy_ip in proxies_ip]loop.run_until_complete(asyncio.wait(tasks))time.sleep(3)except Exception as err:print('发生错误:', err.args)insert_ip(ip_ok)print('数据保存完毕!')def update_mysqlip(urls):ip_list = get_mysqlip()ip_ok = []print('开始测试新爬取的ip: ')try:loop = asyncio.get_event_loop()for i in range(0, len(ip_list), 10):proxies_ip = ip_list[i: i + 10]tasks = [test_mysqlip(proxy_ip, random.choice(urls), ip_ok) for proxy_ip in proxies_ip]loop.run_until_complete(asyncio.wait(tasks))time.sleep(3)except Exception as err:print('发生错误:', err.args)update_ipscore(ip_ok)print('数据更新完毕!')delete_ip()print('已删除score为0的ip!')delete_ideticalip()print('已做去重处理!')if __name__ == '__main__':urls = ['https://blog.csdn.net/qq_42730750/article/details/107868879','https://blog.csdn.net/qq_42730750/article/details/107931738','https://blog.csdn.net/qq_42730750/article/details/107869022','https://blog.csdn.net/qq_42730750/article/details/108016855','https://blog.csdn.net/qq_42730750/article/details/107703589','https://blog.csdn.net/qq_42730750/article/details/107869233','https://blog.csdn.net/qq_42730750/article/details/107869944','https://blog.csdn.net/qq_42730750/article/details/107919690']insret_mysqlip(urls)update_mysqlip(urls)
--End--
近期热门推荐? 1、大厂的 404 页面都长啥样?看到最后一个,我笑了。。。
4、用 Python 使用 Google Colab?岂止是炫酷
5、Ubuntu被曝严重漏洞:切换系统语言+输入几行命令,就能获取root权限
关注公众号,回复“001” 领取Python入门+进阶+实战开发92天全套视频教程
点赞最大的支持