
用 Vue 3.0 来写个小程序框架
由于小程序的开发起来比较原始复杂且繁琐,跟我们主流的开发方式差距很大,所以为了提高我们开发小程序的效率,市面上出现过很多的小程序的框架:mpvue,Taro,uni-app 等等,这些框架或多或少的将我们带到现代化的开发方式中来,它们可以让你使用 React 或者 Vue 来开发小程序。今天就分享一个如何利用 Vue 3.0 来构建一个小程序的框架。
基础知识
Vue 3.0
简单看看 Vue 3.0 有哪些新特性:
Composition-API
Composition-API 是一套让你可以很方便抽取逻辑函数的 API,相比于之前的 Options API,其代码组织能力更强,相同的逻辑可以写在同一个地方,各个逻辑之间界限分明。
看下面的例子即可说明:
<template>
  <div>
    <div>Add todo list</div>
    <div class="field">
       <input @input="handleInput" :value="todo" />
    </div>
    <button @click="handleAdd">Add +</button>
  </div>
</template>
<script>
import { ref, reactive } from 'vue';
import { useMainStore } from '@/store';
export default {
  setup() {
    const todo = ref('');
    const state = reactive({
        a: 1,
        b: 'hello world'
    });
    const store = useMainStore();
    const handleInput = (e) => {
      todo.value = e.detail.value;
      state.a = 'dsdas';
    };
    const handleAdd = () => {
      store.addTodo(todo.value);
    };
    return {
      handleInput,
      todo,
      handleAdd,
    };
  },
};
</script>
Fragment, Teleport
有点类似于 React 的 Fragment,使得我们在写 Vue 的模板时不再限制于需要一个根节点,在 Vue 3.0 里可以有多个根节点。
<Fragment>
   <component-1 />
   <component-2 />
</Fragment>
Teleport 用一种直接声明的方式来将子组件安装到 DOM 中的其他位置,类似于 React 的 Portal,但是功能更加强大。
<body>
  <div id="app" class="demo">
    <h3>Move the #content with the portal component</h3>
    <div>
      <teleport to="#endofbody">
        <p id="content">
          This should be moved to #endofbody.
        </p>
      </teleport>
      <span>This content should be nested</span>
    </div>
  </div>
  <div id="endofbody"></div>
</body>
更好的 TypeScript 支持
现在 Vue 3.0 的代码都是由 TS 来编写,加上 Composition-Api,再写业务代码的时候可以无缝切换到 TS 。
Custom Render API
利用这套 API 可以很方便的构建出自定义的渲染层,这个也是我们接下来需要重点讲的。
import {
  createRenderer,
  CreateAppFunction,
} from '@vue/runtime-core';
export const { render, createApp: baseCreateApp } = createRenderer({
  patchProp, // 修改 props 的函数
  ...nodeOps, // 修改 dom 节点的函数
});
render();
小程序
要开发一个小程序的页面基本上我们只需要四个文件:
index.js
index.js 就是我们写代码逻辑的地方。
有一个 Page 函数,里面是对象配置,类似于 Vue 的 options 配置一样,有一个 data 属性,存放着初始化的数据。 如果想要修改数据改变视图,又需要像 react 一样,需要调用 setData 去修改视图。
Page({
     data: {
       text: 'hello word'
    },
    onLoad() {
        this.setData({
            text: 'xxxxx'
        })
    },
    onReady() {},
    onShow() {},
    onHide() {},
    onUnload() {},
    handleClick() {
        this.setData({
            text: 'hello word'
        })
    }
})
index.ttml
index.ttml 是我们写视图模板的地方。
类似于 vue 的 template,我们需要先定义模板才能显示视图。 注意:不能直接在 index.js 里面去修改定义的模板的 DOM,只能先定义好,这是由于小程序架构双线程导致的,分为逻辑层和渲染层,我们写的 index.js 代码跑在逻辑层里面,index.ttml 跑在渲染层里面,两个线程就通过 setData 进行数据交换。
<view>
    <view bindtap="handleClick">{{text}}</view>
</view>
index.json
配置小程序页面和组件的地方,暂时不列出参数,但是一定要有这个文件。
index.ttss
顾名思义,就是写样式的地方,类似于 CSS。
模板
小程序为了封装的方便,可以先提前定义一个模板,然后再需要的地方引入模板即可,有点像 ejs 和 pug 的 import template 的用法
// 提前定义一个模板,里面用到了 text 这个变量
<template name="view">
   <view>{{text}}</view>
</template>
// 使用这个模板,我们把 data 里面定义的变量给传进去,这样模板里面就能渲染出 text 数据。
<template is="view" data="{{text: text}}"/>
动态模板
上面说到,小程序里面不能动态的修改 DOM 节点,只能提前定义好 template,然后通过 setData 的形式去修改视图。
但是小程序又有个比较动态的特性,叫做动态选择模板。
// 使用这个模板
 <template is="{{type}}" data="{{item: item}}"/>
上面 is 属性的 type 就是动态的,它是个变量,可以根据 type 的值来选择不同的模板,比如 type 为 view 时,就会渲染我们提前定义好的 view template。
自定义渲染层(非常重要)
重头戏来了,我们该如何利用 Vue 3.0 方便的自定义渲染层结合小程序的动态选择模板的特性来去写一个小程序的框架呢?
import {
  createRenderer,
  CreateAppFunction,
} from '@vue/runtime-core';
export const { render, createApp: baseCreateApp } = createRenderer({
  patchProp, // 修改 props 的函数
  ...nodeOps, // 修改 dom 节点的函数
});
我们可以看到 `createRenderer`函数需要两个参数,一个是 patchProp,一个是 nodeOps。
nodeOps
nodeOps 代表着修改 node 节点的一些操作,从而可以去改变视图,比如在 Vue 3.0 的浏览器环境中,是这么写的:
import { RendererOptions } from '@vue/runtime-core'
export const svgNS = 'http://www.w3.org/2000/svg'
const doc = (typeof document !== 'undefined' ? document : null) as Document
let tempContainer: HTMLElement
let tempSVGContainer: SVGElement
// 浏览器环境下的 nodeOps
export const nodeOps: Omit<RendererOptions<Node, Element>, 'patchProp'> = {
  insert: (child, parent, anchor) => {
    parent.insertBefore(child, anchor || null)
  },
  remove: child => {
    const parent = child.parentNode
    if (parent) {
      parent.removeChild(child)
    }
  },
  createElement: (tag, isSVG, is): Element =>
    isSVG
      ? doc.createElementNS(svgNS, tag)
      : doc.createElement(tag, is ? { is } : undefined),
  createText: text => doc.createTextNode(text),
  createComment: text => doc.createComment(text),
  setText: (node, text) => {
    node.nodeValue = text
  },
  setElementText: (el, text) => {
    el.textContent = text
  },
  parentNode: node => node.parentNode as Element | null,
  nextSibling: node => node.nextSibling,
  querySelector: selector => doc.querySelector(selector),
  setScopeId(el, id) {
    el.setAttribute(id, '')
  },
  cloneNode(el) {
    return el.cloneNode(true)
  },
}
实际上 Vue 不管数据怎么变化,要将数据显示到视图上都是调用了 DOM 的一些 API,像上面的 doc.createElement 和 doc.createTextNode 等等。
VNode
是由于小程序的限制,我们不能直接像浏览器环境一样去修改 DOM,那我们可以先模仿浏览器的环境,创造出一个虚拟的 DOM,我们叫做 VNode
class VNode {
  id: number;
  type: string;
  props?: Record<string, any>;
  text?: string;
  children: VNode[] = [];
  eventListeners?: Record<string, Function | Function[]> | null;
  parentNode?: VNode | null;
  nextSibling?: VNode | null;
  constructor({
    id,
    type,
    props = {},
    text,
  }: {
    id: number;
    type: string;
    props?: Record<string, any>;
    text?: string;
  }) {
    this.type = type;
    this.props = props;
    this.text = text;
    this.id = id;
  }
  appendChild(newNode: VNode) {
    if (this.children.find((child) => child.id === newNode.id)) {
      this.removeChild(newNode);
    }
    newNode.parentNode = this;
    this.children.push(newNode);
    setState({ node: newNode, data: newNode.toJSON() }); // 调用了小程序的 setData
  }
  insertBefore(newNode: VNode, anchor: VNode) {
    newNode.parentNode = this;
    newNode.nextSibling = anchor;
    if (this.children.find((child) => child.id === newNode.id)) {
      this.removeChild(newNode);
    }
    const anchorIndex = this.children.indexOf(anchor);
    this.children.splice(anchorIndex, 0, newNode);
    setState({
      node: this,
      key: '.children',
      data: this.children.map((c) => c.toJSON()),
    }); // 调用了小程序的 setData
  }
  removeChild(child: VNode) {
    const index = this.children.findIndex((node) => node.id === child.id);
    if (index < 0) {
      return;
    }
    if (index === 0) {
      this.children = [];
    } else {
      this.children[index - 1].nextSibling = this.children[index + 1];
      this.children.splice(index, 1);
    }
    setState({
      node: this,
      key: '.children',
      data: this.children.map((c) => c.toJSON()),
    });
  }
  setText(text: string) {
    if (this.type === TYPE.RAWTEXT) {
      this.text = text;
      setState({ node: this, key: '.text', data: text });
      return;
    }
    if (!this.children.length) {
      this.appendChild(
        new VNode({
          type: TYPE.RAWTEXT,
          id: generate(),
          text,
        })
      );
      return;
    }
    this.children[0].text = text;
    setState({ node: this, key: '.children[0].text', data: text });
  }
  path(): string {
    if (!this.parentNode) {
      return 'root';
    }
    const path = this.parentNode.path();
    return [
      ...(path === 'root' ? ['root'] : path),
      '.children[',
      this.parentNode.children.indexOf(this) + ']',
    ].join('');
  }
  toJSON(): RawNode {
    if (this.type === TYPE.RAWTEXT) {
      return {
        type: this.type,
        text: this.text,
      };
    }
    return {
      id: this.id,
      type: this.type,
      props: this.props,
      children: this.children && this.children.map((c) => c.toJSON()),
      text: this.text,
    };
  }
}
可以看到我们创建的 VNode 类似于 DOM,也有一些操作 Node 节点的方法,最终生成一个 Node 树。我们就可以仿照 vue 浏览器环境的 nodeOps 写法,先去修改我们的 VNode,在修改 Node 节点的同时里面我们可以去调用小程序的 setData 方法。
// 小程序环境下的 nodeOps,主要是修改 VNode
export const nodeOps = {
  insert: (child: VNode, parent: VNode, anchor?: VNode) => {
    if (anchor != null) {
      parent.insertBefore(child, anchor);
    } else {
      parent.appendChild(child);
    }
  },
  remove: (child: VNode) => {
    const parent = child.parentNode;
    if (parent != null) {
      parent.removeChild(child);
    }
  },
  createElement: (tag: string): VNode =>
    new VNode({ type: tag, id: generate() }),
  createText: (text: string): VNode =>
    new VNode({ type: TYPE.RAWTEXT, text, id: generate() }),
  createComment: (): VNode => new VNode({ type: TYPE.RAWTEXT, id: generate() }),
  setText: (node: VNode, text: string) => {
    node.setText(text);
  },
  setElementText: (el: VNode, text: string) => {
    el.setText(text);
  },
  parentNode: (node: VNode): VNode | null => node.parentNode ?? null,
  nextSibling: (node: VNode): VNode | null => node.nextSibling ?? null,
  querySelector: (): VNode | null => getApp()._root,
  setScopeId(el: VNode, id: string) {
    if (el.props) {
      const className = el.props.class;
      el.props.class = className ? className + ' ' + id : id;
    }
  },
};
toJSON()
光是创造出 VNode 还不够,我们得让它渲染到小程序里面去,小程序要先渲染出数据必须是提前在 data 属性里面定义的数据,而且只能是普通的数据类型。
Page({
    data: {
        root: {
            type: 'view',
            props: {
                class: 'xxx'
            },
            children: [...]
        }
    }
})
toJSON 方法就是可以将一个 VNode 给格式化成普通的对象,让小程序可以渲染出数据。
接口类型如下:
interface RawNode {
  id?: number;
  type: string; // view,input, button
  props?: Record<string, any>;
  children?: RawNode[];
  text?: string; // 文本
}
是不是跟 VDOM 的结构很熟悉?
path()
我们可以看到在我们定义的 VNode 里面,里面有个 path() 方法,这个方法就是获取 Node 节点在整个节点树的一个路径,然后可以利用 path 去修改某一个特定的 Node 节点。
const path = Node.path(); // root.children[2].props.class
// 然后我们可以直接这样来更新小程序
this.setData({
  'root.children[2].props.class': 'xxxxx'
})
结合动态选择模板
<template name="$_TPL">
  <block tt:for="{{root.children}}" tt:key="{{id}}">
    <template is="{{'$_' + item.type}}" data="{{item: item}}"/>
  </block>
</template>
<template name="$_input">
  // input 有三个属性 class 和 bindinput 和 value 对应 vue 文件 template 里的 input 上的属性 class @input value
  <input class="{{item.props['class']}}" bindinput="{{item.props['bindinput']}}" value="{{item.props['value']}}">
    <block tt:for="{{item.children}}" tt:key="{{id}}">
      <template is="{{'$_' + item.type}}" data="{{item}}"/>
    </block>
  </input>
</template>
<template name="$_button">
   // button 有两个属性 class 和 bindTap 对应 vue 文件 template 里的 button 上的属性
  <button class="{{item.props['class']}}" bindtap="{{item.props['bindtap']}}">
    <block tt:for="{{item.children}}" tt:key="{{id}}">
      <template is="{{'$_' + item.type}}" data="{{item}}"/>
    </block>
  </button>
</template>
<template name="$_view">
  <view class="{{item.props['class']}}" bindtap="{{item.props['bindtap']}}">
    <block tt:for="{{item.children}}" tt:key="{{id}}">
      <template is="{{'$_' + item.type}}" data="{{item}}"/>
    </block>
  </view>
</template>
<template name="$_rawText">{{item.text}}</template>
编译层
我们写的代码肯定是 Vue 的代码,不是上面的模板代码,那么 Vue 的代码改怎么样去编译到上面的模板代码呢?
先看一下整体架构图:
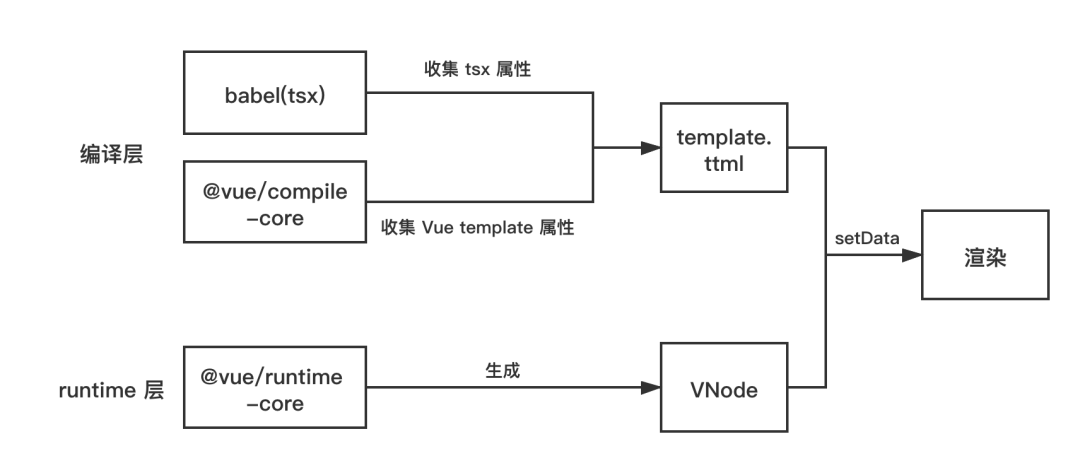
Template
如果我们写的业务代码是常见的 vue 指令模板模式,那么我们可以在底层使用 @vue/compile-core 来 parse Vue 的 template,然后遍历 parse 后的 AST,收集其中用到的 tag 和 props。
import { parse } from '@vue/compiler-sfc';
import {
  baseCompile,
} from '@vue/compiler-core';
const { descriptor } = parse(source, {
    filename: this.resourcePath,
  });
// 遍历这个 ast 去收集 tag 和 props
const { ast } = baseCompile(descriptor.template.content);
JSX/TSX
如果我们写的业务代码是 JSX/TSX,那么这边可以写个收集 Tag 和 props 的 babel plugin,在 babel plugin 里面去遍历 AST,收集 Tag 和 props。
最终生成的 ttml
假如我们有一个 .vue 文件:
<template>
  <div class="container is-fluid">
    <div class="subtitle is-3">Add todo list</div>
    <div class="field">
      <div class="control">
        <input class="input is-info" @input="handleInput" :value="todo" />
      </div>
    </div>
    <button class="button is-primary is-light" @click="handleAdd">Add +</button>
  </div>
</template>
<script>
import { ref } from 'vue';
import { useMainStore } from '@/store';
export default {
  setup() {
    const todo = ref('');
    const store = useMainStore();
    const handleInput = (e) => {
      todo.value = e.detail.value;
    };
    const handleAdd = () => {
      store.addTodo(todo.value);
    };
    return {
      handleInput,
      todo,
      handleAdd,
    };
  },
};
</script>
<style>
.container {
  text-align: center;
  margin-top: 30px;
}
</style>
会生成下面的模板:
<template name="$_TPL">
  <block tt:for="{{root.children}}" tt:key="{{id}}">
    <template is="{{'$_' + item.type}}" data="{{item: item}}"/>
  </block>
</template>
<template name="$_input">
  // input 有三个属性 class 和 bindinput 和 value 对应 vue 文件 template 里的 input 上的属性 class @input value
  <input class="{{item.props['class']}}" bindinput="{{item.props['bindinput']}}" value="{{item.props['value']}}">
    <block tt:for="{{item.children}}" tt:key="{{id}}">
      <template is="{{'$_' + item.type}}" data="{{item}}"/>
    </block>
  </input>
</template>
<template name="$_button">
   // button 有两个属性 class 和 bindTap 对应 vue 文件 template 里的 button 上的属性
  <button class="{{item.props['class']}}" bindtap="{{item.props['bindtap']}}">
    <block tt:for="{{item.children}}" tt:key="{{id}}">
      <template is="{{'$_' + item.type}}" data="{{item}}"/>
    </block>
  </button>
</template>
<template name="$_view">
  <view class="{{item.props['class']}}" bindtap="{{item.props['bindtap']}}">
    <block tt:for="{{item.children}}" tt:key="{{id}}">
      <template is="{{'$_' + item.type}}" data="{{item}}"/>
    </block>
  </view>
</template>
<template name="$_rawText">{{item.text}}</template>
可以看到,从 $_TPL 的 root 节点出发,可以根据每个 item.type 来去选择下面生成的每个模板(input, button, view...),每个模板里面又有循环,这样就可以结合 VNode 无限的递归的渲染。