
史上最便捷搭建Zookeeper服务器的方法

阅读本文大概需要 11 分钟。
什么是 ZooKeeper
单机模式:这种模式一般适用于开发测试环境,一方面我们没有那么多机器资源,另外就是平时的开发调试并不需要极好的稳定性。
集群模式:一个 ZooKeeper 集群通常由一组机器组成,一般 3 台以上就可以组成一个可用的 ZooKeeper 集群了。组成 ZooKeeper 集群的每台机器都会在内存中维护当前的服务器状态,并且每台机器之间都会互相保持通信。
伪集群模式:这是一种特殊的集群模式,即集群的所有服务器都部署在一台机器上。当你手头上有一台比较好的机器,如果作为单机模式进行部署,就会浪费资源,这种情况下,ZooKeeper 允许你在一台机器上通过启动不同的端口来启动多个 ZooKeeper 服务实例,以此来以集群的特性来对外服务。
ZooKeeper 的相关知识
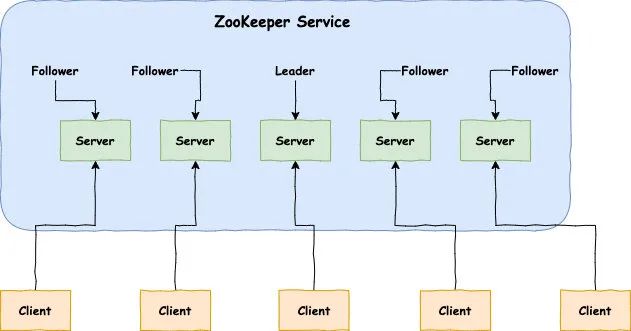
Zookeeper 中的角色:
领导者(leader):负责进行投票的发起和决议,更新系统状态。
跟随者(follower):用于接收客户端请求并给客户端返回结果,在选主过程中进行投票。
观察者(observer):可以接受客户端连接,将写请求转发给 leader,但是observer 不参加投票的过程,只是为了扩展系统,提高读取的速度。
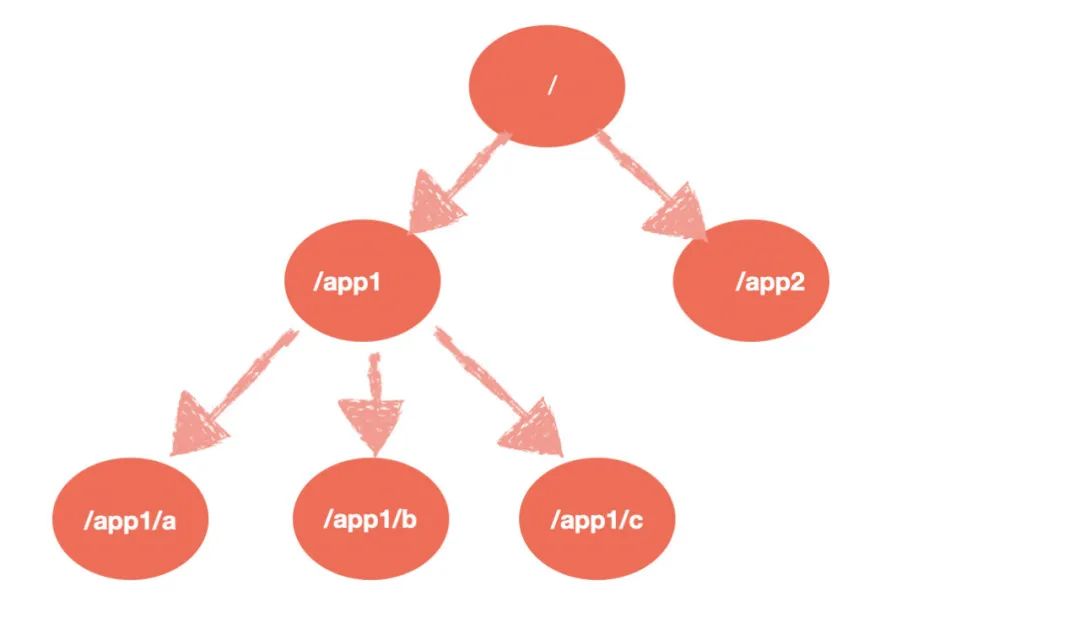
层次化的目录结构,命名符合常规文件系统规范,类似于 Linux。
每个节点在 Zookeeper 中叫做 Znode,并且其有一个唯一的路径标识。
节点 Znode 可以包含数据和子节点,但是 EPHEMERAL 类型的节点不能有子节点。
Znode 中的数据可以有多个版本,比如某一个路径下存有多个数据版本,那么查询这个路径下的数据就需要带上版本。
客户端应用可以在节点上设置监视器。
节点不支持部分读写,而是一次性完整读写。
ZooKeeper 的节点特性
Zookeeper 的应用场景
数据发布与订阅(配置中心)
负载均衡
命名服务(Naming Service)
服务提供者在启动的时候,向 ZooKeeper 上的指定节点 /dubbo/${serviceName}/providers 目录下写入自己的 URL 地址,这个操作就完成了服务的发布。
服务消费者启动的时候,订阅 /dubbo/${serviceName}/providers 目录下的提供者 URL 地址, 并向 /dubbo/${serviceName} /consumers 目录下写入自己的 URL 地址。
分布式通知/协调
分布式锁
由于同一节点下子节点名称不能相同,所以只要在某个节点下创建 Znode,创建成功即表明加锁成功。注册监听器监听此 Znode,只要删除此 Znode 就通知其他客户端来加锁。
创建临时顺序节点:在某个节点下创建节点,来一个请求则创建一个节点,由于是顺序的,所以序号最小的获得锁,当释放锁时,通知下一序号获得锁。
分布式队列
├── docker-compose.yml
version: '3.4'services:zoo1:image: zookeeperrestart: alwayshostname: zoo1ports:2181:2181environment:ZOO_MY_ID: 1ZOO_SERVERS: server.1=0.0.0.0:2888:3888;2181 server.2=zoo2:2888:3888;2181 server.3=zoo3:2888:3888;2181zoo2:image: zookeeperrestart: alwayshostname: zoo2ports:2182:2181environment:ZOO_MY_ID: 2ZOO_SERVERS: server.1=zoo1:2888:3888;2181 server.2=0.0.0.0:2888:3888;2181 server.3=zoo3:2888:3888;2181zoo3:image: zookeeperrestart: alwayshostname: zoo3ports:2183:2181environment:ZOO_MY_ID: 3: server.1=zoo1:2888:3888;2181 server.2=zoo2:2888:3888;2181 server.3=0.0.0.0:2888:3888;2181
连接 ZooKeeper
首先需要下载 ZooKeeper。
将其解压。
进入其 conf/ 目录,将 zoo_sample .cfg 改成 zoo.cfg。
# The number of milliseconds of each tick# tickTime:CS通信心跳数# Zookeeper 服务器之间或客户端与服务器之间维持心跳的时间间隔,也就是每个 tickTime 时间就会发送一个心跳。tickTime以毫秒为单位。tickTime=2000# The number of ticks that the initial# synchronization phase can take# initLimit:LF初始通信时限# 集群中的follower服务器(F)与leader服务器(L)之间初始连接时能容忍的最多心跳数(tickTime的数量)。initLimit=5# The number of ticks that can pass between# sending a request and getting an acknowledgement# syncLimit:LF同步通信时限# 集群中的follower服务器与leader服务器之间请求和应答之间能容忍的最多心跳数(tickTime的数量)。syncLimit=2# the directory where the snapshot is stored.# do not use /tmp for storage, /tmp here is just# example sakes.# dataDir:数据文件目录# Zookeeper保存数据的目录,默认情况下,Zookeeper将写数据的日志文件也保存在这个目录里。dataDir=/data/soft/zookeeper-3.4.12/data# dataLogDir:日志文件目录# Zookeeper保存日志文件的目录。dataLogDir=/data/soft/zookeeper-3.4.12/logs# the port at which the clients will connect# clientPort:客户端连接端口# 客户端连接 Zookeeper 服务器的端口,Zookeeper 会监听这个端口,接受客户端的访问请求。clientPort=2181# the maximum number of client connections.# increase this if you need to handle more clients#maxClientCnxns=60## Be sure to read the maintenance section of the# administrator guide before turning on autopurge.## http://zookeeper.apache.org/doc/current/zookeeperAdmin.html#sc_maintenance## The number of snapshots to retain in dataDir#autopurge.snapRetainCount=3# Purge task interval in hours# Set to "0" to disable auto purge feature#autopurge.purgeInterval=1# 服务器名称与地址:集群信息(服务器编号,服务器地址,LF通信端口,选举端口)# 这个配置项的书写格式比较特殊,规则如下:# server.N=YYY:A:B# 其中N表示服务器编号,YYY表示服务器的IP地址,A为LF通信端口,表示该服务器与集群中的leader交换的信息的端口。B为选举端口,表示选举新leader时服务器间相互通信的端口(当leader挂掉时,其余服务器会相互通信,选择出新的leader)。一般来说,集群中每个服务器的A端口都是一样,每个服务器的B端口也是一样。但是当所采用的为伪集群时,IP地址都一样,只能时A端口和B端口不一样。
Welcome to ZooKeeper!2020-06-01 15:03:52,512 [myid:] - INFO [main-SendThread(localhost:2181):ClientCnxn$SendThread@1025] - Opening socket connection to server localhost/127.0.0.1:2181. Will not attempt to authenticate using SASL (unknown error)JLine support is enabled2020-06-01 15:03:52,576 [myid:] - INFO [main-SendThread(localhost:2181):ClientCnxn$SendThread@879] - Socket connection established to localhost/127.0.0.1:2181, initiating session2020-06-01 15:03:52,599 [myid:] - INFO [main-SendThread(localhost:2181):ClientCnxn$SendThread@1299] - Session establishment complete on server localhost/127.0.0.1:2181, sessionid = 0x100001140080000, negotiated timeout = 30000WATCHER::WatchedEvent state:SyncConnected type:None path:null[zk: 127.0.0.1:2181(CONNECTED) 0]
使用 ls 命令查看当前 ZooKeeper 中所包含的内容。命令:ls /
[] ls /[]
创建了一个新的 znode 节点 zk 以及与它关联的字符串。命令:create /zk myData
[] create /zk myDataCreated /zk[] ls /[][]
获取 znode 节点 zk。命令:get /zk
[] get /zkmyDatacZxid = 0x400000008ctime = Mon Jun 01 15:07:50 CST 2020mZxid = 0x400000008mtime = Mon Jun 01 15:07:50 CST 2020pZxid = 0x400000008cversion = 0dataVersion = 0aclVersion = 0ephemeralOwner = 0x0dataLength = 6numChildren = 0
删除 znode 节点 zk。命令:delete /zk
[zk: 127.0.0.1:2181(CONNECTED) 14] delete /zk[zk: 127.0.0.1:2181(CONNECTED) 15] ls /[zookeeper]
从 GitHub 上面拉取项目。
在 ZooKeeper 文件夹中执行 docker-compose up 命令。
推荐阅读:
微信扫描二维码,关注我的公众号
朕已阅 