java线程池原理
点击上方蓝色字体,选择“标星公众号”
优质文章,第一时间送达
为什么使用线程池?
1.降低资源消耗
通过重复利用创建好的线程,来降低我们创建和销毁线程的造成资源的消耗。
2.提高响应速度
任务执行后,直接通过已经创建好的线程执行,提高我们的响应速度。
3.提高线程的可管理性
线程资源和我们服务器的cpu资源息息相关,不能任意地无限制创建,不仅消耗我们系统资源,还会降低系统的响应速度。使用线程池可以统一监控、调度和调优。
线程池分类
Executor框架的最顶层实现是ThreadPoolExecutor类,Executors工厂类中提供了以下四种:
newScheduledThreadPool:定时任务线程池
newSingleThreadScheduledExecutor:只有一个线程的定时任务线程池
newFixedThreadPool:固定线程数量的线程池
newCachedThreadPool:可缓存的线程池
在实际项目使用过程中,一般不会使用自带的这几种创建方式,下面会将解具体原因。
线程池的核心参数
corePoolSize: 核心池的大小。当有任务来之后,就会创建一个线程去执行任务,当线程池中的线程数目达到corePoolSize后,就会把到达的任务放到缓存队列当中;
maximumPoolSize: 线程池最大线程数,它表示在线程池中最多能创建多少个线程;
keepAliveTime: 表示超出corePoolSize的线程没有任务执行时最多保持多久时间会终止;
unit:参数keepAliveTime的时间单位,有7种取值,在TimeUnit类中有7种静态属性;
workQueue: 阻塞队列,当线程池中的线程数目达到corePoolSize后,就会把到达的任务放到缓存队列当中,通常初始化时需要指定队列大小;
threadFactory: 创建线程的工厂,指定线程前缀,来识别不同业务所需的线程池,方便问题的排查;
handler:拒绝策略,当任务达到maximumPoolSize最大线程数量时,通过指定不同的拒绝策略,来对当前任务做具体的处理。内置了有4种策略:
AbortPolicy:直接拒绝,抛出异常;
CallerRunsPolicy:在主线程中直接执行任务的run方法;
DiscardOldestPolicy:阻塞队列中丢弃最老的未处理任务,然后执行任务;
DiscardPolicy:静默丢弃任务
整个流程
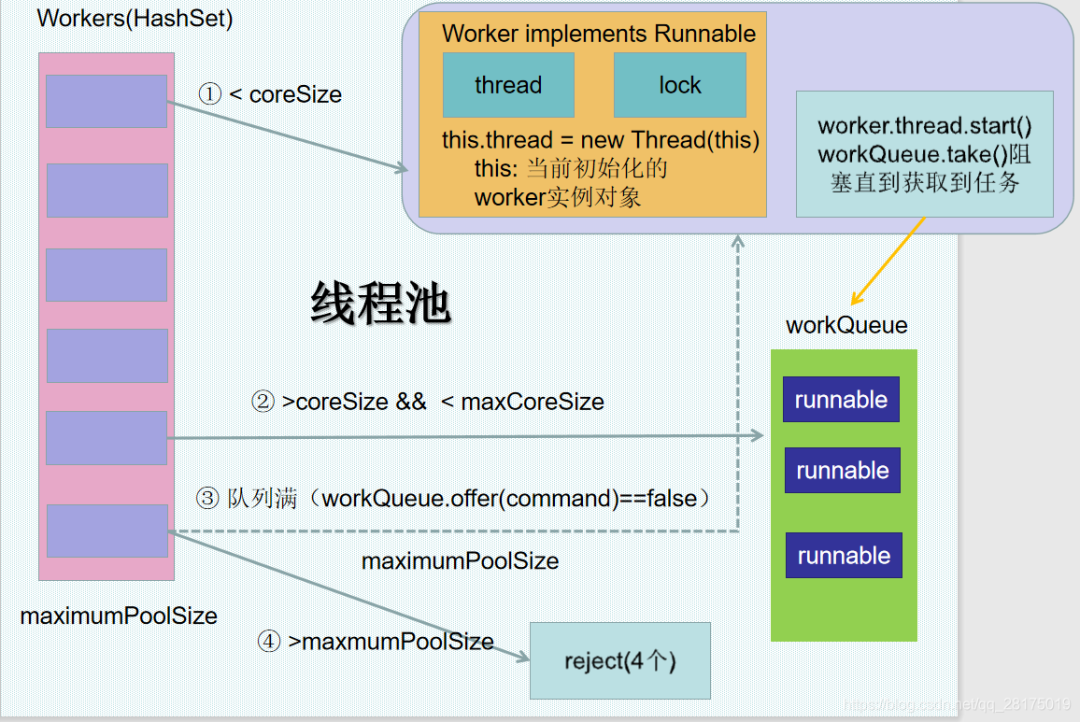
下图是线程池主要的4个流程,结合了线程池的具体源码。

线程池源码分析
new线程池时,初始化线程池参数:
    public ThreadPoolExecutor(int corePoolSize,
                              int maximumPoolSize,
                              long keepAliveTime,
                              TimeUnit unit,
                              BlockingQueue<Runnable> workQueue,
                              ThreadFactory threadFactory,
                              RejectedExecutionHandler handler) {
        if (corePoolSize < 0 ||
            maximumPoolSize <= 0 ||
            maximumPoolSize < corePoolSize ||
            keepAliveTime < 0)
            throw new IllegalArgumentException();
        if (workQueue == null || threadFactory == null || handler == null)
            throw new NullPointerException();
        this.corePoolSize = corePoolSize;
        this.maximumPoolSize = maximumPoolSize;
        this.workQueue = workQueue;
        this.keepAliveTime = unit.toNanos(keepAliveTime);
        this.threadFactory = threadFactory;
        this.handler = handler;
    }
调用线程池的execute():
    public void execute(Runnable command) {
        if (command == null)
            throw new NullPointerException();

        int c = ctl.get();
        //1.小于核心线程池时,创建新的线程
        if (workerCountOf(c) < corePoolSize) {
            if (addWorker(command, true))
                return;
            c = ctl.get();
        }
        //2.任务大于核心线程时,将任务放到阻塞队列中
        if (isRunning(c) && workQueue.offer(command)) {
            int recheck = ctl.get();
            if (! isRunning(recheck) && remove(command))
                reject(command);
            else if (workerCountOf(recheck) == 0)
                addWorker(null, false);
        }
        //3.大于最大线程时
        else if (!addWorker(command, false))
        //4.执行拒绝策略
            reject(command);
    }
Worker分析
将每个任务封住为Worker:
    private final class Worker
        extends AbstractQueuedSynchronizer
        implements Runnable
然后通过while循环获取阻塞队列中的任务, 调用task.run()就会执行我们具体的任务。
final void runWorker(Worker w) {
        Thread wt = Thread.currentThread();
        Runnable task = w.firstTask;
        w.firstTask = null;
        w.unlock(); // allow interrupts
        boolean completedAbruptly = true;
        try {
            while (task != null || (task = getTask()) != null) {
                w.lock();
                // If pool is stopping, ensure thread is interrupted;
                // if not, ensure thread is not interrupted.  This
                // requires a recheck in second case to deal with
                // shutdownNow race while clearing interrupt
                if ((runStateAtLeast(ctl.get(), STOP) ||
                     (Thread.interrupted() &&
                      runStateAtLeast(ctl.get(), STOP))) &&
                    !wt.isInterrupted())
                    wt.interrupt();
                try {
                    beforeExecute(wt, task);
                    Throwable thrown = null;
                    try {
                        task.run();
                    } catch (RuntimeException x) {
                        thrown = x; throw x;
                    } catch (Error x) {
                        thrown = x; throw x;
                    } catch (Throwable x) {
                        thrown = x; throw new Error(x);
                    } finally {
                        afterExecute(task, thrown);
                    }
                } finally {
                    task = null;
                    w.completedTasks++;
                    w.unlock();
                }
            }
            completedAbruptly = false;
        } finally {
            processWorkerExit(w, completedAbruptly);
        }
    }
————————————————
版权声明:本文为CSDN博主「darmi-大张」的原创文章,遵循CC 4.0 BY-SA版权协议,转载请附上原文出处链接及本声明。
原文链接:
https://blog.csdn.net/qq_28175019/article/details/115426872
粉丝福利:Java从入门到入土学习路线图
👇👇👇

👆长按上方微信二维码 2 秒
感谢点赞支持下哈 
