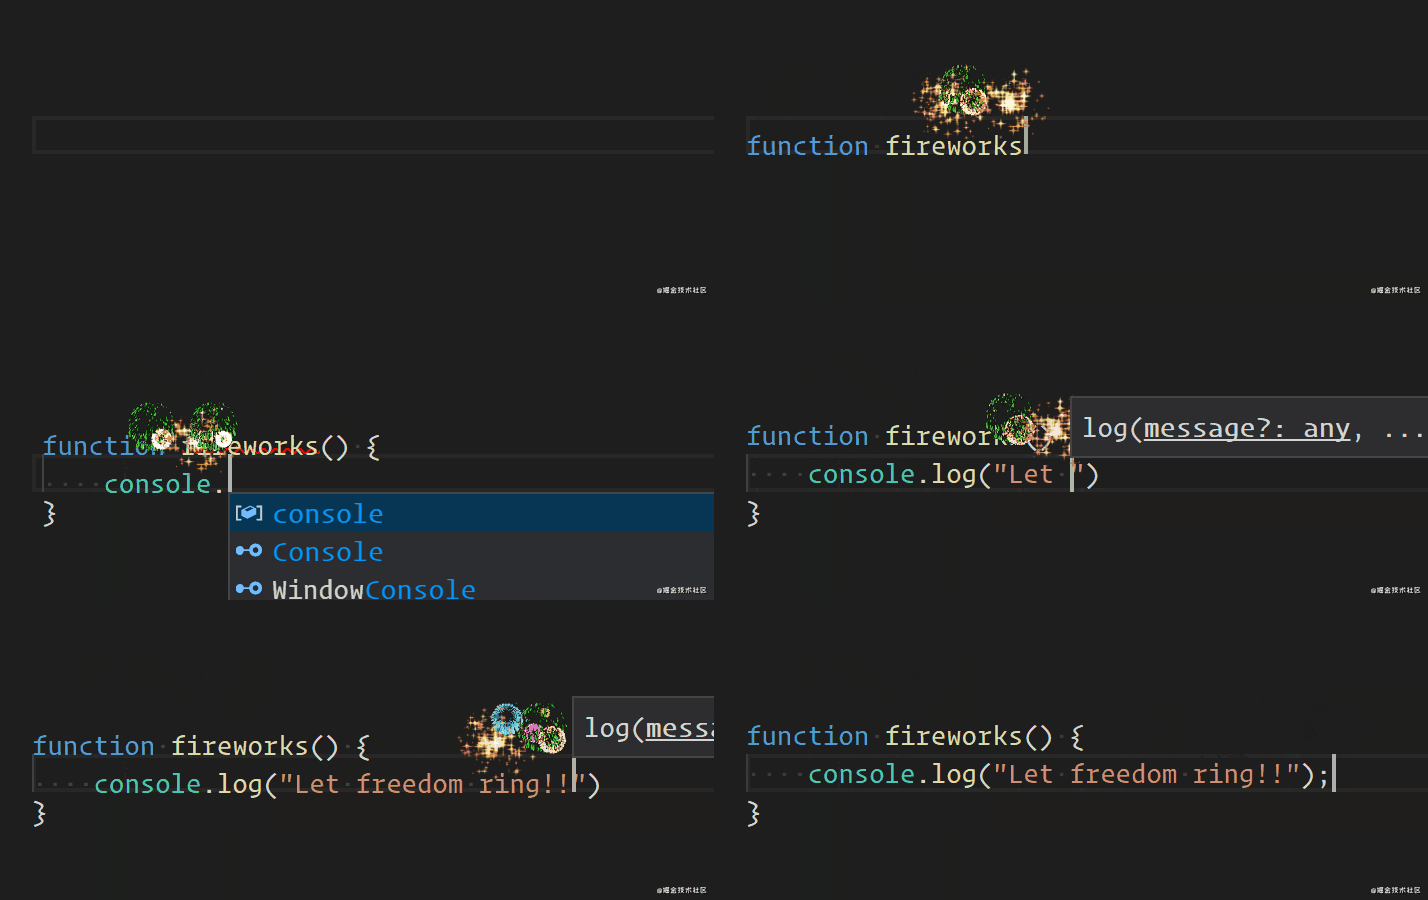
宝,还记得那些年我们一起在 vscode 里面放过的烟花吗?
最近一直在研究 vscode 插件,今天给大家一分享一个效果特别炫的插件,名字叫 power mode。

编写代码边放烟花、编辑器还会抖动。
效果很炫,但是我们肯定不能满足于会用,得研究下它是怎么实现的。
实现思路
在 vscode 里大家可能没啥思路,但如果这个效果放到网页里呢,文本改变的时候抖动编辑器、然后再上面出现一些烟花效果。这个可能有的同学就有思路了。
抖动编辑器:抖动不也是个动画么,就是左右位移,这一秒右移,下一秒回到原位置,这样就抖起来了。
烟花效果:不管啥花里胡哨的烟花,给个 gif 我们就能搞定,就是在文本上方加一个元素,然后把 gif 放上去,下次加 gif 的时候把上次的删除。
这样就能在网页里实现编辑器抖动 + 放烟花效果了。
把这个效果放到 vscode 里实现也是一样的思路,因为 vscode 是基于 electron 实现的啊。
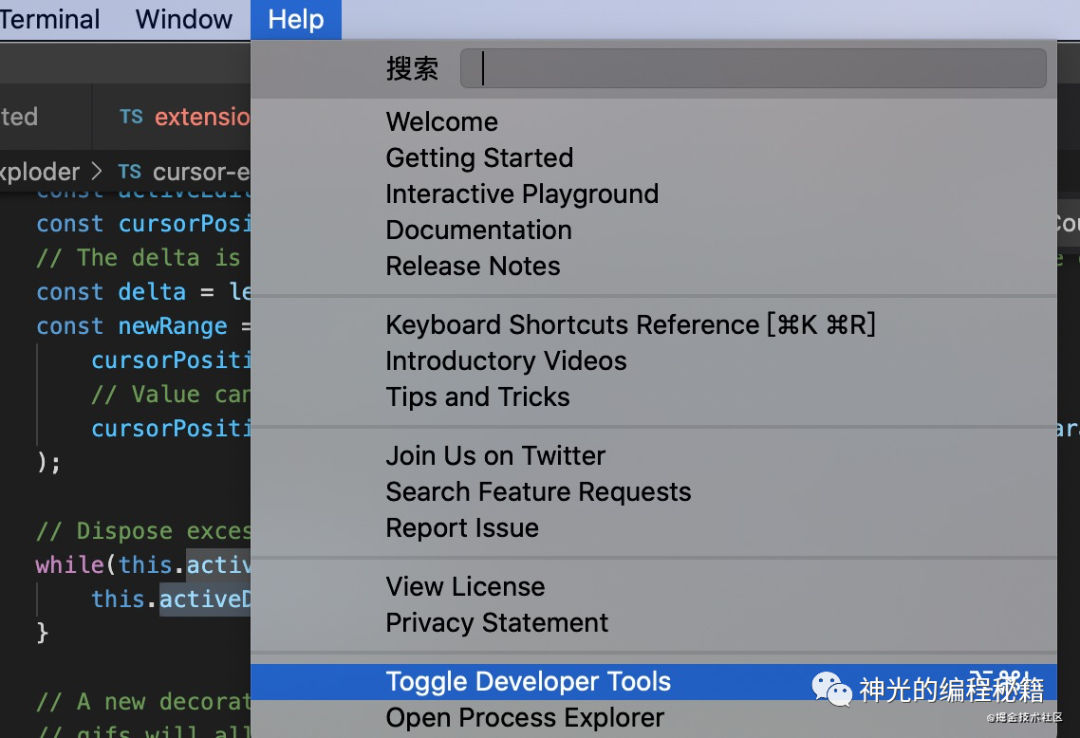
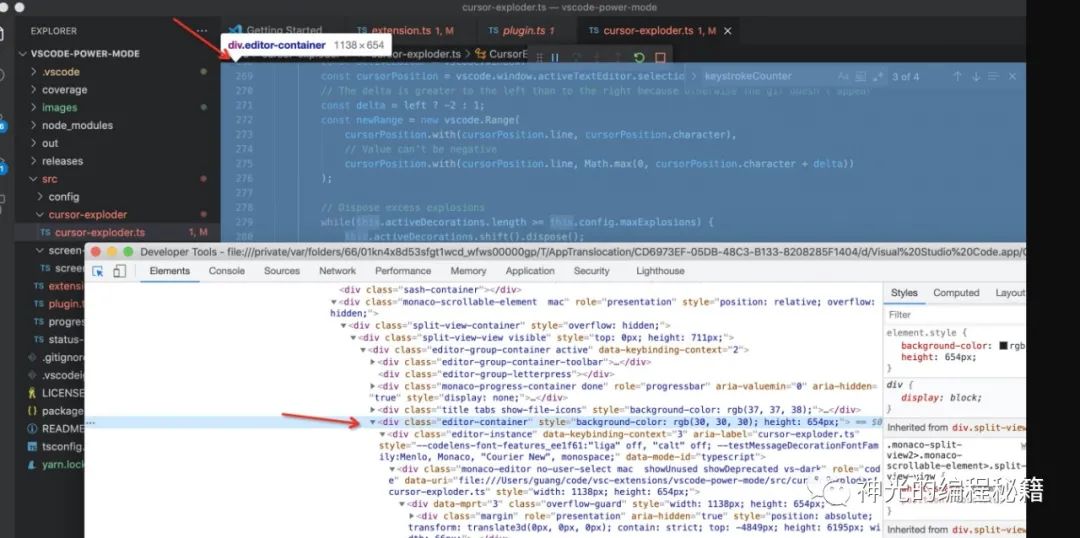
而 electron 又是基于 chromium + nodejs,也就是 ui 部分是网页。我们可以在 vscode 帮助里打开开发者工具:

然后,兄弟萌,看,这编辑器部分部分就是个 div 啊

所以刚才在网页里实现的效果,可以放到 vscode 里实现,思路一样。
思路是一样,但是具体怎么做呢?
这就需要了解下 vscode 的 extension api 了,其实也不难,我给大家介绍一下这里用到的 api:
首先,引入 vscode 包,所有的 api 都在这个包里。
import * as vscode from 'vscode';
然后,我们要给文本加样式,怎么加呢?
在 vscode 的编辑器里面加样式不是直接操作 dom 的,是受到限制的,要这样几步:
(兄弟萌,下面的步骤要一步步来,不能跳着看)
通过 vscode.window 拿到当前的 editor
const activeEditor = vscode.window.activeTextEditor;
拿到当前 editor 的正在编辑的位置
const cursorPosition = activeTextEditor.selection.active;
根据位置计算出要添加装饰的范围(range)
const newRange = new vscode.Range(
    cursorPosition.with(cursorPosition.line, cursorPosition.character),
    cursorPosition.with(cursorPosition.line, Math.max(0, cursorPosition.character + delta))
);
创建装饰对象
vscode.window.createTextEditorDecorationType({
    before: {
        contentText:'',
        textDecoration: `none; ${defaultCssString}${backgroundCssString} ${customCssString}`,
    },
    textDecoration: `none; position: relative;`,
    rangeBehavior: vscode.DecorationRangeBehavior.ClosedClosed
});
然后,给这段 range 的文本加装饰
activeEditor.setDecorations(decoration, [newRange]);
大功告成,现在我们就在 vscode 编辑器里面,你正在编辑的位置,加上了一段样式。
装饰对象可以添加 before、after,这不就是伪元素么?没错,就是伪元素,而且还可以加一系列样式呢。加啥样式都可以。
到了这,是不是就有如何在编辑器里做那些效果的思路了呢?
接下来,我们来看看 power-mode 的实现细节。
代码实现
我们先从效果实现开始看吧,主要是抖动和放烟花:
抖动
抖动的原理我们分析过了,就是定时做位移。
首先,它定义了一系列的位移的装饰对象,就是通过 vscode.window.createTextEditorDecorationType 这个创建装饰对象的 api:
public activate = () => {
    this.dispose();
    this.negativeX = vscode.window.createTextEditorDecorationType(<vscode.DecorationRenderOptions>{
        textDecoration: `none; margin-left: 0px;`
    });

    this.positiveX = vscode.window.createTextEditorDecorationType(<vscode.DecorationRenderOptions>{
        textDecoration: `none; margin-left: ${this.config.shakeIntensity}px;`
    });

    this.negativeY = vscode.window.createTextEditorDecorationType(<vscode.DecorationRenderOptions>{
        textDecoration: `none; margin-top: 0px;`
    });

    this.positiveY = vscode.window.createTextEditorDecorationType(<vscode.DecorationRenderOptions>{
        textDecoration: `none; margin-top: ${this.config.shakeIntensity}px;`
    });

    this.shakeDecorations = [
        this.negativeX,
        this.positiveX,
        this.negativeY,
        this.positiveY
    ];
}
然后呢?就是定时让 editor 抖起来啊:
也是根据编辑的 position 算出 range,然后给这段 range 加装饰
private shake = () => {
    if (!this.config.enableShake) {
        return;
    }

   // 当前 editor
    const activeEditor = vscode.window.activeTextEditor;

  // 要抖动的 range,也就是当前行
    const xRanges = [];
    for (let i = 0; i < activeEditor.document.lineCount; i++) {
        xRanges.push(new vscode.Range(new vscode.Position(i, 0), new vscode.Position(i, 1)));
    }

  // 加装饰
    if (Math.random() > 0.5) {
        activeEditor.setDecorations(this.negativeX, []);
        activeEditor.setDecorations(this.positiveX, xRanges);
    } else {
        activeEditor.setDecorations(this.positiveX, []);
        activeEditor.setDecorations(this.negativeX, xRanges);
    }

    if (Math.random() > 0.5) {
        activeEditor.setDecorations(this.negativeY, []);
        activeEditor.setDecorations(this.positiveY, this.fullRange);
    } else {
        activeEditor.setDecorations(this.positiveY, []);
        activeEditor.setDecorations(this.negativeY, this.fullRange);
    }

    clearTimeout(this.shakeTimeout);
    this.shakeTimeout = setTimeout(() => {
        this.unshake();
    }, 1000);
}
如上,就是定时加不同的位移样式,随机上下左右抖。
放烟花
然后我们来放烟花,思路我们分析过了,就是在编辑的位置加上一个 gif,然后下次放的时候去掉上次的。
来按流程走一遍:
// 当前编辑器
const activeEditor = vscode.window.activeTextEditor;
// 当前编辑位置
const cursorPosition = vscode.window.activeTextEditor.selection.active;
// 要加装饰的范围
const delta = left ? -2 : 1;
const newRange = new vscode.Range(
    cursorPosition.with(cursorPosition.line, cursorPosition.character),
    cursorPosition.with(cursorPosition.line, Math.max(0, cursorPosition.character + delta))
);
//创建装饰对象
const decoration = vscode.window.createTextEditorDecorationType(<vscode.DecorationRenderOptions>{
    before: {
        // before 样式
    },
    textDecoration: `当前元素样式`,
    rangeBehavior: vscode.DecorationRangeBehavior.ClosedClosed
});
// 给该范围加装饰
activeEditor.setDecorations(decoration, [newRange]);
加装饰的流程我们走完了,但是样式还没填,怎么加呢?
首先当前元素要相对定位,然后加个 before 伪元素,设置为绝对定位并且 left 和 top 为负数。
之后就是设置背景图片了,power mode 提供了这么多 gif 可选。

所以呢,装饰对象就是这样的:
// 背景图片的样式
const backgroundCss = this.getBackgroundCssSettings(explosionUrl);

//位置的样式
const defaultCss = {
    position: 'absolute',
    [CSS_LEFT] : `-10px`,
    [CSS_TOP]: `-1.2rem`,
    width: `${this.config.explosionSize}ch`,
    height: `${this.config.explosionSize}rem`,
    display: `inline-block`,
    ['z-index']: 1,
    ['pointer-events']: 'none',
};

// 样式对象转换为字符串
const backgroundCssString = this.objectToCssString(backgroundCss);
const defaultCssString = this.objectToCssString(defaultCss);
const customCssString = this.objectToCssString(this.config.customCss || {});

// 创建装饰对象
const decoration = vscode.window.createTextEditorDecorationType(<vscode.DecorationRenderOptions>{
    before: {
        contentText:'',
        textDecoration: `none; ${defaultCssString}${backgroundCssString} ${customCssString}`,
    },
    textDecoration: `none; position: relative;`,
    rangeBehavior: vscode.DecorationRangeBehavior.ClosedClosed
});
大功告成,这样我们把抖动和放烟花在 vscode 里面实现了一遍。
但是,还得加个触发的入口。
什么时候触发呢?涉及到两个 api:
编辑文本的时候,出现效果
vscode.workspace.onDidChangeTextDocument(onDidChangeTextDocument);
修改了插件配置的时候,重新设置插件对象
vscode.workspace.onDidChangeConfiguration(onDidChangeConfiguration);
从怎么触发的,到触发后干什么,我们都清楚了,接下来呢,还要会怎么注册这个插件到 vscode 中。
插件注册
注册插件就是在 package.json 里面配置一下,指定触发时机:
"activationEvents": [
    "*"
]
指定插件入口:
"main": "./out/src/extension",
指定插件的配置:
"contributes": {
    "configuration": {
      "title": "Power Mode",
      "properties": {
        "powermode.enabled": {
          "default": false, // 默认值
          "type": "boolean",// 值类型
          "description": "Enable to activate POWER MODE!!!"
        }
      }
    }
}
总结
vscode 基于 electron,而 electron 基于 chromium,所以还是用网页来做 ui 的,那么很多网页里面的效果,基本都可以在编辑器实现。
但是是受约束的,要熟悉整个加装饰的流程:
拿到当前编辑器 (activeEditor) 拿到当前编辑的位置 (position) 算出要加装饰的范围 (range) 创建装饰对象 (decorationType) 给那段范围的文本加装饰 (addDecoration)
抖动和放烟花都是基于这个 api 实现的,不过抖动是做上下左右的随机位移,放烟花是在编辑的位置加动图。
实现思路有了,还得指定触发的入口,也就是文本编辑的时候(onDidChangeTextDocument)。还有配置改变也得做下处理(onDidChangeConfiguration)。
之后,注册到 vscode 就可以了,在 package.json 里面配置入口(main)、生效事件(activeEvent)、配置项(contibutes.configuration)
让我们一起在 vscode 里面放烟花吧!

