
锦囊篇|一文摸懂Glide
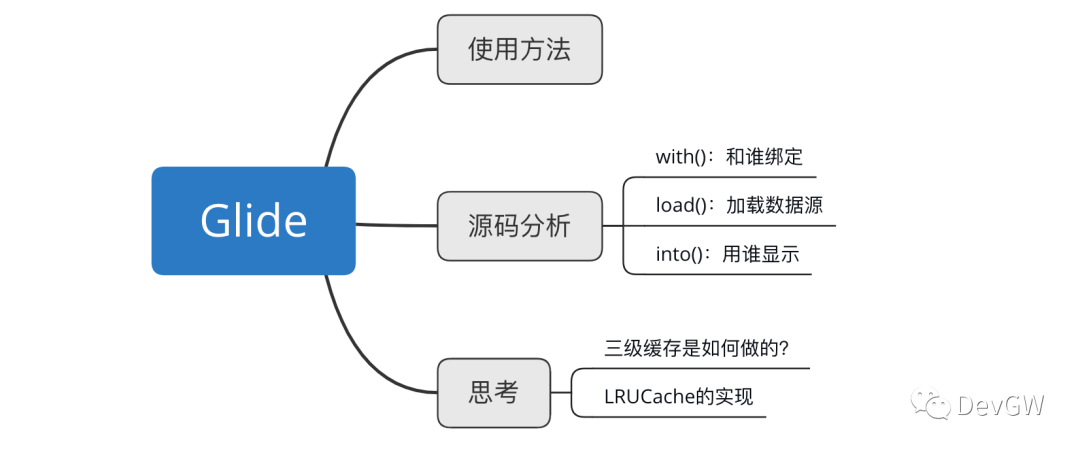 前言
前言
和之前的文章会有一定的不同,这主要是因为Glide自身的源码量导致的问题,因为我是最后写的前言,你会发现在文章刚开始时会代码复制的比较完全,后面就比较零散,而且一部分我直接用自己话去进行了表述。如果真的要看懂,建议还是对着Glide的源码进行查看,这样会帮助你更好去理解GLide的它的实现流程。
(1)资源引入
repositories {
  mavenCentral()
  google()
}

dependencies {
  implementation 'com.github.bumptech.glide:glide:4.11.0'
  annotationProcessor 'com.github.bumptech.glide:compiler:4.11.0'
}
(2)方法使用
// 实现单张图片加载
@Override public void onCreate(Bundle savedInstanceState) {
  ImageView imageView = (ImageView) findViewById(R.id.my_image_view);
// 如果是最新版的系统是不允许http来进行请求的
// 去百度随便拿一张图片的地址来改一下就好了
  Glide.with(this).load("http://goo.gl/gEgYUd").into(imageView);
}

// 实现图片列表加载
@Override public View getView(int position, View recycled, ViewGroup container) {
final ImageView myImageView;
if (recycled == null) {
    myImageView = (ImageView) inflater.inflate(R.layout.my_image_view, container, false);
  } else {
    myImageView = (ImageView) recycled;
  }

  String url = myUrls.get(position);

  Glide
    .with(myFragment)
    .load(url)
    .centerCrop()
    .placeholder(R.drawable.loading_spinner)
    .into(myImageView);

return myImageView;
}
在源码使用中,其实基础的在上面的使用方法中已经讲述到了,一共可以分为三个步骤:
- with(Context)
- load(ImageURL)
- into(ImageView)
我们的分析流程也将围绕这三个函数来进行展开。
with(Context)
  @NonNull
public static RequestManager with(@NonNull Context context) {
return getRetriever(context).get(context);
  }

@NonNull
public static RequestManager with(@NonNull Activity activity) {
return getRetriever(activity).get(activity);
  }

@NonNull
public static RequestManager with(@NonNull FragmentActivity activity) {
return getRetriever(activity).get(activity);
  }

@NonNull
public static RequestManager with(@NonNull Fragment fragment) {
return getRetriever(fragment.getContext()).get(fragment);
  }

@SuppressWarnings("deprecation")
@Deprecated
@NonNull
public static RequestManager with(@NonNull android.app.Fragment fragment) {
return getRetriever(fragment.getActivity()).get(fragment);
  }

@NonNull
public static RequestManager with(@NonNull View view) {
return getRetriever(view.getContext()).get(view);
  }
悄咪咪数了数,Oh my Gosh!!! 竟然高达有6个重载方法。不过呢想必你也发现这些方法都直接调用了getRetriever().get()的方法,那目的就非常明显了,我们进到这个方法去一探究竟了。
  @NonNull
private static RequestManagerRetriever getRetriever(@Nullable Context context) {
return Glide.get(context).getRequestManagerRetriever(); // 1 -->
  }

@NonNull
public static Glide get(@NonNull Context context) {
if (glide == null) {
// 使用了context.getApplicationContext()是为了防止内存泄漏的发生
      GeneratedAppGlideModule annotationGeneratedModule =
          getAnnotationGeneratedGlideModules(context.getApplicationContext());
synchronized (Glide.class) {
if (glide == null) {
// 对glide整体地进行初始化
// 其中就包含了对RequestManagerRetriever的初始化流程
// 代码量比较大就不做介绍了
          checkAndInitializeGlide(context, annotationGeneratedModule);
        }
      }
    }
return glide;
  }
既然是一堆的初始化操作,最后我们的目标又是RequestManagerRetriever这个类,那自然是有必要对这个类进行探究的。
public class RequestManagerRetriever implements Handler.Callback {

public RequestManagerRetriever(@Nullable RequestManagerFactory factory) {
this.factory = factory != null ? factory : DEFAULT_FACTORY;
    handler = new Handler(Looper.getMainLooper(), this /* Callback */);
  }

private static final RequestManagerFactory DEFAULT_FACTORY =
new RequestManagerFactory() {
@NonNull
@Override
public RequestManager build(
            @NonNull Glide glide,
            @NonNull Lifecycle lifecycle,
            @NonNull RequestManagerTreeNode requestManagerTreeNode,
            @NonNull Context context) {
return new RequestManager(glide, lifecycle, requestManagerTreeNode, context);
        }
      };

// getRetriever()的get()方法
// 对标上面的6个重载方法的调用,这里只取其一
@NonNull
public RequestManager get(@NonNull FragmentActivity activity) {
// 如果当前的线程是在后台线程中,则进入
if (Util.isOnBackgroundThread()) {
return get(activity.getApplicationContext()); // 1-->
    } else {
      assertNotDestroyed(activity);
      FragmentManager fm = activity.getSupportFragmentManager();
return supportFragmentGet(activity, fm, /*parentHint=*/ null, isActivityVisible(activity)); // 2 -->
    }
  }
}
(1)通过构造函数我们能够猜测的内容是通信的工具是Handler,而Looper使用的是MainLooper也就是主线程的,那说明最后异步通信也就直接扔到主线程完成了。
(2)通过get()函数,可以发现其实分为两个部分。一是再一层的get()方法;二是supportFragmentGet()或者是FragmentGet()方法。
他们最后的任务都是为了创建出一个RequestManager,但是我们得关注一下它的创建方式。
get()
对于这个方法而言就是对context的判定是否为Application,然后给出相应的结果。
(1)不是Application且是在主线程中时
if (Util.isOnMainThread() && !(context instanceof Application)) {
if (context instanceof FragmentActivity) {
return get((FragmentActivity) context);
      } else if (context instanceof Activity) {
return get((Activity) context);
      } else if (context instanceof ContextWrapper
          && ((ContextWrapper) context).getBaseContext().getApplicationContext() != null) {
return get(((ContextWrapper) context).getBaseContext());
      }
    }
而他们的归宿,最后还是回到我们上方的重载方法。
(2)是Application或是不再主线程时
getApplicationManager(context); // 1 -->

// 使用DCL的方式来创建了单例
@NonNull
private RequestManager getApplicationManager(@NonNull Context context) {
// Either an application context or we're on a background thread.
if (applicationManager == null) {
synchronized (this) {
if (applicationManager == null) {
          Glide glide = Glide.get(context.getApplicationContext());
          applicationManager =
              factory.build(
                  glide,
new ApplicationLifecycle(), // 2
new EmptyRequestManagerTreeNode(),
                  context.getApplicationContext());
        }
      }
    }
return applicationManager;
  }
通过工厂来自建了一个RequestManager,注释2处他直接使用了ApplicationLifecycle原因是因为某些情况下会接受不到生命周期的事件,这里是做的强制性的操作是为了生命周期变化时能够正常相应。
FragmentGet()
瞟了一下,这是要一个废弃的方法了,但是和supportFragmentGet()的方法相比其实也差不太多。
private RequestManager fragmentGet(
      @NonNull Context context,
      @NonNull android.app.FragmentManager fm,
      @Nullable android.app.Fragment parentHint,
boolean isParentVisible) {
    RequestManagerFragment current = getRequestManagerFragment(fm, parentHint, isParentVisible); // 1 -->
    RequestManager requestManager = current.getRequestManager();
if (requestManager == null) {
// TODO(b/27524013): Factor out this Glide.get() call.
      Glide glide = Glide.get(context);
      requestManager =
          factory.build(
              glide, current.getGlideLifecycle(), current.getRequestManagerTreeNode(), context);
// 将requestManager和Fragment相挂钩
// 用以完成生命周期的监听
      current.setRequestManager(requestManager);
    }
return requestManager;
  }

// 1 -->
// 获取对应的Fragment
private RequestManagerFragment getRequestManagerFragment(
      @NonNull final android.app.FragmentManager fm,
      @Nullable android.app.Fragment parentHint,
boolean isParentVisible) {
// 寻找的方式是通过设置的TAG
    RequestManagerFragment current = (RequestManagerFragment) fm.findFragmentByTag(FRAGMENT_TAG);
// 先去等待队列中进行查询
// 这一步的作用是防止Fragment的重复添加
// 因为添加的Fragment的所谓的生命周期有一定的延时性
if (current == null) {
      current = pendingRequestManagerFragments.get(fm);
// 如果等待队列创建一个新的TAG
if (current == null) {
        current = new RequestManagerFragment();
        current.setParentFragmentHint(parentHint);
if (isParentVisible) {
          current.getGlideLifecycle().onStart();
        }
        pendingRequestManagerFragments.put(fm, current);
        fm.beginTransaction().add(current, FRAGMENT_TAG).commitAllowingStateLoss();
        handler.obtainMessage(ID_REMOVE_FRAGMENT_MANAGER, fm).sendToTarget();
      }
    }
return current;
  }
总结
- 初始化
Glide的同时在内部完成了RequestManagerRetriever的创建 - 获取到的
RequestManagerRetriever调用get()方法,获取到RequestManager,获取方式分为以下两种:
Context为Application时, 通过getApplicationManager()方法创建RequestManager完成,将生命周期的监听与Application强制绑定用于接收。Context不为Application时, 通过supportFragmentGet()方法创建RequestManager完成,生命周期的监听是与Fragment进行绑定实现。
创建对应TAG的一个非常直接的好处,我们的图片像RecyclerView会放置中不容易出现错位的现象。
load(ImageURL)
总体来说上面的就是一个初始化和必要变量获取的操作,那接下从函数方法来看我们似乎是要去获得的图片了呢。
public RequestBuilder load(@Nullable String string) {
return asDrawable().load(string); // 1 -->
  }
注释1处,我们通过观察可以知道他最后会选择将获取的数据转化变成一个Drawable的类然后再在我们对应的ImageView上来进行显示。那我们就对asDrawable()先进行一段源码的分析。
// asDrawable()不断深入能发现调用到的函数
// 是完成一个类RequestBuilder的对象创建
public  RequestBuilder as(
      @NonNull Class resourceClass) { // Drawable.class
return new RequestBuilder<>(glide, this, resourceClass, context);
  }
那接下来的问题就要进入到这个类中,因为在前面我们的探索其实算是并没有什么收获的,而如果只是创建一个类显然是不会让这句话显得这么重要,那关键点一定会出现在这个类的构造中了。
protected RequestBuilder(
@NonNull Glide glide,
RequestManager requestManager,
Class transcodeClass,
Context context) {
this.glide = glide;
this.requestManager = requestManager;
this.transcodeClass = transcodeClass;
this.context = context;
this.transitionOptions = requestManager.getDefaultTransitionOptions(transcodeClass);
this.glideContext = glide.getGlideContext();
initRequestListeners(requestManager.getDefaultRequestListeners()); // 1 -->
// 这段代码过长,不做展示,它的主要任务就是一些策略开关
// 各种选项的开启装置,比如错误提示、优先级、磁盘缓存策略、固定宽高等等
apply(requestManager.getDefaultRequestOptions());
}
// 1-->
// 从某种意义上讲就是对生命周期的监听
private void initRequestListeners(List> requestListeners) {
for (RequestListener而如果回到load(string)方法。
private RequestBuilder loadGeneric(@Nullable Object model) {
this.model = model;
    isModelSet = true;
return this;
  }
他最后的差事也就是将URI的值放到了model这个变量中,那整个load()函数作用其实最后只是创建了一个RequestBuilder的事例,那最后的获取和加载工作肯定是在into()函数中才进行了操作的。
into(ImageView)
public ViewTarget into(@NonNull ImageView view) {
    Util.assertMainThread();
    Preconditions.checkNotNull(view);

    BaseRequestOptions requestOptions = this;
if (!requestOptions.isTransformationSet()
        && requestOptions.isTransformationAllowed()
        && view.getScaleType() != null) {
// 通过scaleType,对图片的属性进行设定
switch (view.getScaleType()) {
case CENTER_CROP:
// 。。。。。。
default:
// Do nothing.
      }
    }
// 正式将图片数据塞入
// 1 -->
return into(
// 2 -->
        glideContext.buildImageViewTarget(view, transcodeClass), // 深度调用可以知道也就是将View进行了赋值
/*targetListener=*/ null,
        requestOptions,
// 能够看到线程池的影子,后面的图片的获取和处理我们猜测就是通过池来进行处理
        Executors.mainThreadExecutor());
  }

// 1 --> 将数据塞入
private > Y into(
      @NonNull Y target,
      @Nullable RequestListener targetListener,
      BaseRequestOptions options,
      Executor callbackExecutor) {
// 正常情况构建SingleRequest的请求
// 因为thumbnail一般需要额外的需求
    Request request = buildRequest(target, targetListener, options, callbackExecutor);

    Request previous = target.getRequest();
// 当前请求和最新的一样
if (request.isEquivalentTo(previous)
        && !isSkipMemoryCacheWithCompletePreviousRequest(options, previous)) {
// 如果请求完成,重新启动会保证结果送达并触动目标
// 如果请求失败,会给出机会去再次完成
// 如果请求正在运行,不会打断
if (!Preconditions.checkNotNull(previous).isRunning()) {
        previous.begin();
      }
return target;
    }

    requestManager.clear(target);
    target.setRequest(request); // 置换最新的请求
    requestManager.track(target, request); // 3 -->

return target;
  }
下面的内容将主要对上述代码中的注释2和注释3进行讲解。
glideContext.buildImageViewTarget(view, transcodeClass)
从字面意思,相比你也能够进行理解了,就是要构建一个存放的目标。
  @NonNull
public  ViewTarget buildImageViewTarget(
      @NonNull ImageView imageView, @NonNull Class transcodeClass) {
return imageViewTargetFactory.buildTarget(imageView, transcodeClass); // 1 -->
  }

// 1-->
// 根据不同的数据类型选择存储是以Drawable还是Bitmap构建
public  ViewTarget buildTarget(
      @NonNull ImageView view, @NonNull Class clazz) {
if (Bitmap.class.equals(clazz)) {
// 以Bitmap构建
return (ViewTarget) new BitmapImageViewTarget(view); // 2-->
    } else if (Drawable.class.isAssignableFrom(clazz)) {
// 以Drawable构建
return (ViewTarget) new DrawableImageViewTarget(view); // 2 -->
    } else {
throw new IllegalArgumentException(
"Unhandled class: " + clazz + ", try .as*(Class).transcode(ResourceTranscoder)");
    }
  }

// 2-->
// 两个注释最后深度调用之后都会调用到这段代码
// 如果单看这段代码的时候其实
public ViewTarget(@NonNull T view) {
this.view = Preconditions.checkNotNull(view);
// 如果只看这个构造函数,确实没什么东西
// 不行你可以直接看注释3的代码处
    sizeDeterminer = new SizeDeterminer(view); // 3 -->
  }
// 非常简单的就只是对view进行了一个赋值操作
SizeDeterminer(@NonNull View view) {
this.view = view;
    }
 那如果就只有上面那么一点不就完了??其实并不,如果你观察了一下
DrawableImageViewTarget和BitmapImageViewTarget的其他方法,能发现这样的一个特征。
protected void setResource(Bitmap resource) {
    view.setImageBitmap(resource);
  }

protected void setResource(@Nullable Drawable resource) {
    view.setImageDrawable(resource);
  }
没错!! 赋值操作,这个操作说明最后其实的结束点肯定是在这里的,而调用他的函数最后也就是onResourceReady()这个方法,也就意味着图片获取成功了,不过呢这个请求完成肯定是和数据的获取相互关联的,也就是下面部分的内容了。
requestManager.track(target, request)
// 以同步的方式完成数据的请求
synchronized void track(@NonNull Target target, @NonNull Request request) {
    targetTracker.track(target); // 对当前的目标的生命周期有一个追踪
    requestTracker.runRequest(request); // 2 --> 执行操作正式开启
  }
// 2 -->
public void runRequest(@NonNull Request request) {
    requests.add(request);
// 会对当前的所有请求做一个判断处理
// 会根据当前的状态确定是否要进行数据加载的操作
// 一般来说对应的就是生命周期
if (!isPaused) {
      request.begin();
    } else {
      request.clear();
      pendingRequests.add(request);
    }
  }
那上面一段代码说明我们正常运行的时候,网络传输的操作肯定是已经在正常运行了的,而其实正常没有设置时调用的会是SingleRequest的类,不多逼逼,瞅瞅它的begin()方法有什么特殊之处了。
public void begin() {
synchronized (requestLock) {
// 。。。。。

// 如果正在运行就抛出异常
if (status == Status.RUNNING) {
throw new IllegalArgumentException("Cannot restart a running request");
      }

// 从缓存中直接拿出数据
if (status == Status.COMPLETE) {
        onResourceReady(resource, DataSource.MEMORY_CACHE);
return;
      }
// ==============重中之重==============
// 因为在上述文章中讲到过了图片的大小问题
// 在Glide中这里就是给出解决方案的地方,两种方案:
// 1. 给出了固定长宽
// 2. 没有设置时
      status = Status.WAITING_FOR_SIZE;
if (Util.isValidDimensions(overrideWidth, overrideHeight)) {
        onSizeReady(overrideWidth, overrideHeight);
      } else {
        target.getSize(this);
      }
// 使用一个占位符先顶替
if ((status == Status.RUNNING || status == Status.WAITING_FOR_SIZE)
          && canNotifyStatusChanged()) {
        target.onLoadStarted(getPlaceholderDrawable());
      }
    }
  }
那接下来要讲述的内容就应该是他的一些大小设置问题了,Glide到底是用什么样的方式完成大小的设置的呢?
onSizeReady(overrideWidth, overrideHeight)
public void onSizeReady(int width, int height) {
    stateVerifier.throwIfRecycled();
synchronized (requestLock) {
// .....
      status = Status.RUNNING;
// 对长宽重新进行预估
float sizeMultiplier = requestOptions.getSizeMultiplier();
this.width = maybeApplySizeMultiplier(width, sizeMultiplier);
this.height = maybeApplySizeMultiplier(height, sizeMultiplier);

      loadStatus =
          engine.load(各种参数);
// .....
    }
  }
通过观察对onSizeReady()函数发现,他使用的方案其实又是一个名叫做engine.load()的方式。
public  LoadStatus load(各种参数) {

    EngineResource memoryResource;
synchronized (this) {
      memoryResource = loadFromMemory(key, isMemoryCacheable, startTime);

if (memoryResource == null) {
return waitForExistingOrStartNewJob(各种参数);
      }
    }
    cb.onResourceReady(memoryResource, DataSource.MEMORY_CACHE);
return null;
  }
上述是我省略过后的代码,他表达意思其实非常之简单:
(1)内存里有数据,你就从我内存里拿。
(2)内存里没数据,那你就自己创建一个。
这样想来,问题又要往下继续延伸了,正常来说我们没有数据啊,那就要去调用这个waitForExistingOrStartNewJob()方法,来完成图片数据的获取了。
private  LoadStatus waitForExistingOrStartNewJob(各种参数) {
    EngineJob current = jobs.get(key, onlyRetrieveFromCache);
if (current != null) {
      current.addCallback(cb, callbackExecutor);
return new LoadStatus(cb, current);
    }

    EngineJob engineJob =
        engineJobFactory.build(各种参数);

    DecodeJob decodeJob =
        decodeJobFactory.build(各种参数);

    jobs.put(key, engineJob); // 对当前驱动工作进行缓存操作

    engineJob.addCallback(cb, callbackExecutor);
    engineJob.start(decodeJob); // 开启图片获取工作

return new LoadStatus(cb, engineJob);
}
能够注意到有出现两个新的类EngineJob和DecodeJob,转换成中文去理解就是工作驱动器和解码工作,并且EngineJob内部与线程池搭噶,最后肯定用于完成最后的图片获取工作,而DecodeJob作为被运行的工作,处理逻辑就应该在其之中。
public void run() {
    DataFetcher localFetcher = currentFetcher;
try {
// .....
      runWrapped(); // 1 -->
    } catch (Exception e) {
// .....
    } finally {
// .....
    }
  }
// 1 -->
private void runWrapped() {
switch (runReason) {
case INITIALIZE:
// 获取 Stage.INITIALIZE 的下一步操作,也就是选择三种方案
// 1. 资源缓存:ResourceCacheGenerator
// 2. 数据缓存:DataCacheGenerator
// 3. 网络资源:SourceGenerator
        stage = getNextStage(Stage.INITIALIZE);
        currentGenerator = getNextGenerator();
        runGenerators();
break;
case SWITCH_TO_SOURCE_SERVICE:
        runGenerators();
break;
case DECODE_DATA:
        decodeFromRetrievedData();
break;
default:
throw new IllegalStateException("Unrecognized run reason: " + runReason);
    }
  }
其实上述内容中已经开始讲述到我们常见的三大缓存了,也就是网络缓存、磁盘缓存和内存缓存,这段代码中其实已经开始涉及网络缓存和磁盘缓存了。
SourceGenerator:关于网络缓存
private void runGenerators() {
    currentThread = Thread.currentThread();
    startFetchTime = LogTime.getLogTime();
boolean isStarted = false;
while (!isCancelled
        && currentGenerator != null
        && !(isStarted = currentGenerator.startNext())) { // 1 -->
      stage = getNextStage(stage);
      currentGenerator = getNextGenerator();
// 只对Source这个枚举类型相应
if (stage == Stage.SOURCE) {
        reschedule();
return;
      }
    }
// 已完成就通知失败
if ((stage == Stage.FINISHED || isCancelled) && !isStarted) {
      notifyFailed();
    }
  }
// 1-->
public boolean startNext() {
// 需要数据有缓存才行
if (dataToCache != null) {
      Object data = dataToCache;
      dataToCache = null;
      cacheData(data);
    }

if (sourceCacheGenerator != null && sourceCacheGenerator.startNext()) {
return true;
    }
    sourceCacheGenerator = null;

    loadData = null;
boolean started = false;
while (!started && hasNextModelLoader()) {
// 从映射表找出能够对应上的图片类型的ModelLoader
      loadData = helper.getLoadData().get(loadDataListIndex++);
if (loadData != null
          && (helper.getDiskCacheStrategy().isDataCacheable(loadData.fetcher.getDataSource())
              || helper.hasLoadPath(loadData.fetcher.getDataClass()))) {
        started = true;
// 完成数据的加载
        startNextLoad(loadData);
      }
    }
return started;
  }
针对注释1进行探讨,这里的话,我们就尽量不放代码查看了,因为看了这么多代码,你肯定也累了。其实你能够猜测到它的下一步是网络请求,那如果获取成功了,是要直接进行图片数据的显示吗?那三次缓存应该在什么时机进行操作呢?因为代码量的原因,这里我们用图来展示流程。
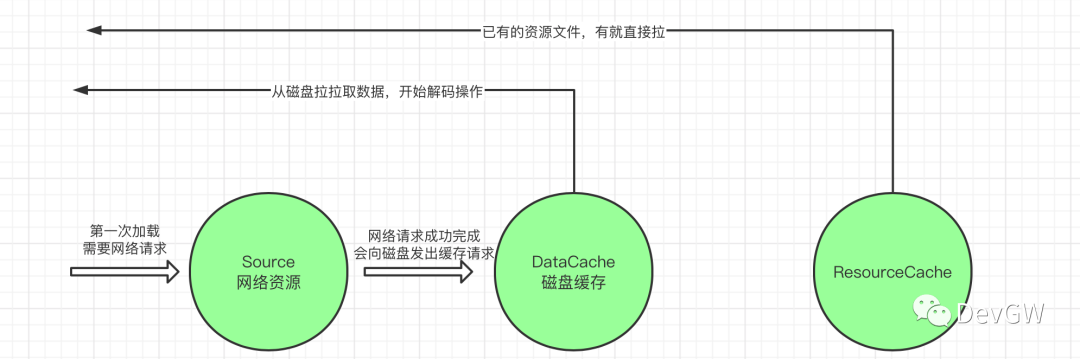
从图中可以知道,其实从网络获取的资源最后还是要被放到磁盘中进行缓存的,而磁盘缓存成功之后,接下来要干的事情就是要去通知View把获取的数据进行解码。这里你是否有一定的疑问了?
你没有听错,就是解码,如果你去各个官方查看图片的时候,很多给的都是后期重新被编码过的数据,本身数据其实并不能够在直接运行的,而解码就是让图片正式可视化的必经之路,也就是DecodeJob的本质工作了,对应的函数就是decodeFromRetrievedData()方法,把磁盘中拷贝出来的数据要进行解码操作。
private void decodeFromRetrievedData() {
    Resource resource = null;
// 将网络获取的数据进行解码操作
try {
      resource = decodeFromData(currentFetcher, currentData, currentDataSource); // 1 -->
    } catch (GlideException e) {
    }
// 解码完成,发出通知
if (resource != null) {
      notifyEncodeAndRelease(resource, currentDataSource); // 2-->
    } else {
      runGenerators();
    }
  }
你能够发现我在这段代码中打了两个注释,其实对应的就是两大操作解码完成,通知可以显示了。
decodeFromData(currentFetcher, currentData, currentDataSource);
下面会给出一段很长的深度调用代码。
(1)resource = decodeFromData(currentFetcher, currentData, currentDataSource);
(2)Resource result = decodeFromFetcher(data, dataSource);
(3)return path.load(
          rewinder, options, width, height, new DecodeCallback(dataSource));
(4)return loadWithExceptionList(rewinder, options, width, height, decodeCallback, throwables);
(5)result = path.decode(rewinder, width, height, options, decodeCallback);
(6)
public Resource decode(
      DataRewinder rewinder,
int width,
int height,
      @NonNull Options options,
      DecodeCallback callback)
throws GlideException {
// 这里会有很多转化的方法,一般来说对图片最常见的就是转成Bitmap
    Resource decoded = decodeResource(rewinder, width, height, options);
    Resource transformed = callback.onResourceDecoded(decoded);
return transcoder.transcode(transformed, options);
  }
在decode()这个函数其实做了三件事:
decodeResource将原始数据转换成我们原始图片的过程;callback.onResourceDecoded()是当得到了原始图片之后对图片继续处理过程;transcoder.transcode()会使用BitmapDrawableTranscoder进行再包装
decodeResource中可以转化的部分解码器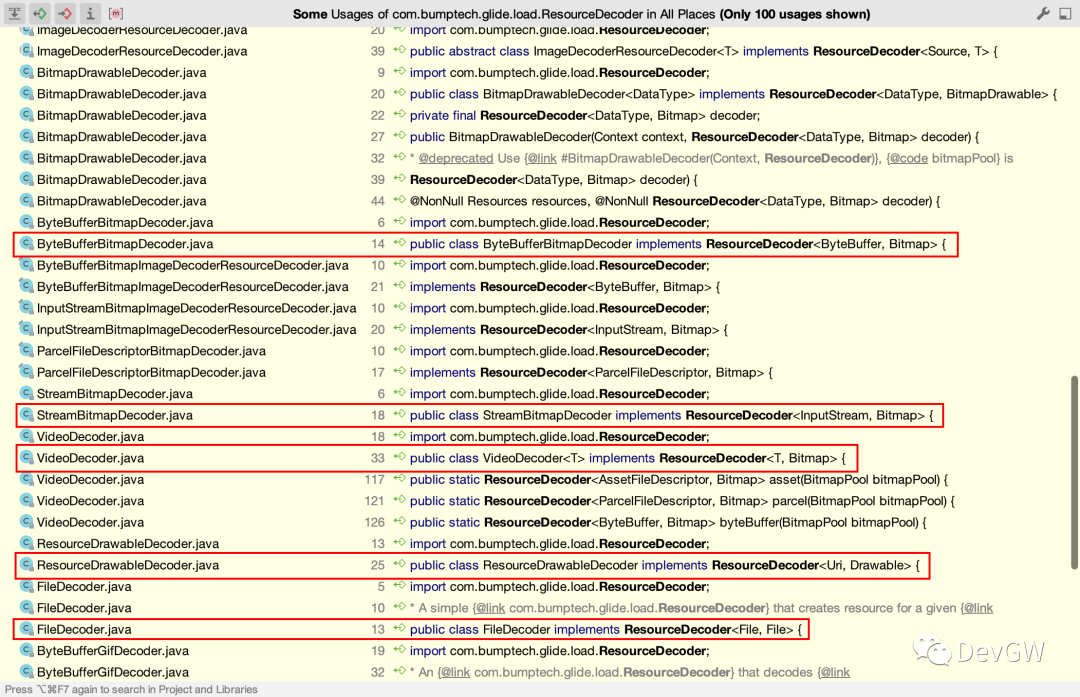
那这个时候你就正式拿到了一张图片了,那下一步还需要干嘛???显示啊!!!废了这么大周折,还不赶紧拿去显示,不是做了一大堆无用功嘛?
notifyEncodeAndRelease(resource, currentDataSource);
只看少量代码来完成这项工作
(1)notifyComplete(result, dataSource);
(2)
private void notifyComplete(Resource resource, DataSource dataSource) {
    setNotifiedOrThrow();
    callback.onResourceReady(resource, dataSource);
  }
你是否有注意到这样的问题,onResourceReady()是不是有点眼熟,在很上面的glideContext.buildImageViewTarget(view, transcodeClass),也就是构建放置的目标中我们就已经讲到过这个方法了,最后会通过一个set()的方法来将数据进行放置。
那基本上来说,上面就是一个比较详细的Glide的源码分析,因为代码是在太多了,所以我这里删去了很多。
其实你会发现我并没有正式讲完三级缓存,还差一个内存缓存没讲不是?
其实这是一个很早就被用到的方法,他对应的位置就在SingleRequest被调用了OnSizeReady()方法的时候有个engine.load(),里面就包含了第三级缓存内存缓存,里面对应的是这样的一段代码memoryResource = loadFromMemory(key, isMemoryCacheable, startTime);以及他深度调用后的EngineResource active = loadFromActiveResources(key);从活跃的的资源数据中进行寻找。同样是一个非常简单的实现手法。
final Map activeEngineResources = new HashMap<>();
就是通过一个Map对数据进行了保存,这样从复用的角度上来看就被比较好的继承了。
但如果不是活跃资源数据呢?
不要着急,还有一些数据还会在cache的变量中被保存着,这个方法里就是用了我们经常会提及到的LRUCache的一个淘汰算法,这里的详细请查看我的另外一篇文章:Glide都在用的LruCache,你学会了吗?。