自学鸿蒙应用开发(26)- 自定义CommonDialog
执行效果
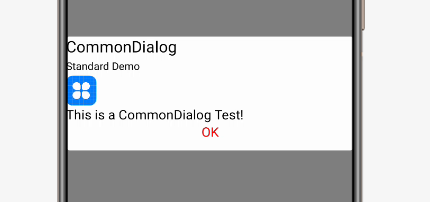
上一篇文章中说过,直接使用鸿蒙系统中的CommonDialog大致是下面的效果:

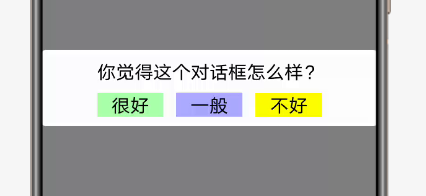
这个效果实在是无法用于实际的应用开发。本文介绍如何定制自己的CommonDialog。还是先看演示视频:
准备布局
定制CommonDialog的第一步是定义对话框的布局,具体如下:
<DirectionalLayout xmlns:ohos="http://schemas.huawei.com/res/ohos"ohos:width="match_parent"ohos:height="match_content"ohos:alignment="center"ohos:orientation="vertical"><DirectionalLayoutohos:width="match_content"ohos:height="match_content"ohos:top_padding="10vp"ohos:bottom_padding="10vp"ohos:left_padding="10vp"ohos:right_padding="10vp"ohos:background_element="#FFFFFF"ohos:orientation="vertical"><Textohos:width="match_content"ohos:height="match_content"ohos:text="你觉得这个对话框怎么样?"ohos:text_color="#000000"ohos:text_size="20fp"/><DirectionalLayoutohos:height="match_content"ohos:width="match_parent"ohos:top_margin="10vp"ohos:orientation="horizontal"><Buttonohos:id="$+id:good"ohos:width="0vp"ohos:weight = "5"ohos:height="match_content"ohos:text="很好"ohos:text_size="20fp"ohos:text_color="#000000"ohos:background_element="#AAFFAA"/><Componentohos:width="0vp"ohos:weight = "1"ohos:height="match_parent"/><Buttonohos:id="$+id:ordinary"ohos:width="0vp"ohos:weight = "5"ohos:height="match_content"ohos:text="一般"ohos:text_size="20fp"ohos:text_color="#000000"ohos:background_element="#AAAAFF"/><Componentohos:width="0vp"ohos:weight = "1"ohos:height="match_parent"/><Buttonohos:id="$+id:bad"ohos:width="0vp"ohos:weight = "5"ohos:height="match_content"ohos:text="不好"ohos:text_size="20fp"ohos:text_color="#000000"ohos:background_element="#FFFF00"/><Componentohos:width="20vp"ohos:height="match_parent"/>DirectionalLayout>DirectionalLayout>DirectionalLayout>
需要注意的是,最外层布局中只包含一个二层布局,这种做法的目的是为了解决对话框默认占满屏幕宽度的问题。
生成定制对话框
第2行通过LayoutScatter解析前面的布局文件。这种用法在ListContainer示例中使用过。
第3行代码将对话框设为透明,实际的效果是让最外层布局透明。视频中展示的从第二层布局开始到内容。
CommonDialog dlg = new CommonDialog(this);Component layout = LayoutScatter.getInstance(this).parse(ResourceTable.Layout_common_dialog, null, true);dlg.setTransparent(true);dlg.setContentCustomComponent(layout);Component.ClickedListener listener = new Component.ClickedListener() {public void onClick(Component component) {new ToastDialog(getContext()).setText(((Button)component).getText()).show();}};Button good = (Button)layout.findComponentById(ResourceTable.Id_good);good.setClickedListener(listener);Button ordinary = (Button)layout.findComponentById(ResourceTable.Id_ordinary);ordinary.setClickedListener(listener);Button bad = (Button)layout.findComponentById(ResourceTable.Id_bad);bad.setClickedListener(listener);dlg.show();
如果不调用setTransparent方法的话,画面看起来是下面的样子:

第4行代码是通过setContentCustomComponent方法生成你的布局对象传递给CommonDialog。
注意事项
目前的这种做法在鸿蒙文档中并没有说明,因此也就不排除将来发生变化的可能性。希望早日看到官方文档中的正式说法。
参考代码
完整代码可以从以下链接下载:
https://github.com/xueweiguo/Harmony/tree/master/HelloHarmony
参考资料
CommonDialog类
https://developer.harmonyos.com/cn/docs/documentation/doc-references/commondialog-0000001054678727
作者著作介绍
《实战Python设计模式》是作者去年3月份出版的技术书籍,该书利用Python 的标准GUI 工具包tkinter,通过可执行的示例对23 个设计模式逐个进行说明。这样一方面可以使读者了解真实的软件开发工作中每个设计模式的运用场景和想要解决的问题;另一方面通过对这些问题的解决过程进行说明,让读者明白在编写代码时如何判断使用设计模式的利弊,并合理运用设计模式。

对设计模式感兴趣而且希望随学随用的读者通过本书可以快速跨越从理解到运用的门槛;希望学习Python GUI 编程的读者可以将本书中的示例作为设计和开发的参考;使用Python 语言进行图像分析、数据处理工作的读者可以直接以本书中的示例为基础,迅速构建自己的系统架构。
觉得本文有帮助?请分享给更多人。
关注微信公众号【面向对象思考】轻松学习每一天!
面向对象开发,面向对象思考!
