Python自带爬虫库urllib使用大全
回复“书籍”即可获赠Python从入门到进阶共10本电子书
这篇文章主要来讲解下Python自带的爬虫库urllib常见用法,主要围绕urllib定义、urllib的常用模块和urllib+lxml爬虫案例三个部分进行展开。
一、什么是urllib
它是一个http请求的Python自带的标准库,无需安装,直接可以用。并且提供了如下功能:网页请求、响应获取、代理和cookie设置、异常处理、URL解析,可以说是一个比较强大的模块。
二、urllib模块
可分为以下模块:
urllib.request 请求模块urllib.error 异常处理模块urllib.parse 解析模块urllib.robotparser 解析模块
那么,我们先从第一个模块开始说起吧,首先说一下它的大致用法:
urllib.request.urlopen(url, data=None, [timeout, ]*, cafile=None, capath=None, cadefault=False, context=None) #里面有很多方法,类似与requests模块中的renquest方法request里包含了很多方法,如果我们要发送一个请求并读取请求内容,最简单的方法就是:
请求格式:
urllib.request.urlopen(url,data,timeout)url :请求地址
data:请求数据
timeout:请求超时时间
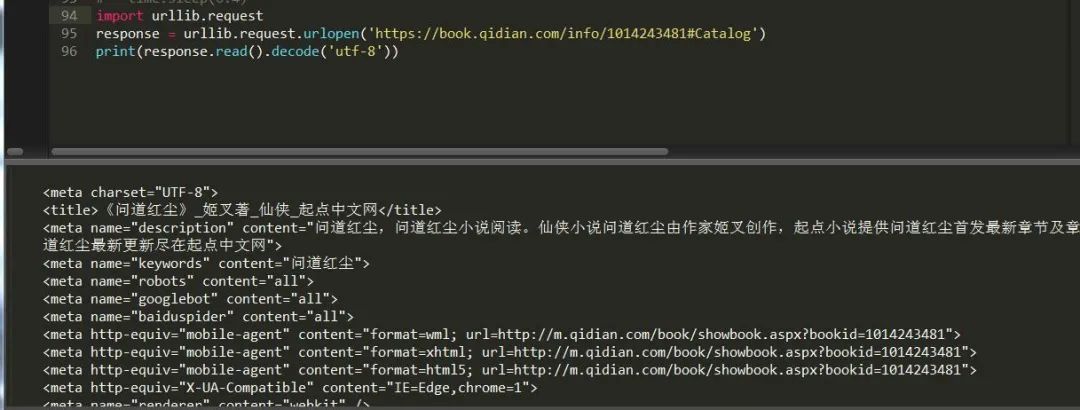
这里采用的是get请求,如果想要进行post请求,只需给data方法传参数即可,这里有个问题需要,因为传递参数必须是字节,所以得先编码成bytes才能读取。

也可以这样写:

通过解析模块先将它解析为byte格式然后读取,同样行之有效,这样就完成了一次post请求。
通过上面例子我们找到了request模块的使用方法,我们使用response.read()获取的是响应体的内容,我们还可以通过response.status、response.getheaders().response.getheader("server"),获取状态码以及头部信息,如果我们要给请求的网址添加头部信息的话了,就要使用urllib.request.Request方法了。
它的用法为:
urllib.request.Request(url,data,headers,timeout,method)url:请求地址
data:请求数据
headers:请求头
timeout:请求超时时间
method:请求方法,如get post
大致了解下我们可以先来访问下起点网:
from urllib import request, parseurl = 'https://book.qidian.com/info/1014243481#Catalog'headers = {'User-Agent': 'Mozilla/5.0 (Windows NT 6.1; WOW64) AppleWebKit/537.36 (KHTML, like Gecko) Chrome/78.0.3904.108 Safari/537.36','Host': 'book.qidian.com'}data = {'hw': 'hw'}data = bytes(parse.urlencode(data), encoding='utf8')req = request.Request(url=url, data=data,timeout=2,headers=headers, method='POST')response = request.urlopen(req)print(response.read().decode('utf-8'))
可以看出这是个post请求,因为method设置为post,data传了参数。
这里补充说明下有个urlencode方法,它的作用是将字典转换为url,例子如下:
from urllib.parse import urlencodedata = {"name":"hw","age":25,}url = "https://www.baidu.com?"page_url = url+urlencode(data)print(page_url)
添加请求头其实还有一种方法,请看:
from urllib import request, parseurl = 'https://book.qidian.com/info/1014243481#Catalog'data = {'hw': 'hw'}data = bytes(parse.urlencode(data), encoding='utf8')req = request.Request(url=url, data=data,method='POST')req.add_header('User-Agent','Mozilla/5.0 (Windows NT 6.1; WOW64) AppleWebKit/537.36 (KHTML, like Gecko) Chrom/78.0.3904.108 Safari/537.36') #添加请求头response = request.urlopen(req)print(response.read().decode('utf-8'))
这种添加方式有个好处是自己可以定义一个请求头字典,然后循环进行添加,伪造多个浏览器头。
urllib.request 还可以设置代理,用法如下,
urllib.request.ProxyHandler({'http':'http://fsdfffs.com','https':'https://fsdfwe.com'})这样就可以避免同一个IP访问网站多次被封的尴尬局面了。
import urllib.requestproxy_handler = urllib.request.ProxyHandler({'http': 'http://127.0.0.1:8000','https': 'https://127.0.0.1:8000'})opener = urllib.request.build_opener(proxy_handler) #构建代理池response = opener.open('https://book.qidian.com/info/1014243481#Catalog') #代理访问网站print(response.read())
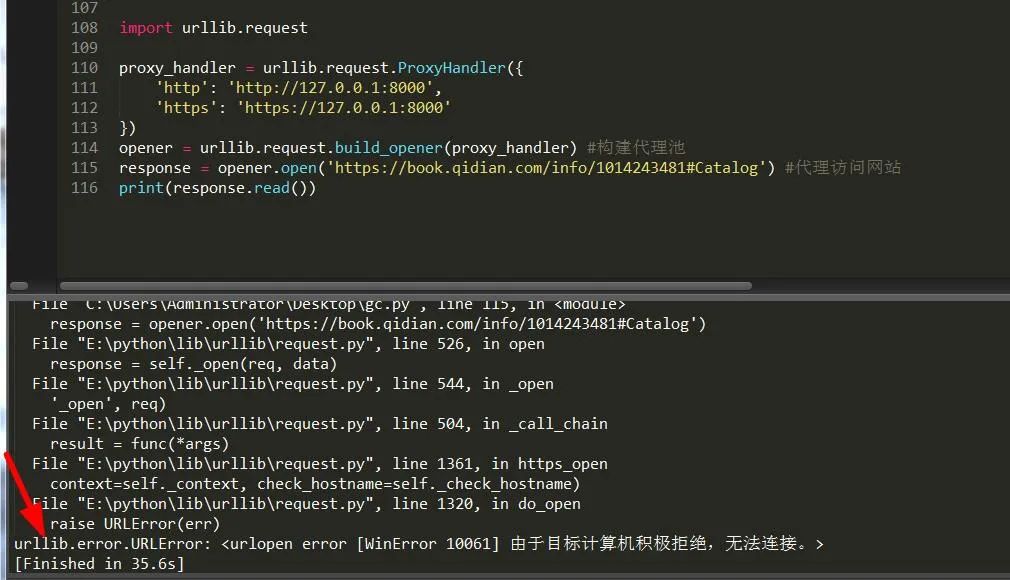
可以看出,由于本人使用无用的IP导致链接错误,所以此时应该处理异常。
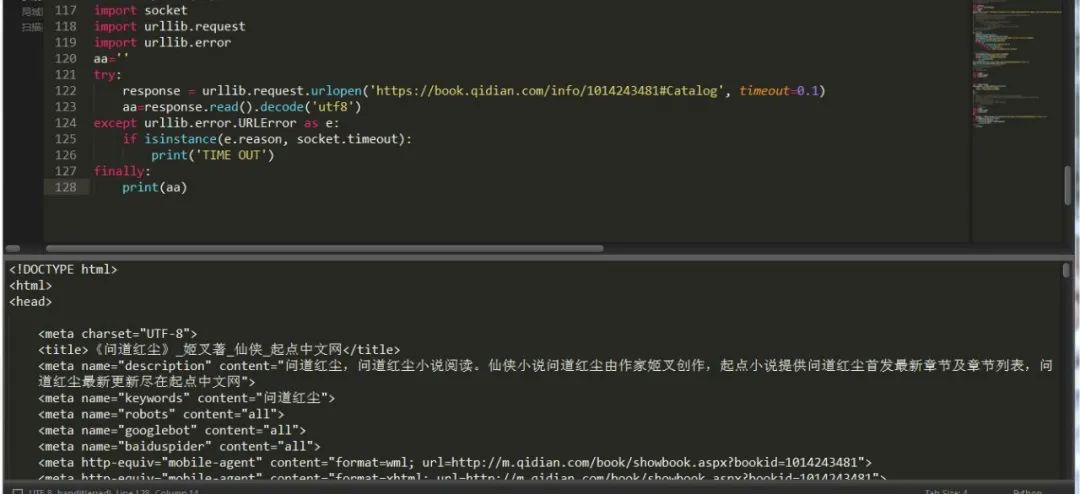
换了种处理异常的方式,不过总的来说还是比较全面的。异常模块中有两个异常错误:
URLError,HTTPError,其中HTTPError是URLError的子类,URLError 里只有一个属性:reason,即抓异常的时候只能打印错误信息,类似上面的例子。
HTTPError 里有三个属性:code,reason,headers,即抓异常的时候可以获得code,reson,headers三个信息,
import socketimport urllib.requestimport urllib.erroraa=''try:response = urllib.request.urlopen('https://book.qidian.com/info/1014243481#Catalog', timeout=0.1)aa=response.read().decode('utf8')except urllib.error.URLError as e:print(e.reason)if isinstance(e.reason,socket.timeout):print("time out")except urllib.error.HTTPError as e:print(e.reason,e.code)finally:print(aa)
除此之外,它还可以处理cookie数据,不过要借助另一个模块 http。
import http.cookiejar, urllib.requestcookie = http.cookiejar.CookieJar() #创建cookiejar对象handler = urllib.request.HTTPCookieProcessor(cookie) 建立cookie请求opener = urllib.request.build_opener(handler) #构建请求response = opener.open('https://www.baidu.com') #发送请求for item in cookie:print(item.name+"="+item.value) #打印cookie信息
同时cookie可以写入到文件中保存,有两种方式http.cookiejar.MozillaCookieJar和http.cookiejar.LWPCookieJar(),想用哪种自己决定。
http.cookiejar.MozillaCookieJar()方式
import http.cookiejar, urllib.requestfilename = "cookie.txt"cookie = http.cookiejar.MozillaCookieJar(file_name)handler = urllib.request.HTTPCookieProcessor(cookie)opener = urllib.request.build_opener(handler)response = opener.open('https://www.baidu.com')cookie.save(ignore_discard=True, ignore_expires=True)#保存信息
http.cookiejar.LWPCookieJar()方式
import http.cookiejar, urllib.requestfilename = 'cookie.txt'cookie = http.cookiejar.LWPCookieJar(file_name)handler = urllib.request.HTTPCookieProcessor(cookie)opener = urllib.request.build_opener(handler)response = opener.open('https://www.baidu.com')cookie.save(ignore_discard=True, ignore_expires=True)
如果想要通过获取文件中的cookie获取的话可以通过load方式,它也有两种方式,http.cookiejar.MozillaCookieJar和http.cookiejar.LWPCookieJar(),想用哪种自己决定。
http.cookiejar.MozillaCookieJar()方式
import http.cookiejar, urllib.requestcookie = http.cookiejar.MozillaCookieJar()cookie.load('cookie.txt', ignore_discard=True, ignore_expires=True)handler = urllib.request.HTTPCookieProcessor(cookie)opener = urllib.request.build_opener(handler)response = opener.open('https://www.baidu.com')print(response.read().decode('utf-8'))
http.cookiejar.LWPCookieJar()方式
import http.cookiejar, urllib.requestcookie = http.cookiejar.LWPCookieJar()cookie.load('cookie.txt', ignore_discard=True, ignore_expires=True)handler = urllib.request.HTTPCookieProcessor(cookie)opener = urllib.request.build_opener(handler)response = opener.open('https://www.baidu.com')print(response.read().decode('utf-8'))
urllib parse模块
它是负责解析页面内容,模块下有一个urlparse方法用于拆分解析内容,具体用法如下:
urllib.parse.urlparse(url,scheme)URL:页面地址
scheme: 协议类型 ,比如 http https

有拆分当然也会有拼接,我们可以看到上面返回的有六个值,所以我们在做拼接时一定要填写六个参数,否则它会报没有足够的值用来解包的错误。
urllib.parse.urlunpars(url,scheme)
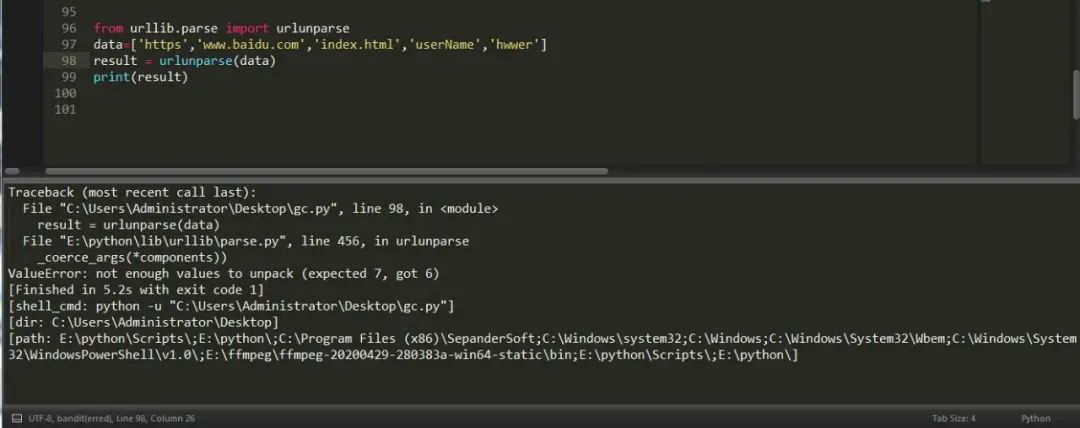
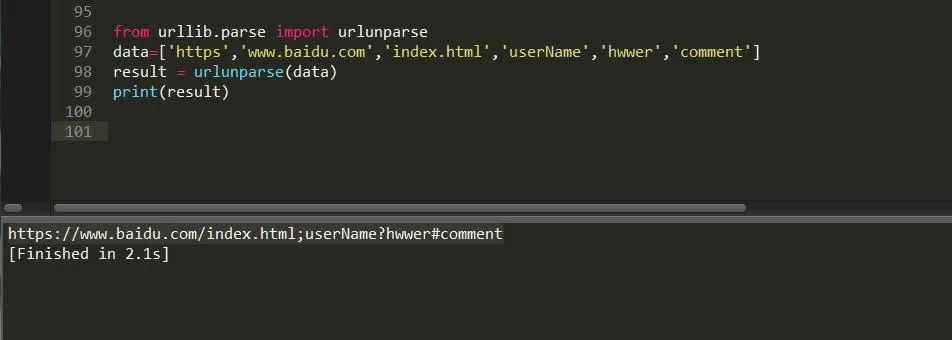
类似的拼接方法其实还有,比如说urljoin,例子如下:

urllib.robotparser 它也是一个解析模块,从它的字面意思看,应该是一个机器人解析模块。
而且它还与机器人协议有关联,它的存在就是为了解析每个网站中机器人协议,判断这个网站是否可以抓取。
每个网站中都会有一个robots.txt文件,我们要做的就是先解析它,然后在对要下载的网页数据进行判断是否可以抓取。
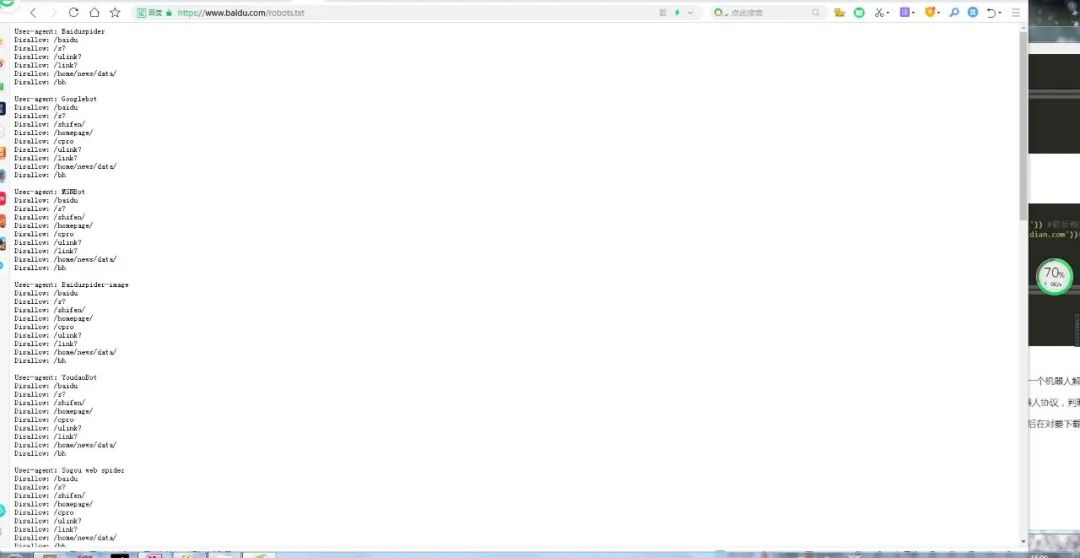
可以通过直接输入url的方式来判断:
from urllib import robotparserrb = robotparser.RobotFileParser('https://www.baidu.com/robots.txt')print(rb.read())url = 'https://www.baidu.com'user_agent = 'BadCrawler'aa=rb.can_fetch(user_agent, url) #确定指定的用户代理是否允许访问网页print(aa) #禁止使用的用户代理 falseuser_agent = 'Googlebot'bb=rb.can_fetch(user_agent, url)print(bb)#允许使用的用户代理 true
也可以通过间接设置url的方式来判断:
from urllib import robotparserrb = robotparser.RobotFileParser()rb.set_url('https://www.baidu.com/robots.txt')rb.read() #读取url = 'https://www.baidu.com'user_agent = 'BadCrawler'aa=rb.can_fetch(user_agent, url) #确定指定的用户代理是否允许访问网页print(aa) #禁止使用的用户代理 falseuser_agent = 'Googlebot'bb=rb.can_fetch(user_agent, url)print(bb)#允许使用的用户代理 trueprint(rb.mtime()) #返回抓取分析robots协议的时间rb.modified() #将当前时间设置为上次抓取和分析 robots.txt 的时间print(rb.mtime())# 返回 robots.txt 文件对请求速率限制的值print(rb.request_rate('Googlebot'))print(rb.request_rate('MSNBot'))# 返回 robotx.txt 文件对抓取延迟限制的值print(rb.crawl_delay('Googlebot'))print(rb.crawl_delay('MSNBot'))
三、应用案例:爬取起点小说名
老样子,按下键盘快捷键F12,进行网页分析,这次我们采用lxml,我们得知只需要将这个页面中的某一个部分的数据变动一下就可以抓取到所有数据。如图:
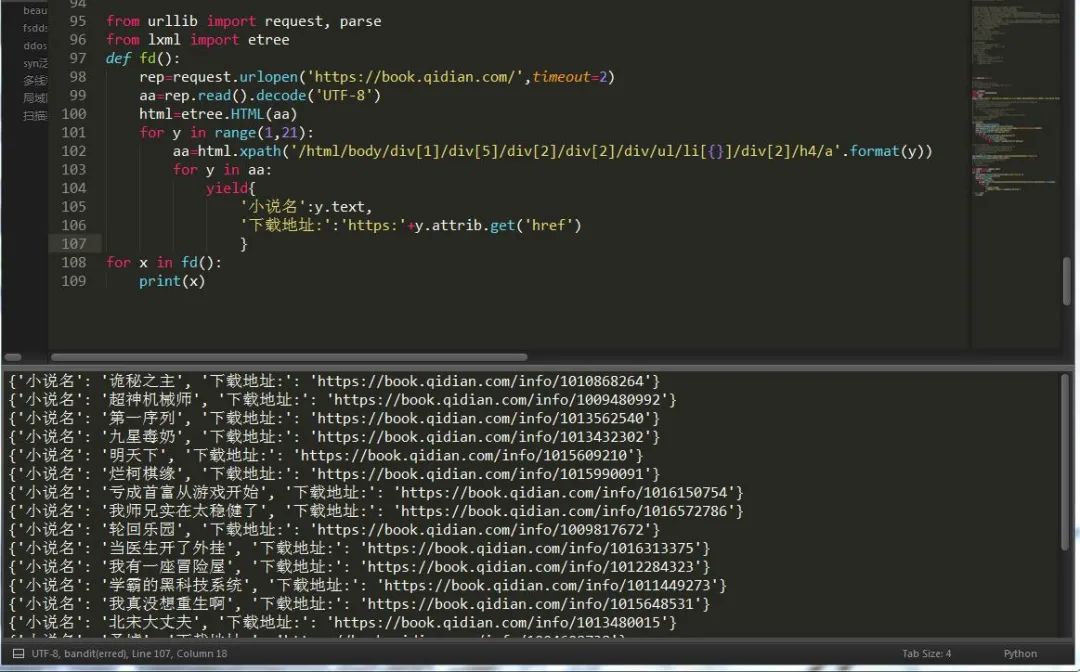
下次我们来讲lxml和xpath语法,以便于大家更好的爬取数据,urllib内容就这么多,并不复杂,requests更为简单易学。
最后想学习更多关于Python的知识,可以参考学习网址:http://pdcfighting.com/,点击阅读原文,可以直达噢~
------------------- End -------------------
往期精彩文章推荐:

欢迎大家点赞,留言,转发,转载,感谢大家的相伴与支持
想加入Python学习群请在后台回复【入群】
万水千山总是情,点个【在看】行不行
/今日留言主题/
随便说一两句吧~~
