5 分钟快速上手 pytest 测试框架
为什么要做单元测试
print() 函数将其打印输出到控制台上。def myfunc(*args, **kwargs):
do_something()
data = ...
print(data)
print() 函数来确保结果的准确性,但同时,也由于要测试的模块或者函数变多,代码中也会逐渐遗留着各种未被去掉或注释的 print() 调用,让整个代码变得不是那么简洁得体。print() 进行测试的步骤统一地放到单元测试中来进行。unittest。但对于新手来说,unittest 在学习曲线上是稍微有点难度的,因为是需要通过继承测试用例类(TestCase)来进行封装,所以需要对面向对象的知识有足够多的了解;而和类绑定在一起就意味着如果想要实现定制化或者模块解耦,可能就需要多花一些时间在设计划分上。
TestCase 来实现我们的测试,我们只需要简单到保持我们原有的代码逻辑不变,外加一个 assert 关键字来断言结果,剩下的部分 pytest 会帮我们处理。# main.py
import pytest
raw_data = read_data(...)
def test_myfunc(*args, **kwargs):
do_something()
data = ...
assert data == raw_data
if __name__ == '__main__':
pytest.main()
main.py 文件,就能在终端控制台上看到 pytest 为我们测试得到的结果。如果结果通过,则不会有过多的信息显示,如果测试失败,则会抛出错误信息并告知运行时 data 里的内容是什么。快速实现你的第一个 Pytest 测试
pip install pytest 安装 pytest 之后,我们就可以快速实现我们的第一个测试。test_main.py 命名,然后当中留存如下内容:from typing import Union
import pytest
def add(
x: Union[int, float],
y: Union[int, float],
) -> Union[int, float]:
return x + y
@pytest.mark.parametrize(
argnames="x,y,result",
argvalues=[
(1,1,2),
(2,4,6),
(3.3,3,6.3),
]
)
def test_add(
x: Union[int, float],
y: Union[int, float],
result: Union[int, float],
):
assert add(x, y) == result
pytest -v,就会看到 pytest 已经帮我们将待测试的参数传入到测试函数中,并实现对应的结果:
for 循环传参,并且还能直观地从结果中看到每次测试中传入参数的具体数值是怎样。这里我们只通过 pytest 提供的 mark.parametrize 装饰器就搞定了。也说明 pytest 的上手程度是比较容易的,只不过我们需要稍微了解一下这个框架中的一些概念。Pytest 概念与用法
命名
test_* 开头或是以 *_test 结尾,这是为了遵守标准的测试约定。如果我们将前面快速上手的例子文件名中的 test_ 去掉,就会发现 pytest 没有收集到对应的测试用例。# content of pytest.ini
# Example 1: have pytest look for "check" instead of "test"
[pytest]
python_files = check_*.py
python_classes = Check
python_functions = *_check
pytest test.py::test_demo
pytest test.py::TestDemo::test_demo
标记(mark)
mark 标记是一个十分好用的功能,通过标记的装饰器来装饰我们的待测试对象,让 pytest 在测试时会根据 mark 的功能对我们的函数进行相应的操作。mark 功能,我们只挑常用的说。参数测试:pytest.parametrize
mark.parametrize 主要就是用于我们想传递不同参数或不同组合的参数到一个待测试对象上的这种场景。test_add() 示例一样,分别测试了:当 x=1且y=1时,结果是否为result=2的情况当 x=2且y=4时,结果是否为result=6的情况当 x=3.3且y=3时,结果是否为result=6.3的情况……
import pytest

@pytest.mark.parametrize("x", [0, 1])
@pytest.mark.parametrize("y", [2, 3])
@pytest.mark.parametrize("result", [2, 4])
def test_add(x, y, result):
    assert add(x,y) == result
parametrize 中,pytest 依旧能帮我们把所有情况都给测试一遍。这样我们就再也不用写多余的代码。parametrize 和我们后面将要讲到的一个重要的概念 fixture 会有一些差异:前者主要是模拟不同参数下时待测对象会输出怎样的结果,而后者是在固定参数或数据的情况下,去测试会得到怎样的结果。跳过测试
add(),但当版本大于 Python 3.3 时使用必然会出现问题。mark.skip 和 mark.skipif 两个标记,当然后者用的更多一些。import pytest
import sys
@pytest.mark.skipif(sys.version_info >= (3,3))
def test_add(x, y, result):
assert add(x,y) == result
sys 模块判断 Python 解释器的版本是否大于 3.3,大于则会自动跳过。预期异常
def div(x, y):
    return x / y
y=0 时,必然会引发 ZeroDivisionError 异常。所以通常的做法要么就用 try...exception 来捕获异常,并且抛出对应的报错信息(我们也可以使用 if 语句进行条件判断,最后也同样是抛出报错):def div(x, y):
try:
return x/y
except ZeroDivisionError:
raise ValueError("y 不能为 0")
raises() 方法:import pytest
@pytest.mark.parametrize("x", [1])
@pytest.mark.parametrize("y", [0])
def test_div(x, y):
with pytest.raises(ValueError):
div(x, y)
ZeroDivisionError 后我们自己指定抛出的 ValueError,而非前者。当然我们可以使用另外一个标记化的方法(pytest.mark.xfail)来和 pytest.mark.parametrize 相结合:
@pytest.mark.parametrize(
    "x,y,result",
    [
        pytest.param(1,0, None, marks=pytest.mark.xfail(raises=(ValueError))),
    ]
)
def test_div_with_xfail(x, y, result):
    assert div(x,y) == result
Fixture
fixture。关于 fixture 的翻译大部分人都直接将其直译为了「夹具」一词,但如果你有了解过 Java Spring 框架的 那么你在实际使用中你就会更容易将其理解为 IoC 容器类似的东西,但我自己认为它叫「载具」或许更合适。fixture 的作用往往就是为我们的测试用例提供一个固定的、可被自由拆装的通用对象,本身就像容器一样承载了一些东西在里面;让我们使用它进行我们的单元测试时,pytest 会自动向载具中注入对应的对象。connect(),接着进行操作,最后使用完之后断开连接 close() 以释放资源。# test_fixture.py
import pytest
class Database(object):
def __init__(self, database):
self.database = database
def connect(self):
print(f"\n{self.database} database has been connected\n")
def close(self):
print(f"\n{self.database} database has been closed\n")
def add(self, data):
print(f"`{data}` has been add to database.")
return True
@pytest.fixture
def myclient():
db = Database("mysql")
db.connect()
yield db
db.close()
def test_foo(myclient):
assert myclient.add(1) == True
@pytest.fixture 这一行装饰器代码,通过该装饰器我们可以直接使用一个带有资源的函数将其作为我们的载具,在使用时将函数的签名(即命名)作为参数传入到我们的测试用例中,在运行测试时 pytest 则会自动帮助我们进行注入。
myclient() 中 db 对象的 connect() 方法调用模拟数据库连接的方法,在测试完成之后会再次帮我们调用 close() 方法释放资源。fixture 机制是一个让我们能实现复杂测试的关键,试想我们以后只需要写好一个带有测试数据的 fixture,就可以在不同的模块、函数或者方法中多次使用,真正做到「一次生成,处处使用」。function:函数作用域(默认)class:类作用域module:模块作用域package:包作用域session:会话作用域
@pytest.fixture() 中多增加一个 scope 参数,从而提升载具作用的范围。conftest.py 文件中进行统一管理:# conftest.py
import pytest
class Database:
def __init__(self, database):
self.database:str = database
def connect(self):
print(f"\n{self.database} database has been connected\n")
def close(self):
print(f"\n{self.database} database has been closed\n")
def add(self, data):
print(f"\n`{data}` has been add to database.")
return True
@pytest.fixture(scope="package")
def myclient():
db = Database("mysql")
db.connect()
yield db
db.close()
test_add() 测试部分稍微修改一下,无需显式导入 myclient 载具就可以直接注入并使用:from typing import Union
import pytest
def add(
x: Union[int, float],
y: Union[int, float],
) -> Union[int, float]:
return x + y
@pytest.mark.parametrize(
argnames="x,y,result",
argvalues=[
(1,1,2),
(2,4,6),
]
)
def test_add(
x: Union[int, float],
y: Union[int, float],
result: Union[int, float],
myclient
):
assert myclient.add(x) == True
assert add(x, y) == result
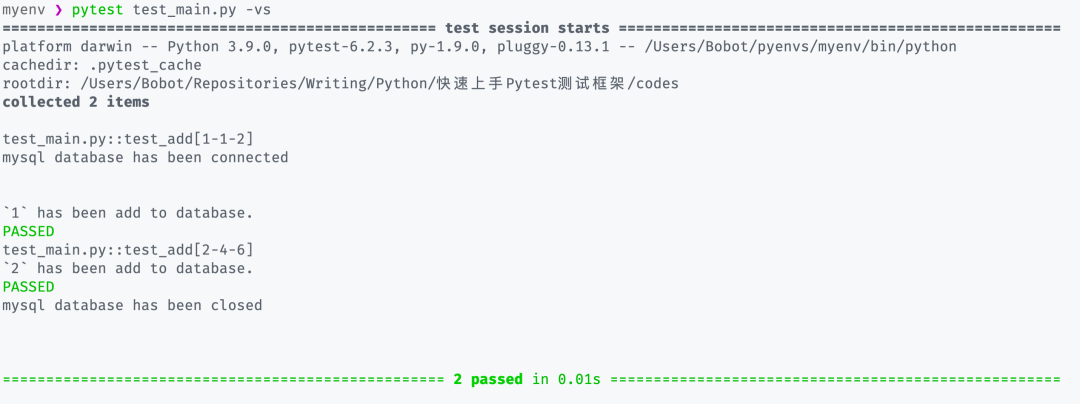
pytest -vs 即可看到输出的结果:
Pytest 扩展
pip 命令安装即可,最后使用只需要简单的参照插件的使用文档编写相应的部分,最后启动 pytest 测试即可。pytest-xdist
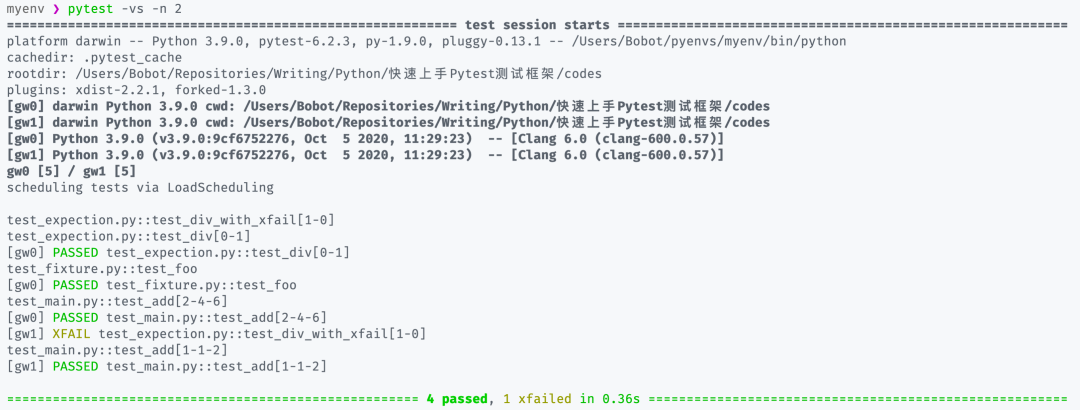
-n <CPU_NUMBER> 参数即可,其中的 CPU 数量可以直接用 auto 代替,它会自动帮你调整 pytest 测试所使用的 CPU 核心数:
pytest-asyncio
@pytest.mark.asyncio 标记装饰异步函数或方法,然后进行测试即可:import asyncio
import pytest
async def foo():
await asyncio.sleep(1)
return 1
@pytest.mark.asyncio
async def test_foo():
r = await foo()
assert r == 1
结语
评论
