
520 表白不够,521 来凑!!!

文 | 潮汐
来源:Python 技术「ID: pythonall」

昨天是520,各地情侣们该表白的表白,该求婚的求婚,该领证的领证,小编也在此祝天下有情人终成眷属,如果大家昨天因为太忙没来得及表白或者昨天晚上才找到表白的女神的话,今天的表白小技能请笑纳,相信对作为程序员的我们有帮助,显得更有新意!
简易字母表白
import matplotlib.pyplot as plt
import seaborn
import numpy

# 定义方法
def draw_love():
 #拼凑字母
    l = numpy.arange(0, 4, 0.01)
    L = 1.0 / l
    theta = numpy.arange(-4, 4, 0.01)
    o = 3.0 * numpy.cos(theta)
    O = 3.0 * numpy.sin(theta)
    v = numpy.arange(-4, 4, 0.01)
    V = numpy.abs(-2.0 * v)
    e = numpy.arange(-3, 3, 0.01)
    E = -1.0 * numpy.abs(numpy.sin(e))
    y = numpy.arange(-10, 10, 0.01)
    Y = numpy.log2(numpy.abs(y))
    u = numpy.arange(-4, 4, 0.01)
    U = 2.0 * u ** 2
    points = []

    for heartY in numpy.linspace(-100, 100, 500):
        for heartX in numpy.linspace(-100, 100, 500):
            if ((heartX * 0.03) ** 2 + (heartY * 0.03) ** 2 - 1) ** 3 - (heartX * 0.03) ** 2 * (
                    heartY * 0.03) ** 3 <= 0:
                points.append({"x": heartX, "y": heartY})
# 设置直角坐标系
    heart_x = list(map(lambda point: point["x"], points))
    heart_y = list(map(lambda point: point["y"], points))

# 添加网格
    fig = plt.figure(figsize=(13, 7))
    ax_L = fig.add_subplot(2, 4, 1)
    ax_O = fig.add_subplot(2, 4, 2)
    ax_V = fig.add_subplot(2, 4, 3)
    ax_E = fig.add_subplot(2, 4, 4)
    ax_Y = fig.add_subplot(2, 4, 5)
    ax_O_2 = fig.add_subplot(2, 4, 6)
    ax_U = fig.add_subplot(2, 4, 7)
    ax_heart = fig.add_subplot(2, 4, 8)

    # 设置坐标
    ax_L.plot(l, L)
    ax_O.plot(o, O)
    ax_V.plot(v, V)
    ax_E.plot(E, e)
    ax_Y.plot(y, Y)
    ax_Y.axis([-10.0, 10.0, -10.0, 5.0])
    ax_O_2.plot(o, O)

    ax_U.plot(u, U)

    ax_heart.scatter(heart_x, heart_y, s=10, alpha=0.5)
 # 设置颜色
    plt.plot(color='red')
 # 展示结果
    plt.show()

# 主函数
if __name__ == '__main__':
    seaborn.set_style('dark')
    draw_love()
结果图如下:
动图小爱心
小爱心表白详细代码如下:
import turtle
import time

def hart_arc():
    for i in range(200):
        turtle.right(1)
        turtle.forward(2)


def move_pen_position(x, y):
    turtle.hideturtle()  # 隐藏画笔(先)
    turtle.up()  # 提笔
    turtle.goto(x, y)  # 移动画笔到指定起始坐标(窗口中心为0,0)
    turtle.down()  # 下笔
    turtle.showturtle()  # 显示画笔


love = input("请输入表白话语:")
signature = input("请签署你的名字:")
date=input("请写上日期:")

if love == '':
    love = 'I Love You'

turtle.setup(width=800, height=500)  # 窗口(画布)大小
turtle.color('red', 'pink')  # 画笔颜色
turtle.pensize(3)  # 画笔粗细
turtle.speed(1)  # 描绘速度
# 初始化画笔起始坐标
move_pen_position(x=0, y=-180)  # 移动画笔位置
turtle.left(140)  # 向左旋转140度

turtle.begin_fill()  # 标记背景填充位置

# 画图和展示
turtle.forward(224)  # 向前移动画笔,长度为224
# 画爱心圆弧
hart_arc()  # 左侧圆弧
turtle.left(120)  # 调整画笔角度
hart_arc()  # 右侧圆弧
# 画心形直线( 右下方 )
turtle.forward(224)

turtle.end_fill()  # 标记背景填充结束位置

move_pen_position(x=70, y=160)  # 移动画笔位置
turtle.left(185)  # 向左旋转180度
turtle.circle(-110,185)  # 右侧圆弧
# 画心形直线( 右下方 )
#turtle.left(20)  # 向左旋转180度
turtle.forward(50)
move_pen_position(x=-180, y=-180)  # 移动画笔位置
turtle.left(180)  # 向左旋转140度

# 画心形直线( 左下方 )
turtle.forward(600)  # 向前移动画笔,长度为224

# 在心形中写上表白话语
move_pen_position(0,50)  # 表白语位置
turtle.hideturtle()  # 隐藏画笔
turtle.color('#CD5C5C', 'pink')  # 字体颜色
# font:设定字体、尺寸(电脑下存在的字体都可设置)  align:中心对齐
turtle.write(love, font=('Arial', 20, 'bold'), align="center")

# 签写署名和日期
if (signature != '') & (date != ''):
    turtle.color('red', 'pink')
    time.sleep(2)
    move_pen_position(220, -180)
    turtle.hideturtle()  # 隐藏画笔
    turtle.write(signature, font=('Arial', 20), align="center")
    move_pen_position(220, -220)
    turtle.hideturtle()  # 隐藏画笔
    turtle.write(date, font=('Arial', 20), align="center")

#点击窗口关闭程序
window = turtle.Screen()
window.exitonclick()
运行效果如下: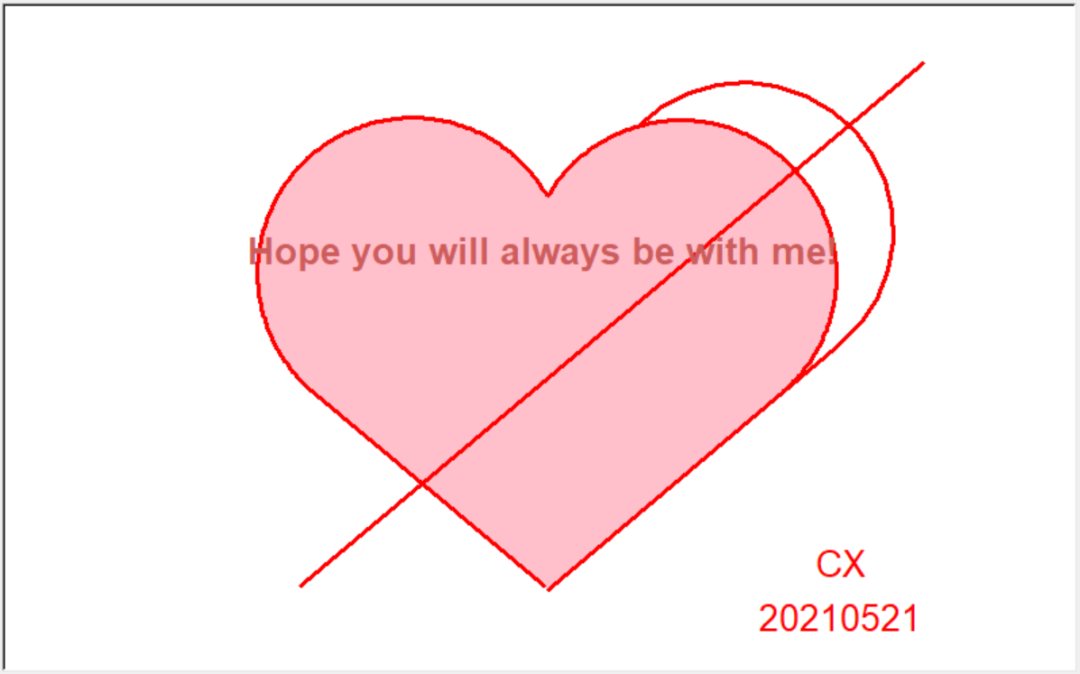
以上小爱心是动图噢!
总结
今天的表白小技能到此结束,大家速速拿去用吧,愿天下有情人终成眷属!
PS:公号内回复「Python」即可进入Python 新手学习交流群,一起 100 天计划!
老规矩,兄弟们还记得么,右下角的 “在看” 点一下,如果感觉文章内容不错的话,记得分享朋友圈让更多的人知道!


【代码获取方式】
评论