从零搭建开发脚手架 Spring Boot文件上传的多种方式、原理及遇到的问题
“在这里总结了常见上传方式、文件上传原理以及遇到的问题及解决方案。
文件上传
概述
Spring支持可插拔的MultipartResolver对象进行文件上传。目前有2个实现;
在Servlet 2.5 及早期版本之前,文件上传需要借助 commons-fileupload 组件来实现。 从Servlet 3.0规范之后,提供了对文件上传的原生支持,进一步简化了应用程序的实现。
commons-fileupload
要使用commons-fileupload的CommonsMultipartResolver处理文件上传,我们需要添加以下依赖项:
<dependency>
    <groupId>commons-fileupload</groupId>
    <artifactId>commons-fileupload</artifactId>
</dependency>
配置定义CommonsMultipartResolver bean。
@Bean(name = "multipartResolver")
public CommonsMultipartResolver multipartResolver() {
    CommonsMultipartResolver multipartResolver = new CommonsMultipartResolver();
    multipartResolver.setMaxUploadSize(100000);
    return multipartResolver;
}
Servlet 3.0
SpringBoot项目参见MultipartAutoConfiguration.java类,默认会自动配置StandardServletMultipartResolver,我们不需要做任何事情,就能使用了。
@Configuration(proxyBeanMethods = false)
@ConditionalOnClass({ Servlet.class, StandardServletMultipartResolver.class, MultipartConfigElement.class })
@ConditionalOnProperty(prefix = "spring.servlet.multipart", name = "enabled", matchIfMissing = true)
@ConditionalOnWebApplication(type = Type.SERVLET)
@EnableConfigurationProperties(MultipartProperties.class)
public class MultipartAutoConfiguration {

 private final MultipartProperties multipartProperties;

 public MultipartAutoConfiguration(MultipartProperties multipartProperties) {
  this.multipartProperties = multipartProperties;
 }

 @Bean
 @ConditionalOnMissingBean({ MultipartConfigElement.class, CommonsMultipartResolver.class })
 public MultipartConfigElement multipartConfigElement() {
  return this.multipartProperties.createMultipartConfig();
 }

 @Bean(name = DispatcherServlet.MULTIPART_RESOLVER_BEAN_NAME)
 @ConditionalOnMissingBean(MultipartResolver.class)
 public StandardServletMultipartResolver multipartResolver() {
  StandardServletMultipartResolver multipartResolver = new StandardServletMultipartResolver();
  multipartResolver.setResolveLazily(this.multipartProperties.isResolveLazily());
  return multipartResolver;
 }

}
常见文件上传相关需求,我整理总结如下:
单文件上传
前端核心代码
<form method="POST" action="/upload-file" enctype="multipart/form-data">
    <table>
        <tr>
            <td><input type="file" name="file" /></td>
        </tr>
        <tr>
            <td><input type="submit" value="Submit" /></td>
        </tr>
    </table>
</form>
后端核心代码
@RequestMapping(value = "/upload-file", method = RequestMethod.POST)
public String submit(@RequestParam("file") MultipartFile file) {
    return "ok";
}
多文件上传
前端核心代码
<form method="POST" action="/upload-files" enctype="multipart/form-data">
    <table>
        <tr>
            <td>Select a file to upload</td>
            <td><input type="file" name="files" /></td>
        </tr>
        <tr>
            <td>Select a file to upload</td>
            <td><input type="file" name="files" /></td>
        </tr>
        <tr>
            <td>Select a file to upload</td>
            <td><input type="file" name="files" /></td>
        </tr>
        <tr>
            <td><input type="submit" value="Submit" /></td>
        </tr>
    </table>
</form>
后端核心代码
我们需要注意每个输入字段具有相同的名称,以便可以将其作为MultipartFile数组进行访问:
    @RequestMapping(value = "/upload-files", method = RequestMethod.POST)
    public String submit(@RequestParam("files") MultipartFile[] files) {
        return "ok";
    }
带其他参数的文件上传
前端核心代码
<form method="POST" action="/upload-files-with-data" enctype="multipart/form-data">
    <table>
        <tr>
            <td>Name</td>
            <td><input type="text" name="name" /></td>
        </tr>
        <tr>
            <td>Email</td>
            <td><input type="text" name="email" /></td>
        </tr>
        <tr>
            <td>Select a file to upload</td>
            <td><input type="file" name="file" /></td>
        </tr>
        <tr>
            <td><input type="submit" value="Submit" /></td>
        </tr>
    </table>
</form>
后端核心代码
“在控制器中,我们可以使用@RequestParam注解获取所有表单数据,也可以不使用@RequestParam获取
@PostMapping("/upload-files-with-data")
public String submit(
            @RequestParam MultipartFile file, @RequestParam String name,
            String email) {
    return "ok";
}
优雅的后端实现
我们还可以将所有表单字段封装在类中,当文件中有很多其他字段时,就很方便。
public class FormDataWithFile {
    private String name;
    private String email;
    private MultipartFile file;
}
@PostMapping("/upload-files-with-data")
public String submit(FormDataWithFile formDataWithFile) {
    return "ok";
}
多个(文件+参数)上传
功能需求类似于上传如下请求:
[
    {
        "name": "a",
        "emainl": "b",
        "file":
    },
    {
        "name": "a",
        "emainl": "",
        "file":
    }
]
但是这样写是行不通的,解决方案如下:
方案一:上传文件Base64
把文件转为base64字符串,但是转换后的字符串大小是原图片大小的3倍。(慎用)
[
    {
        "name": "a",
        "emainl": "",
        "fileBase64":"xxxxx"
    },
    {
        "name": "b",
        "emainl": "",
        "fileBase64":"xxxxx"
    }
]
方案二:上传文件url
先把图片上传到服务器,获取文件url,然后再把文件的URL与其他参数上传到后端
[
    {
        "name": "a",
        "emainl": "",
        "fileUrl":"xxxxx.png"
    },
    {
        "name": "b",
        "emainl": "",
        "fileUrl":"xxxxx.png"
    }
]
文件上传原理
通常一个文件上传的请求内容格式如下:
POST /upload HTTP/1.1
Host:xxx.org
Content-type: multipart/form-data, boundary="boundaryStr"

--boundaryStr
content-disposition: form-data; name="name"

Name Of Picture
--boundaryStr
Content-disposition: attachment; name="picfile"; filename="picfile.gif"
Content-type: image/gif
Content-Transfer-Encoding: binary

...contents of picfile.gif...
其中 boundary 指定了内容分割的边界字符串;
Content-dispostion 指定了这是一个附件(文件),包括参数名称、文件名称;
Content-type 指定了文件类型;
Content-Transfer-Encoding 指定内容传输编码;
Tomcat 实现了 Servlet3.0 规范,通过ApplicationPart对文件上传流实现封装, 其中,DiskFileItem 描述了上传文件实体,在请求解析时生成该对象, 需要关注的是,DiskFileItem 声明了一个临时文件,用于临时存储上传文件的内容, SpringMVC 对上层的请求实体再次封装,最终构造为MultipartFile传递给应用程序。示例如下:
生成的临时文件如下:
“这个是临时文件的目录,可以配置的
 临时文件打开,查看其内容如下:
参数:name 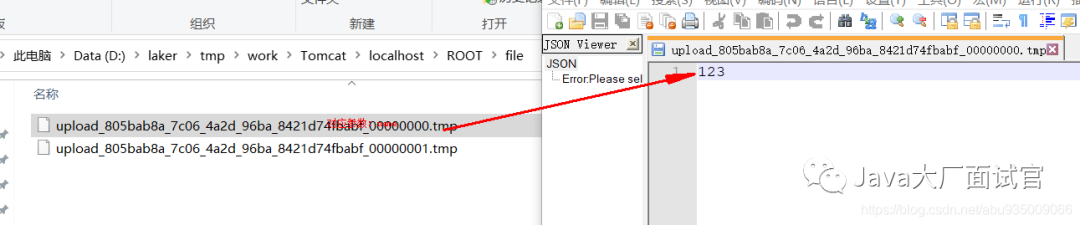
参数:file  上传完毕后,临时文件会删除
“可以看到,不是file类型的参数也会写入到临时文件。
通过Fiddler进行抓包:
POST http://localhost:8080/upload-files-with-data HTTP/1.1
cache-control: no-cache
Accept: */*
Host: localhost:8080
accept-encoding: gzip, deflate
content-type: multipart/form-data; boundary=--------------------------895818005136536360125479
content-length: 268707
Connection: keep-alive

----------------------------895818005136536360125479
Content-Disposition: form-data; name="name"

123
----------------------------895818005136536360125479
Content-Disposition: form-data; name="file"; filename="test.txt"
Content-Type: text/plain

abc123
----------------------------895818005136536360125479
Content-Disposition: form-data; name="file"; filename="1114289-20190110120111312-1475461850.png"
Content-Type: image/png

...contents of png...
----------------------------895818005136536360125479--
到这里,我们就大概就知道了HTTP上传文件的原理了。HTTP把需要上传的表单的所有数据按照一定的格式存放在请求体中,对于文件也是同样的。
Content-Type: multipart/form-data; boundary=----WebKitFormBoundaryqj67FUBQUHXZj78G表示要上传附件,其中 boundary表示分隔符,如果表单中有多项,就要使用boundary进行分隔,每个表单项由------FormBoundary开始,以------FormBoundary结尾。例如这样:
------FormBoundary
Content-Disposition: form-data; name="param1"

value1
------FormBoundary
这个boundary的值是由浏览器生成的,由浏览器来保证与上传内容不重复。
在每个分隔项里,需要我们去重点关注 Content-Disposition消息头,其中第一个参数总是固定不变的form-data,name表示表单元素属性名,回车换行符后面的内容就是元素的值。还有Content-Type表示我们上传的文件的MIME类型,我们在服务器端需要根据这个进行文件的区分。最后一个 boundary的结尾会多两个--
HTTP就是按照这种格式,把表单中的数据封装成一个请求一股脑的发给服务器端,服务器端根据这种规则对接收到的请求进行解析,从而完成文件上传功能。
下面是从网上找的一个后台解析示例。可以DEBUG跟踪代码去分析。
@WebServlet(urlPatterns = "/lakerfile")
public class FileUploadDemo extends HttpServlet {
    @Override
    public void doPost(HttpServletRequest request, HttpServletResponse response) throws ServletException, IOException {
        DiskFileItemFactory fac = new DiskFileItemFactory();
        ServletFileUpload upload = new ServletFileUpload(fac);
        upload.setFileSizeMax(10 * 1024 * 1024);
        upload.setSizeMax(20 * 1024 * 1024);
        if (ServletFileUpload.isMultipartContent(request)) { // 只处理Multipart请求
                List<FileItem> list = upload.parseRequest(new ServletRequestContext(request));// 解析报文
                for (FileItem item : list) {
                    if (item.isFormField()) {
                        String fileName = item.getFieldName();
                        String value = item.getString("UTF-8");
                    } else {
                        File file = new File(realPath, name);
                        item.write(file);
                        ...
        }
    }
}
遇到的问题
Spring Boot上传文件大小限制
spring:
  servlet:
    multipart:
      # 最大文件大小(单个)
      max-file-size: 10MB
      # 文件大于该阈值时,将写入磁盘,支持B/KB/MB单位
      file-size-threshold: 0B
      # //最大请求大小(总体)
      max-request-size: 100MB
这几个参数由SpringMVC控制,用于注入 Servlet3.0 的文件上传配置,关联类如下:
public class MultipartConfigElement {
    private final String location;// = "";
    private final long maxFileSize;// = -1;
    private final long maxRequestSize;// = -1;
    private final int fileSizeThreshold;// = 0;
上传文件过大异常拦截
@ExceptionHandler(MaxUploadSizeExceededException.class)
public Response handleMaxSizeException(MaxUploadSizeExceededException e) {
    log.error(e.getMessage(), e);
    return Response.error(500, "File too large!");
}
自定义tomcat工作目录
自定义临时文件生成目录
server:
  tomcat:
    basedir: /laker/tmp
使用swagger上传文件不起作用
allowMultiple=true:表示是数组格式的参数dataType = "__file":表示数组中参数的类型
@ApiOperation(value = "上传", notes = "上传")
@ApiImplicitParams({
            @ApiImplicitParam(paramType = "form", name = "file", value = "文件对象", required = true, dataType = "__file"),
            @ApiImplicitParam(paramType = "form", name = "files", value = "文件数组", allowMultiple = true, dataType = "__file")
    })
public void test(@RequestParam("file") MultipartFile file, @RequestParam(value = "files", required = false) MultipartFile[] files) throws Exception {
}
参考:
https://www.cnblogs.com/yougewe/p/12916211.html
https://www.baeldung.com/spring-file-upload
我已经更新了《10万字Springboot经典学习笔记》,点击下面小卡片,进入【武哥聊编程】,回复:笔记,即可免费获取。
点赞是最大的支持