
Spring boot 2.5.x 启动流程源码分析

我想知道为什么 spring boot 启动就一行代码,直接完成了那么多功能,今天就进去看个究竟,顺便记录一下。
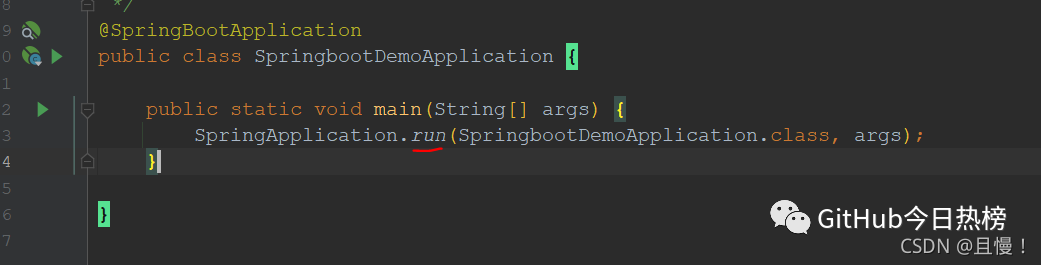
第一个 run 方法
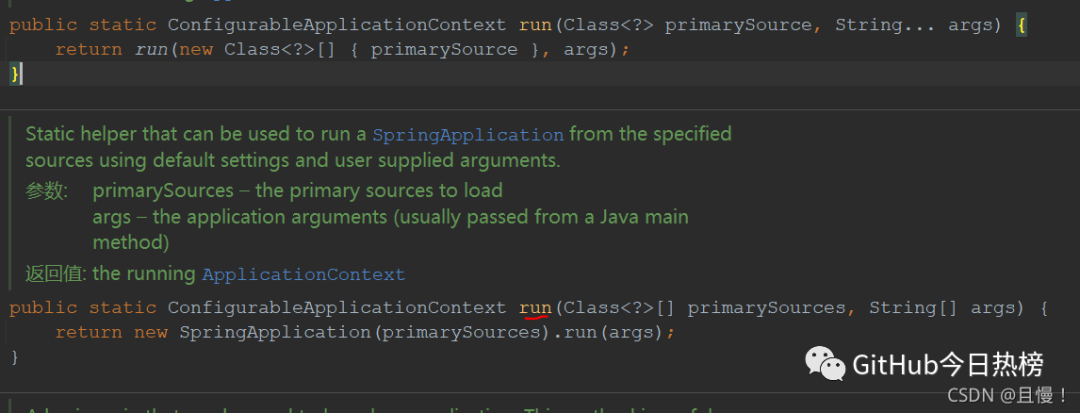
要想往进去看,入口少不了,就是你了,这看着人畜无害的一行代码,直接点进去。
然后便来到了这里,根据入参直接看这个 run() ,发现这个 run() 里就 new 了这个 SpringApplication(primarySources) 的匿名对象,然后执行了 run。
new SpringApplication()
那么就先来看看这个 SpringApplication 的构造方法吧。
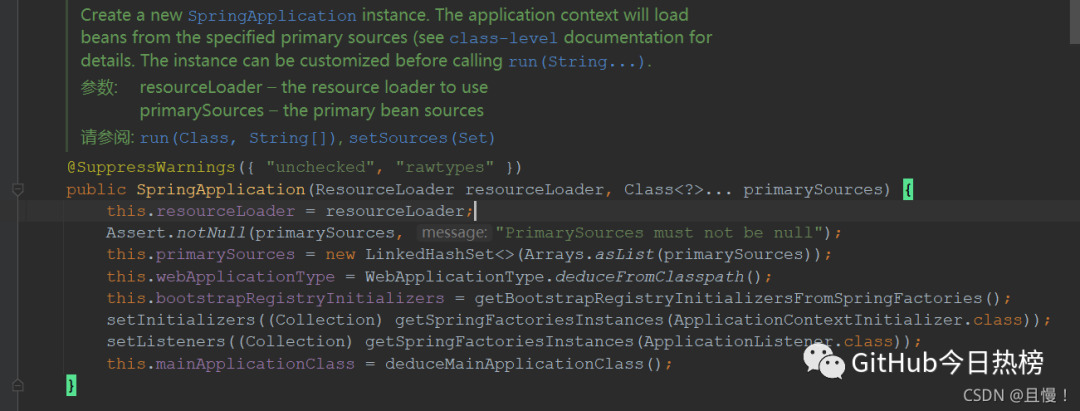
public SpringApplication(ResourceLoader resourceLoader, Class<?>... primarySources) {
    this.resourceLoader = resourceLoader;
    Assert.notNull(primarySources, "PrimarySources must not be null");
    //用LinkedHashSet将主类给保存了起来
    this.primarySources = new LinkedHashSet<>(Arrays.asList(primarySources));
    //对项目的类型做一个判断,WebApplicationType枚举类中有三种,后边这个方法就是一个判断方法
    this.webApplicationType = WebApplicationType.deduceFromClasspath();
    //这里将对象注册表初始化,然后保存起来
    this.bootstrapRegistryInitializers = getBootstrapRegistryInitializersFromSpringFactories();
    //这个是要通过 SPI 机制去扫描 META-INF/spring.factories ,加载 ApplicationContextInitializer 接口的实例,这个类当springboot上下文Context初始化完成后会调用
    setInitializers((Collection) getSpringFactoriesInstances(ApplicationContextInitializer.class));
    //同上,这个 ApplicationListener 类当springboot启动时事件change后都会触发
    setListeners((Collection) getSpringFactoriesInstances(ApplicationListener.class));
    //堆栈跟踪判断方法是否是 main
    this.mainApplicationClass = deduceMainApplicationClass();
  }
简单说一下 SPI 机制
我对此机制的概念理解:提供给服务提供厂商与扩展框架功能的开发者使用的接口,约定如下:
在META-INF/services/目录中创建以接口全限定名命名的文件该文件内容为Api具体实现类的全限定名
使用ServiceLoader类动态加载META-INF中的实现类
如SPI的实现类为Jar则需要放在主程序classPath中
Api具体实现类必须有一个不带参数的构造方法
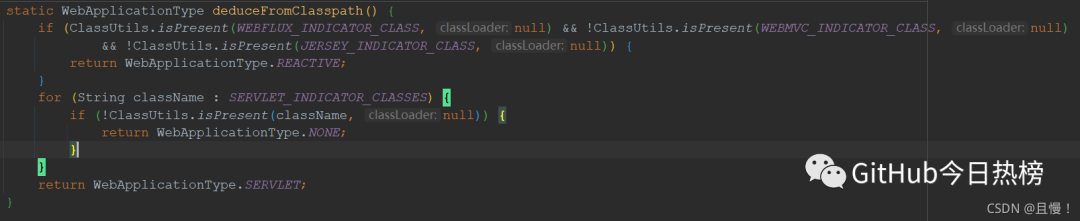
判断项目类型的那个方法
对象注册表初始化那个方法
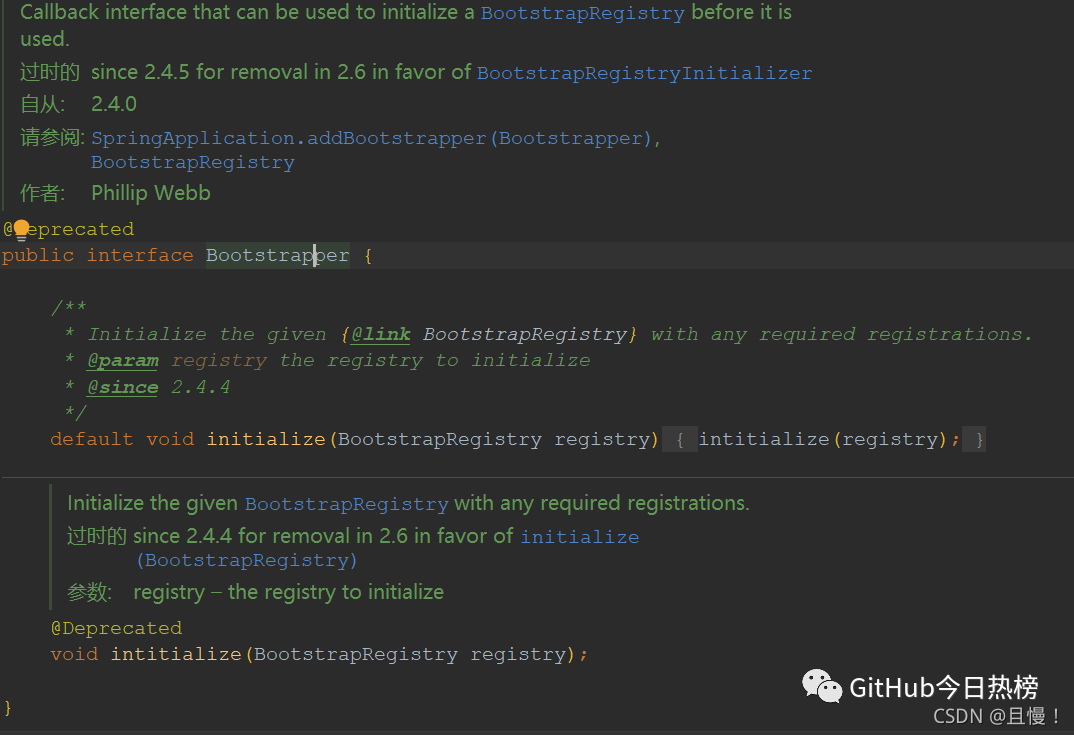
这里可以再往进去看看。

看看这个类 Bootstrapper.class,上边 lambda 表达式里用的接口和方法就是这里,再可以看看这个入参是个啥这个 BootstrapRegistry 类。
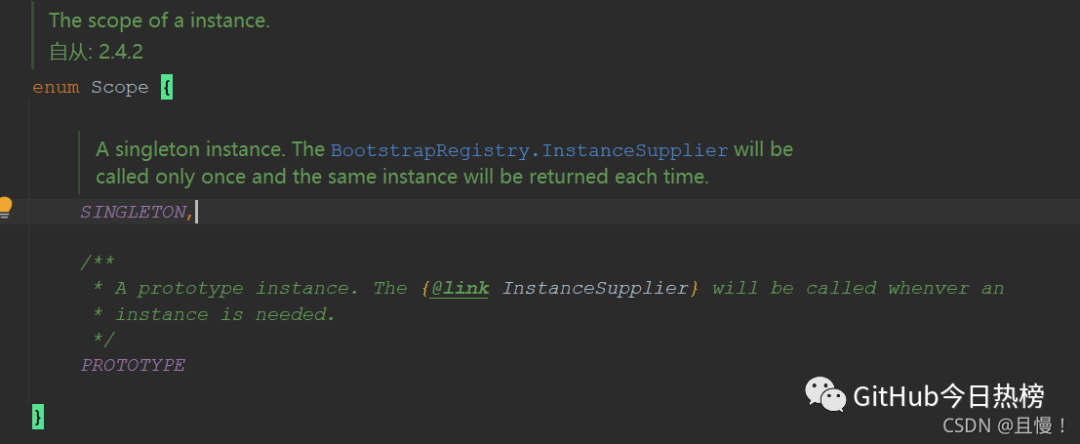
可以发现,这个类里出现了熟悉的东西,单例和原的枚举值。
如何使用 SPI 机制扫描 META-INF/spring.factories 这个文件,并且加载接口实例
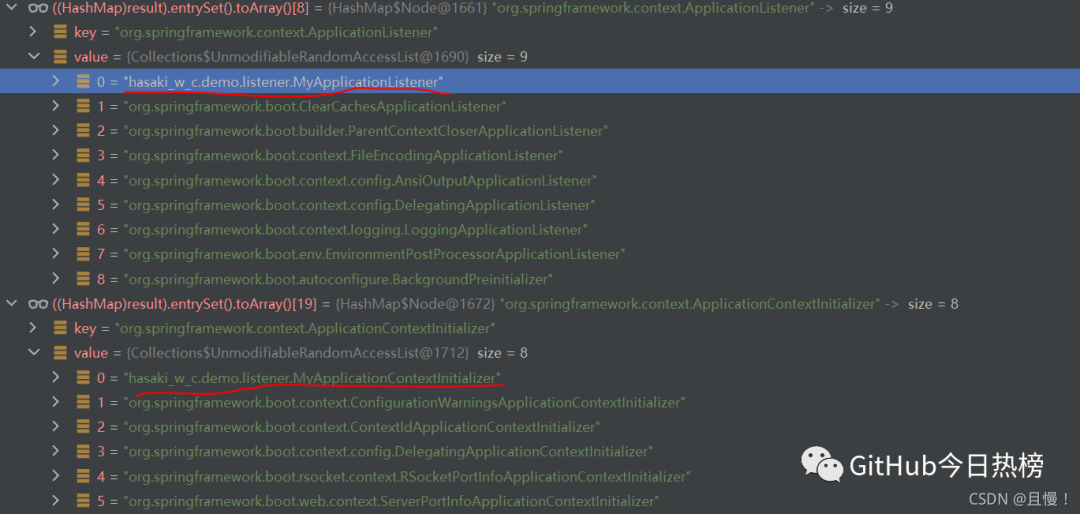
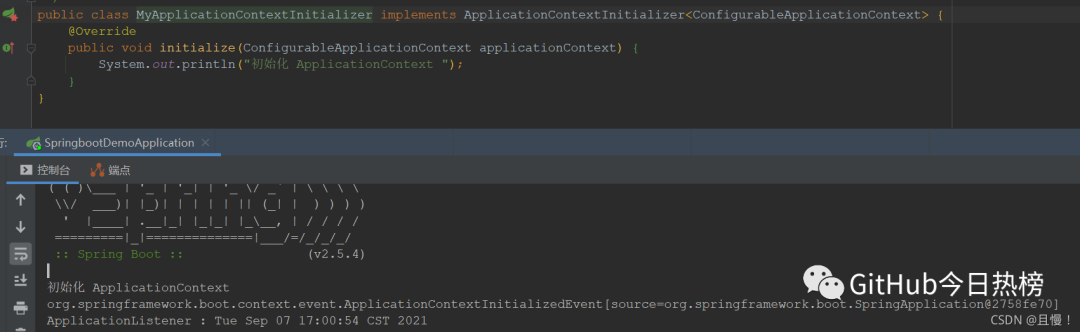
这里我们可以自己实现一下 ApplicationContextInitializer.class 和 ApplicationListener.class 这俩个接口的实现类。
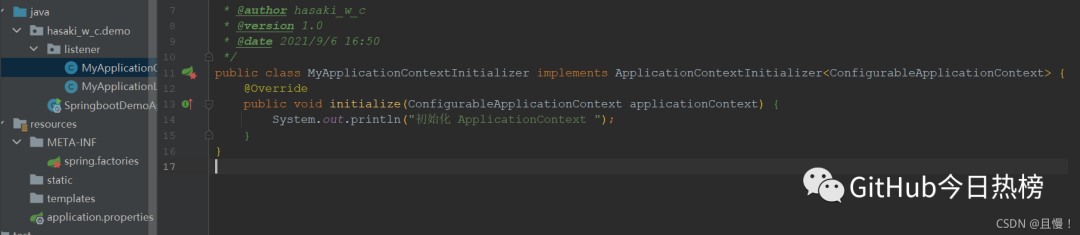
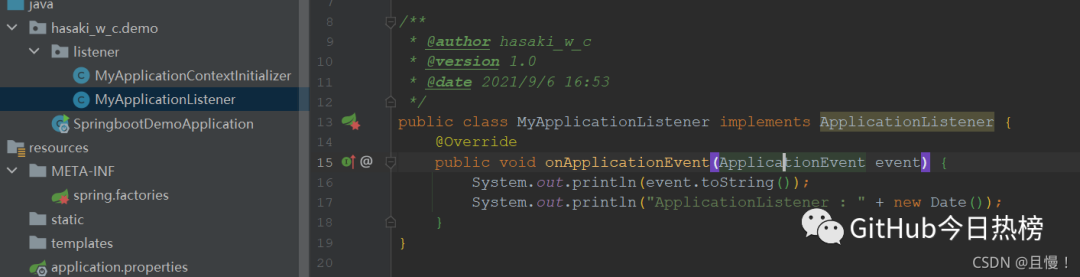
将这两个实现类写出来以后,然后在 resourse 目录下写一个 META-INF/spring.factories ,如上图所示,然后配置以下自己实现的那两个类,如下:
org.springframework.context.ApplicationContextInitializer=\
hasaki_w_c.demo.listener.MyApplicationContextInitializer

org.springframework.context.ApplicationListener=\
hasaki_w_c.demo.listener.MyApplicationListener
这样,就把我们自己写的接口实现类集成到 spring boot 中去了,然后从 new SpringApplication() 那一段构造代码中的 getSpringFactoriesInstances() 这个方法进去

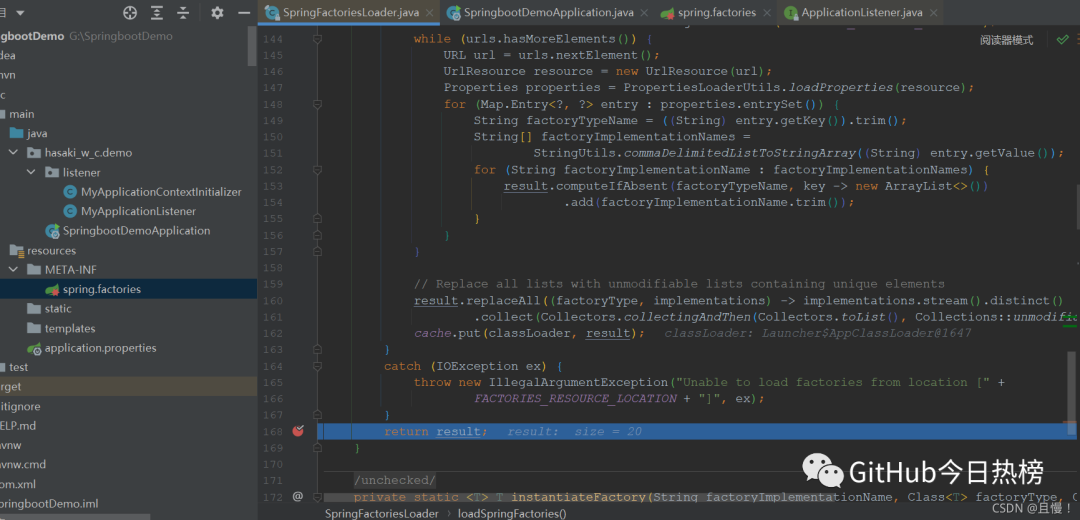
然后再进到这个方法里边,入参传进来的那两个类都会走这里的这两个方法,所以我们直接在这个 loadSpringFactories 这个方法里 debug
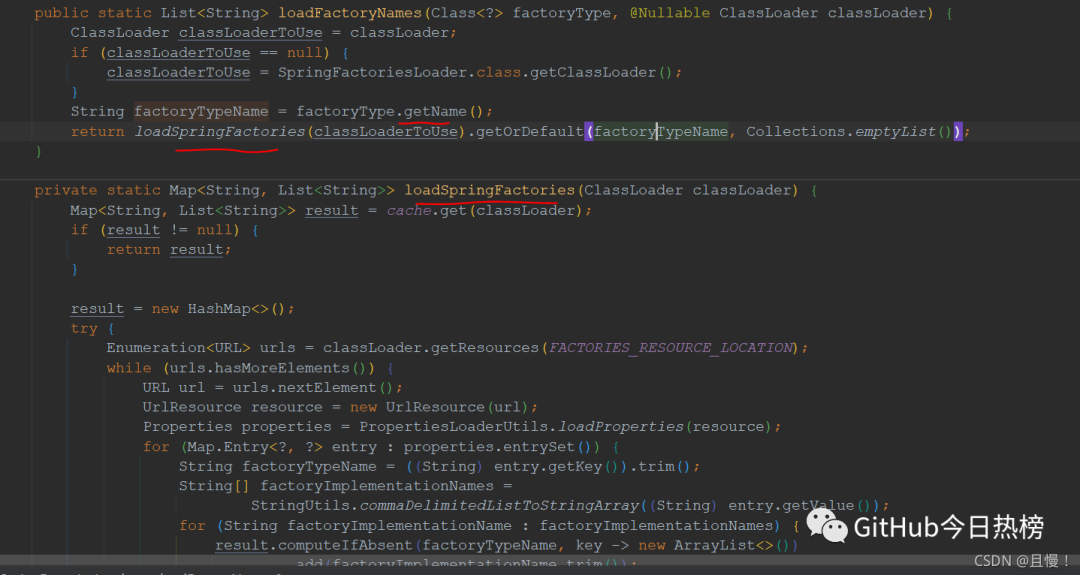
然后打断点,看一下是不是添加进去了,断点的地方就打在返回值里
然后调试启动这个项目,然后我这里把 result 的关于自己实现的那俩个接口拿出来监视了,查看其里边的值,会发现,自己实现的那两个接口也被添加了进去。
然后从控制台也可以直观的看到,自己实现的两个接口和方法都被打印了出来。
然后稍微详细地看了一下 loadSpringFactories 这个方法,大概就是先使用 classLoader.getResources() 将 spring.factories 中的实现类加载到Enumeration 接口中,接口如下:
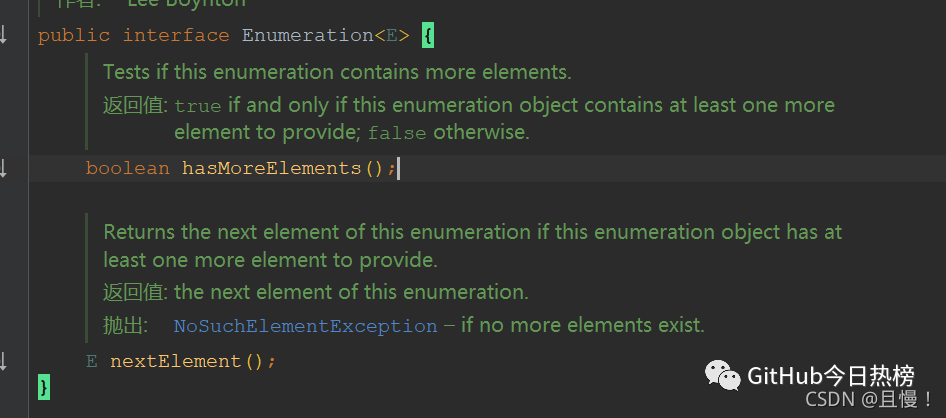
这个接口是有两个方法,一个判断里边还有没有元素了,另一个是返回下一个元素。
然后通过两三次的类型转换,转换成 Properties 对象(Properties 类继承了Hashtable),然后遍历,取到这个properties 的 key,然后通过 StringUtils 里边有个把逗号分隔的列表直接转化成 String 数组的那个方法获取到 properties 的 value,然后将这些key和value加入到返回值中,最后用包含唯一元素的不可修改列表替换所有列表,最后返回这个Map类型的返回值;这里就完成了这两个接口实例的设置。
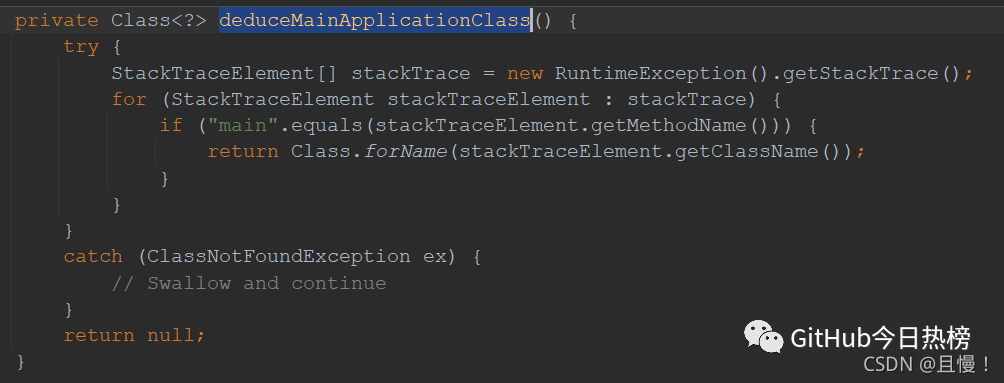
堆栈跟踪判断
new SpringApplication() 的最后一行,就是将堆栈跟踪返回值保存,堆栈跟踪方法中通过判断每一个元素的方法是不是equals “main”,如果是则通过Class.forName 返回这个元素的 class 对象,不是则返回 null。
到这里这个 SpringApplication 的方法就看完了。
第二个 run 方法
有兴趣的可以都点进去看一看,我这里就不一一截图了。
public ConfigurableApplicationContext run(String... args) {
    //启动一个 StopWatch 计时器(spring 5.2以后,运行时间就以纳秒进行跟踪了)
    StopWatch stopWatch = new StopWatch();
    //计时器启动
    stopWatch.start();
    DefaultBootstrapContext bootstrapContext = createBootstrapContext();
    ConfigurableApplicationContext context = null;
    //设置环境变量
    configureHeadlessProperty();
    //获取事件监听器SpringApplicationRunListener类型
    SpringApplicationRunListeners listeners = getRunListeners(args);
    //入参是上下文对象和前边new SpringApplication最后那个堆栈跟踪的返回值,这里就启动了监听器
    listeners.starting(bootstrapContext, this.mainApplicationClass);
    try {
      //然后把参数封装成提供运行SpringApplication 的参数的访问的这个接口对象,通过这个接口的默认实现类进行的
      ApplicationArguments applicationArguments = new DefaultApplicationArguments(args);
      //然后把环境和上下文以及上边它刚刚封装好的那个参数访问对象绑定
      ConfigurableEnvironment environment = prepareEnvironment(listeners, bootstrapContext, applicationArguments);
      //对环境的值判断,以及设置
      configureIgnoreBeanInfo(environment);
      //然后打印 banner (就是那个启动后的控制台比较大的那个spring boot)(终于直到那个图形哪里来的了)
      Banner printedBanner = printBanner(environment);
      //创建上下文,根据项目类型创建上下文,这个创建的方法里是要用到new 时候那个 WebApplicationType
      context = createApplicationContext();
      //保存使用ApplicationStartup来标记应用程序启动期间的步骤,以及记录一些收集到的执行上下文或其处理时间的数据
      context.setApplicationStartup(this.applicationStartup);
      //准备上下文,将前边的几个变量全丢进这个方法的参数里
      prepareContext(bootstrapContext, context, environment, listeners, applicationArguments, printedBanner);
      //这个就是非常重要的东西了,是spring 的启动代码,这里边扫描并初始化 bean 了,然后 spring boot 内嵌的web 容器也在这里边被启动,需要进去细看了。
      refreshContext(context);
      //进去看了以下发现啥也没干
      afterRefresh(context, applicationArguments);
      //停止计时器
      stopWatch.stop();
      if (this.logStartupInfo) {
        //启动时记录程序的信息,并打印日志
        new StartupInfoLogger(this.mainApplicationClass).logStarted(getApplicationLog(), stopWatch);
      }
      //执行ApplicationRunListeners中的started()方法
      listeners.started(context);
      //执行两个Runner(ApplicationRunner和CommandLineRunner)
      callRunners(context, applicationArguments);
    }
    catch (Throwable ex) {
      //处理运行失败
      handleRunFailure(context, ex, listeners);
      throw new IllegalStateException(ex);
    }

    try {
      //执行ApplicationRunListeners中的started()方法
      listeners.running(context);
    }
    catch (Throwable ex) {
      //处理运行失败
      handleRunFailure(context, ex, null);
      throw new IllegalStateException(ex);
    }
    return context;
  }
refreshContext() 方法
点进去看看

发现有一个 refresh 方法,再点进去看看

然后又是一个 refresh 方法,再干进去
找到这个方法的实现,是一个抽象类里边的实现方法,发现这里就是 spring 包下的类了,这个就是 spring 的启动类了,容器就在这里初始化,每一行代码也都有注释,代码附上
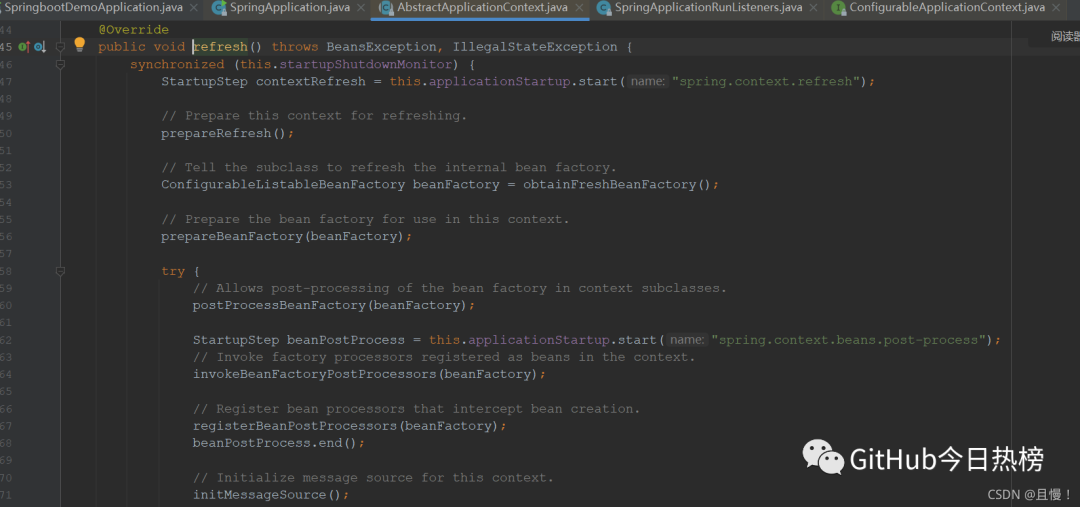
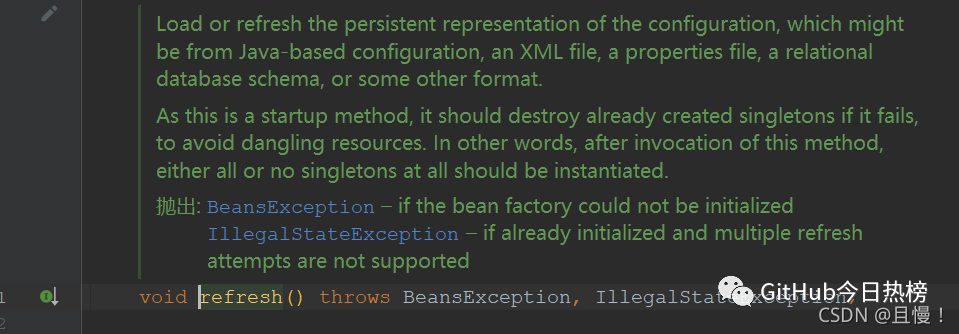
public void refresh() throws BeansException, IllegalStateException {
    synchronized (this.startupShutdownMonitor) {
      StartupStep contextRefresh = this.applicationStartup.start("spring.context.refresh");

      // Prepare this context for refreshing.
      prepareRefresh();

      // Tell the subclass to refresh the internal bean factory.
      ConfigurableListableBeanFactory beanFactory = obtainFreshBeanFactory();

      // Prepare the bean factory for use in this context.
      prepareBeanFactory(beanFactory);

      try {
        // Allows post-processing of the bean factory in context subclasses.
        postProcessBeanFactory(beanFactory);

        StartupStep beanPostProcess = this.applicationStartup.start("spring.context.beans.post-process");
        // Invoke factory processors registered as beans in the context.
        invokeBeanFactoryPostProcessors(beanFactory);

        // Register bean processors that intercept bean creation.
        registerBeanPostProcessors(beanFactory);
        beanPostProcess.end();

        // Initialize message source for this context.
        initMessageSource();

        // Initialize event multicaster for this context.
        initApplicationEventMulticaster();

        // Initialize other special beans in specific context subclasses.
        //这个重点看一下
        onRefresh();

        // Check for listener beans and register them.
        registerListeners();

        // Instantiate all remaining (non-lazy-init) singletons.
        finishBeanFactoryInitialization(beanFactory);

        // Last step: publish corresponding event.
        finishRefresh();
      }

      catch (BeansException ex) {
        if (logger.isWarnEnabled()) {
          logger.warn("Exception encountered during context initialization - " +
              "cancelling refresh attempt: " + ex);
        }

        // Destroy already created singletons to avoid dangling resources.
        destroyBeans();

        // Reset 'active' flag.
        cancelRefresh(ex);

        // Propagate exception to caller.
        throw ex;
      }

      finally {
        // Reset common introspection caches in Spring's core, since we
        // might not ever need metadata for singleton beans anymore...
        resetCommonCaches();
        contextRefresh.end();
      }
    }
  }
大概就是有这么些功能:
设置上下文状态,获取一些属性,获取并配置新的BeanFactory,实例化并调用所有注册的beanFactory后置处理器,实例化和注册beanFactory中扩展了被注解修饰了的那些类的bean,初始化事件广播器,这里重点看一下onRefresh()这个方法,找到这个重写的方法,然后再继续往里看,这时候就可以发现有个getWebServer()的接口方法了,然后它的实现类就是tomcat、jetty了,内嵌的 tomcat 也启动了,然后注册监听器,实例化所有剩余的(非懒加载)单例,最后finishRefresh,清除上下文资源缓存,初始化上下文的生命周期处理器。
onRefresh() 方法
这里看一下这个方法,从 spring 的 refresh() 中点进去,是抽象类的方法,然后找到它的重写方法,这里由于我们一般是 web 工程,所以找 springboot 包下的这个方法
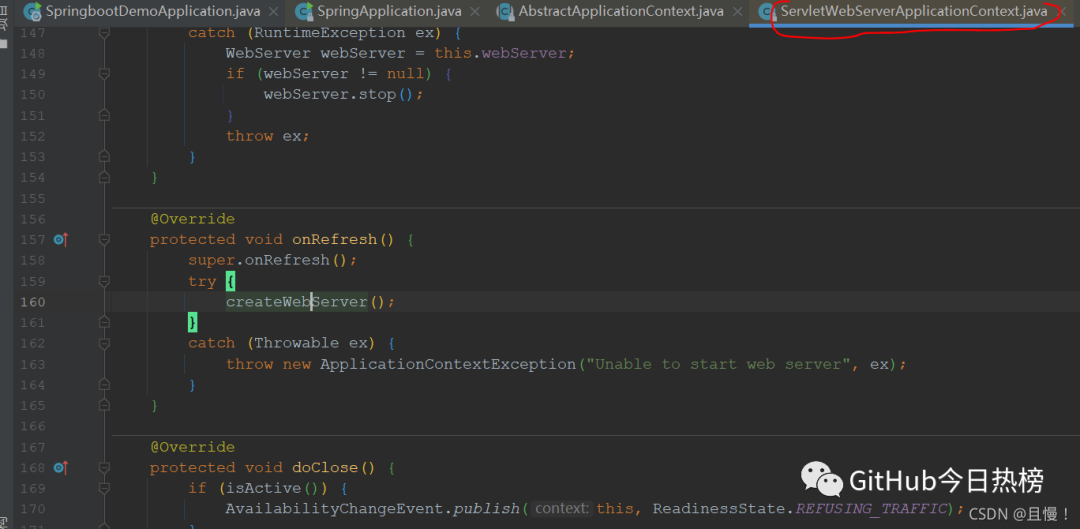
然后再进去这个 createWebServer ,它的名字告诉我 web 容器就从这里初始化的,直接点进去看看

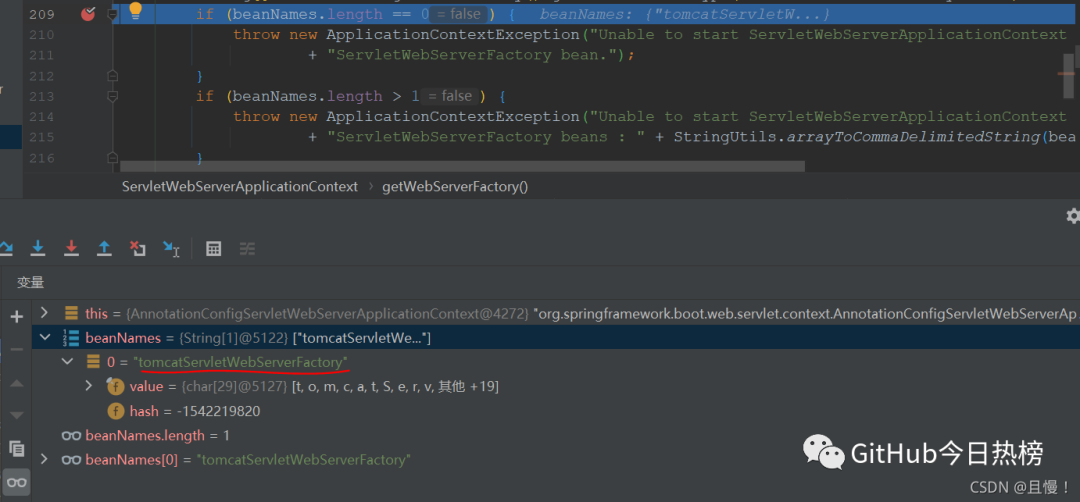
先看一下这个 getWebServerFactory() 方法,这个方法可以直到选择了哪种类型的 web 容器,点进去在下图地方打个断点调试一下看看,可以看到熟悉的tomcat 了,这时候回到上边 createWebServer() ,可以看到后边这个工厂调用了 getWebServer() 这个方法。
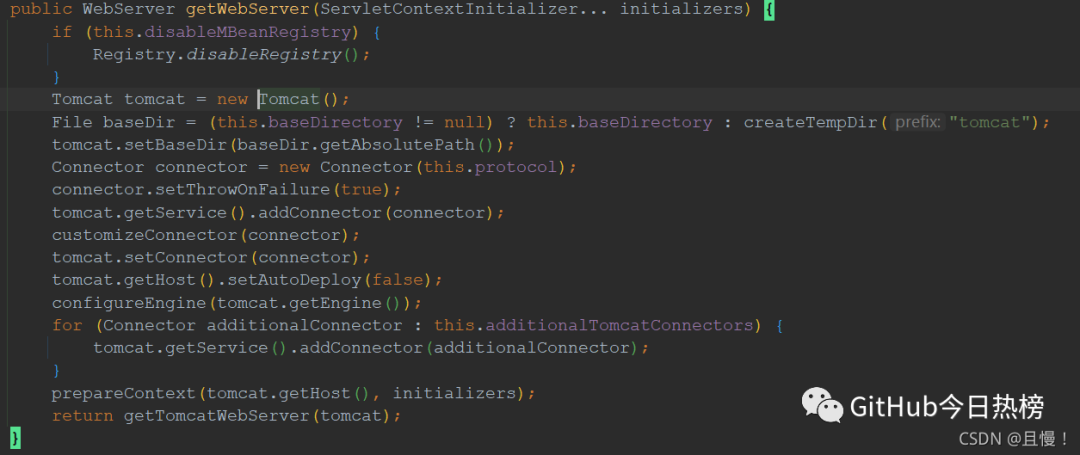
点进去这个 getWebServer() ,查看它的实现类,这里有三个实现类,

终于发现 web 容器在哪初始化的了,看一下 tomcat 的,明显看出是在初始化设置参数的值。
这里 web 容器就成功启动了,然后再就是执行 onRefresh() 方法之后的那几个方法了,再一步一步倒回去看看,好像大概的流程都看完了,从最初的 run,到最后跑到 spring 里,回去在再把第二个 run 跑完,整个 spring boot 的启动就完成了。
此次对 spring boot 框架的源码学习,让我对它如何启动有了一个较为清晰的认识,虽还可能有遗漏,但大概流程应该没跑偏。
出处:blog.csdn.net/qq_45456859/article/details/120142517
关注GitHub今日热榜,专注挖掘好用的开发工具,致力于分享优质高效的工具、资源、插件等,助力开发者成长!
点个在看,你最好看