springboot+rabbitmq+redis实现电商场景中的秒杀场景
点击上方蓝色字体,选择“标星公众号”
优质文章,第一时间送达
作者 | YoungDeng
来源 | urlify.cn/zyauYn
在分布式系统中,设计思路很重要
先来讲讲大概思路,代码都是可以改的但思路大同小异。
先缓存商品,加载到redis,秒杀场景下如果直接访问关系型数据库,会引起雪崩效应,系统瘫痪,所以就改为访问redis,这里是减库存的时候先减redis,然后异步去减DB。就可以防止系统崩溃。
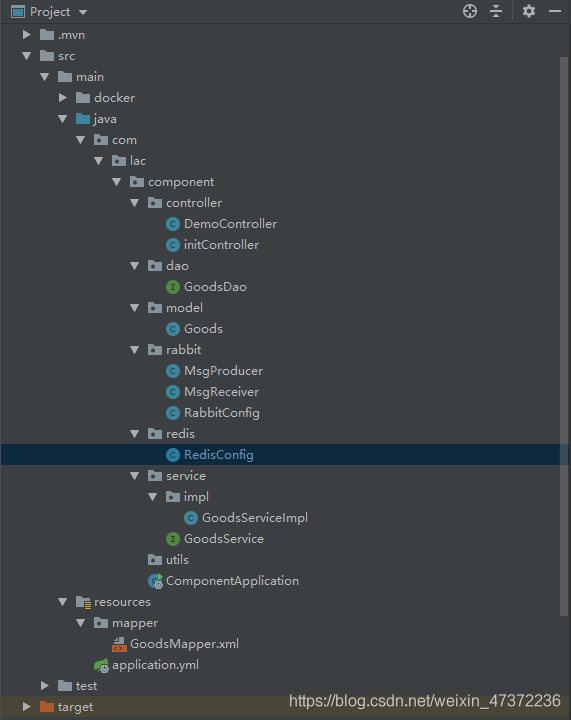
正题 先看工程目录

pom.xml
<?xml version="1.0" encoding="UTF-8"?>
<project xmlns="http://maven.apache.org/POM/4.0.0"
    xmlns:xsi="http://www.w3.org/2001/XMLSchema-instance"
    xsi:schemaLocation="http://maven.apache.org/POM/4.0.0 https://maven.apache.org/xsd/maven-4.0.0.xsd">
    <modelVersion>4.0.0</modelVersion>
    <parent>
        <groupId>org.springframework.boot</groupId>
        <artifactId>spring-boot-starter-parent</artifactId>
        <version>2.3.0.RELEASE</version>
        <relativePath /> <!-- lookup parent from repository -->
    </parent>
    <groupId>com.lac</groupId>
    <artifactId>miaosha</artifactId>
    <version>0.0.2-SNAPSHOT</version>
    <name>miaosha</name>
    <description>Demo project for Spring Boot</description>

    <properties>
        <java.version>1.8</java.version>
    </properties>

    <dependencies>
        <dependency>
            <groupId>org.springframework.boot</groupId>
            <artifactId>spring-boot-starter-web</artifactId>
        </dependency>
        <dependency>
            <groupId>org.springframework.boot</groupId>
            <artifactId>spring-boot-starter</artifactId>
        </dependency>
        <dependency>
            <groupId>com.alibaba.cloud</groupId>
            <artifactId>spring-cloud-starter-alibaba-nacos-discovery</artifactId>
            <version>2.2.1.RELEASE</version>
        </dependency>
        <!-- https://mvnrepository.com/artifact/redis.clients/jedis -->
        <dependency>
            <groupId>redis.clients</groupId>
            <artifactId>jedis</artifactId>
        </dependency>
        <dependency>
            <groupId>org.springframework.data</groupId>
            <artifactId>spring-data-redis</artifactId>
        </dependency>
        <!--redis-->

        <dependency>
            <groupId>com.alibaba</groupId>
            <artifactId>fastjson</artifactId>
            <version>1.2.68</version>
        </dependency>
        <dependency>
            <groupId>mysql</groupId>
            <artifactId>mysql-connector-java</artifactId>
        </dependency>
        <dependency>
            <groupId>com.alibaba</groupId>
            <artifactId>druid-spring-boot-starter</artifactId>
            <version>1.1.22</version>
        </dependency>
        <dependency>
            <groupId>org.springframework.boot</groupId>
            <artifactId>spring-boot-starter-amqp</artifactId>
        </dependency>
        <dependency>
            <groupId>org.springframework.boot</groupId>
            <artifactId>spring-boot-starter-jdbc</artifactId>
        </dependency>
        <dependency>
            <groupId>org.mybatis.spring.boot</groupId>
            <artifactId>mybatis-spring-boot-starter</artifactId>
            <version>2.1.3</version>
        </dependency>
        <dependency>
            <groupId>org.springframework.boot</groupId>
            <artifactId>spring-boot-starter-test</artifactId>
            <scope>test</scope>
            <exclusions>
                <exclusion>
                    <groupId>org.junit.vintage</groupId>
                    <artifactId>junit-vintage-engine</artifactId>
                </exclusion>
            </exclusions>
        </dependency>
    </dependencies>
    <dependencyManagement>
        <dependencies>
            <dependency>
                <groupId>org.springframework.cloud</groupId>
                <artifactId>spring-cloud-dependencies</artifactId>
                <version>Hoxton.SR5</version>
                <type>pom</type>
                <scope>import</scope>
            </dependency>
        </dependencies>
    </dependencyManagement>
    <build>
        <plugins>
            <plugin>
                <groupId>org.springframework.boot</groupId>
                <artifactId>spring-boot-maven-plugin</artifactId>
            </plugin>
            <plugin>
                <groupId>org.apache.maven.plugins</groupId>
                <artifactId>maven-deploy-plugin</artifactId>
                <configuration>
                    <skip>true</skip>
                </configuration>
            </plugin>
            <plugin>
                <groupId>com.spotify</groupId>
                <artifactId>dockerfile-maven-plugin</artifactId>
                <version>1.4.13</version>
                <executions>
                    <execution>
                        <id>default</id>
                        <goals>
                            <goal>build</goal>
                            <goal>push</goal>
                        </goals>
                    </execution>
                </executions>
                <configuration>
                    <repository>danbing2226/dockerfilemavenplugins</repository>
                    <tag>${project.version}</tag>
                    <useMavenSettingsForAuth>true</useMavenSettingsForAuth>
                    <buildArgs>
                        <JAR_FILE>target/${project.build.finalName}.jar</JAR_FILE>
                    </buildArgs>
                </configuration>
            </plugin>
        </plugins>
    </build>

</project>
application.yml
用的都是我前面文章配置过的东西,直接可以去前面文章找
spring:
  application:
    name: miaosha
  datasource:
    #   数据源基本配置
    username: root
    password: root
    driver-class-name: com.mysql.cj.jdbc.Driver
    url: jdbc:mysql://192.168.142.129:3306/mysql?autoReconnect=true
    type: com.alibaba.druid.pool.DruidDataSource
    #   数据源其他配置
    initialSize: 5
    minIdle: 5
    maxActive: 20
    maxWait: 60000
    timeBetweenEvictionRunsMillis: 60000
    minEvictableIdleTimeMillis: 300000
    validationQuery: SELECT 'x'
    testWhileIdle: true
    testOnBorrow: false
    testOnReturn: false
    poolPreparedStatements: true
    filters: stat,wall
    maxPoolPreparedStatementPerConnectionSize: 20
    useGlobalDataSourceStat: true
    connectionProperties: druid.stat.mergeSql=true;druid.stat.slowSqlMillis=500
  rabbitmq:
    host: 192.168.142.129
    port: 5672
    username: root
    password: root
  cloud:
    nacos:
      discovery:
        server-addr: 192.168.142.129:8848
  redis:
    database: 0
    host: 192.168.142.129
    port: 6379
    password:
    timeout: 500
    pool:
      max-active: 20
      max-wait: -1
      max-idle: 8
      min-idle: 0
mybatis:
  mapper-locations: classpath:mapper/*.xml
  type-aliases-package: com.lac.component.model

#  cloud:
#    zookeeper:
#      connect-string: 192.168.99.100:2181
#      discovery:
#        enabled: true
server:
    port: 8093
ComponentApplication.java
package com.lac.component;

import org.mybatis.spring.annotation.MapperScan;
import org.springframework.boot.SpringApplication;
import org.springframework.boot.autoconfigure.SpringBootApplication;
import org.springframework.cloud.client.discovery.EnableDiscoveryClient;

@SpringBootApplication
@EnableDiscoveryClient
@MapperScan("com.lac.component.dao")
public class ComponentApplication {

    public static void main(String[] args) {
        SpringApplication.run(ComponentApplication.class, args);
    }

}
RedisConfig
配置redis的键值格式化方式
package com.lac.component.redis;

import com.alibaba.fastjson.support.spring.FastJsonRedisSerializer;
import com.fasterxml.jackson.annotation.JsonAutoDetect;
import com.fasterxml.jackson.annotation.PropertyAccessor;
import com.fasterxml.jackson.databind.ObjectMapper;
import org.springframework.context.annotation.Bean;
import org.springframework.context.annotation.Configuration;
import org.springframework.data.redis.connection.RedisConnectionFactory;
import org.springframework.data.redis.core.RedisTemplate;
import org.springframework.data.redis.serializer.Jackson2JsonRedisSerializer;
import org.springframework.data.redis.serializer.RedisSerializer;
import org.springframework.data.redis.serializer.StringRedisSerializer;


@Configuration
public class RedisConfig {

@Bean
public RedisTemplate redisTemplate(RedisConnectionFactory redisConnectionFactory ) {
    //设置序列化
    Jackson2JsonRedisSerializer jackson2JsonRedisSerializer = new Jackson2JsonRedisSerializer(Object.class);
    ObjectMapper om = new ObjectMapper();
    om.setVisibility(PropertyAccessor.ALL, JsonAutoDetect.Visibility.ANY);
    jackson2JsonRedisSerializer.setObjectMapper(om);
    RedisSerializer redisSerializer = new FastJsonRedisSerializer(Object.class);
    // 配置redisTemplate
    RedisTemplate redisTemplate = new RedisTemplate<String, Object>();
    redisTemplate.setConnectionFactory(redisConnectionFactory);
    RedisSerializer stringSerializer = new StringRedisSerializer();
    redisTemplate.setKeySerializer(stringSerializer); // key序列化
    redisTemplate.setValueSerializer(jackson2JsonRedisSerializer); // value序列化
    redisTemplate.setHashKeySerializer(stringSerializer); // Hash key序列化
    redisTemplate.setHashValueSerializer(jackson2JsonRedisSerializer); // Hash value序列化
    redisTemplate.afterPropertiesSet();
    return redisTemplate;
}
}
RabbitConfig配置,这里不细讲,后面文章会将到
package com.lac.component.rabbit;

import org.slf4j.Logger;
import org.slf4j.LoggerFactory;
import org.springframework.amqp.core.*;
import org.springframework.amqp.rabbit.connection.CachingConnectionFactory;
import org.springframework.amqp.rabbit.connection.ConnectionFactory;
import org.springframework.amqp.rabbit.core.RabbitTemplate;
import org.springframework.beans.factory.annotation.Value;
import org.springframework.beans.factory.config.ConfigurableBeanFactory;
import org.springframework.context.annotation.Bean;
import org.springframework.context.annotation.Configuration;
import org.springframework.context.annotation.Scope;

@Configuration
public class RabbitConfig {

    private final Logger logger = LoggerFactory.getLogger(this.getClass());

    @Value("${spring.rabbitmq.host}")
    private String host;
    @Value("${spring.rabbitmq.port}")
    private int port;
    @Value("${spring.rabbitmq.username}")
    private String username;
    @Value("${spring.rabbitmq.password}")
    private String password;

    public static final String EXCHANGE_A = "my-mq-exchange_A";
    public static final String EXCHANGE_B = "my-mq-exchange_B";
    public static final String EXCHANGE_C = "my-mq-exchange_C";

    public static final String QUEUE_A = "QUEUE_A";
    public static final String QUEUE_B = "QUEUE_B";
    public static final String QUEUE_C = "QUEUE_C";
    public static final String QUEUE_D = "QUEUE_D";


    public static final String ROUTINGKEY_A = "spring-boot-routingKey_A";
    public static final String ROUTINGKEY_B = "spring-boot-routingKey_B";
    public static final String ROUTINGKEY_C = "spring-boot-routingKey_C";

    public static final String FANOUT_EXCHANGE = "FANOUT_EXCHANGE";
    public static final String TOPIC_EXCHANGE = "TOPIC_EXCHANGE";

    /**
     * Broker:它提供一种传输服务,它的角色就是维护一条从生产者到消费者的路线,保证数据能按照指定的方式进行传输,
     * Exchange:消息交换机,它指定消息按什么规则,路由到哪个队列。
     * Queue:消息的载体,每个消息都会被投到一个或多个队列。
     * Binding:绑定,它的作用就是把exchange和queue按照路由规则绑定起来.
     * Routing Key:路由关键字,exchange根据这个关键字进行消息投递。
     * vhost:虚拟主机,一个broker里可以有多个vhost,用作不同用户的权限分离。
     * Producer:消息生产者,就是投递消息的程序.
     * Consumer:消息消费者,就是接受消息的程序.
     * Channel:消息通道,在客户端的每个连接里,可建立多个channel.
     * 异步登陆日志,业务解耦,流量削峰,秒杀,异步发送注册邮件,异步发送异常登陆信息。
     */
    @Bean
    public ConnectionFactory connectionFactory() {
        CachingConnectionFactory connectionFactory = new CachingConnectionFactory(host, port);
        connectionFactory.setUsername(username);
        connectionFactory.setPassword(password);
        connectionFactory.setVirtualHost("/");
        // connectionFactory.setPublisherConfirms(true);
        return connectionFactory;
    }

    @Bean
    @Scope(ConfigurableBeanFactory.SCOPE_PROTOTYPE)
    public RabbitTemplate rabbitTemplate() {
        RabbitTemplate template = new RabbitTemplate(connectionFactory());
        return template;
    }

    @Bean
    public DirectExchange defaultExchange() {
        return new DirectExchange(EXCHANGE_A);
    }
    @Bean
    public DirectExchange defaultExchange1() {
        return new DirectExchange(EXCHANGE_B);
    }
    /*
     *获取队列A
     */
    @Bean
    public Queue queueA() {
        return new Queue(QUEUE_A, true);//队列持久
    }

    /*
     *获取队列B
     */
    @Bean
    public Queue queueB() {
        return new Queue(QUEUE_B, true);//队列持久
    }
    /*
     *获取队列C
     */
    @Bean
    public Queue queueC() {
        return new Queue(QUEUE_C, true);//队列持久
    }
    /*
     *获取队列D
     */
    @Bean
    public Queue queueD() {
        return new Queue(QUEUE_D, true);//队列持久
    }
    @Bean
    public Queue queueMessage() {
        return new Queue("topic.message",true);
    }

    @Bean
    public Queue queueMessages() {
        return new Queue("topic.messages",true);
    }
    //
    @Bean
    public Binding binding() {
        return BindingBuilder.bind(queueA()).to(defaultExchange()).with(RabbitConfig.ROUTINGKEY_A);
    }
//
//    // 一个交换机可以绑定多个消息队列,也就是消息通过一个交换机,可以分发到不同的队列当中去
//    @Bean
//    public Binding bindingB() {
//        return BindingBuilder.bind(queueB()).to(defaultExchange1()).with(RabbitConfig.ROUTINGKEY_B);
//    }
    //配置fanout_exchange
    @Bean
    FanoutExchange fanoutExchange() {
        return new FanoutExchange(RabbitConfig.FANOUT_EXCHANGE);
    }
    @Bean
    TopicExchange topicExchange(){
        return new TopicExchange(this.TOPIC_EXCHANGE);
    }
    @Bean
    Binding bingingExchangeMessage(Queue queueMessage,TopicExchange topicExchange){
        return BindingBuilder.bind(queueMessage).to(topicExchange).with("topic.message");
    }
    @Bean
    Binding bingingExchangeMessages(Queue queueMessages,TopicExchange topicExchange){
        return BindingBuilder.bind(queueMessages).to(topicExchange).with("topic.#");
    }
//    @Bean
//    Binding bingingExchangeFanout(FanoutExchange fanoutExchange){
//        return BindingBuilder.bind(queueA()).to(fanoutExchange);
//    }
}
最关键一句
把queueA绑到默认的交互机上
@Bean
public Binding binding() {
return BindingBuilder.bind(queueA()).to(defaultExchange()).with(RabbitConfig.ROUTINGKEY_A);
}
核心代码来了,注意
MsgProducer
生产者,就是把要生产的重要数据传输过来,发送个消费者,消费者里面调用service去进行数据库操作。
package com.lac.component.rabbit;

import com.lac.component.rabbit.RabbitConfig;
import org.slf4j.Logger;
import org.slf4j.LoggerFactory;
import org.springframework.amqp.rabbit.connection.CorrelationData;
import org.springframework.amqp.rabbit.core.RabbitTemplate;
import org.springframework.beans.factory.annotation.Autowired;
import org.springframework.data.redis.core.RedisTemplate;
import org.springframework.stereotype.Service;

import java.util.HashMap;
import java.util.Map;

// import java.util.UUID;
public class MsgProducer implements RabbitTemplate.ConfirmCallback {

    private final Logger logger = LoggerFactory.getLogger(this.getClass());

    //由于rabbitTemplate的scope属性设置为ConfigurableBeanFactory.SCOPE_PROTOTYPE,所以不能自动注入
    private RabbitTemplate rabbitTemplate;

    /**
     * 构造方法注入rabbitTemplate
     */
    @Autowired
    public MsgProducer(RabbitTemplate rabbitTemplate){
        this.rabbitTemplate = rabbitTemplate;
        //rabbitTemplate如果为单例的话,那回调就是最后设置的内容
        rabbitTemplate.setConfirmCallback(this);
    }
    public void sendMsg(String goodsId,String content){
        // CorrelationData correlationId = new CorrelationData(UUID.randomUUID().toString());
        //Fanout 就是我们熟悉的广播模式,给Fanout交换机发送消息,绑定了这个交换机的所有队列都收到这个消息。
        //rabbitTemplate.convertAndSend(RabbitConfig.FANOUT_EXCHANGE,content);
        //把消息放入ROUTINGKEY_A对应的队列当中去,对应的是队列A
        //rabbitTemplate.convertAndSend(RabbitConfig.EXCHANGE_A,RabbitConfig.ROUTINGKEY_A,content,correlationId);
        //传输对象
        Map mp = new HashMap(1024);
        mp.put("goodsId",goodsId);
        mp.put("reduce",Integer.valueOf(content));
        rabbitTemplate.convertAndSend(RabbitConfig.EXCHANGE_A,RabbitConfig.ROUTINGKEY_A,mp);
        //rabbitTemplate.convertAndSend(RabbitConfig.EXCHANGE_A,RabbitConfig.ROUTINGKEY_A,user,correlationId);

    }
    /*
     * 回调
     */
    @Override
    public void confirm(CorrelationData correlationData, boolean ack, String cause) {
        logger.info(" 回调id:" + correlationData);
        if (ack) {
            logger.info("生产者0被消息成功消费");
        } else {
            logger.info("生产者0被消息消费失败:" + cause );
        }
    }

}
MsgReceiver
消费者,看代码头部是不是做了一个监听
package com.lac.component.rabbit;

import com.fasterxml.jackson.core.type.TypeReference;
import com.fasterxml.jackson.databind.ObjectMapper;
import com.lac.component.model.Goods;
import com.lac.component.service.GoodsService;
import org.slf4j.Logger;
import org.slf4j.LoggerFactory;
import org.springframework.amqp.rabbit.annotation.RabbitHandler;
import org.springframework.amqp.rabbit.annotation.RabbitListener;
import org.springframework.beans.factory.annotation.Autowired;
import org.springframework.stereotype.Component;

import java.util.HashMap;
import java.util.List;
import java.util.Map;

@Component
@RabbitListener(queues = RabbitConfig.QUEUE_A)
public class MsgReceiver {
    private final Logger logger = LoggerFactory.getLogger(this.getClass());


    @Autowired
    private GoodsService goodsService;
    //   @RabbitHandler
//    public void process(String content) {
//       logger.info("处理器one接收处理队列A当中的消息:" +content);
//   }

    @RabbitHandler
    public void process(Map mp){
        List<Goods> goodsList = this.goodsService.selectGoods();
        ObjectMapper mapper = new ObjectMapper();
        Map hashMap = new HashMap<String,Integer>();
        //!!!解决linkedHashmap转实体类的问题
        List<Goods> goods1 = mapper.convertValue(goodsList, new TypeReference<List<Goods>>(){});

        for(Goods a:goods1){
            hashMap.put(a.getGoodsId(),a.getGoodsCount());
        }
        Integer allCount = (Integer)hashMap.get("goods1");

        String goodsId = (String) mp.get("goodsId");
        Integer reduce = (Integer) mp.get("reduce");
        System.out.println("更新成的件数"+String.valueOf(allCount-reduce));
       int successFlag =  this.goodsService.updateGoods("goods1",allCount-reduce);
       System.out.println(successFlag+"更新成功");

    }
}
初始化进来的时候先查数据库缓存到redis中
initController
package com.lac.component.controller;

import com.fasterxml.jackson.core.type.TypeReference;
import com.fasterxml.jackson.databind.ObjectMapper;
import com.lac.component.model.Goods;
import com.lac.component.service.GoodsService;
import org.springframework.beans.factory.InitializingBean;
import org.springframework.beans.factory.annotation.Autowired;
import org.springframework.data.redis.core.RedisTemplate;
import org.springframework.stereotype.Controller;

import java.util.List;

@Controller
public class initController implements InitializingBean {

    @Autowired
    private RedisTemplate redisTemplate;
    @Autowired
    private GoodsService goodsService;
    @Override
    public void afterPropertiesSet() throws Exception {
        List<Goods> goodsList = this.goodsService.selectGoods();
        ObjectMapper mapper = new ObjectMapper();
        //!!!解决linkedHashmap转实体类的问题
        List<Goods> goods1 = mapper.convertValue(goodsList, new TypeReference<List<Goods>>(){});

        for(Goods a:goods1){
            redisTemplate.opsForValue().set(a.getGoodsId(),a.getGoodsCount());
            System.out.println(redisTemplate.opsForValue().get(a.getGoodsId()));
        }

    }
}
判断逻辑我写在了controller里面,实际项目写在service
DemoController
package com.lac.component.controller;
import com.lac.component.rabbit.MsgProducer;
import com.lac.component.rabbit.RabbitConfig;
import org.springframework.beans.factory.annotation.Autowired;
import org.springframework.data.redis.core.RedisTemplate;
import org.springframework.web.bind.annotation.GetMapping;
import org.springframework.web.bind.annotation.PathVariable;
import org.springframework.web.bind.annotation.RestController;
import java.util.Random;
@RestController
public class DemoController {
@Autowired
private RedisTemplate redisTemplate;
@Autowired
private RabbitConfig rabbitConfig;
@GetMapping("/")
public String getHello() {
return "hello";
}
@GetMapping("/user/{string}")
public String test(@PathVariable String string) {
return "Hello Nacos :" + string;
}
@GetMapping("/danbing2226/{string}")
public String test1(@PathVariable String string) {
return "灰色天空 :" + string;
}
@GetMapping("/xiawanan/{str}")
public String test2(@PathVariable String str) {
return "夏婉安的歌曲:"+str;
}
@GetMapping("/huisetiankong/{str}")
public String test3(@PathVariable String str) {
return "听了无数遍:"+str;
}
@GetMapping("/rabbit")
public String send() throws Exception{
String goodsId = "goods1";
Random r = new Random(1);
int i = r.nextInt(100);
MsgProducer producer = new MsgProducer(rabbitConfig.rabbitTemplate());
System.out.println(redisTemplate.opsForValue().toString());
Integer count = (Integer) redisTemplate.opsForValue().get(goodsId);
if(count == 0){
System.out.println("没库存了");
return "没库存了";
}
long kucun = redisTemplate.opsForValue().decrement(goodsId,i);
if(kucun <0 ){
count = (Integer) redisTemplate.opsForValue().get(goodsId);
if(count != 0 && count < Integer.valueOf(i)){
redisTemplate.opsForValue().increment(goodsId,i);
System.out.println("买多了再把库存还原");
return "买多了再把库存还原";
}else if(count == 0){
redisTemplate.opsForValue().set(goodsId,0);
return "库存卖完了";
}
System.out.println("redis库存:"+ redisTemplate.opsForValue().get(goodsId));
}
producer.sendMsg("goods1",String.valueOf(i));
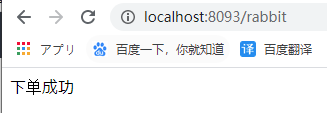
return "下单成功";
}
}
逻辑代码认真看下,不多,库存够就下单成功生产者就发送信息,卖多了就返回库存,返回信息,这个是简易版,至于你想返回什么完全根据项目或自己的需要
结合上的生产者和消费者,理解一下就是这么简单。
为了减少学习成本,这里也用到了mybatis dao层和entity我也都贴出来
GoodsDao
有的项目叫mapper不影响理解。一个查询一个更新
package com.lac.component.dao;

import com.lac.component.model.Goods;
import org.apache.ibatis.annotations.Param;
import org.springframework.stereotype.Repository;

import java.util.List;

@Repository
public interface GoodsDao {
    List<Goods> selectGoods();
    int updateGoods(@Param("id")String id, @Param("count")Integer count);
}
GoodsMapper.xml
<?xml version="1.0" encoding="UTF-8" ?>
<!DOCTYPE mapper PUBLIC "-//mybatis.org//DTD Mapper 3.0//EN" "http://mybatis.org/dtd/mybatis-3-mapper.dtd" >
<mapper namespace="com.lac.component.dao.GoodsDao">

    <sql id="GOODS">
goods
    </sql>

    <sql id="GOODS_COLUMN">
    goodsId,goodsName,goodsPrice,goodsCount
    </sql>


    <select id="selectGoods" resultType="com.lac.component.model.Goods">
        SELECT
        <include refid="GOODS_COLUMN"/>
        FROM
        <include refid="GOODS"/>
    </select>


    <update id="updateGoods" parameterType="com.lac.component.model.Goods">
        UPDATE
        <include refid="GOODS"/>
        SET goodsCount=#{count}
        WHERE goodsId=#{id}
    </update>

</mapper>
service层
GoodsService
package com.lac.component.service;

import com.lac.component.model.Goods;

import java.util.List;


public interface GoodsService {
    List<Goods> selectGoods();
    int updateGoods(String id, Integer count);
}
GoodsServiceImpl
package com.lac.component.service.impl;

import com.lac.component.dao.GoodsDao;
import com.lac.component.model.Goods;
import com.lac.component.service.GoodsService;
import org.springframework.beans.factory.annotation.Autowired;
import org.springframework.stereotype.Service;

import java.io.Serializable;
import java.util.List;

@Service(value = "GoodsService")
public class GoodsServiceImpl implements GoodsService, Serializable {

    @Autowired
    private GoodsDao goodsDao;
    @Override
    public List<Goods> selectGoods() {
        return goodsDao.selectGoods();
    }

    @Override
    public int updateGoods(String id, Integer count) {
        return goodsDao.updateGoods(id,count);
    }
}
源码放在最后了
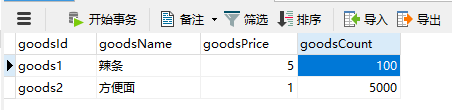
看下效果
先把服务起起来

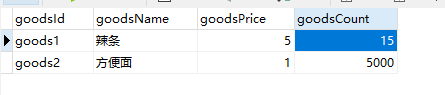
再次点击,不够卖了。
锋哥最新SpringCloud分布式电商秒杀课程发布
👇👇👇
👆长按上方微信二维码 2 秒
感谢点赞支持下哈