像玩 jQuery 一样玩 AST
本文已获得原作者的独家授权,有想转载的朋友们可以在后台联系我申请开白哦! PS:欢迎掘友们向我投稿哦,被采用的文章还可以送你掘金精美周边!
本文来自飞猪前端的 @呦嘿 同学,萌妹子手把手教你使用 AST,这篇文章写得很不错值得一读。
这篇文章适合在原理性知识不通的情况下,仍然对 ast 蠢蠢欲动的开发者们,文章不具备任何专业性以及严谨性,它除了实用,可能一无是处。
关于 AST 的介绍,网上已经一大堆了,不仅生涩难懂,还自带一秒劝退属性。其实我们可以很(hao)接(bu)地(yan)气(jin)的去了解一个看上去高端大气的东西,比如,AST 是一个将代码解构成一棵可以千变万化的树的黑魔法。所以,只要我们知道咒语怎么念,世界的大门就打开了。有趣的是,魔法咒语长得像 jQuery~
欢迎你,魔法师
在成为一名魔法师之前,我们需要准备四样东西:趁手的工具、又简短又常用的使用技巧,即使看不懂也不影响使用的权威 api、 以及天马行空的想象力。
🍭 魔法棒 之 趁手的工具
🔗 AST exporer
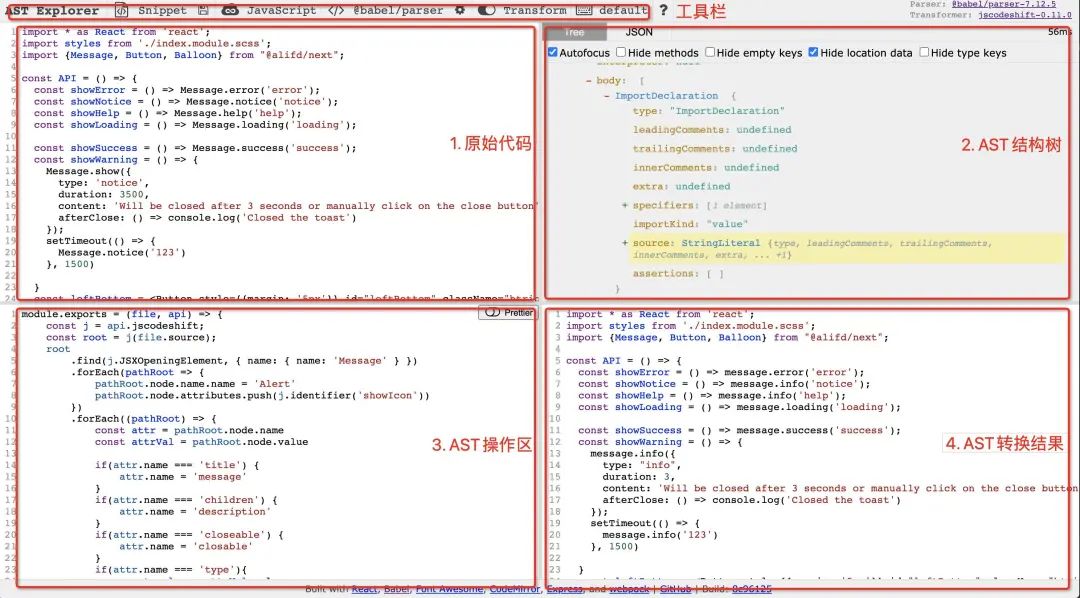
这是一个 ast 在线调试工具,有了它,我们可以非常直观的看到 ast 生成前后以及代码转换,它分五个区域。我们接下来都依赖这个工具进行代码操作。
🔗 jscodeshift
它是一个 ast 转换器,我们通过它来将原始代码转译成 ast 语法树,并借用其开放的 api 操作 ast,最终转换成我们想要的代码。
jscodeshift 的 api 基于 recast 封装,语法十分接近 jquery。recast 是对 babel/travers & babel/types 的封装,它提供简易的 ast 操作,而 travers 是 babel 中用于操作 ast 的工具,types 我们可以粗浅的理解为字典,它用于描述结构树类型。
同时,jscodeshift 还提供额外的功能,使得开发者们能够在项目工程阶段、亦或开发阶段皆可投入使用,同时无需感知 babel 转译前后的过程,只专注于如何操作或改变树,并得到结果。
尽管 jscodeshift 缺少中文文档,但其源码可读性非常高,这也是为什么推荐使用 jscodeshift 的重要原因之一。关于其 api 操作技巧,将在实践中为大家揭晓。
📖 魔法书 之 权威 api
🔗 babel-types
ast 语法字典,方便我们快速查阅结构树的类型,它是我们想要通过 ast 生成某行代码时的重要工具之一。
认识 AST
我以为的 AST

实际中的 AST
假如我们有这样一份代码
var a = 1
复制代码
我们将其转化为 AST,以 JSON 格式展示如下
{
  "type": "Program",
  "sourceType": "script",
  "body": [
    {
      "type": "VariableDeclaration",
      "kind": "var",
      "declarations": [
        {
          "type": "VariableDeclarator",
          "id": {
            "type": "Identifier",
            "name": "a"
          },
          "init": {
            "type": "Literal",
            "value": 1
          }
        }
      ]
    }
  ]
}
复制代码
当我操作对象 init 中 value 的值 1 改为 2 时,对应的 js 也会跟着改变为 var a = 2 当我操作对象 id 中的 name 的值 a 改为 b 时, 对应的 js 也会跟着改变为 var b = 2
看到这里,突然发现,操作 AST 无非就是操作一组有规则的 JSON,发现新大陆有木有??那么只要明白规则,是不是很快就可以掌握一个世界了有!木!有!
了解 AST 节点
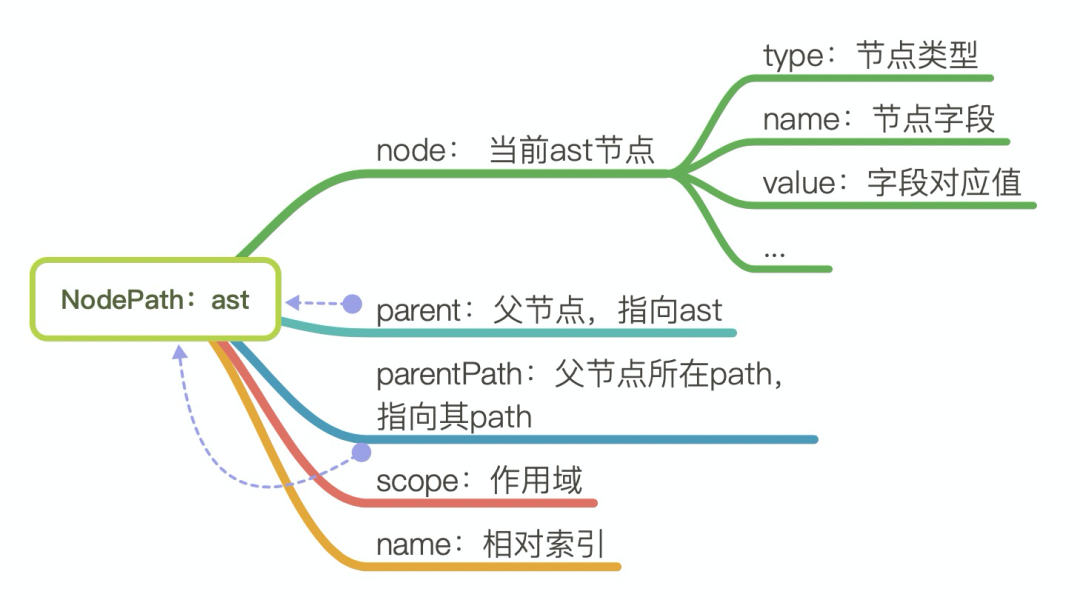
探索 AST 节点类型
常用节点含义对照表  看了规则后瞬间明白 ast 的 json 中那些看不懂的 type 是个什么玩意了 (详细可对照 babel-types),真的就是描述语法的词汇罢了!原来掌握一个世界竟然可以这么简!单!
jscodeshift 简易操作
查找
| api | 类型 | 接收参数 | 描述 |
|---|---|---|---|
| find | fn | type:ast 类型 | |
| 找到所有符合筛选条件的 ast 类型的 ast 节点,并返回一个 array。 | |||
| filter | fn | callback:接受一个回调,默认传递被调用的 ast 节点 | 筛选指定条件的 ast 节点,并返回一个 array |
| forEach | fn | callback:接受一个回调,默认传递被调用的 ast 节点 | 遍历 ast 节点,同 js 的 forEach 函数 |
除此之外, 还有 some、every、closest 等用法基本一致。
删除
| api | 类型 | 接收参数 | 描述 |
|---|---|---|---|
| remove | fn | type:ast 类型 | |
| filter:筛选条件 | 找到所有符合筛选条件的 ast 类型的 ast 节点,并返回一个 array。 |
添加 & 修改
| api | 类型 | 接收参数 | 描述 |
|---|---|---|---|
| replaceWith | fn | nodes:ast 节点 | 替换 ast 节点,如果为空则表示删除 |
| insertBefore | fn | fn | nodes:ast 节点 |
| insertAfter | fn | fn | nodes:ast 节点 |
| toSource | fn | options: 配置项 | ast 节点转译,返回 js |
除此之外, 还有 some、every、closest 等用法基本一致。
其它
子节点相关操作如 getAST()、nodes() 等。指定 ast 节点的查找,如:findJSXElements()、hasAttributes()、hasChildren() 等。
更多可通过 ast explore 在操作区 console 查看、或直接查看 jscodeshift/collections
命令
// -t 转换文件的文件路径 可以是本地或者url
// myTransforms ast执行文件
// fileA fileB 待操作的文件
// --params=options 用于执行文件接收的参数
jscodeshift -t myTransforms fileA fileB --params=options
复制代码
更多命令查看 🔗 jscodeshift
实践
接下来,我将在实践中传递技巧。
简单的例子
我们先来看一个例子,假设有如下代码
import * as React from 'react';
import styles from './index.module.scss';
import { Button } from "@alifd/next";


const Button = () => {
  return (
    <div>
      <h2>转译前</h2>
      <div>
        <Button type="normal">Normal</Button>
        <Button type="primary">Prirmary</Button>
        <Button type="secondary">Secondary</Button>


        <Button type="normal" text>Normal</Button>
        <Button type="primary" text>Primary</Button>
        <Button type="secondary" text>Secondary</Button>


        <Button type="normal" warning>Normal</Button>
      </div>
    </div>
  );
};

export default Button;

复制代码
执行文件(通过 jscodeshift 进行操作)
module.exports = (file, api) => {
    const j = api.jscodeshift;
    const root = j(file.source);
    root
        .find(j.ImportDeclaration, { source: { value: "@alifd/next" } })
        .forEach((path) => {
            path.node.source.value = "antd";
        })
    root
     .find(j.JSXElement, {openingElement: { name: { name: 'h2' } }})
    .forEach((path) => {
         path.node.children = [j.jsxText('转译后')]
        })
    root
        .find(j.JSXOpeningElement, { name: { name: 'Button' } })
        .find(j.JSXAttribute)
        .forEach((path) => {
            const attr = path.node.name
            const attrVal = ((path.node.value || {}).expression || {}).value ? path.node.value.expression : path.node.value

            if (attr.name === "type") {
                if (attrVal.value === 'normal') {
                    attrVal.value = 'default'
                }
            }

            if (attr.name === "size") {
                if (attrVal.value === 'medium') {
                    attrVal.value = 'middle'
                }
            }

            if (attr.name === "warning") {
                attr.name = 'danger'
            }

            if (attr.name === "text") {
                const attrType = path.parentPath.value.filter(item => item.name.name === 'type')
                attr.name = 'type'
                if (attrType.length) {
                    attrType[0].value.value = 'link'
                    j(path).replaceWith('')
                } else {
                    path.node.value = j.stringLiteral('link')
                }

            }
        });

    return root.toSource();
}

复制代码
该例代码大致解读如下
将 js 转换为 ast 遍历代码中所有包含 @alifd/next 的引用模块,并做如下操作 改变该模块名为 antd。 找到代码中标签名为 h2 的代码块,并修改该标签内的文案。 遍历代码中所有 Button 标签,并做如下操作 改变标签中 type 和 size 属性的值 改变标签中 text 属性变为 type = "link" 改变标签中 warning 属性为 danger 返回由 ast 转换后的 js。
最终输出结果
import * as React from 'react';
import styles from './index.module.scss';
import { Button } from "antd";


const Button = () => {
  return (
    <div>
      <h2>转译后</h2>
      <div>
        <Button type="default">Normal</Button>
        <Button type="primary">Prirmary</Button>
        <Button type="secondary">Secondary</Button>


        <Button type="link" >Normal</Button>
        <Button type="link" >Primary</Button>
        <Button type="link" >Secondary</Button>


        <Button type="default" danger>Normal</Button>
      </div>
    </div>
  );
};

export default Button;
复制代码
逐句解读
获取必要的数据
// 获取操作ast用的api,获取待编译的文件主体内容,并转换为AST结构。
const j = api.jscodeshift;
const root = j(file.source);
复制代码
执行 jscodeshift 命令后,执行文件接收 3 个参数
file
| 属性 | 描述 |
|---|---|
| path | 文件路径 |
| source | 待操作的文件主体,我们主要用到这个。 |
api
| 属性 | 描述 |
|---|---|
| jscodeshift | 对 jscodeshift 库的引用,我们主要用到这个。 |
| stats | --dry 运行期间收集统计信息的功能 |
| report | 将传递的字符串打印到 stdout |
options
执行 jscodeshift 命令时,接收额外传入的参数,目前用不到,不做额外赘述。
代码转换
// root: 被转换后的ast跟节点
root
 // ImportDeclaration 对应 import 句式
  .find(j.ImportDeclaration, { source: { value: "@alifd/next" } })
  .forEach((path) => {
  // path.node 为import句式对应的ast节点
   path.node.source.value = "antd";
 })
复制代码
解读:
遍历代码中所有包含 @alifd/next 的引用模块,并做如下操作 改变该模块名为 antd。
root
 // JSXElement 对应 element 完整句式,如 <h2 ...> ... </h2>
 // openingElement 对应 element 的 开放标签句式, 如 <h2 ...>
  .find(j.JSXElement, {openingElement: { name: { name: 'h2' } }})
  .forEach((path) => {
  // jsxText 对应 text
   path.node.children = [j.jsxText('转译后')]
})
复制代码
解读:
筛选标签为 h2 的 html,更改该标签的内容的 text 为 “转译后”
root
      // 筛选Button的 element开放句式
        .find(j.JSXOpeningElement, { name: { name: 'Button' } })
    // JSXAttribute 对应 element 的 attribute 句式, 如 type="normal" ...
        .find(j.JSXAttribute)
        .forEach((path) => {
            const attr = path.node.name
            const attrVal = ((path.node.value || {}).expression || {}).value ? path.node.value.expression : path.node.value

            if (attr.name === "type") {
                if (attrVal.value === 'normal') {
                    attrVal.value = 'default'
                }
            }

            if (attr.name === "size") {
                if (attrVal.value === 'medium') {
                    attrVal.value = 'middle'
                }
            }

            if (attr.name === "warning") {
                attr.name = 'danger'
            }

            if (attr.name === "text") {
               // 判断该ast节点的兄弟节点是否存在 type,
                // 如果有,则修改type的值为link,如果没有则改变当前节点为type=“link”
                const attrType = path.parentPath.value.filter(item => item.name.name === 'type')
                attr.name = 'type'
                if (attrType.length) {
                    attrType[0].value.value = 'link'
                    j(path).replaceWith('')
                } else {
                   // stringLiteral 对应 string类型字段值
                    path.node.value = j.stringLiteral('link')
                }

            }
        });
复制代码
解读:
遍历代码中所有 Button 标签,并做如下操作 改变标签中 type 和 size 属性的值 改变标签中 text 属性变为 type = "link" 改变标签中 warning 属性为 danger
return root.toSource();
复制代码
解读:
返回由 ast 转换后的 js。
天马行空的想象力来自于 “懒”
假如我们想插入一大段代码,按照 ast 的写法就得使用大量的 type 生成大量的节点对象,如此繁琐,大可不必,万事总有暴力解决法 🌝。
const formRef = j('const formRef = React.createRef();').nodes()[0].program.body[0]
path.insertAfter(formRef)
复制代码
假如我们想句式转换,比如 element 的 text 句式转 attr 标签。
const getStringEle = (source) => {
    if (Array.isArray(source)) {
        let arr = []
        source.forEach((item, i, items) => {
            if (!item.replace(/\s+|\n/g, '').length && i!==0 && i!== (items.length - 1 )){
                arr.push('<></>')
            }
            arr.push(item)
        })
        return arr.join('')
    } else {
        return source
    }
}

...
.find(j.JSXAttribute)
.forEach(path => {
  const attrVal = ((path.node.value || {}).expression || {}).value ? path.node.value.expression : path.node.value
 const childrenEleStr = getStringEle(j(path).toSource())

  j(path).replaceWith(j.jsxIdentifier(
    `attr={[${childrenEleStr.replace(/<><\/>/g, ',')}]}`
  ))

})

复制代码
掌握更多的链式写法,就能玩出更多的花样~ 这点和 jQuery 如出一辙。
让文件结合工程 run 起来
以上我们都基于 ast exporer,并不能实用于项目场景,或者满足工程需要。真实的工程化场景,并不满足于一份文件,如果想让 ast 工程化,真正的落实在项目中,利用 ast 重构业务代码,解放重复的劳动力,以下是一个很好的解决思路。
以下基于 node,我推荐两个工具
npx & execa
利用 npx 实现一个复杂命令,来创建一个简易 cli。通过 execa 批量执行 jscodeshift。
关键代码如下
package.json
"bin": {
    "ast-cli": "bin/index.js"
  },
复制代码
index.js
#! /usr/bin/env node
require('./cli').main()
复制代码
main()
...

const path = require('path')
const execa = require('execa');
const jscodeshiftBin = require.resolve('.bin/jscodeshift');

module.exports.main = async () => {
 ...
  const astFilesPath = ...
  astFilesPath.forEach(async (transferPath, i) => {
    const outdrr = await execa.sync(jscodeshiftBin, ['-t', transferPath, src])
    if (outdrr.failed) {
      console.log(`编译出错: ${outdrr}`)
    }
  })
  ...
}

...

复制代码
感谢大家
关注「前端UpUp」,分享精选面试热点文章。
加我好友,一起讨论算法,2021一起UpUp。