mmdetection性能简单优化方法

极市导读
本文介绍了在使用mmdetection的过程中可以将性能优化的一些经验,附有相关代码。 >>加入极市CV技术交流群,走在计算机视觉的最前沿
最近工作经常要用到mmdetection,在这里简单介绍一些性能优化方面的经验。
1. 数据读取与inference异步
mmdetection在inference时,整个流程是串行的,即需要先读取图片并预处理,然后转移到gpu,最后送入模型获取结果。速度优化时最简单的方法就是让图片读取与模型推理异步运行,大致的思路是:主线程之外额外开一个线程和cuda的stream(GPU上同一个stream串行执行,不同stream异步执行),在该线程和stream中读取图片并转移数据到gpu,主线程获取数据时使用queue.get(),耗时不到1ms,这时获取到的数据已经在GPU上了,直接送入网络就行。python的队列可以限制最大元素数量(q = queue.Queue(MAX_NUM)),避免消耗过多内存。
class imageReader(threading.Thread):def __init__(self, img_list, device, q):super(imageReader, self).__init__()self.img_list = img_listself.device = deviceself.q = q # q = queue.Queue(10)self.stream = torch.cuda.Stream()def run(self):with torch.cuda.stream(self.stream):for img_path in self.img_list:img = cv2.imread(img_path)if img is None:print('NoneType: %s' % img_path)img = torch.Tensor(img).to(device=self.device)self.q.put((img, img_path))
在v100显卡上运行faster rcnn,原版mmdetection耗时约46ms每张图,gpu负载45%左右,使用该方法后可提速至35ms每图,gpu负载达到80%。后续启动两个进程可以使gpu负载达到100%,但运行速度依然是35ms每图,多进程对性能已经没有提升了。
2. GPU预处理图片
mmdetection的图片预处理是在cpu上完成的,其中对图片的归一化操作(减去均值再除以方差)将消耗巨量cpu资源,模型速度越快,该问题越严重。将图片预处理的代码搬到GPU上可以降低4倍以上的cpu负载,在cpu较差的机器上也可以大幅提高模型性能。
图片读取和预处理的主要代码在mmcv包中,使用单步调试追踪图片处理的流程,并将其用pytorch改写一下(以下代码可在mmdet2.7.0的faster rcnn中使用,注意:代码没有经过完整测试,不保证正确性):
class imageReader(threading.Thread):def __init__(self, img_list, cfg, device, q):super(imageReader, self).__init__()self.img_list = img_listself.cfg = cfgself.device = deviceself.q = qself.stream = torch.cuda.Stream()# self.img_scale = (1333, 800)self.img_scale = cfg.test_pipeline[1]['img_scale']self.mean = torch.tensor(cfg.img_norm_cfg['mean'], dtype=torch.float32).reshape(1, -1).to(device)self.std = torch.tensor(cfg.img_norm_cfg['std'], dtype=torch.float32).reshape(1, -1).to(device)self.stdinv = 1.0 / self.stdself.size_divisor = 32def run(self):"""流程:1. 读取图片(cv2.imread)2. rescale3. 归一化4. padding:return:"""with torch.cuda.stream(self.stream):for img_path in self.img_list:img_src = cv2.imread(img_path, cv2.IMREAD_COLOR)if img_src is None:print('NoneType image: %s' % img_path)continue# brg to rgbimg_src = img_src[:, :, ::-1]ori_shape = img_src.shapeimg_rescale, scale_factor = mmcv.imrescale(img_src, self.img_scale,return_scale=True, backend='cv2')img_rescale_shape = img_rescale.shapeh_scale = int(img_rescale_shape[0]) / ori_shape[0]w_scale = int(img_rescale_shape[1]) / ori_shape[1]scale_factor = np.array([w_scale, h_scale, w_scale, h_scale], dtype=np.float32)img_rescale = torch.from_numpy(img_rescale.astype(np.float32)).to(self.device).sub_(self.mean).mul_(self.stdinv)pad_h = int(np.ceil(img_rescale.shape[0] / self.size_divisor)) * self.size_divisorpad_w = int(np.ceil(img_rescale.shape[1] / self.size_divisor)) * self.size_divisor# img_rescale_pad = mmcv.impad_to_multiple(img_rescale, self.size_divisor)img_rescale_pad = img_rescale.unsqueeze_(0).permute((0, 3, 1, 2))img_rescale_pad = torch.nn.functional.pad(img_rescale_pad,[0, pad_w - img_rescale_shape[1], 0, pad_h - img_rescale_shape[0]])pad_shape = img_rescale_pad.shapemeta_datas = {"filename": img_path,"ori_filename": img_path,"ori_shape": ori_shape,"img_shape": img_rescale_shape,"pad_shape": pad_shape,"scale_factor": scale_factor,"flip": False,"flip_direction": "horizontal","img_norm_cfg": None,"pad_size_divisor": self.size_divisor,"keep_ratio": True}data = {"img_metas": [[meta_datas]], "img": [img_rescale_pad.contiguous()]}self.q.put((data, img_path))
其中最核心的一句是图片归一化操作,cpu负载的降低主要来自这行代码:
img_rescale = torch.from_numpy(img_rescale.astype(np.float32)).to(self.device).sub_(self.mean).mul_(self.stdinv)3. 其它性能优化方面的小问题
(1)Batch inference对二阶段检测模型的速度提升很小,从训练的时候就能看出来,batch size增加一倍,训练的时间也会增加一倍。一方面因为GPU的负载已经很高了,另一方面二阶段检测模型的内部依然使用for循环来处理多张图片;
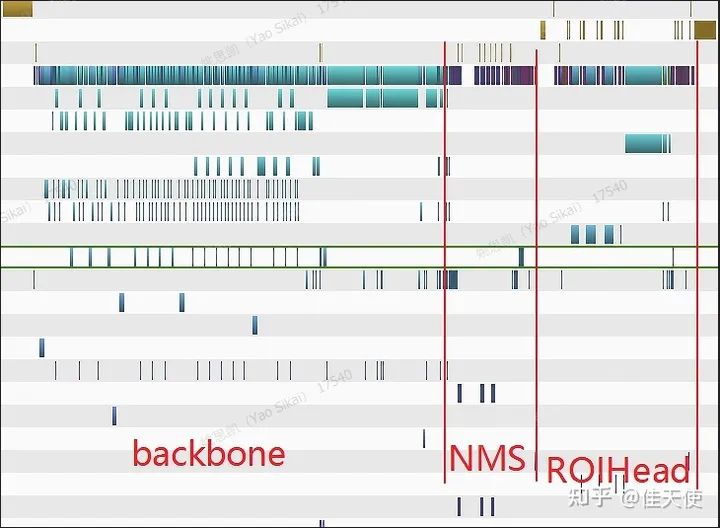
(2)这是faster rcnn(resnet50)的profile(实际是用libtorch重写的mmdet2.2.1版的faster rcnn测试得到的)。单张图片耗时35ms,可以看到大约60%的时间都消耗在了backbone上。mmdetection的nms使用cuda重写过,早已不再是性能瓶颈,使用fpn时,每一个尺度的feature map都会使用一次nms,耗时都在1ms以内;
(3)cuda11开始TensorRT才支持FPN中的上采样操作;
推荐阅读
2020-12-12
2020-09-22

2020-06-03

# CV技术社群邀请函 #
备注:姓名-学校/公司-研究方向-城市(如:小极-北大-目标检测-深圳)
即可申请加入极市目标检测/图像分割/工业检测/人脸/医学影像/3D/SLAM/自动驾驶/超分辨率/姿态估计/ReID/GAN/图像增强/OCR/视频理解等技术交流群
每月大咖直播分享、真实项目需求对接、求职内推、算法竞赛、干货资讯汇总、与 10000+来自港科大、北大、清华、中科院、CMU、腾讯、百度等名校名企视觉开发者互动交流~