React 基础案例 | 提醒列表和旅游清单列表(一)

一、开篇
大家好,本系列文章小编将和大家一起,从最基础的真实案例实践 React Hook 相关的知识,如果你已经很熟练了 React Hook 相关内容了,本系列文章你可以忽略。
本系列文章由浅入深,将从最简单的案例开始学习,本篇文章将从两个列表的数据渲染开始讲起,一个是从本地文件获取数据、另一个通过接口请求的方式获取数据。
二、案例1:生日列表加载本地数据
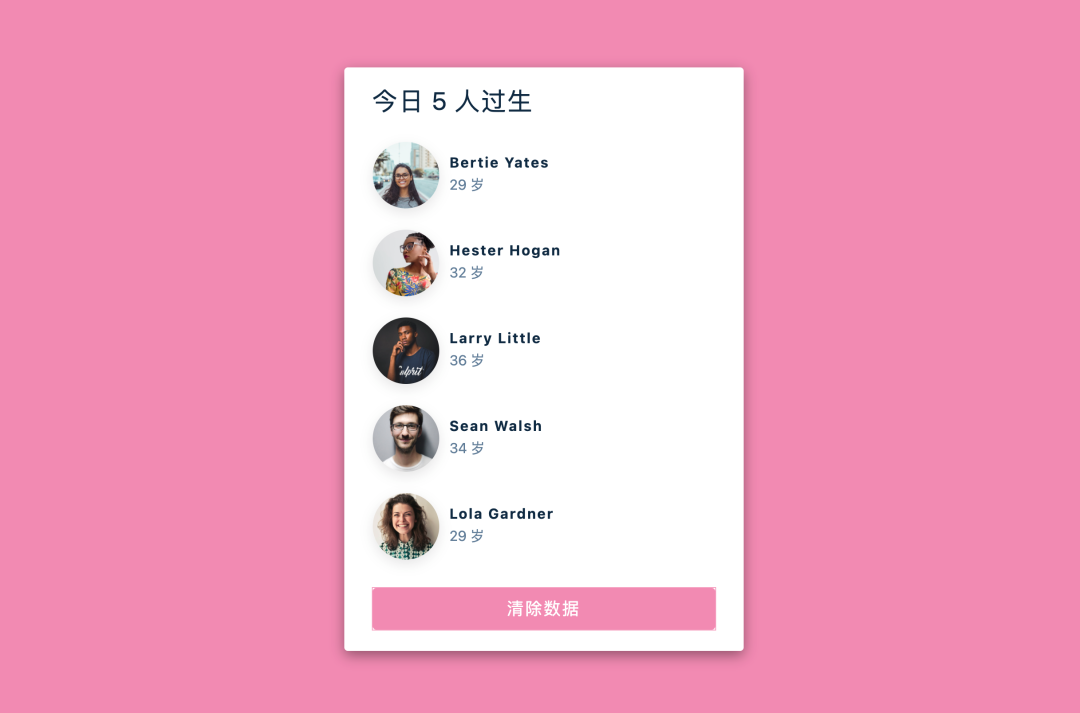
如下图所示,本案例从本地数据加载生日列表数据,列表数据包含了用户的头像、姓名、年龄,同时又包含了一个清除数据的按钮。

2.1、创建项目
开始之前,我们通过 create-react-app 命令创建项目 birthday-reminder,删除一些不相关的文件,保留 App.js、index.css、index.js,index.js 的文件内容修改如下:
import React from 'react';
import ReactDOM from 'react-dom';
import './index.css';
import App from './App';

ReactDOM.render(
  <React.StrictMode>
    <App />
  </React.StrictMode>,
  document.getElementById('root')
);

// src/index.js
2.2、设计本地文件数据结构
本案例的数据结构比较简单,一个数组对象,包含 id、name(姓名)、age(年龄)、image(图片地址),新建 data.js 数据文件,示例结构如下:
export default [
  {
    id: 1,
    name: 'Bertie Yates',
    age: 29,
    image:
      'https://res.cloudinary.com/diqqf3eq2/image/upload/v1595959131/person-2_ipcjws.jpg',
  },
  {
    id: 2,
    name: 'Hester Hogan',
    age: 32,
    image:
      'https://res.cloudinary.com/diqqf3eq2/image/upload/v1595959131/person-3_rxtqvi.jpg',
  },
  //更多数据...
]

// src/data.js
2.3、新建本地样式文件
基于页面,我们新建 index.css 文件,定义基础的颜色和常用的尺寸变量等,由于代码比较简单,这里就不过多解释啦,直接贴上代码
/*
===============
Variables
===============
*/

:root {
  /* dark shades of primary color*/
  --clr-primary-1: hsl(162, 61%, 89%);
  --clr-primary-2: hsl(162, 60%, 78%);
  --clr-primary-3: hsl(162, 61%, 67%);
  --clr-primary-4: hsl(162, 61%, 57%);
  /* primary/main color */
  --clr-primary-5: hsl(162, 73%, 46%);
  /* lighter shades of primary color */
  --clr-primary-6: #1aa179;
  --clr-primary-7: #13795b;
  --clr-primary-8: #0d503c;
  --clr-primary-9: #06281e;
  /* darkest grey - used for headings */
  --clr-grey-1: hsl(212, 33%, 89%);
  --clr-grey-2: hsl(210, 31%, 80%);
  --clr-grey-3: hsl(211, 27%, 70%);
  --clr-grey-4: hsl(209, 23%, 60%);
  /* grey used for paragraphs */
  --clr-grey-5: hsl(210, 22%, 49%);
  --clr-grey-6: hsl(209, 28%, 39%);
  --clr-grey-7: hsl(209, 34%, 30%);
  --clr-grey-8: hsl(211, 39%, 23%);
  --clr-grey-9: hsl(209, 61%, 16%);
  --clr-white: #fff;
  --clr-red-dark: hsl(360, 67%, 44%);
  --clr-red-light: hsl(360, 71%, 66%);
  --clr-green-dark: hsl(125, 67%, 44%);
  --clr-green-light: hsl(125, 71%, 66%);
  --clr-black: #222;
  --transition: all 0.3s linear;
  --spacing: 0.1rem;
  --radius: 0.25rem;
  --light-shadow: 0 5px 15px rgba(0, 0, 0, 0.1);
  --dark-shadow: 0 5px 15px rgba(0, 0, 0, 0.4);
  --max-width: 1170px;
  --fixed-width: 450px;
  --clr-pink: #f28ab2;
}
/*
===============
Global Styles
===============
*/

*,
::after,
::before {
  margin: 0;
  padding: 0;
  box-sizing: border-box;
}
body {
  font-family: -apple-system, BlinkMacSystemFont, 'Segoe UI', Roboto, Oxygen,
    Ubuntu, Cantarell, 'Open Sans', 'Helvetica Neue', sans-serif;
  background: var(--clr-pink);
  color: var(--clr-grey-9);
  line-height: 1.5;
  font-size: 0.875rem;
}
ul {
  list-style-type: none;
}
a {
  text-decoration: none;
}
h1,
h2,
h3,
h4 {
  letter-spacing: var(--spacing);
  text-transform: capitalize;
  line-height: 1.25;
  margin-bottom: 0.75rem;
}
h1 {
  font-size: 3rem;
}
h2 {
  font-size: 2rem;
}
h3 {
  font-size: 1.25rem;
}
h4 {
  font-size: 0.875rem;
}
p {
  margin-bottom: 1.25rem;
  color: var(--clr-grey-5);
}
@media screen and (min-width: 800px) {
  h1 {
    font-size: 4rem;
  }
  h2 {
    font-size: 2.5rem;
  }
  h3 {
    font-size: 1.75rem;
  }
  h4 {
    font-size: 1rem;
  }
  body {
    font-size: 1rem;
  }
  h1,
  h2,
  h3,
  h4 {
    line-height: 1;
  }
}
/*  global classes */

/* section */
.section {
  width: 90vw;
  margin: 0 auto;
  max-width: var(--max-width);
}

@media screen and (min-width: 992px) {
  .section {
    width: 95vw;
  }
}

main {
  min-height: 100vh;
  display: flex;
  justify-content: center;
  align-items: center;
}

.container {
  width: 90vw;
  margin: 5rem 0;
  max-width: var(--fixed-width);
  background: var(--clr-white);
  border-radius: var(--radius);
  padding: 1.5rem 2rem;
  box-shadow: var(--dark-shadow);
}
.container h3 {
  font-weight: normal;
  text-transform: none;
  margin-bottom: 2rem;
}
.person {
  display: grid;
  grid-template-columns: auto 1fr;
  column-gap: 0.75rem;
  margin-bottom: 1.5rem;
  align-items: center;
}
.person img {
  width: 75px;
  height: 75px;
  object-fit: cover;
  border-radius: 50%;
  box-shadow: var(--light-shadow);
}
.person h4 {
  margin-bottom: 0.35rem;
}
.person p {
  margin-bottom: 0;
}
.container button {
  color: var(--clr-white);
  display: block;
  width: 100%;
  border-color: transparent;
  background: var(--clr-pink);
  margin: 2rem auto 0 auto;
  text-transform: capitalize;
  font-size: 1.2rem;
  padding: 0.5rem 0;
  letter-spacing: var(--spacing);
  border-radius: var(--radius);
  outline: 1px solid rgba(242, 138, 178, 0.8);
  cursor: pointer;
}

/*
/src/index.css
*/
2.4、设计 List 列表组件
接下来我们新建 List.js 组件,用来展示用户的列表信息,组件定义了 people 属性,用于接收 data 的数据,进行渲染列表数据。
我们使用 map 函数渲染列表数据, 同时使用 const {id,name,age,image} =person 来结构化 person的属性,示例代码如下:
import React from 'react';

const List = ({people}) => {
  return (
    <>
        {
            people.map((person)=>{
                const {id,name,age,image} =person;
                return(
                  <article key={id} className='person'>
                      <img src={image} alt={name}/>
                      <div>
                          <h4>{name}</h4>
                          <p>{age} 岁</p>
                      </div>
                  </article>
                );
            })
        }
    </>
  );
};

export default List;

// src/List.js
2.5、加载数据,渲染 LiST 列表数据
最后我们需要在 App.js 文件里,加载 data.js 中的数据,这里我们使用 state hook 函数加载 data.js 文件中的数据,定义 people 数据状态变量接收 data 数据,将其传至 List 列表中的 people 属性中渲染列表数据。最后我们添加清除按钮,使用 setPeople([]) 方法,将列表的数据清空,界面将会重新 re-render,示例代码如下:
import React, { useState } from 'react';
import data from './data';
import List from './List';
function App() {
  const [people,setPeople] = useState(data);
  return (
      <main>
        <section className='container'>
          <h3>今日 {people.length} 人过生</h3>
          <List people={people}/>
          <button onClick={()=>setPeople([])}> 清除数据</button>
        </section>
      </main>
  );
}

export default App;

// src/app.js
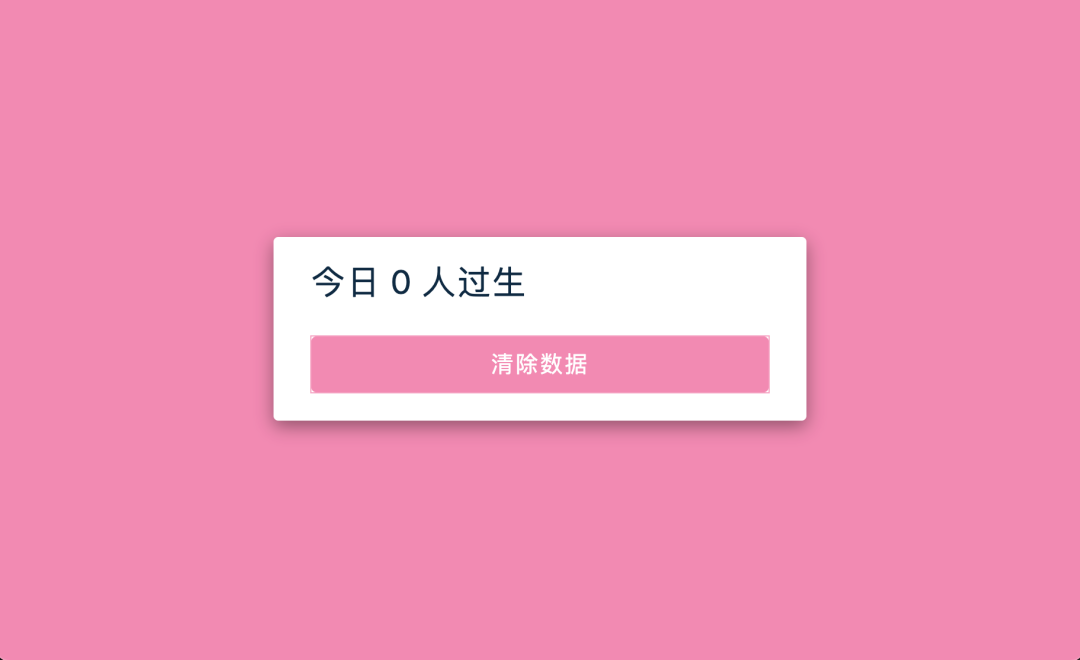
点击清除按钮后的效果

到这里,本案例就完成了,是一个很基础的示例,但是列表加载数据是一个很常用的场景,值得多多练习。
三、案例2:旅游清单列表请求接口加载数据
首先描述相关需求:
此案例通过接口请求数据,加载过程中,显示 Loading 状态,加载完成后显示旅游相关的图片、文章的标题、文章的描述、价格;
文字描述过长时,则会自动省略,点击 Read More 查看完整的介绍;
如果用户不敢兴趣的话,可以点击 not interested 按钮进行移除;
如果列表内容都被移除,显示 refresh 刷新按钮,点击后,重新加载旅游清单数据。
具体交互,如下视频所示:
3.1、 创建项目
开始之前,我们通过 create-react-app 命令创建项目 tours,删除一些不相关的文件,保留 App.js、index.css、index.js,index.js 文件内容如下:
import React from 'react';
import ReactDOM from 'react-dom';
import './index.css';
import App from './App';

ReactDOM.render(
  <React.StrictMode>
    <App />
  </React.StrictMode>,
  document.getElementById('root')
);

// src/index.js
3.2、设计接口对象数据
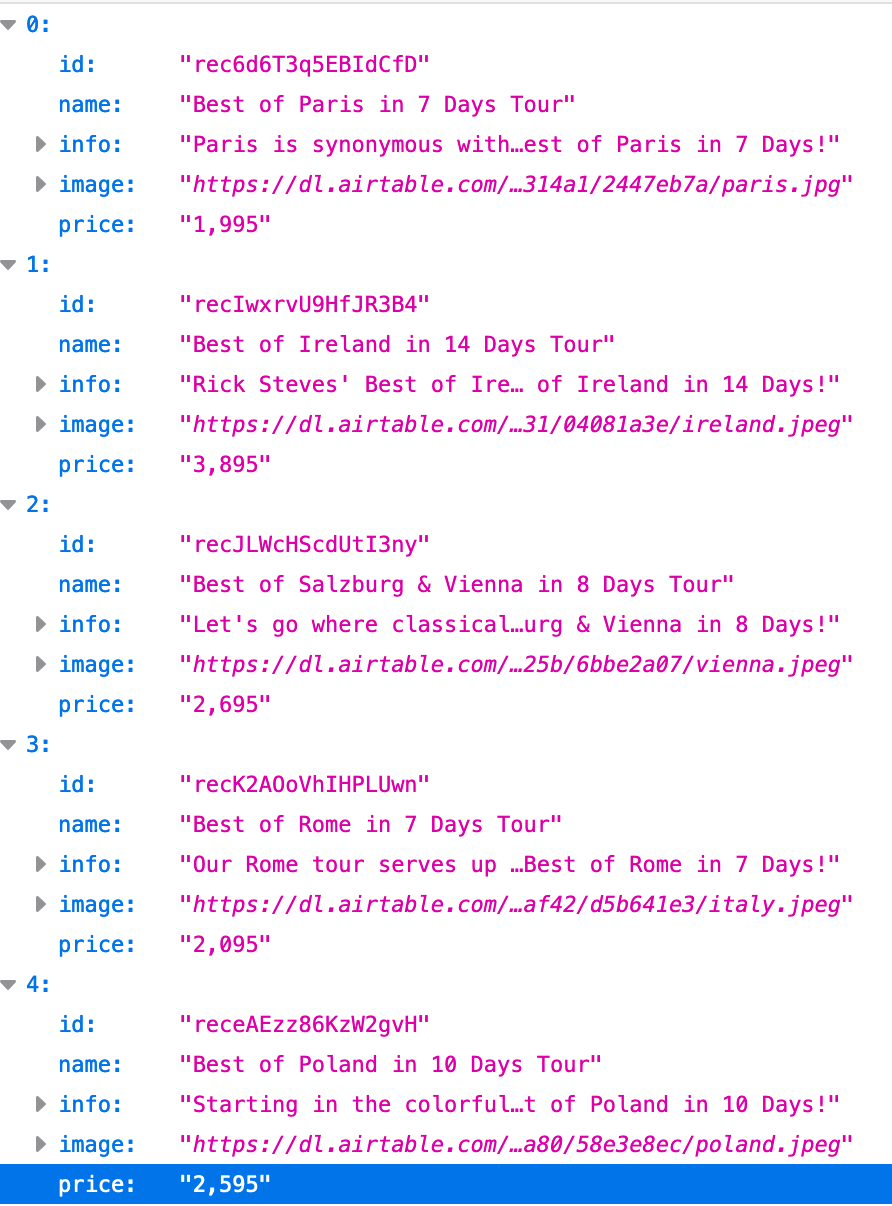
基于界面展示的需求,我们的接口数据需要返回一个数组对象,包含:id(主键)、name(标题)、info(信息)、image(图片)、price(价格),本篇示例,提供一个 https://course-api.com/react-tours-project 接口地址,返回如下数据:

3.3、创建 index.css 样式
基于界面样式,我们新建 index.css 样式文件,由于代码比较简单,这里只是贴上相关代码,代码如下所示:
/*
===============
Variables
===============
*/

:root {
  /* dark shades of primary color*/
  --clr-primary-1: hsl(205, 86%, 17%);
  --clr-primary-2: hsl(205, 77%, 27%);
  --clr-primary-3: hsl(205, 72%, 37%);
  --clr-primary-4: hsl(205, 63%, 48%);
  /* primary/main color */
  --clr-primary-5: hsl(205, 78%, 60%);
  /* lighter shades of primary color */
  --clr-primary-6: hsl(205, 89%, 70%);
  --clr-primary-7: hsl(205, 90%, 76%);
  --clr-primary-8: hsl(205, 86%, 81%);
  --clr-primary-9: hsl(205, 90%, 88%);
  --clr-primary-10: hsl(205, 100%, 96%);
  /* darkest grey - used for headings */
  --clr-grey-1: hsl(209, 61%, 16%);
  --clr-grey-2: hsl(211, 39%, 23%);
  --clr-grey-3: hsl(209, 34%, 30%);
  --clr-grey-4: hsl(209, 28%, 39%);
  /* grey used for paragraphs */
  --clr-grey-5: hsl(210, 22%, 49%);
  --clr-grey-6: hsl(209, 23%, 60%);
  --clr-grey-7: hsl(211, 27%, 70%);
  --clr-grey-8: hsl(210, 31%, 80%);
  --clr-grey-9: hsl(212, 33%, 89%);
  --clr-grey-10: hsl(210, 36%, 96%);
  --clr-white: #fff;
  --clr-red-dark: hsl(360, 67%, 44%);
  --clr-red-light: hsl(360, 71%, 66%);
  --clr-green-dark: hsl(125, 67%, 44%);
  --clr-green-light: hsl(125, 71%, 66%);
  --clr-black: #222;
  --transition: all 0.3s linear;
  --spacing: 0.1rem;
  --radius: 0.25rem;
  --light-shadow: 0 5px 15px rgba(0, 0, 0, 0.1);
  --dark-shadow: 0 5px 15px rgba(0, 0, 0, 0.2);
  --max-width: 1170px;
  --fixed-width: 620px;
}
/*
===============
Global Styles
===============
*/

*,
::after,
::before {
  margin: 0;
  padding: 0;
  box-sizing: border-box;
}
body {
  font-family: -apple-system, BlinkMacSystemFont, 'Segoe UI', Roboto, Oxygen,
    Ubuntu, Cantarell, 'Open Sans', 'Helvetica Neue', sans-serif;
  background: var(--clr-grey-10);
  color: var(--clr-grey-1);
  line-height: 1.5;
  font-size: 0.875rem;
}
ul {
  list-style-type: none;
}
a {
  text-decoration: none;
}
h1,
h2,
h3,
h4 {
  letter-spacing: var(--spacing);
  text-transform: capitalize;
  line-height: 1.25;
  margin-bottom: 0.75rem;
}
h1 {
  font-size: 3rem;
}
h2 {
  font-size: 2rem;
}
h3 {
  font-size: 1.25rem;
}
h4 {
  font-size: 0.875rem;
}
p {
  margin-bottom: 1.25rem;
  color: var(--clr-grey-5);
}
@media screen and (min-width: 800px) {
  h1 {
    font-size: 4rem;
  }
  h2 {
    font-size: 2.5rem;
  }
  h3 {
    font-size: 1.75rem;
  }
  h4 {
    font-size: 1rem;
  }
  body {
    font-size: 1rem;
  }
  h1,
  h2,
  h3,
  h4 {
    line-height: 1;
  }
}
/*  global classes */

/* section */
.section {
  width: 90vw;
  margin: 0 auto;
  max-width: var(--max-width);
}

@media screen and (min-width: 992px) {
  .section {
    width: 95vw;
  }
}
.btn {
  background: var(--clr-primary-5);
  display: inline-block;
  padding: 0.25rem 0.5rem;
  border-radius: var(--radius);
  text-transform: capitalize;
  color: var(--clr-white);
  letter-spacing: var(--spacing);
  border-color: transparent;
  cursor: pointer;
  margin-top: 2rem;
  font-size: 1.2rem;
}
/*
===============
Tours
===============
*/
main {
  width: 90vw;
  max-width: var(--fixed-width);
  margin: 5rem auto;
}
.loading {
  text-align: center;
}
.title {
  text-align: center;
  margin-bottom: 4rem;
}
.underline {
  width: 6rem;
  height: 0.25rem;
  background: var(--clr-primary-5);
  margin-left: auto;
  margin-right: auto;
}

.single-tour {
  background: var(--clr-white);
  border-radius: var(--radius);
  margin: 2rem 0;
  box-shadow: var(--light-shadow);
  transition: var(--transition);
}
.single-tour:hover {
  box-shadow: var(--dark-shadow);
}
.single-tour img {
  width: 100%;
  height: 20rem;
  object-fit: cover;
  border-top-right-radius: var(--radius);
  border-top-left-radius: var(--radius);
}
.tour-info {
  display: flex;
  justify-content: space-between;
  align-items: center;
  margin-bottom: 1.5rem;
}
.tour-info h4 {
  margin-bottom: 0;
}
.single-tour button {
  background: transparent;
  border-color: transparent;
  text-transform: capitalize;
  color: var(--clr-primary-5);
  font-size: 1rem;
  cursor: pointer;
  padding-left: 0.25rem;
}
.tour-price {
  color: var(--clr-primary-5);
  background: var(--clr-primary-10);
  padding: 0.25rem 0.5rem;
  border-radius: var(--radius);
}
.single-tour footer {
  padding: 1.5rem 2rem;
}
.single-tour .delete-btn {
  display: block;
  width: 200px;
  margin: 1rem auto 0 auto;
  color: var(--clr-red-dark);
  letter-spacing: var(--spacing);
  background: transparent;
  border: 1px solid var(--clr-red-dark);
  padding: 0.25rem 0.5rem;
  border-radius: var(--radius);
}

/*
  src/index.css
*/
3.4、创建加载 Loading 组件
在数据请求阶段,我们需要给用户一个数据正在加载中的状态提示,此时我们需要新建一个 Loading 的组件,代码比较简单,新建一个 Loading.js 的文件,示例代码如下:
import React from 'react';

const Loading = () => {
  return (
    <div className="loading">
      <h1>loading...</h1>
    </div>
  );
};

export default Loading;

// src/Loading.js
3.5、创建清单 Tour 卡片组件
由于清单列表中单个卡片的内容比较多,比如清单的图片、标题、描述信息展示以及 readMore 操作按钮查看完整的信息描述、点击 not interested 移除卡片清单,因此我们要单独创建 Tour.js 卡片组件。
这里我们为组件定义 id,image(图片),info(信息),name(标题),price(价格),removeTour(移除事件属性),同时我们定义 readMore 状态(state hook)用来显示或省略详情内容。
import React, { useState } from 'react';

const Tour = ({id,image,info,name,price,removeTour}) => {
  const [readMore,setReadMore] = useState(false);
  return (
      <article className="single-tour">
        <img src={image} alt={name}/>
        <footer>
          <div className="tour-info">
            <h4>{name}</h4>
            <h4 className="tour-price">${price}</h4>
          </div>
          <p>
            {readMore ? info:`${info.substring(0,200)}...`}
            <button onClick={()=>setReadMore(!readMore)}>
                {readMore?'show less':'read more'}
            </button>
          </p>
          <button className='delete-btn' onClick={()=>removeTour(id)}>
              not interested
          </button>
        </footer>
      </article>
  );
};

export default Tour;

// src/Tour.js
3.6、创建 Tours 列表组件
接下来我们创建卡片清单列表,新建 Tours.js 文件,列表组件定义 tours, removeTour 两个属性,tours 属性用于接收父组件传递的数据,removeTour 事件用于删除对应的清单。列表组件通过数组的 map 函数迭代 Tour 卡片组件,渲染父组件传过来的 Data 属性,示例代码如下:
import React from 'react';
import Tour from './Tour';
const Tours = ({tours, removeTour}) => {
  return (
      <section>
        <div className="title">
          <h2>our tours</h2>
          <div className="underline"></div>
        </div>
        <div>
          {tours.map((tour)=>{
            return <Tour key={tour.id} {...tour} removeTour={removeTour} />;
          })}
        </div>
      </section>
  );
};

export default Tours;
// src/Tours.js
3.7、完善 App.js 界面
最后我们完善 App.js 界面,引入 Tours 组件,按照以下思路编写:
定义接口地址 URL 变量,https://course-api.com/react-tours-project 定义加载数据状态和清单数据状态(state hook):loading 和 tours,用来显示加载状态和渲染接口的数据 定义 removeTour 事件,使用 filter 属性删除对应清单。 接下来定义接口请求方法 fetchTours,使用 async,await 方式请求接口,通过 useEffect Hook 调用 fetchTours 方法,最后别忘记 useEffect 的第二个参数 [] 为空数组,只加载一次; 最后使用条件语句,判断数据是否加载中,显示 Loading 组件;接口请求完成时,调用 Tours 组件,显示清单列表;如果清单列表为空,显示 refresh 重新加载数据的按钮,点击时,重新请求接口加载数据;
基于以上的思路,完成后的代码如下所示:
import React, { useState, useEffect } from 'react'
import Loading from './Loading'
import Tours from './Tours'
// ATTENTION!!!!!!!!!!
// I SWITCHED TO PERMANENT DOMAIN
const url = 'https://course-api.com/react-tours-project'
function App() {
  const [loading,setLoading]=useState(true);
  const [tours,setTours]=useState([]);

  const removeTour = (id)=>{
    const newTours = tours.filter((tour)=> tour.id !==id);
    setTours(newTours);
  }

  const fetchTours = async ()=>{
    setLoading(true);
    try {
      const response = await fetch(url);
      const tours=await response.json();
      setLoading(false);
      setTours(tours);
    } catch (error) {
      setLoading(false);
      console.log(error);
    }
  }

  useEffect(()=>{
    fetchTours()
  },[])

  if(loading){
    return (
        <main>
          <Loading/>
        </main>
    )
  }

  if(tours.length===0){
    return (
        <main>
          <div className='title'>
            <h2>no tours left</h2>
            <button className='btn' onClick={()=>fetchTours()}>
              refresh
            </button>
          </div>
        </main>
    )
  }

  return (
      <main>
        <Tours tours={tours} removeTour={removeTour}/>
      </main>
  )
}

export default App
到这里,本案例相关所有的代码就完成了,是不是很简单呢。
结束语
今天的两个实例就介绍这里,虽然简单,但是在实际应用场景又很常见,大家还是有必要亲自动手练习的,如果你想获取本案例源码,请关注“前端达人”公众号,回复“b1”,感谢你的阅读。
