开发也要防“沉迷”?IDEA插件教程详解

当初年少懵懂,那年夏天填志愿选专业,父母听其他长辈说选择计算机专业好。从那以后,我的身上就有了计院深深的烙印。从寝室到机房,从机房到图书馆,C、C++、Java……只要是写点自己感兴趣的东西,一坐便是几个小时,但那时年轻,起身收拾,一路小跑会女神,仍旧轻轻松松。
现在工作了,我毫无意外地做着开发工作,写代码一忙就会忘记起来活动一下,经常等到忙完了就感觉腰和腿十分不舒服。直到今年的体检报告下来之后,我才幡然醒悟:没有一个好身体,就不能好好工作,完成自己远(sheng)大(zhi)的(jia)梦(xin)想。
那开发究竟如何防“沉迷”?以下是我在工作中经常见到的方式:
1. 定闹钟
2. 定时喝水水杯
3. 定时唤醒手环
以上归根结底都是定时提醒,但到底有没有从源头(IDE)上来解决呢?譬如,让你的工作环境 (IDE)歇一会 ?
最近我在 IDEA 插件发现了一个有趣的项目 StopCoding 停止代码编写,思路十分的简单。今天,我就借助这个项目及 EOS 插件的相关开发经验,为大家介绍下 IDEA 插件开发的相关操作。
我们先看下作者实现的效果图:
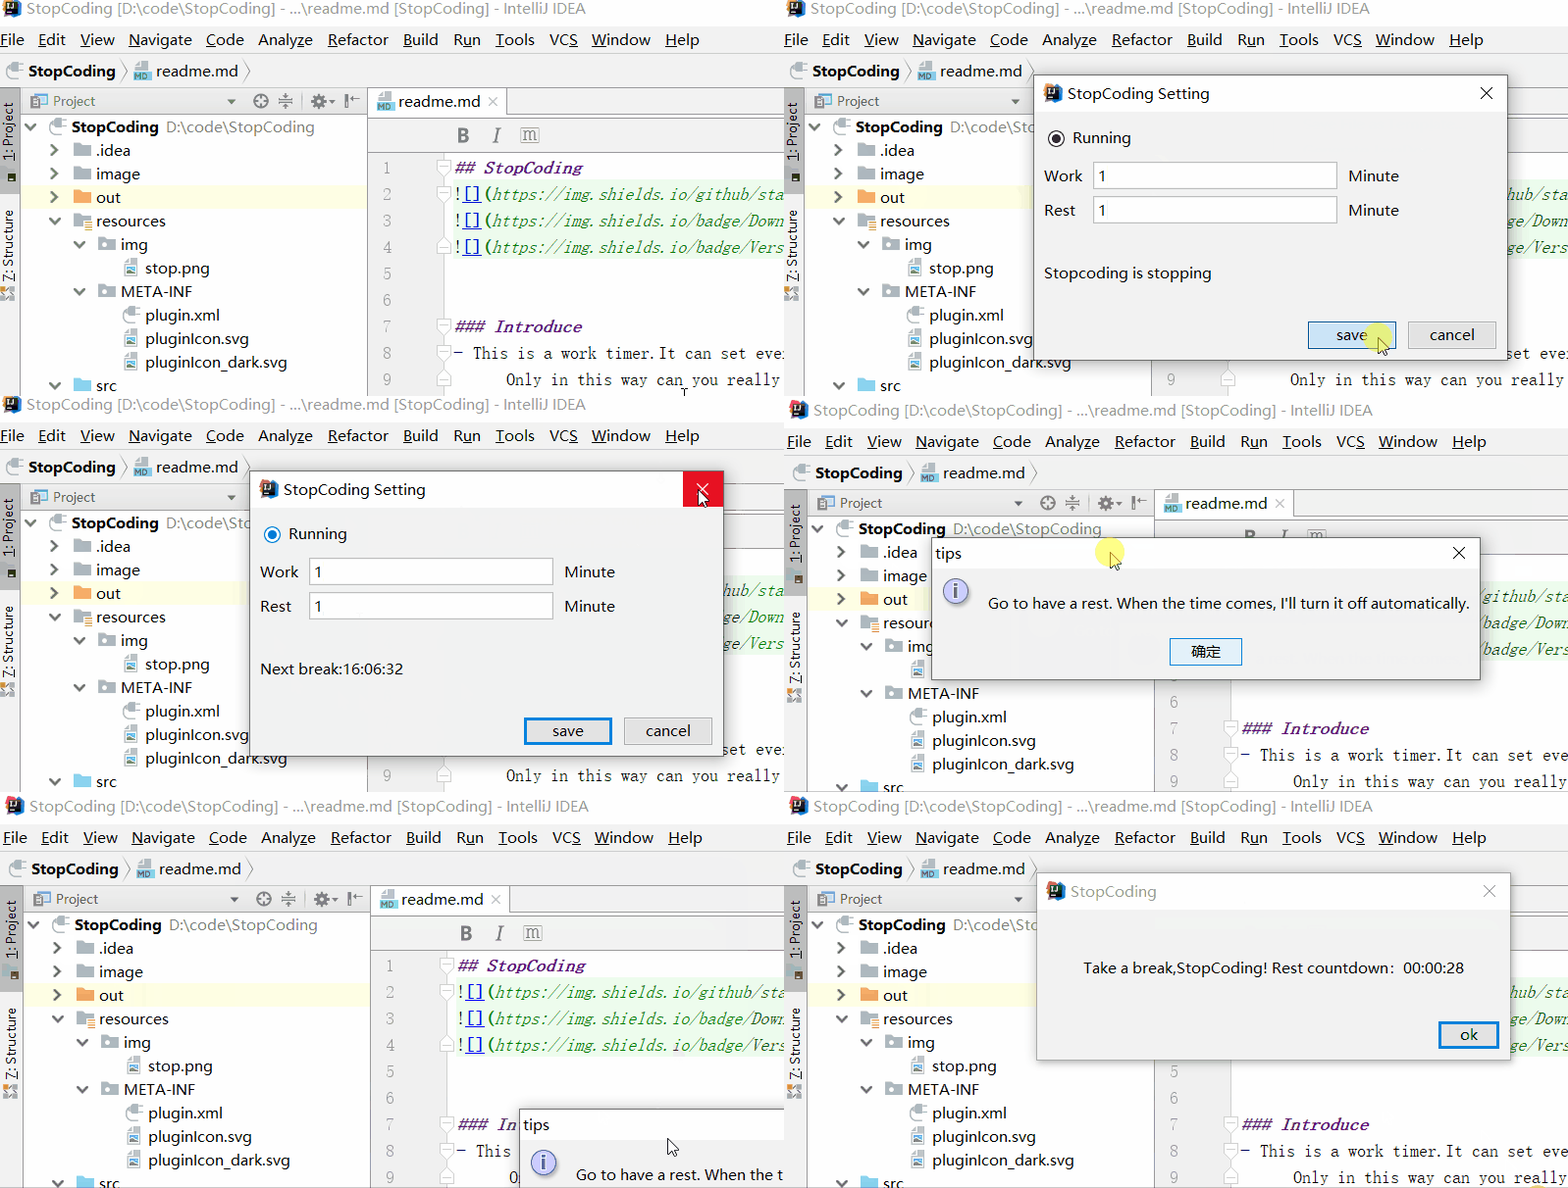
本文将从以下几个方面来进行 IDEA 插件开发及 StopCoding 的实现介绍:
IntelliJ IDEA 与 IntelliJ Platform
开发环境搭建
开发的一个简单的插件
StopCoding原理及源码解析

IntelliJ IDEA 简称 IDEA,是 Jetbrains 公司旗下的一款 JAVA 开发工具,支持 Java、Scala、Groovy 等语言的开发,同时具备支持目前主流的技术和框架,擅长于企业应用、移动应用和 Web 应用的开发,提供了丰富的功能,智能代码助手、代码自动提示、重构、J2EE 支持、各类版本工具(git、svn等)、JUnit、CVS 整合、代码分析、 创新的 GUI 设计等。
IntelliJ Platform 是一个构建 IDE 的开源平台,基于它构建的 IDE 有 IntelliJ IDEA、WebStorm、DataGrip、以及 Android Studio 等等。IDEA 插件也是基于 IntelliJ Platform 开发的。

官方开发文档 IntelliJ Platform SDK:
https://plugins.jetbrains.com/docs/intellij/welcome.html
开发工具使用 Intellij IDEA,下载地址:
https://www.jetbrains.com/idea/
IDEA 分为两个版本:
社区版(Community):完全免费,代码开源,但是缺少一些旗舰版中的高级特性。
旗舰版(Ultimate):30 天免费,支持全部功能,代码不开源。
开发 IDEA 的插件推荐使用社区版,因为社区版是开源的,在开发插件的时候,可以调试源代码。

官方文档指导给出了两种开发方式:
Gradle
DevKit
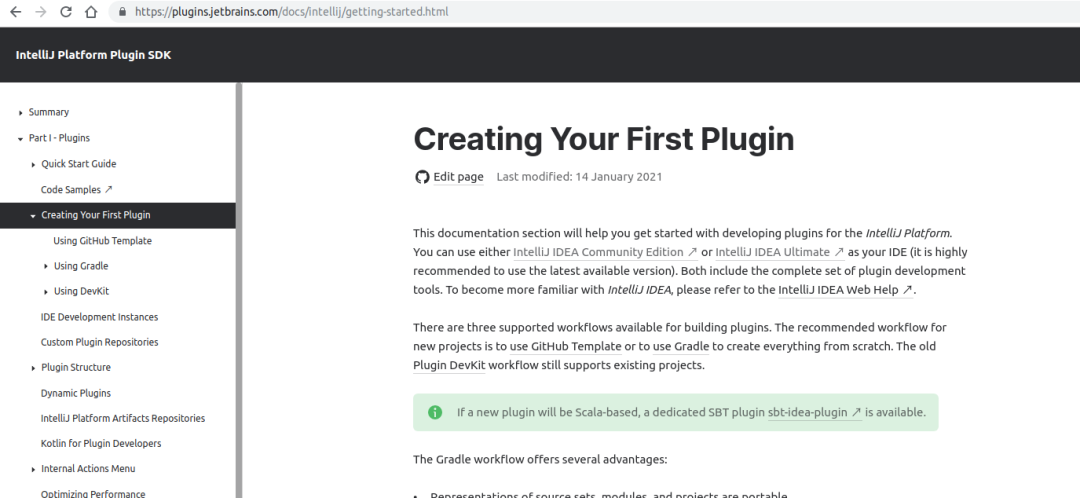
新建工程目录如下:
 1my_gradle_plugin
 2├── build.gradle
 3├── gradle
 4│   └── wrapper
 5│       ├── gradle-wrapper.jar
 6│       └── gradle-wrapper.properties
 7├── gradlew
 8├── gradlew.bat
 9├── settings.gradle
10└── src
11├── main
12│   ├── java
13│   └── resources
14│       └── META-INF
15│           └── plugin.xml
16└── test
17    ├── java
18    └── resources
<左右滑动以查看完整代码>
根目录 build.gradle 配置内容如下:
 1plugins {
 2    id 'java'
 3    id 'org.jetbrains.intellij' version '0.6.5'
 4}
 5
 6group 'com.your.company'
 7version '1.0'
 8sourceCompatibility = 1.8
 9
10repositories {
11      mavenCentral()
12}
13dependencies {
14    testImplementation group: 'junit', name: 'junit', version: '4.12'
15}
16
17// See https://github.com/JetBrains/gradle-intellij-plugin/
18intellij {
19    version '2020.1'
20}
21patchPluginXml {
22    changeNotes """
23      Add change notes here.<br/>
24      <em>most HTML tags may be usedem>"""
25}
<左右滑动以查看完整代码>
Gradle 类型工程 Running 方式:
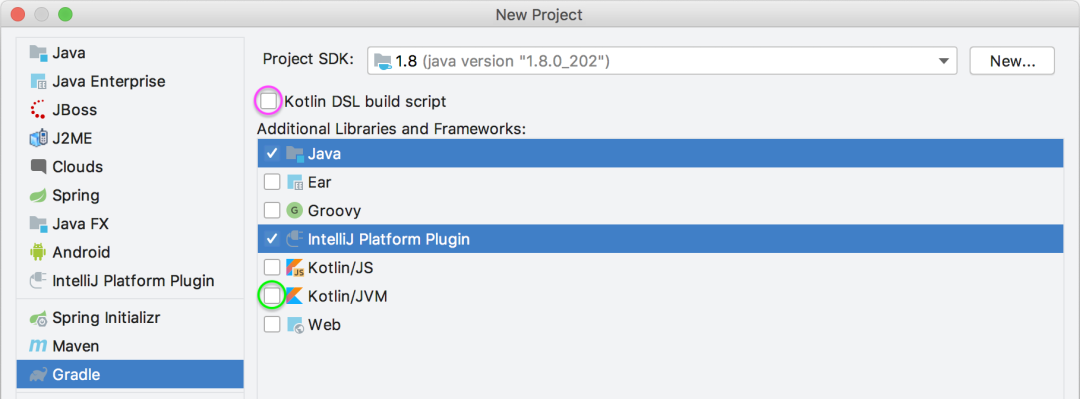
推荐使用 gradle 方式开发插件,gradle 方式对本地环境要求较低,不需要去配置复杂的 sdk 等相关内容。
启用 Plugin DevKit
Plugin DevKit 是 IntelliJ 的一个插件,它使用 IntelliJ IDEA 自己的构建系统来为开发 IDEA 插件提供支持。开发 IDEA 插件之前需要安装并启用 Plugin DevKit 。
打开 IDEA,导航到 Settings | Plugins,若插件列表中没有 Plugin DevKit,点击 Install JetBrains plugin,搜索并安装。
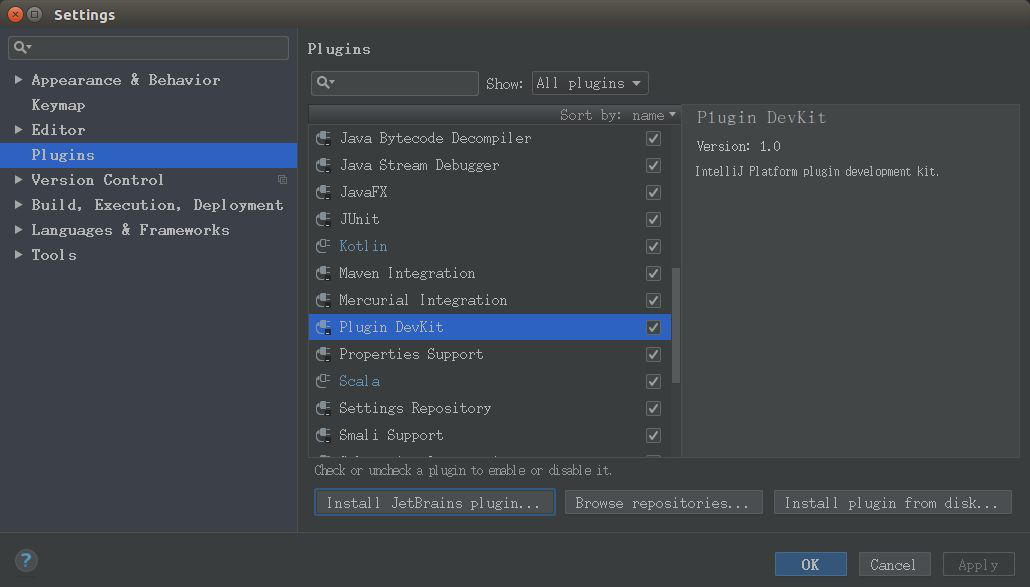
配置 IntelliJ Platform Plugin SDK
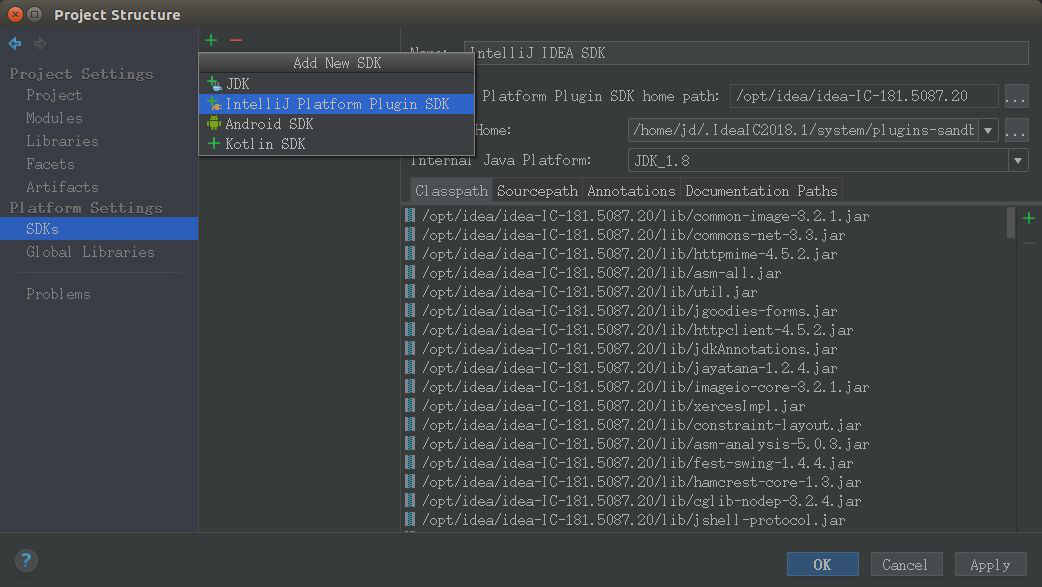
导航到 File | Project Structure,选择对话框左侧栏 Platform Settings 下的 SDKs
点击 + 按钮,先选择 JDK,指定 JDK 的路径;再创建 IntelliJ Platform Plugin SDK,指定 home path 为 IDEA 的安装路径,如图:
这里示例用官方 action 增加一个简单的 action 作为示例,原地址如下:
https://plugins.jetbrains.com/docs/intellij/working-with-custom-actions.html#developing-the-anaction-methods
1、定义action
定义一个 Java class,继承 AnAction 类,并重写 actionPerformed 方法, 如:
 1public class PopupDialogAction extends AnAction {
 2    @Override
 3    public void actionPerformed(@NotNull AnActionEvent event) {
 4// Using the event, create and show a dialog
 5        Project currentProject = event.getProject();
 6        StringBuffer dlgMsg = new StringBuffer(event.getPresentation().getText() + " Selected!");
 7        String dlgTitle = event.getPresentation().getDescription();
 8        // If an element is selected in the editor, add info about it.
 9        Navigatable nav = event.getData(CommonDataKeys.NAVIGATABLE);
10        if (nav != null) {
11        dlgMsg.append(String.format("\nSelected Element: %s", nav.toString()));
12        }
13        Messages.showMessageDialog(currentProject, dlgMsg.toString(), dlgTitle, Messages.getInformationIcon());
14     }
15}
<左右滑动以查看完整代码>
2、注册 Action
在 plugin.xml 文件的 元素内注册。
 1<action< span=""> id="org.intellij.sdk.action.PopupDialogAction" class="org.intellij.sdk.action.PopupDialogAction"
 2    text="Action Basics Plugin: Pop Dialog Action" description="SDK action example" icon="SdkIcons.Sdk_default_icon">
 3
 4   <override-< span="">text place="MainMenu" text="Pop Dialog Action"/>
 5
 6   <keyboard-shortcut< span=""> first-keystroke="control alt A" second-keystroke="C" keymap="$default"/>
 7
 8   <mouse-shortcut< span=""> keystroke="control button3 doubleClick" keymap="$default"/>
 9
10   <add-< span="">to-group group-id="ToolsMenu" anchor="first"/>
11
12  </action>
<左右滑动以查看完整代码>
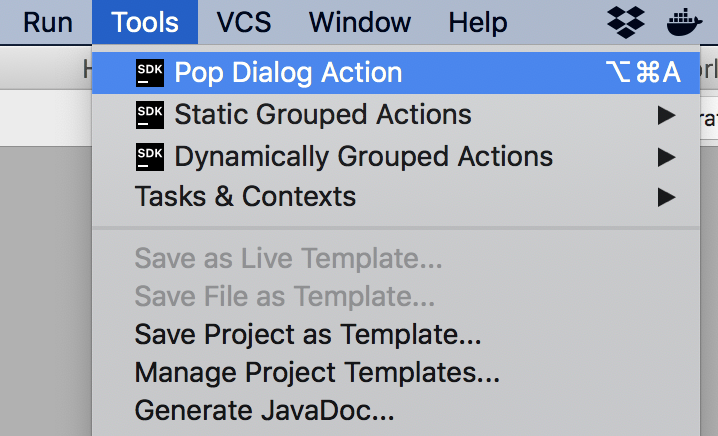
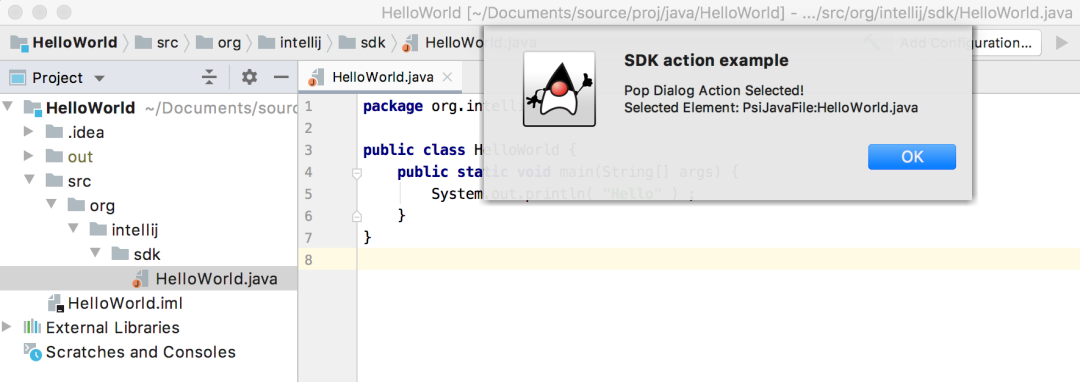
上面示例会定义一个被添加到 IDEA tools 菜单的第一个位置(anchor=”first”)添加了”Pop Dialog Action”菜单,点击该菜单将弹出一个“Action Basics Plugin: Pop Dialog Action Selected!” item,如图:
点击该 “Pop Dialog Action” item,弹出一个提示输入名字的对话框。

开源地址:
https://github.com/jogeen/StopCoding.git
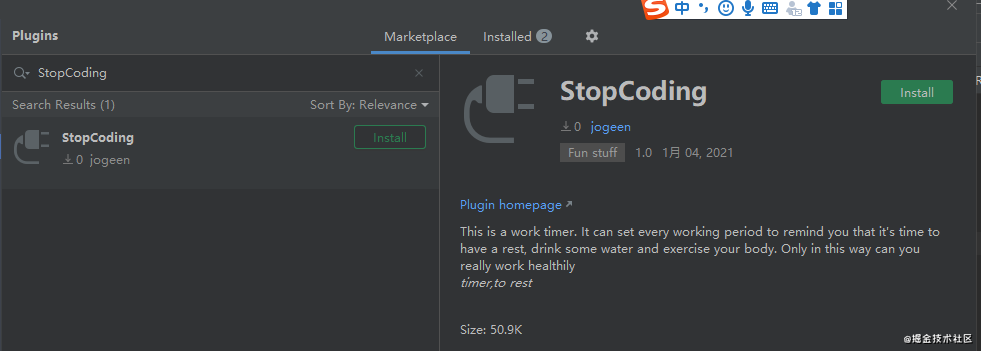
该插件已经上传插件市场,可下载体验:
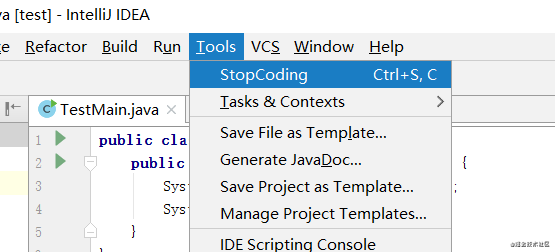
Step1. 然后在菜单栏中tools->StopCoding。
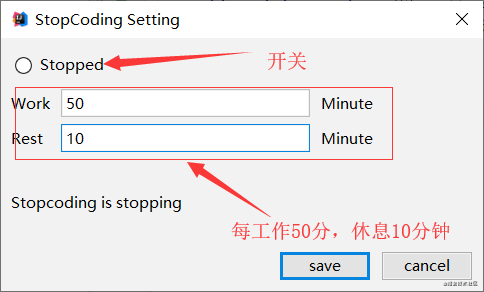
Step2. 设置适合你的参数然后保存。
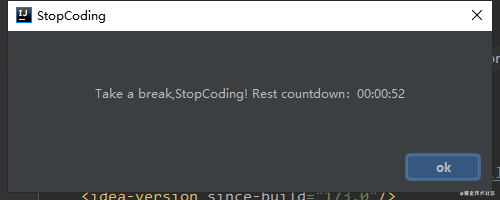
Step3. 快乐的Coding,再不用担心自己会“沉迷”了。工作时间结束,就会弹出下框进行提醒。当然,这个框是关不掉的。只有你休息了足够的时间它才会自动关闭。
工程结构分析:
 1.
 2├── image
 3│   ├── step1.png
 4│   ├── step2.png
 5│   ├── step3.png
 6│   └── step.gif
 7├── LICENSE
 8├── readme.md
 9├── readme_ZH.md
10├── resources
11│   ├── img
12│   │   └── stop.png
13│   └── META-INF
14│       ├── pluginIcon_dark.svg
15│       ├── pluginIcon.svg
16│       └── plugin.xml
17├── src
18│   └── icu
19│       └── jogeen
20│           └── stopcoding
21│               ├── data
22│               │   ├── DataCenter.java
23│               │   └── SettingData.java
24│               ├── service
25│               │   └── TimerService.java
26│               ├── StopCodingSettingAction.java
27│               ├── task
28│               │   ├── RestTask.java
29│               │   └── WorkTask.java
30│               └── ui
31│                   ├── SettingDialog.form
32│                   ├── SettingDialog.java
33│                   ├── TipsDialog.form
34│                   └── TipsDialog.java
35└── StopCoding.iml
<左右滑动以查看完整代码>
上图可以看到,工程结构十分的简单,基于devkit模式进行开发。
data 包
SettingData,配置信息对应 model。
DataCenter,作为运行时的数据中心,都是些静态的全局变量。
service
TimerService 这个定时计算的核心代码。
task
RestTask 休息时的定时任务。
WorkTask 工作时的定时任务。
ui
SettingDialog 设置信息的对话框。
TipsDialog 休息时提醒的对话框。
StopCodingSettingAction 启动入口的 action。
plugin.xml
这是插件工程的核心配置文件,里面每一项的都添加了详细的注释,有疑问的小伙伴可以在公众号后台留言,我们一起探讨。
 1<idea-plugin>
 2 <!-- 插件唯一id,不能和其他插件项目重复,所以推荐使用com.xxx.xxx的格式
 3   插件不同版本之间不能更改,若没有指定,则与插件名称相同 -->
 4  <id>icu.jogeen.StopCoding.id</id>
 5  <!-- 插件名称,别人在官方插件库搜索你的插件时使用的名称 -->
 6
 7  <name>StopCoding</name>
 8  <!-- 插件版本号 -->
 9
10  <version>1.2.1</version>
11  <!-- 供应商主页和email(不能使用默认值,必须修改成自己的)-->
12
13  <vendor email="jogeen@qq.com" url="https://github.com/jogeen/StopCoding">jogeen</vendor>
14
15  <!-- 插件的描述 (不能使用默认值,必须修改成自己的。并且需要大于40个字符)-->
16
17  <description><![CDATA[
18   <p>This is a work timer.It can set every working period to remind you that it's time to have a rest, drink some water and exercise your body.
19    Only in this way can you really work healthily</p>
20   <ol>
21      <li>In the tools menu bar, open stopcoding.</li>
22      <li>Set working hours and rest time, and save them.</li>
23      <li>When the set time comes, there will be a pop-up box to remind you to rest, so that you can not operate idea temporarily.</li>
24   </ol>
25   <hr>
26   <p>如果你也经常沉迷于写代码,忘了起身休息喝水,那么试试这个插件吧</p>
27    <ol>
28       <li>在菜单栏的Tools中,打开StopCoding插件进行设置</li>
29       <li>设置工作时间和休息时间,并且保存</li>
30       <li>当设置的时间一到,就会有弹框提醒你休息,让你暂时不能操作idea</li>
31   </ol>
32   <p>项目地址:<a href="https://github.com/jogeen/StopCoding">https://github.com/jogeen/StopCoding</p>
33   ]]></description>
34
35   <!-- 插件版本变更信息,支持HTML标签;
36        将展示在 settings | Plugins 对话框和插件仓库的Web页面 -->
37   <change-notes><![CDATA[
38     <ul>
39           <li>V1.2 add icon(Thanks for the icon provided by my good friend Hu Wei).</li>
40           <li>V1.1 update Guide to use.</li>
41           <li>V1.0 release.</li>
42       </ul>
43   ]]>
44   </change-notes>
45
46   <!-- 插件兼容IDEAbuild 号(最低版本号)-->
47   <idea-version since-build="173.0"/>
48   <!-- 插件所依赖的其他插件的id -->
49   <depends>com.intellij.modules.lang</depends>
50
51
52   <extensions defaultExtensionNs="com.intellij">
53     <!-- 声明该插件对IDEA core或其他插件的扩展 -->
54
55   </extensions>
56
57   <!-- 编写插件动作 -->
58   <actions>
59       <action id="StopCoding_setting_id" class="icu.jogeen.stopcoding.StopCodingSettingAction" text="StopCoding"
60               description="setting">
61           <add-to-group group-id="ToolsMenu" anchor="first"/>
62           <keyboard-shortcut keymap="$default" first-keystroke="ctrl S" second-keystroke="C"/>
63       </action>
64   </actions>
65
66</idea-plugin>
<左右滑动以查看完整代码>
从 public.xml 可以看出,这个插件比较简单,只有一个 StopCoding_setting_id 配置项,入口类也是
icu.jogeen.stopcoding.StopCodingSettingAction
1 public class StopCodingSettingAction extends AnAction {
2
3     @Override
4     public void actionPerformed(AnActionEvent e) {
5         SettingDialog settingDialog = new SettingDialog();
6         settingDialog.setVisible(true);
7     }
8}
<左右滑动以查看完整代码>
源码中只是展示了SettingDialog,基于Swing画了一个可视化界面。
icu.jogeen.stopcoding.ui.SettingDialog
 1//绑定确定按钮事件
 2    buttonOK.addActionListener(new ActionListener() {
 3        public void actionPerformed(ActionEvent e) {
 4            onOK();
 5        }
 6    });
 7    //绑定取消按钮事件
 8    buttonCancel.addActionListener(new ActionListener() {
 9        public void actionPerformed(ActionEvent e) {
10            onCancel();
11        }
12    });
13    //绑定关闭按钮事件
14    setDefaultCloseOperation(DO_NOTHING_ON_CLOSE);
15    addWindowListener(new WindowAdapter() {
16        public void windowClosing(WindowEvent e) {
17            onCancel();
18        }
19    });
20    contentPane.registerKeyboardAction(new ActionListener() {
21        public void actionPerformed(ActionEvent e) {
22            onCancel();
23        }
24    }, KeyStroke.getKeyStroke(KeyEvent.VK_ESCAPE, 0), JComponent.WHEN_ANCESTOR_OF_FOCUSED_COMPONENT);
25    //绑定启用选择按钮时间
26    openRbtn.addChangeListener(new ChangeListener() {
27        @Override
28        public void stateChanged(ChangeEvent e) {
29            openRbtn.setText(openRbtn.isSelected() ? "Running" : "Stopped");
30        }
31    });
<左右滑动以查看完整代码>
在 SettingDialog 中对事件进行了监听,其主要思路就是 schedule 去添加一个定时任务,和使用 cancel 去取消任务停止定时器。然后弹出一个 dialog 阻止持续 coding。

对大多数程序员来说,生活没那么多诗和远方,大部分是加不完的班,写不完的代码和修不完的 bug。相信有了这些基本介绍,感兴趣的小伙伴去看看源码,并尝试自己写一个小插件就没什么太大问题了,要知道程序员不止眼前的逻辑和代码,还应有健康的体魄和精气神。最后,希望这篇文章能帮到作为程序员的你,也希望大家都能做最好的自己。


