手把手教你Locust压测实践
做了半年压测,期间接触了不少压测工具,今天就分享下上周刚上手的locust压测工具,简单易于上手,看完本文应该都能用它来压测普通接口了。
1、概述
Locust是一款通过Python语言来编写压测脚本,且使用简单的分布式负载测试工具,完全基于事件,即一个locust节点也可以在一个进程中支持数千并发用户,不使用回调,通过gevent使用轻量级过程(即在自己的进程内运行)。
其中gevent是第三方库,通过greenlet实现协程,greenlet是python的并行处理的一个库。python 有一个非常有名的库叫做 stackless ,用来做并发处理, 主要是弄了个叫做tasklet的微线程的东西, 而greenlet 跟stackless的最大区别是greenlet需要你自己来处理线程切换, 就是说,你需要自己指定现在执行哪个greenlet再执行哪个greenlet。
2、特点
①、不需要编写笨重的UI或者臃肿的XML代码,基于协程而不是回调,脚本编写简单易读;
②、有一个基于web简洁的HTML+JS的UI用户界面,可以实时显示相关的测试结果;
③、支持分布式测试,用户界面基于网络,因此具有跨平台且易于扩展的特点;
④、所有繁琐的I / O和协同程序都被委托给gevent,替代其他工具的局限性;
3、locust与jmeter的区别
| 工具 | 区别 |
|---|---|
| jmeter | 需要在UI界面上通过选择组件来“编写”脚本,模拟的负载是线程绑定的,意味着模拟的每个用户,都需要一个单独的线程。单台负载机可模拟的负载数有限 |
| locust | 通过编写简单易读的代码完成测试脚本,基于事件,同样配置下,单台负载机可模拟的负载数大于jmeter |
4、locust的局限性
locust的局限性在于,目前其本身对测试过程的监控和测试结果展示,不如jmeter全面和详细,需要进行二次开发才能满足需求越来越复杂的性能测试需要。
运行大规模测试时,建议在Linux机器上执行,因为gevent在Windows下的性能很差。
5、测试脚本demo
下面的demo 是基于locust最新的v2.1.0版本,笔者在学习时,发现网上很多blog资料都已经过时了,所以在这里特别说明一下版本,因为2.1.0版本的API和脚本编写跟之前版本有较大差异。
最新版本可以参考官方的文档:https://docs.locust.io/en/stable/writing-a-locustfile.html
# 该demo适用于:locust v2.1.0
from locust import HttpUser, task, between, events
from locust.runners import MasterRunner

debug = False

@events.init.add_listener
def on_locust_init(environment, **kwargs):
    if isinstance(environment.runner, MasterRunner):
        print("I'm on master node")
    else:
        print("I'm on a worker or standalone node")

# 压测开始的时候执行
@events.test_start.add_listener
def on_test_start(environment, **kwargs):
    print("test is starting")

# 压测结束的时候执行
@events.test_stop.add_listener
def on_test_stop(environment, **kwargs):
    print("test is ending")

class HttpDemo(HttpUser):
    wait_time = between(0, 10)
    host = 'http://test.yourdns.com/api/query/12345'  # 示例地址是脱敏过的

    def on_start(self):
        # 每次任务开始的时候执行
        print("task start")

    def on_stop(self):
        # 每次任务执行完时执行
        print("task stop")

    '''例子'''

    @task
    def test(self):

        header = {
            "User-Agent": "Mozilla/5.0 (Windows NT 6.1; Win64; x64) AppleWebKit/537.36 (KHTML, like Gecko) Chrome/78.0.3904.108 Safari/537.36"}
        req = self.client.get(self.host, headers=header, verify=False)  # self.client调用get和post方法,和requests一样

        if req.status_code == 200: #这里的校验逻辑可以按需求写
            print("success")
        else:
            print("fails")

if __name__ == "__main__":
    # 调试模式,1s执行一次
    if debug:
        from locust.env import Environment
        my_env = Environment(user_classes=[HttpDemo])
        HttpDemo(my_env).run()
    else:
        import os
        #os.system("locust -f http_demo.py --host=http://lotcheck.woa.com")  # web console
        os.system("locust -f http_demo.py --host=http://test.yourdns.com HttpDemo --headless -u 1 -r 2 --run-time 10s")  # commandline启动
脚本说明:
1)新建一个类Demo(HttpUser),继承User,该类下面需要实现压测的相关逻辑,包含请求和校验;
2)实现用户行为:@task装饰该方法表示为用户行为,括号里面参数表示该行为的执行权重:数值越大,执行频率越高,不设置默认是1;
3)压测设置:
host:指向压测的host或url
wait_time:模拟负载的任务之间执行时等待时间的区间:单位:毫秒
默认情况下,时间是在区间之间随机选择,但是可以通过将wait_function设置为任意函数来使用任何用户定义的时间分布。
4) 任务的生命周期函数:
User on_start # user初始化的时候执行,只执行一次
User tasks…
User on_stop # user执行完时执行,只执行一次
此外压测的初始和结束时会调用的函数可以通过事件监听器来实现,如压测开始的on_test_start函数就是通过@events.test_start.add_listener、on_test_stop函数通过events.test_stop.add_listener
其他说明可以参考脚本中的注释说明
6、启动执行
locust提供了2种方式方式来启动执行:
1)web 控制台启动:
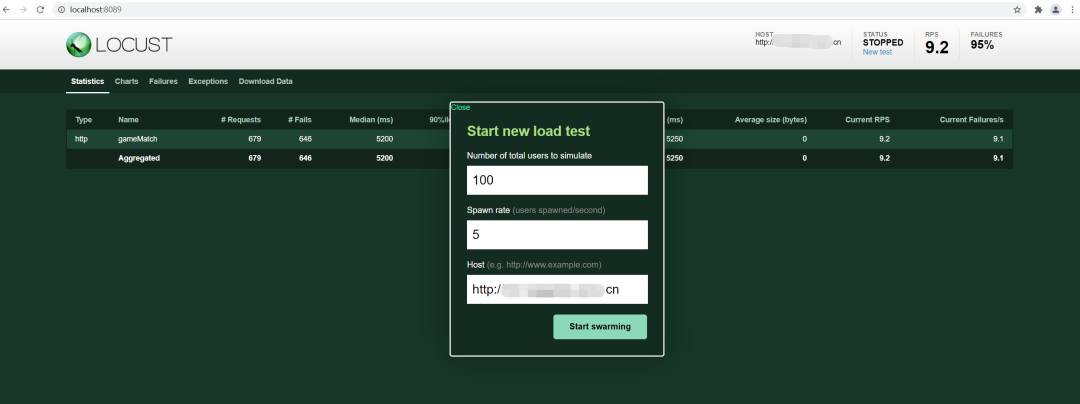
命令行执行:locust -f http_demo.py --host=https://test.yourdns.com,程序运行后可以在浏览器输入http://ip:8089(8089是该服务启动的端口号,本地启动的话就直接localhost:8089)打开web控制台,输入总的用户数和每秒的并发用户数,如下图:

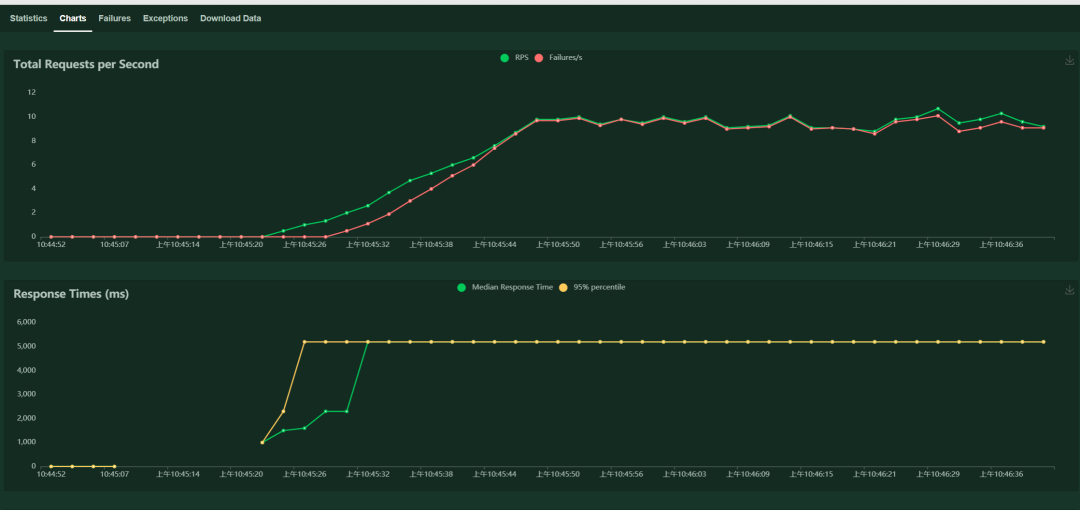
web控制台上的执行效果如下:

2)命令行启动(非web控制台触发执行):
执行命令行:locust -f http_demo.py --headless -u 10 -r 3 --run-time 10s
或者在代码中执行:
if __name__ == '__main__':
    import os
    os.system("locust -f http_demo.py --headless -u 10 -r 3 --run-time 10s")

参数说明:
--headless 无头模式,不显示UI
-f   locust_file.py文件(locust任务文件)
-u   指定要生成的Locust用户数
-r   每秒生成的用户数
--run-time 或-t   指定测试的运行时间
7、分布式模式启动
locust单机模式启动下,对于多核CPU仍不能完全利用,单机模式下的并发量维持在千级,再往上需要利用master-slave分布式模式,master节点负责分发和统计,slave节点负责并发执行。
分布式模式的使用也很简单,只需要在locust命令行中加上 --master 或 --worker即可,下面为了方便在同一台服务器上启动master和多个worker,自己写的一个shell启动脚本:
# master-slave分布式模式启动locust压测
echo "start master..."
nohup locust -f http_demo.py --master --host=https://test.yourdns.com EnterRoom --headless -u 5000 -r 100 --run-time 60s > main.log 2>&1 &

workerNum=2
echo "start worker, size=${workerNum}..."
for i in $( seq 1 ${workerNum})
do
  nohup locust -f http_demo.py --worker --master-host=9.111.12.120 --host=https://test.yourdns.com EnterRoom --headless > worker${i}.log 2>&1 &
  echo "output worker${i}.log"
done

echo "end..."
PS:再发个测试开发栈的专属微信群,欢迎大家加入交流:
