
高通 Camx 架构了解下(一)
和你一起终身学习,这里是程序员Android
通过阅读本文您将收获以下知识点:
一、camx 代码结构
二、camx 编译
三、camx 代码流程分析
四、camx 调试
一、camx 代码结构
目前主流的机型都使用camx架构,这个架构和之前架构的主要区别就是 芯片接口层的代码从hardware/qcom 迁移到 vendor/qcom/proprietary/下面,我们主要关注的camera hal层的源码也是放在vendor/qcom/proprietary/camx/下面。

二、camx 编译
camx的核心目录是 vendor/qcom/proprietary/camx/src/目录下面:
total 40
drwxrwxr-x 10 lxl lxl 4096  4月  4 10:52 ./
drwxrwxr-x  4 lxl lxl 4096  4月  4 10:52 ../
drwxrwxr-x  3 lxl lxl 4096  4月  4 10:52 chiiqutils/
drwxrwxr-x  7 lxl lxl 4096  4月  4 10:56 core/
drwxrwxr-x  7 lxl lxl 4096  4月  4 10:52 csl/
drwxrwxr-x 14 lxl lxl 4096  4月  4 10:52 hwl/
drwxrwxr-x  3 lxl lx 4096  4月  4 10:52 lib/
drwxrwxr-x  3 lxl lxl 4096  4月  4 10:52 osutils/
drwxrwxr-x 11 lxl lxl 4096  4月  4 10:52 swl/
drwxrwxr-x  3 lxl lxl 4096  4月  4 10:52 utils/
核心的Android.mk在 ./lib/build/android/Android.mk 中。
其中包括的静态库如下:
# Libraries to link
LOCAL_STATIC_LIBRARIES :=   \
    libcamxcore             \
    libcamxchi              \
    libcamxcsl              \
    libcamxofflinestats     \
    libnc                   \
    libcamxncs              \
    libifestriping          \
    libstriping

LOCAL_WHOLE_STATIC_LIBRARIES := \
    libcamxdspstreamer          \
    libcamxhwlbps               \
    libcamxgenerated            \
    libcamxhal                  \
    libcamxhalutils             \
    libcamxhwlfd                \
    libcamxhwlife               \
    libcamxhwlipe               \
    libcamxhwliqmodule          \
    libcamxswlfdmanager         \
    libcamxswljpeg              \
    libcamxhwljpeg              \
    libcamxhwllrme              \
    libcamxswlransac            \
    libcamxhwltitan17x          \
    libcamxiqsetting            \
    libcamxosutils              \
    libcamxstats                \
    libcamxsensor               \
    libcamxutils
这些静态库都是camx或者其他的目录下编译的,编译工程的时候,我们要先编译这些静态库,然后编译camx的动态库(/vendor/lib/hw/camera.qcom.so)。
三、camx 代码流程分析
camera.provider中如何实现到camera hal层的跳跃,camera service调用到camera provider中的接口方法,现在调用到 camera provider中的 hardware/interfaces/camera/device/3.2/default/CameraDeviceSession.cpp中的processCaptureRequest(...)方法,最终会调用到:
status_t ret = mDevice->ops->process_capture_request(mDevice, &halRequest);
这个mDevice->ops 就是 hardware/libhardware/include/hardware/camera3.h中的 camera3_device_ops 结构体:(参考:https://www.jianshu.com/p/099cc3b0ab25)
typedef struct camera3_device_ops {
    int (*initialize)(const struct camera3_device *,
            const camera3_callback_ops_t *callback_ops);
    int (*configure_streams)(const struct camera3_device *,
            camera3_stream_configuration_t *stream_list);
    int (*register_stream_buffers)(const struct camera3_device *,
            const camera3_stream_buffer_set_t *buffer_set);
    const camera_metadata_t* (*construct_default_request_settings)(
            const struct camera3_device *,
            int type);
    int (*process_capture_request)(const struct camera3_device *,
            camera3_capture_request_t *request);
    void (*get_metadata_vendor_tag_ops)(const struct camera3_device*,
            vendor_tag_query_ops_t* ops);
    void (*dump)(const struct camera3_device *, int fd);
    int (*flush)(const struct camera3_device *);

    /* reserved for future use */
    void *reserved[8];
} camera3_device_ops_t;
camera3_device_ops_t 映射函数指针操作: hardware/libhardware/modules/camera/3_0/Camera.cpp
const camera3_device_ops_t Camera::sOps = {
    .initialize = default_camera_hal::initialize,
    .configure_streams = default_camera_hal::configure_streams,
    .register_stream_buffers = default_camera_hal::register_stream_buffers,
    .construct_default_request_settings
        = default_camera_hal::construct_default_request_settings,
    .process_capture_request = default_camera_hal::process_capture_request,
    .get_metadata_vendor_tag_ops = NULL,
    .dump = default_camera_hal::dump,
    .flush = default_camera_hal::flush,
    .reserved = {0},
};
这样找到在camera hal层的函数指针的映射关系。
映射到:vendor/qcom/proprietary/camx/src/core/hal/camxhal3entry.cpp中的static Dispatch g_dispatchHAL3(&g_jumpTableHAL3);:
/// Array containing camera3_device_ops_t methods
static camera3_device_ops_t g_camera3DeviceOps =
{
    CamX::initialize,
    CamX::configure_streams,
    NULL,
    CamX::construct_default_request_settings,
    CamX::process_capture_request,
    NULL,
    CamX::dump,
    CamX::flush,
    {0},
};
定义了g_camera3DeviceOps变量:
/// Array containing camera3_device_ops_t methods
static camera3_device_ops_t g_camera3DeviceOps =
{
    CamX::initialize,
    CamX::configure_streams,
    NULL,
    CamX::construct_default_request_settings,
    CamX::process_capture_request,
    NULL,
    CamX::dump,
    CamX::flush,
    {0},
};
并在\vendor\qcom\proprietary\camx\src\core\hal\camxhaldevice.cpp的Initialize方法中通过GetCamera3DeviceOps获取,建立联系:
CamxResult HALDevice::Initialize(
    const HwModule* pHwModule,
    UINT32          cameraId)
{
    CamxResult result = CamxResultSuccess;

    m_cameraId = cameraId;

    if (CamxResultSuccess == result)
    {
        m_camera3Device.hwDevice.tag     = HARDWARE_DEVICE_TAG; /// @todo (CAMX-351) Get from local macro
        m_camera3Device.hwDevice.version = CAMERA_DEVICE_API_VERSION_3_3;
        m_camera3Device.hwDevice.close   = reinterpret_cast<CloseFunc>(GetHwDeviceCloseFunc());
        m_camera3Device.pDeviceOps       = reinterpret_cast<Camera3DeviceOps*>(GetCamera3DeviceOps());
        m_camera3Device.pPrivateData     = this;
        // NOWHINE CP036a: Need exception here
        m_camera3Device.hwDevice.pModule = const_cast<HwModule*>(pHwModule);

        m_HALCallbacks.ProcessCaptureResult = ProcessCaptureResult;
        m_HALCallbacks.NotifyResult         = Notify;
        CamX::ChiOverrideBypass(&m_HALCallbacks);
    }

    m_pHALSession = NULL;
    Utils::Memset(m_flushRequest, 0, sizeof(m_flushRequest));

    return result;
}
看一下g_jumpTableHAL3 变量:在 vendor/qcom/proprietary/camx/src/core/hal/camxhal3.cpp 中定义的:
////////////////////////////////////////////////////////////////////////////////////////////////////////////////////////////////
// Jump table for HAL3
////////////////////////////////////////////////////////////////////////////////////////////////////////////////////////////////
JumpTableHAL3 g_jumpTableHAL3 =
{
    open,
    get_number_of_cameras,
    get_camera_info,
    set_callbacks,
    get_vendor_tag_ops,
    open_legacy,
    set_torch_mode,
    init,
    parallelQuery,
    setCallBack,
    get_tag_count,
    get_all_tags,
    get_section_name,
    get_tag_name,
    get_tag_type,
    close,
    initialize,
    configure_streams,
    construct_default_request_settings,
    process_capture_request,
    dump,
    flush,
    camera_device_status_change,
    torch_mode_status_change,
    process_capture_result,
    notify
};
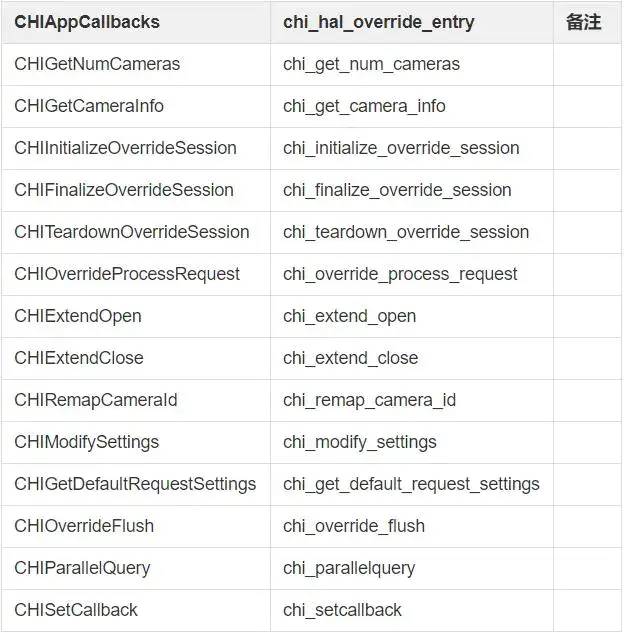
这儿直接构成了指针函数的映射关系(对应camxhaldevice.cpp中的函数)。vendor/qcom/proprietary/camx/src/core/chi/camxchitypes.h中定义了CHIAppCallbacks结构体,如下:
struct CHIAppCallbacks
{
    /// @brief Called by the driver to get number of cameras
    INT(*CHIGetNumCameras)(
        UINT32* pNumFwCameras,
        UINT32* pNumLogicalCameras);

    /// @brief Called by the driver to get the camera info for the camera id
    CamxResult (*CHIGetCameraInfo)(
        UINT32      cameraId,
        CameraInfo* pCameraInfo);

    /// @brief Defines the prototype for the device status change callback method from to the framework. Please refer to
    ///        the camera_device_status_change documentation in hardware/camera_common.h.
    VOID (*CHIInitializeOverrideSession)(
        UINT32               cameraId,
        const Camera3Device* pCamera3Device,
        const HALCallbacks*  pHALCallbacks,
        Camera3StreamConfig* pStreamConfig,
        BOOL*                isOverrideEnabled,
        VOID**               ppPrivate);

    /// @brief Defines the prototype for the torch mode status change callback method from to the framework. Please refer to
    ///        the torch_mode_status_change documentation in hardware/camera_common.h.
    VOID (*CHIFinalizeOverrideSession)(
        const Camera3Device* pCamera3Device,
        UINT64*              pSession,
        VOID**               ppPrivate);

    /// @brief Called by the driver to inform about session closing
    VOID (*CHITeardownOverrideSession)(
        const Camera3Device* pCamera3Device,
        UINT64*              pSession,
        VOID*                pPrivate);

    /// @brief Called by the driver to pass on capture request call to CHI
    INT (*CHIOverrideProcessRequest)(
        const Camera3Device*    pCamera3Device,
        Camera3CaptureRequest*  pCaptureRequest,
        VOID*                   pPrivate);

    /// @brief Called by the driver to allow for additional override processing during open()
    INT(*CHIExtendOpen)(
        UINT32  cameraId,
        VOID*   pPrivateData);

    /// @brief Called by the driver to allow for additional override processing during close()
    INT(*CHIExtendClose)(
        UINT32  cameraId,
        VOID*   pPrivateData);

    /// @brief Called by the driver to allow override to remap special camera IDs into logical camera IDs
    UINT32(*CHIRemapCameraId)(
        UINT32              frameworkCameraId,
        CameraIdRemapMode   mode);

    /// @brief Interface to allow various override-specific settings to be toggled.
    UINT32(*CHIModifySettings)(
        VOID*   pPrivateData);

    /// @brief Get any vendor tag specific request settings the override wants to get added to the default settings
    VOID (*CHIGetDefaultRequestSettings)(
        UINT32           frameworkCameraId,
        INT              requestTemplate,
        const Metadata** pAdditionalMetadata);

    /// @brief Called by the driver to allow for flush()
    INT(*CHIOverrideFlush)(
        const Camera3Device*    pCamera3Device);
    INT(*CHIParallelQuery) (INT num, char* list[]);
    INT(*CHISetCallback) (void*);

};

typedef VOID(*CHIHALOverrideEntry)(CHIAppCallbacks* pCHIAppCallbacks);
这个结构体是函数指针,映射关系:vendor/qcom/proprietary/camx/src/core/hal/camxhal3module.h中定义了 CHIAppCallbacks m_ChiAppCallbacks;
CHIAppCallbacks m_ChiAppCallbacks; ///< CHI HAL override entry
vendor/qcom/proprietary/camx/src/core/hal/camxhal3module.cpp中的 HAL3Module构造函数中,存在下面的执行语句:
CHIHALOverrideEntry funcCHIHALOverrideEntry =
    reinterpret_cast<CHIHALOverrideEntry>(
        CamX::OsUtils::LibGetAddr(m_hChiOverrideModuleHandle, "chi_hal_override_entry"));

if (NULL != funcCHIHALOverrideEntry)
{
    funcCHIHALOverrideEntry(&m_ChiAppCallbacks); //对应到 chxextensioninterface.cpp 中的chi_hal_override_entry函数

    CAMX_ASSERT(NULL != m_ChiAppCallbacks.CHIGetNumCameras);
    CAMX_ASSERT(NULL != m_ChiAppCallbacks.CHIGetCameraInfo);
    CAMX_ASSERT(NULL != m_ChiAppCallbacks.CHIFinalizeOverrideSession);
    CAMX_ASSERT(NULL != m_ChiAppCallbacks.CHIInitializeOverrideSession);
    CAMX_ASSERT(NULL != m_ChiAppCallbacks.CHIOverrideProcessRequest);
    CAMX_ASSERT(NULL != m_ChiAppCallbacks.CHIOverrideFlush);
    CAMX_ASSERT(NULL != m_ChiAppCallbacks.CHITeardownOverrideSession);
    CAMX_ASSERT(NULL != m_ChiAppCallbacks.CHIExtendOpen);
    CAMX_ASSERT(NULL != m_ChiAppCallbacks.CHIExtendClose);
    CAMX_ASSERT(NULL != m_ChiAppCallbacks.CHIRemapCameraId);
    CAMX_ASSERT(NULL != m_ChiAppCallbacks.CHIModifySettings);
    CAMX_ASSERT(NULL != m_ChiAppCallbacks.CHIParallelQuery);
    CAMX_ASSERT(NULL != m_ChiAppCallbacks.CHISetCallback);

    if ((NULL != m_ChiAppCallbacks.CHIGetNumCameras)             &&
        (NULL != m_ChiAppCallbacks.CHIGetCameraInfo)             &&
        (NULL != m_ChiAppCallbacks.CHIFinalizeOverrideSession)   &&
        (NULL != m_ChiAppCallbacks.CHIInitializeOverrideSession) &&
        (NULL != m_ChiAppCallbacks.CHIOverrideProcessRequest)    &&
        (NULL != m_ChiAppCallbacks.CHIOverrideFlush)             &&
        (NULL != m_ChiAppCallbacks.CHITeardownOverrideSession)   &&
        (NULL != m_ChiAppCallbacks.CHIExtendOpen)                &&
        (NULL != m_ChiAppCallbacks.CHIExtendClose)               &&
        (NULL != m_ChiAppCallbacks.CHIRemapCameraId)             &&
        (NULL != m_ChiAppCallbacks.CHIModifySettings)            &&
        (NULL != m_ChiAppCallbacks.CHIParallelQuery)             &&
        (NULL != m_ChiAppCallbacks.CHISetCallback))
    {
        CAMX_LOG_WARN(CamxLogGroupHAL, "CHI Module library function pointers exchanged");
    }
}
m_ChiAppCallbacks 通过 funcCHIHALOverrideEntry 映射到 chi_hal_override_entry这个 chi_hal_override_entry 就是指vendor/qcom/proprietary/chi-cdk/vendor/chioverride/default/chxextensioninterface.cpp中的 chi_hal_override_entry 函数,如下:
void chi_hal_override_entry(
    chi_hal_callback_ops_t* callbacks)
{
    ExtensionModule* pExtensionModule = ExtensionModule::GetInstance();

    CHX_ASSERT(NULL != callbacks);

    if (NULL != pExtensionModule)
    {
        callbacks->chi_get_num_cameras              = chi_get_num_cameras;
        callbacks->chi_get_camera_info              = chi_get_camera_info;
        callbacks->chi_initialize_override_session  = chi_initialize_override_session;
        callbacks->chi_finalize_override_session    = chi_finalize_override_session;
        callbacks->chi_override_process_request     = chi_override_process_request;
        callbacks->chi_teardown_override_session    = chi_teardown_override_session;
        callbacks->chi_extend_open                  = chi_extend_open;
        callbacks->chi_extend_close                 = chi_extend_close;
        callbacks->chi_remap_camera_id              = chi_remap_camera_id;
        callbacks->chi_modify_settings              = chi_modify_settings;
        callbacks->chi_get_default_request_settings = chi_get_default_request_settings;
        callbacks->chi_override_flush               = chi_override_flush;
        callbacks->chi_parallelquery                = chi_parallelquery;
        callbacks->chi_setcallback                  = chi_setcallback;
    }
}
这样就建立了 CHIAppCallbacks 中函数指针的一一映射关系。
vendor/qcom/proprietary/chi-cdk/vendor/chioverride/default/chxextensionmodule.cpp 中的 ExtensionModule::OverrideProcessRequest 函数中执行了 m_pUsecaseFactory->CreateUsecaseObject,如下:
m_pSelectedUsecase[logicalCameraId] =
            m_pUsecaseFactory->CreateUsecaseObject(&m_logicalCameraInfo[logicalCameraId],
                static_cast<UsecaseId>(m_SelectedUsecaseId[logicalCameraId]),
                m_pStreamConfig[logicalCameraId]);
直接调用到:vendor/qcom/proprietary/chi-cdk/vendor/chioverride/default/chxusecaseutils.cpp中的 UsecaseFactory::CreateUsecaseObject 函数:
Usecase* UsecaseFactory::CreateUsecaseObject(
    LogicalCameraInfo*              pLogicalCameraInfo,     ///< camera info
    UsecaseId                       usecaseId,              ///< Usecase Id
    camera3_stream_configuration_t* pStreamConfig)          ///< Stream config
{
    Usecase* pUsecase  = NULL;
    UINT     camera0Id = pLogicalCameraInfo->ppDeviceInfo[0]->cameraId;
    CHX_LOG_ERROR("UsecaseFactory::CreateUsecaseObject id = %d", usecaseId);
    switch (usecaseId)
    {
        case UsecaseId::PreviewZSL:
            pUsecase = AdvancedCameraUsecase::Create(pLogicalCameraInfo, pStreamConfig, usecaseId);
            break;
        case UsecaseId::MultiCamera:
            pUsecase = UsecaseMultiCamera::Create(pLogicalCameraInfo, pStreamConfig);
            break;
        case UsecaseId::MultiCameraVR:
            pUsecase = UsecaseMultiVRCamera::Create(pLogicalCameraInfo, pStreamConfig);
            break;
        case UsecaseId::MFNR:
            pUsecase = UsecaseMFNR::Create(camera0Id, pStreamConfig);
            break;
        case UsecaseId::QuadCFA:
            pUsecase = UsecaseQuadCFA::Create(pLogicalCameraInfo, pStreamConfig);
            break;
        case UsecaseId::Torch:
            pUsecase = UsecaseTorch::Create(camera0Id, pStreamConfig);
            break;
        default:
            pUsecase = AdvancedCameraUsecase::Create(pLogicalCameraInfo, pStreamConfig, usecaseId);
            break;
    }

    return pUsecase;
}
enum class UsecaseId
{
    NoMatch         = 0,
    Default         = 1,
    Preview         = 2,
    PreviewZSL      = 3,
    MFNR            = 4,
    MFSR            = 5,
    MultiCamera     = 6,
    QuadCFA         = 7,
    RawJPEG         = 8,
    MultiCameraVR   = 9,
    Torch           = 10,
    YUVInBlobOut    = 11,
    MaxUsecases     = 12,
};
前置摄像头的UsecaseId是 PreviewZSL,是单摄,后置摄像头的UsecaseId是 MultiCamera,是多摄。
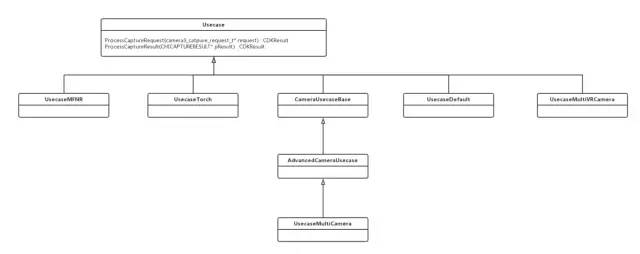
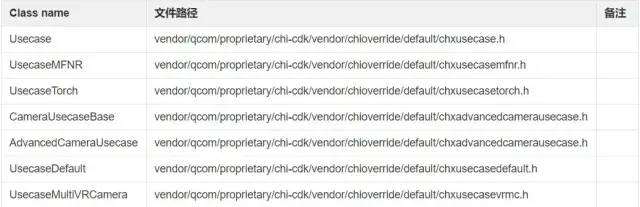
camx-usecase
vendor/qcom/proprietary/camx/src/core/chi/camxchi.cpp中的 ChiEntry函数如下:
////////////////////////////////////////////////////////////////////////////////////////////////////////////////////////////////
/// ChiEntry
////////////////////////////////////////////////////////////////////////////////////////////////////////////////////////////////
CAMX_VISIBILITY_PUBLIC VOID ChiEntry(
    ChiContextOps* pChiContextOps)
{
    if (NULL != pChiContextOps)
    {
        pChiContextOps->size                       = sizeof(ChiContextOps);

        pChiContextOps->majorVersion               = CHI_API_MAJOR_VERSION;
        pChiContextOps->minorVersion               = CHI_API_MINOR_VERSION;
        pChiContextOps->pOpenContext               = CamX::ChiOpenContext;
        pChiContextOps->pCloseContext              = CamX::ChiCloseContext;
        pChiContextOps->pGetNumCameras             = CamX::ChiGetNumCameras;
        pChiContextOps->pGetCameraInfo             = CamX::ChiGetCameraInfo;
        pChiContextOps->pEnumerateSensorModes      = CamX::ChiEnumerateSensorModes;
        pChiContextOps->pCreatePipelineDescriptor  = CamX::ChiCreatePipelineDescriptor;
        pChiContextOps->pDestroyPipelineDescriptor = CamX::ChiDestroyPipelineDescriptor;
        pChiContextOps->pCreateSession             = CamX::ChiCreateSession;
        pChiContextOps->pDestroySession            = CamX::ChiDestroySession;
        pChiContextOps->pFlushSession              = CamX::ChiFlushSession;
        pChiContextOps->pActivatePipeline          = CamX::ChiActivatePipeline;
        pChiContextOps->pDeactivatePipeline        = CamX::ChiDeactivatePipeline;
        pChiContextOps->pSubmitPipelineRequest     = CamX::ChiSubmitPipelineRequest;
        pChiContextOps->pTagOps                    = CamX::ChiGetTagOps;
    }

    // This is the workaround for presil HAL3test on Windows
    // On Device, set_camera_metadata_vendor_ops will be call the set the
    // static vendor tag operation in camera_metadata.c
    //
    // On Windows side, theoretically hal3test should mimic what Android framework
    // does and call the set_camera_metadata_vendor_ops function in libcamxext library
    // However, in Windows, if both hal3test.exe and hal.dll link to libcamxext library,
    // there are two different instance of static varibles sit in different memory location.
    // Even if set_camera_metadata_vendor_ops is called in hal3test, when hal try to
    // access to vendor tag ops, it is still not set.
    //
    // This is also a workaround to call vendor tag ops in Chi at GetNumCameras which happens to get called before
    // GetVendorTagOps
    CamX::g_vendorTagOps.get_all_tags     = CamX::ChiGetAllTags;
    CamX::g_vendorTagOps.get_section_name = CamX::ChiGetSectionName;
    CamX::g_vendorTagOps.get_tag_count    = CamX::ChiGetTagCount;
    CamX::g_vendorTagOps.get_tag_name     = CamX::ChiGetTagName;
    CamX::g_vendorTagOps.get_tag_type     = CamX::ChiGetTagType;

    set_camera_metadata_vendor_ops(&(CamX::g_vendorTagOps));
}
这个函数映射关系很重要,也在camx chi中比较常见,直接映射在此文件的CamxChi类中。都是从 vendor/qcom/proprietary/chi-cdk/vendor/chioverride/default/chxextensionmodule.cpp中调用过来的。
下面是预览时capture request 处理流程图:
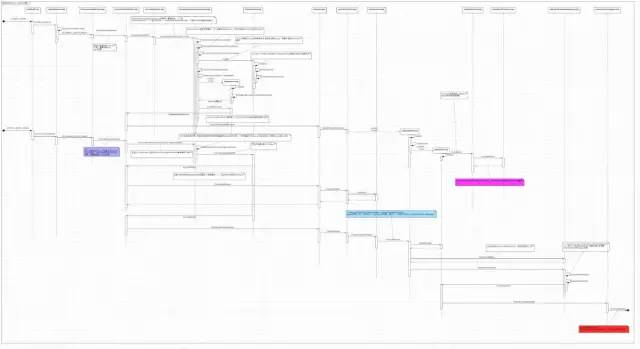
check这段流程的时候我们最关注应该是5个重要的处理类型:
1.UseCase
vendor/qcom/proprietary/chi-cdk/vendor/chioverride/default/chxusecase.h上面有介绍类图。UseCase在camx中很有很多衍生类,这是camx针对不同的stream来建立不同的usecase对象,用来管理选择feature,并且创建 pipeline以及session。2.ChiFeature
vendor/qcom/proprietary/chi-cdk/vendor/chioverride/default/chxfeature.h, usecase选择相应的feature,关联一组pipeline,收到request请求,根据request选择对应的feature。3.Node
vendro/qcom/propriatary/camx/src/core/camxnode.h,下面有类图。Node是camx中非常重要的一个父类,是camx中处理camera 请求的一个中间节点,用于处理pipeline下发的请求,下面有类图介绍,比较重要**的Node子类已经标出来了。4.pipeline
一连串node的集合,通过pipeline下发给各个node处理。5.session
若干个有关联的pipeline的集合,用来管理pipeline,使用pipeline处理请求。
注:Node 节点在camx chi架构中至关重要,数据的处理都是通过封装好的Node节点来进行的。

camxnode结构图:
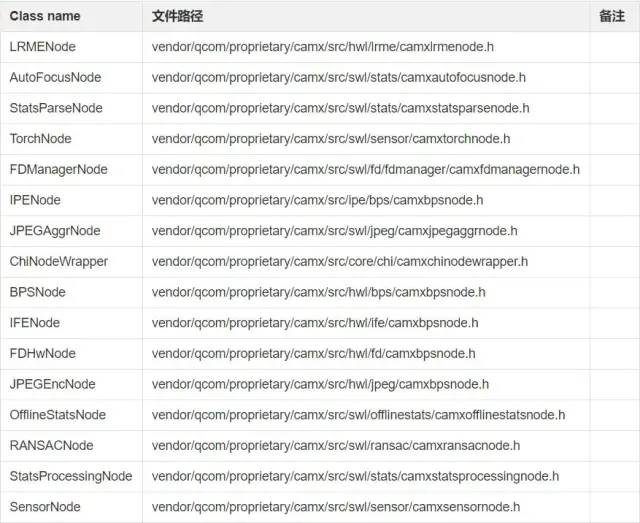
node节点的创建地方在
vendor/qcom/proprietary/camx/src/hwl/titian17x/camxtitian17xfactory.cpp
Node* Titan17xFactory::HwCreateNode(
    const NodeCreateInputData* pCreateInputData,
    NodeCreateOutputData*      pCreateOutputData
    ) const
{
    Node* pNode = NULL;

    switch (pCreateInputData->pNodeInfo->nodeId)
    {
        case AutoFocus:
            pNode = AutoFocusNode::Create(pCreateInputData, pCreateOutputData);
            break;
        case BPS:
            pNode = BPSNode::Create(pCreateInputData, pCreateOutputData);
            break;
        case IFE:
            pNode = IFENode::Create(pCreateInputData, pCreateOutputData);
            break;
        case IPE:
            pNode = IPENode::Create(pCreateInputData, pCreateOutputData);
            break;
        case Sensor:
            pNode = SensorNode::Create(pCreateInputData, pCreateOutputData);
            break;
        case StatsProcessing:
            pNode = StatsProcessingNode::Create(pCreateInputData, pCreateOutputData);
            break;
        case JPEG:
            pNode = JPEGEncNode::Create(pCreateInputData, pCreateOutputData);
            break;
        case JPEGAggregator:
            pNode = JPEGAggrNode::Create(pCreateInputData, pCreateOutputData);
            break;
        case StatsParse:
            pNode = StatsParseNode::Create(pCreateInputData, pCreateOutputData);
            break;
        case ChiExternalNode:
            pNode = ChiNodeWrapper::Create(pCreateInputData, pCreateOutputData);
            break;
        case FDHw:
            pNode = FDHwNode::Create(pCreateInputData, pCreateOutputData);
            break;
        case FDManager:
            pNode = FDManagerNode::Create(pCreateInputData, pCreateOutputData);
            break;
        case OfflineStats:
            pNode = OfflineStatsNode::Create(pCreateInputData, pCreateOutputData);
            break;
        case Torch:
            pNode = TorchNode::Create(pCreateInputData, pCreateOutputData);
            break;
        case LRME:
            pNode = LRMENode::Create(pCreateInputData, pCreateOutputData);
            break;
        case RANSAC:
            pNode = RANSACNode::Create(pCreateInputData, pCreateOutputData);
            break;
        default:
            CAMX_ASSERT_ALWAYS_MESSAGE("Unexpected node type");
            break;
    }

    return pNode;
}

camx_feature:
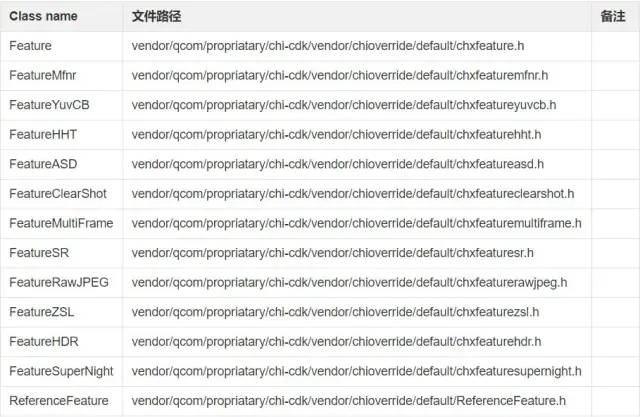
在 vendor/qcom/proprietary/chi-cdk/vendor/chioverride/default/chxadvancedcamerausecase.cpp中的SelectFeatures(...)函数中有这些feature的创建代码。
拍照的场景分为前置和后置,前置是单摄,后置是多摄,前面也有介绍,单摄和多摄使用的usecase是不同:
前置拍照创建的pipeline有:
MiuiZSLSnapshotJpeg at index 0 for session 0, session's pipeline 0, camera id:1
MiuiZSLPreviewRaw at index 1 for session 1, session's pipeline 0, camera id:1
BinningZSLYuv2Jpeg at index 2 for session 2, session's pipeline 0, camera id:1
BinningMerge3YuvCustomTo1Yuv at index 3 for session 3, session's pipeline 0, camera id:1
ZSLSnapshotYUV at index 4 for session 4, session's pipeline 0, camera id:1
AdvancedAsdMeta at index 5 for session 5, session's pipeline 0, camera id:1
SWMFClearShotYuv at index 6 for session 6, session's pipeline 0, camera id:1
BinningZSLSnapshotYUV at index 7 for session 7, session's pipeline 0, camera id:1
后置拍照创建的pipeline有:
BackCameraJpegEncode at index 0 for session 0, session's pipeline 0, camera id:0
MfnrPrefilter at index 1 for session 0, session's pipeline 1, camera id:0
MfnrBlend at index 2 for session 0, session's pipeline 2, camera id:0
MfnrPostFilter at index 3 for session 0, session's pipeline 3, camera id:0
MfnrScale at index 4 for session 0, session's pipeline 4, camera id:0
Merge3YuvCustomTo1Yuv at index 5 for session 1, session's pipeline 0, camera id:0
ZSLSnapshotYUV at index 6 for session 2, session's pipeline 0, camera id:0
ZSLSnapshotYUVAux at index 7 for session 3, session's pipeline 0, camera id:3
SWMFSRYuv at index 8 for session 4, session's pipeline 0, camera id:0
AdvancedAsdMeta at index 9 for session 5, session's pipeline 0, camera id:0
pipeline在camx中的配置文件是:vendor/qcom/proprietary/chi-cdk/vendor/topology/default/titan17x_usecases.xml,编译时会根据此xml的配置生成对应vendor\qcom\proprietary\chi-cdk\vendor\chioverride\default\g_pipelines.h,vendor\qcom\proprietary\chi-cdk\vendor\chioverride\default\build\android\Android.mk:
...
$(info $(shell perl $(CAMX_CDK_PATH)/topology/usecaseconverter.pl $(CAMX_VENDOR_PATH)/topology/default/titan17x_usecases.xml $(LOCAL_PATH)/g_pipelines.h))
...
然后在\vendor\qcom\proprietary\chi-cdk\vendor\chioverride\default\chxusecaseutils.cpp中会根据pStreamConfig->num_streams选择到对应的Usecases(g_pipelines.h中定义):
////////////////////////////////////////////////////////////////////////////////////////////////////////////////////////////////
// UsecaseSelector::DefaultMatchingUsecase
////////////////////////////////////////////////////////////////////////////////////////////////////////////////////////////////
ChiUsecase* UsecaseSelector::DefaultMatchingUsecase(
    camera3_stream_configuration_t* pStreamConfig)
{
...
  pSelectedUsecase = &pChiTargetUsecases->pChiUsecases[i];
...

}
DefaultMatchingUsecase方法即在\vendor\qcom\proprietary\chi-cdk\vendor\chioverride\default\chxadvancedcamerausecase.cpp 被调用:
CDKResult AdvancedCameraUsecase::SelectUsecaseConfig(
    LogicalCameraInfo*              pCameraInfo,   ///< Camera info
    camera3_stream_configuration_t* pStreamConfig)  ///< Stream configuration
{
...
        m_pChiUsecase = UsecaseSelector::DefaultMatchingUsecase(pStreamConfig);
...
}
四、camx 调试
修改\vendor\qcom\proprietary\camx\src\core\camxsettings.xml 设置 log 打印级别,如:
overrideLogLevels=0x1F
logInfoMask=0x40080
logVerboseMask=0x40000
原文链接:https://www.cnblogs.com/blogs-of-lxl/p/10668554.html
相关文章友情推荐
1. Android开发干货分享
至此,本篇已结束。转载网络的文章,小编觉得很优秀,如有侵权,恳请联系小编删除,欢迎您的建议与指正。同时期待您的关注,感谢您的阅读,谢谢!
点个在看,方便您使用时快速查看!