如何逆向Flutter应用
相关阅读:一个90后员工猝死的全过程
作者:david09
链接:https://www.jianshu.com/p/d55c0419d790目前大多数使用Flutter的应用都是采用add2app的方式,在APP中与Flutter相关的内容主要有FlutterEngine、APP产物、资源文件。我们可以在应用市场上寻找一个接入Flutter的应用做实验。(apk可在各大应用市场下载,ipa下载可以在mac上安装Apple Configurator 2进行),apk和ipa中flutter相关产物目录如下:
iOS包文件为ipa,下载后将其后缀重命名为zip进行解压,解压后Payload下即可看到应用文件夹,其中FlutterEngine、APP产物、资源文件分别在如下位置:
xxx.app
└── Frameworks
├── App.framework
│ ├── App(Dart APP产物)
│ ├── Info.plist
│ ├── SC_Info
│ ├── _CodeSignature
│ └── flutter_assets
│ ├── flutter_assets
│ ├── AssetManifest.json
│ ├── FontManifest.json
│ ├── LICENSE
│ ├── fonts
│ ├── images
│ ├── mtf_module_info
│ └── packages
└── Flutter.framework
├── Flutter(FlutterEngine)
├── Info.plist
├── SC_Info
├── _CodeSignature
└── icudtl.datAndroid包文件为apk,下载后将其后缀重命名为zip进行解压,其中FlutterEngine、APP产物、资源文件分别在如下位置:
xxx.apk
├── assets
│ └── flutter_assets
│ └── flutter_assets
│ ├── AssetManifest.json
│ ├── FontManifest.json
│ ├── LICENSE
│ ├── fonts
│ ├── images
│ ├── mtf_module_info
│ └── packages
└── lib
└── armeabi
├── libapp.o(Dart APP产物)
└── libflutter.so(FlutterEngine)FlutterEngine各个app都是使用官方或者在官方基础上进行修改,差别不多,我们暂不关心这部分的逆向。资源文件多是图片,字体等无需逆向即可查看的资源。我们主要关心的是使用Dart编写的业务逻辑或者某些框架代码,这部分代码在APP产物中。即:App.framework/App 或 armeabi/libapp.o这两个文件都是动态库,我们先简单看看里面包含什么?
# 可以安装常用的 bin utils工具,如 brew update && brew install binutils
~/Downloads > objdump -t App
App: 文件格式 mach-o-arm64
SYMBOL TABLE:
0000000001697e60 g 0f SECT 02 0000 [.const] _kDartIsolateSnapshotData
000000000000b000 g 0f SECT 01 0000 [.text] _kDartIsolateSnapshotInstructions
0000000001690440 g 0f SECT 02 0000 [.const] _kDartVmSnapshotData
0000000000006000 g 0f SECT 01 0000 [.text] _kDartVmSnapshotInstructions
~/Downloads > greadelf -s libapp.so
Symbol table '.dynsym' contains 5 entries:
Num: Value Size Type Bind Vis Ndx Name
0: 00000000 0 NOTYPE LOCAL DEFAULT UND
1: 00001000 12992 FUNC GLOBAL DEFAULT 1 _kDartVmSnapshot[...]
2: 00005000 0x127df60 FUNC GLOBAL DEFAULT 2 _kDartIsolateSna[...]
3: 01283000 22720 OBJECT GLOBAL DEFAULT 3 _kDartVmSnapshotData
4: 01289000 0x9fc858 OBJECT GLOBAL DEFAULT 4 _kDartIsolateSna[...]可以看到无论是Android还是iOS,Dart App产物中都包含4个程序段。(来自https://github.com/flutter/flutter/wiki/Flutter-engine-operation-in-AOT-Mode)
'_kDartVmSnapshotData':代表 isolate 之间共享的 Dart 堆 (heap) 的初始状态。有助于更快地启动 Dart isolate,但不包含任何 isolate 专属的信息。
'_kDartVmSnapshotInstructions':包含 VM 中所有 Dart isolate 之间共享的通用例程的 AOT 指令。这种快照的体积通常非常小,并且大多会包含程序桩 (stub)。
'_kDartIsolateSnapshotData':代表 Dart 堆的初始状态,并包含 isolate 专属的信息。
'_kDartIsolateSnapshotInstructions':包含由 Dart isolate 执行的 AOT 代码。
看了上面可能还是一脸懵o((⊙﹏⊙))o,为什么分四块,Data与Instructions,Vm与Isolate是什么?为什么使用Snapshot(快照)命名。关于这些问题,推荐一篇博客https://mrale.ph/dartvm/ 。Data与Instructions,Vm与Isolate这些概念两两组合,正好对应上面四个段。也就是VmData、VmInstructions、IsolateData、IsolateInstructions。
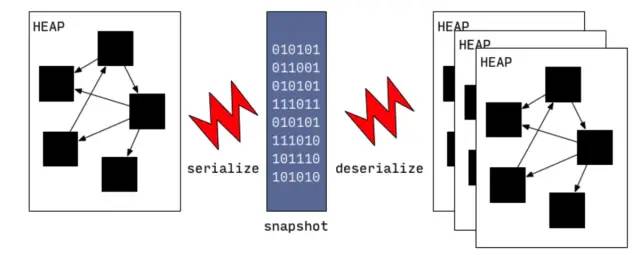
先说一下Data与Instructions。首先我们知道的是Flutter编译运行在app上分为JIT和AOT模式,线上只能使用AOT模式,也就是Flutter引入的DartVM包含了执行AOT产物的功能。为了与JIT模式兼容,DartVM采用了所谓快照的方式,即JIT运行时编译后的基本结构与AOT编译的基本结构相同。将类信息、全局变量、函数指令直接以序列化的方式存在磁盘中,称为Snapshot(快照)。
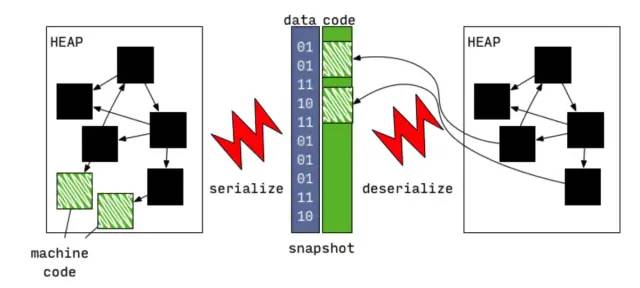
由于快照的序列化格式针对性的为读取速率做了设计,从快照读取也大大提高代码的加载速度(创建所需类信息、全局数据等,可以类比OC Runtime启动加载元类、类信息等)。最开始快照中是不包含机器代码的(即函数体内部的执行逻辑),后来随着AOT模式的开发这部分被加入到快照中了,这些后来者也就是前面说的Instructions。
这里要补充的是,Instructions指的是可执行汇编指令,在.o文件中必须放在text段里,标记为可执行(否则iOS无法加载并执行它)。类信息、全局变量这些内容可以放在data端作为普通数据被加载。(字节的优化50%包体积也是基于此,有兴趣可以看一下文章:https://juejin.im/post/6844904014170030087)。
接着说DartVmSnapshot 与DartIsolateSnapshot。这就涉及Data虚拟机是如何运行业务代码。虚拟是Data代码运行的载体,VM中运行的逻辑都跑在一个抽象的叫做Isolate(隔离)的实体中。你可以把Isolate当做OC里一个带有Runloop的Thread看待(至于他们之间的关系又是一个令人头疼的面试题,这里不展开了)。简要来说Isolate中维护了堆栈变量,函数调用栈帧,用于GC、JIT等辅助任务的子线程等, 而这里的堆栈变量就是要被序列化到磁盘上的东西,即IsolateSnapshot。此外像dart预置的全局对象,比如null,true,false等等等是由VMIsolate管理的,这些东西需序列化后即VmSnapshot。
到这里大致了解Flutter APP产物中的结构。那如何读取他们呢?我们可以从clustered_snapshot.cc中的FullSnapshotReader:: 函数看起,看他是如何反序列化的。
void Deserializer::ReadIsolateSnapshot(ObjectStore* object_store) {
Array& refs = Array::Handle();
Prepare();
{
NoSafepointScope no_safepoint;
HeapLocker hl(thread(), heap_->old_space());
// N.B.: Skipping index 0 because ref 0 is illegal.
const Array& base_objects = Object::vm_isolate_snapshot_object_table();
for (intptr_t i = 1; i < base_objects.Length(); i++) {
AddBaseObject(base_objects.At(i));
}
Deserialize();
// Read roots.
RawObject** from = object_store->from();
RawObject** to = object_store->to_snapshot(kind_);
for (RawObject** p = from; p <= to; p++) {
*p = ReadRef();
}
#if defined(DEBUG)
int32_t section_marker = Read<int32_t>();
ASSERT(section_marker == kSectionMarker);
#endif
refs = refs_;
refs_ = NULL;
}
thread()->isolate()->class_table()->CopySizesFromClassObjects();
heap_->old_space()->EvaluateSnapshotLoad();
#if defined(DEBUG)
Isolate* isolate = thread()->isolate();
isolate->ValidateClassTable();
isolate->heap()->Verify();
#endif
for (intptr_t i = 0; i < num_clusters_; i++) {
clusters_[i]->PostLoad(refs, kind_, zone_);
}
// Setup native resolver for bootstrap impl.
Bootstrap::SetupNativeResolver();
}要看懂这部分也是十分费力,另一个大神的分析文章可能会为我们带来很多启示:https://blog.tst.sh/reverse-engineering-flutter-apps-part-1/
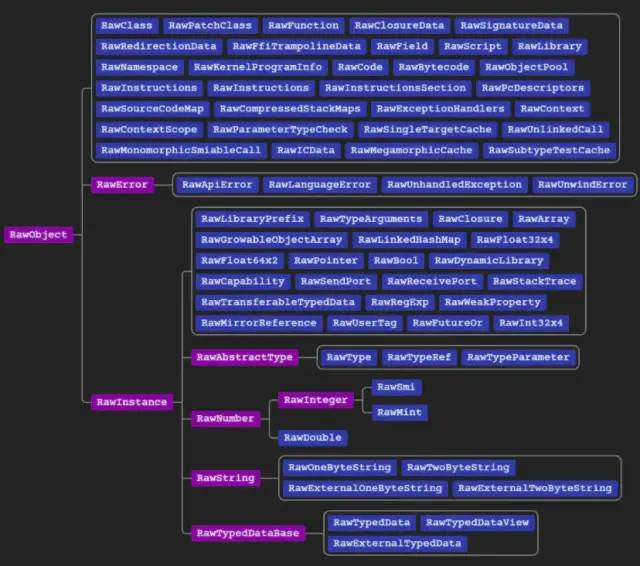
我们要看如何读取RawObject对象
image 每个对象均以包含以下标记的uint32_t开头:
原则上我们自己可以写一个读取的程序进行分析,但是网上有一个使用Python写好的读取程序(只支持读取ELF格式文件,也就是只支持Android包产物的分析):https://github.com/hdw09/darter 基于这个读取工具提供的API我们可以写一个导出应用所有类定义的工具。
from darter.file import parse_elf_snapshot, parse_appjit_snapshot
from darter.asm.base import populate_native_references
import re
from collections import defaultdict
import os
import shutil
def get_funciont(fun_index, s, span=False):
spanStr = ''
if span:
spanStr = ' '
fun_str = '\n'+spanStr+'// 函数索引:' + '{0}'.format(fun_index)+'\n'
returnTypeStr = ''
if '_class' in s.refs[fun_index].x['result_type'].x.keys():
returnTypeStr = s.refs[fun_index].x['result_type'].x['_class'].x['name'].x['value']
elif 'name' in s.refs[fun_index].x['result_type'].x.keys():
returnTypeStr = str(s.refs[fun_index].x['result_type'])
else:
returnTypeStr = s.refs[fun_index].x['result_type'].x['value']
fun_str = fun_str+spanStr + returnTypeStr
fun_str = fun_str + ' ' + s.refs[fun_index].x['name'].x['value']+'('
parameterCount = 0
if type(s.refs[fun_index].x['parameter_types'].x['value']) != type(''):
for parameterName in s.refs[fun_index].x['parameter_names'].x['value']:
parType = ''
if '_class' in s.refs[fun_index].x['parameter_types'].x['value'][parameterCount].x.keys():
parType = s.refs[fun_index].x['parameter_types'].x['value'][parameterCount].x['_class'].x['name'].x['value']
else:
parType = s.refs[fun_index].x['parameter_types'].x['value'][parameterCount].x['value']
fun_str = fun_str + parType + ' '
fun_str = fun_str + parameterName.x['value'] + ', '
parameterCount = parameterCount + 1
fun_str = fun_str + ') \n'+spanStr+'{ \n'
for nrefsItem in s.refs[fun_index].x['code'].x['nrefs']:
fun_str = fun_str + spanStr + ' {0}'.format(nrefsItem) + '\n'
fun_str = fun_str + spanStr+'}'
return fun_str
def get_classDis(clas_index, s):
class_str = '\n// 类索引:' + '{0}'.format(clas_index)+' 使用s.refs[xxxx].x跟查\n'
superName = ''
if '_class' in s.refs[clas_index].x['super_type'].x.keys():
superName = s.refs[clas_index].x['super_type'].x['_class'].x['name'].x['value']
else:
superName = s.refs[clas_index].x['super_type'].x['value']
class_str = class_str + \
'class {0} : {1} {2}\n'.format(
s.refs[clas_index].x['name'].x['value'], superName, '{')
if type(s.refs[clas_index].x['functions'].x['value']) != type(''):
for fun in s.refs[clas_index].x['functions'].x['value']:
class_str = class_str+'\n'+get_funciont(fun.ref, s, True)
return class_str+'\n\n}'
def get_lob_class(lib, s):
all_class = ''
for item in lib.src:
if 'name' in item[0].x.keys():
all_class = all_class + get_classDis(item[0].ref, s) + '\n'
if '类索引' in all_class:
return all_class
else:
return '没有获得任何信息'
def show_lob_class(lib, s):
print(get_lob_class(lib, s))
def writeStringInPackageFile(packageFile, content):
packageFile = packageFile.replace('dart:', 'package:dart/')
filename = packageFile.replace('package:', 'out/')
filePath = filename[0:filename.rfind('/')]
content = '// {0} \n'.format(packageFile)+content
if os.path.exists(filePath) == False:
os.makedirs(filePath)
file = open(filename, 'w')
file.write(content)
file.close()
def getFiles(elfFile, filter):
s = parse_elf_snapshot(elfFile)
populate_native_references(s)
allLibrary = sorted(s.getrefs('Library'),
key=lambda x: x.x['url'].x['value'])
for tempLibrary in allLibrary:
name = tempLibrary.x['url'].x['value']
if filter in name:
print(name + '开始生成....')
writeStringInPackageFile(
name, get_lob_class(s.strings[name].src[1][0], s))
print(name + '生成成功✅')
# 开始执行
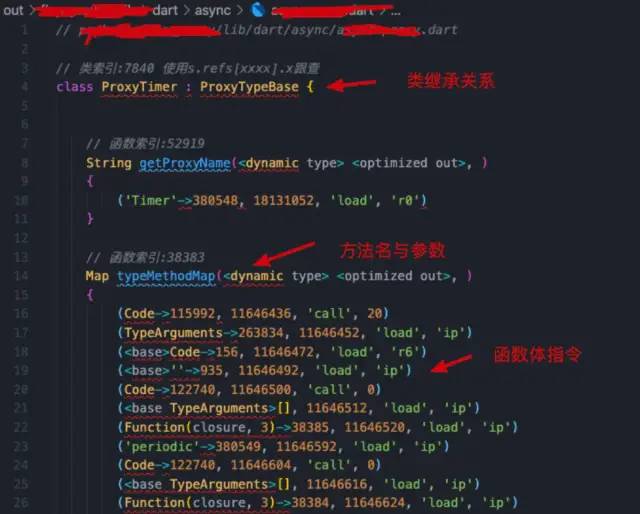
getFiles('samples/arm-app.so', '')这个脚本最终会提取所有指定文件的源码,其中对友商app其中一个类的导出结果如下:
其中标注了类对象 与函数的索引,可以在控制台使用s.refs[xxxxx].x继续跟查。


