
面试官:说说RabbitMQ的消费端限流、TTL、死信队列
你知道的越多,不知道的就越多,业余的像一棵小草!
你来,我们一起精进!你不来,我和你的竞争对手一起精进!
编辑:业余草
cnblogs.com/Jacian/p/14212401.html
推荐:https://www.xttblog.com/?p=5160
关于消息队列,我们不仅要会用,还要能说出它的设计实现原理,这也是在面试中经常被问到的一些经典面试题。下面通过本文,我们一起来重新认识一下RabbitMQ的消费端限流、TTL、死信队列。
消费端限流
1. 为什么要对消费端限流
2.限流的 api 讲解
/**
* Request specific "quality of service" settings.
* These settings impose limits on the amount of data the server
* will deliver to consumers before requiring acknowledgements.
* Thus they provide a means of consumer-initiated flow control.
* @param prefetchSize maximum amount of content (measured in
* octets) that the server will deliver, 0 if unlimited
* @param prefetchCount maximum number of messages that the server
* will deliver, 0 if unlimited
* @param global true if the settings should be applied to the
* entire channel rather than each consumer
* @throws java.io.IOException if an error is encountered
*/
void basicQos(int prefetchSize, int prefetchCount, boolean global) throws IOException;
prefetchSize:0,单条消息大小限制,0代表不限制 prefetchCount:一次性消费的消息数量。会告诉 RabbitMQ 不要同时给一个消费者推送多于 N 个消息,即一旦有 N 个消息还没有 ack,则该 consumer 将 block 掉,直到有消息 ack。 global:true、false 是否将上面设置应用于 channel,简单点说,就是上面限制是 channel 级别的还是 consumer 级别。当我们设置为 false 的时候生效,设置为 true 的时候没有了限流功能,因为 channel 级别尚未实现。 注意:prefetchSize 和 global 这两项,rabbitmq 没有实现,暂且不研究。特别注意一点,prefetchCount 在 no_ask=false 的情况下才生效,即在自动应答的情况下这两个值是不生效的。
3.如何对消费端进行限流
首先第一步,我们既然要使用消费端限流,我们需要关闭自动 ack,将 autoAck 设置为 falsechannel.basicConsume(queueName, false, consumer); 第二步我们来设置具体的限流大小以及数量。channel.basicQos(0, 15, false); 第三步在消费者的 handleDelivery 消费方法中手动 ack,并且设置批量处理 ack 回应为 truechannel.basicAck(envelope.getDeliveryTag(), true);
import com.rabbitmq.client.Channel;
import com.rabbitmq.client.Connection;
import com.rabbitmq.client.ConnectionFactory;

public class QosProducer {
    public static void main(String[] args) throws Exception {
        //1. 创建一个 ConnectionFactory 并进行设置
        ConnectionFactory factory = new ConnectionFactory();
        factory.setHost("localhost");
        factory.setVirtualHost("/");
        factory.setUsername("guest");
        factory.setPassword("guest");

        //2. 通过连接工厂来创建连接
        Connection connection = factory.newConnection();

        //3. 通过 Connection 来创建 Channel
        Channel channel = connection.createChannel();

        //4. 声明
        String exchangeName = "test_qos_exchange";
        String routingKey = "item.add";

        //5. 发送
        String msg = "this is qos msg";
        for (int i = 0; i < 10; i++) {
            String tem = msg + " : " + i;
            channel.basicPublish(exchangeName, routingKey, null, tem.getBytes());
            System.out.println("Send message : " + tem);
        }

        //6. 关闭连接
        channel.close();
        connection.close();
    }
}import com.rabbitmq.client.*;
import java.io.IOException;
public class QosConsumer {
public static void main(String[] args) throws Exception {
//1. 创建一个 ConnectionFactory 并进行设置
ConnectionFactory factory = new ConnectionFactory();
factory.setHost("localhost");
factory.setVirtualHost("/");
factory.setUsername("guest");
factory.setPassword("guest");
factory.setAutomaticRecoveryEnabled(true);
factory.setNetworkRecoveryInterval(3000);
//2. 通过连接工厂来创建连接
Connection connection = factory.newConnection();
//3. 通过 Connection 来创建 Channel
final Channel channel = connection.createChannel();
//4. 声明
String exchangeName = "test_qos_exchange";
String queueName = "test_qos_queue";
String routingKey = "item.#";
channel.exchangeDeclare(exchangeName, "topic", true, false, null);
channel.queueDeclare(queueName, true, false, false, null);
channel.basicQos(0, 3, false);
//一般不用代码绑定,在管理界面手动绑定
channel.queueBind(queueName, exchangeName, routingKey);
//5. 创建消费者并接收消息
Consumer consumer = new DefaultConsumer(channel) {
@Override
public void handleDelivery(String consumerTag, Envelope envelope,
AMQP.BasicProperties properties, byte[] body)
throws IOException {
try {
Thread.sleep(5000);
} catch (InterruptedException e) {
e.printStackTrace();
}
String message = new String(body, "UTF-8");
System.out.println("[x] Received '" + message + "'");
channel.basicAck(envelope.getDeliveryTag(), true);
}
};
//6. 设置 Channel 消费者绑定队列
channel.basicConsume(queueName, false, consumer);
channel.basicConsume(queueName, false, consumer1);
}
}
TTL
RabbitMQ支持队列的过期时间,从消息入队列开始计算,只要超过了队列的超时时间配置,那么消息会自动的清除。
1.消息的 TTL
/**
         * deliverMode 设置为 2 的时候代表持久化消息
         * expiration 意思是设置消息的有效期,超过10秒没有被消费者接收后会被自动删除
         * headers 自定义的一些属性
         * */
        //5. 发送
        Map<String, Object> headers = new HashMap<String, Object>();
        headers.put("myhead1", "111");
        headers.put("myhead2", "222");

        AMQP.BasicProperties properties = new AMQP.BasicProperties().builder()
                .deliveryMode(2)
                .contentEncoding("UTF-8")
                .expiration("100000")
                .headers(headers)
                .build();
        String msg = "test message";
        channel.basicPublish("", queueName, properties, msg.getBytes());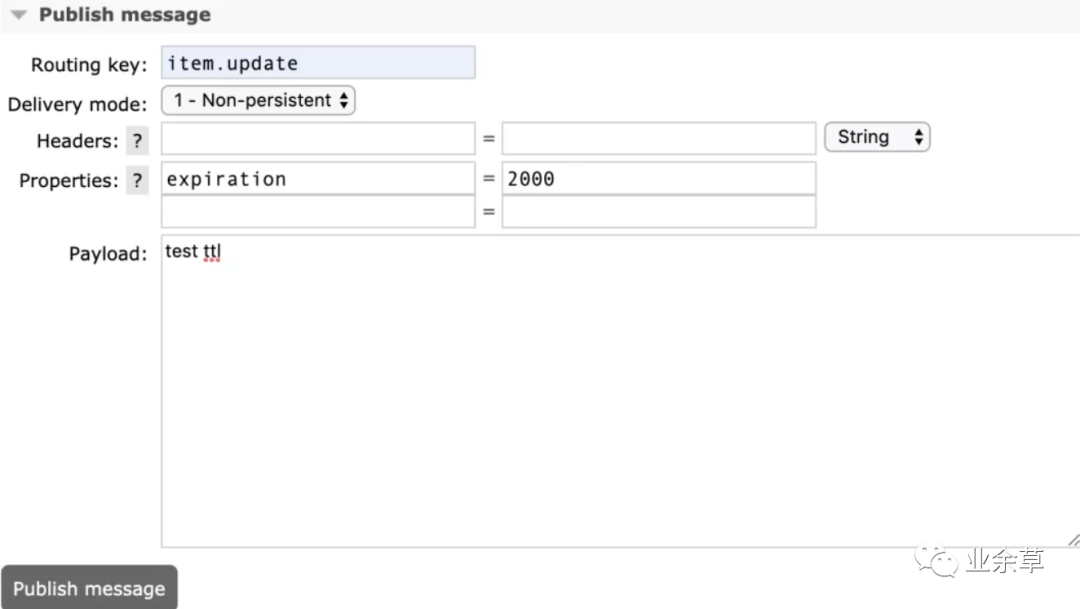
2.队列的 TTL
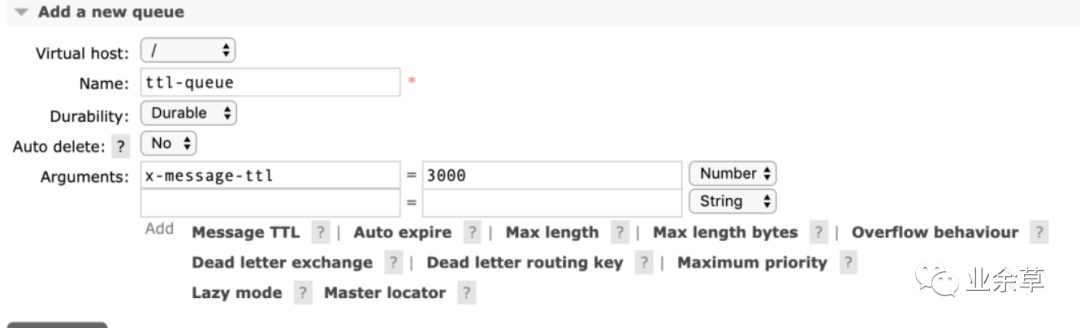
死信队列
a.消息被拒绝(basic.reject/ basic.nack)并且不再重新投递 requeue=false b.TTL(time-to-live) 消息超时未消费 c.达到最大队列长度
实现死信队列步骤
首先需要设置死信队列的 exchange 和 queue,然后进行绑定:
Exchange: dlx.exchange
Queue: dlx.queue
RoutingKey: # 代表接收所有路由 key
然后我们进行正常声明交换机、队列、绑定,只不过我们需要在普通队列加上一个参数即可: arguments.put("x-dead-letter-exchange",' dlx.exchange' ) 这样消息在过期、requeue失败、 队列在达到最大长度时,消息就可以直接路由到死信队列!
import com.rabbitmq.client.AMQP;
import com.rabbitmq.client.Channel;
import com.rabbitmq.client.Connection;
import com.rabbitmq.client.ConnectionFactory;
public class DlxProducer {
    public static void main(String[] args) throws Exception {
        //设置连接以及创建 channel 湖绿
        String exchangeName = "test_dlx_exchange";
        String routingKey = "item.update";

        String msg = "this is dlx msg";

        //我们设置消息过期时间,10秒后再消费 让消息进入死信队列
        AMQP.BasicProperties properties = new AMQP.BasicProperties().builder()
                .deliveryMode(2)
                .expiration("10000")
                .build();

        channel.basicPublish(exchangeName, routingKey, true, properties, msg.getBytes());
        System.out.println("Send message : " + msg);

        channel.close();
        connection.close();
    }
}


import com.rabbitmq.client.*;
import java.io.IOException;
import java.util.HashMap;
import java.util.Map;

public class DlxConsumer {
    public static void main(String[] args) throws Exception {
        //创建连接、创建channel忽略 内容可以在上面代码中获取
        String exchangeName = "test_dlx_exchange";
        String queueName = "test_dlx_queue";
        String routingKey = "item.#";

        //必须设置参数到 arguments 中
        Map<String, Object> arguments = new HashMap<String, Object>();
        arguments.put("x-dead-letter-exchange", "dlx.exchange");

        channel.exchangeDeclare(exchangeName, "topic", true, false, null);
        //将 arguments 放入队列的声明中
        channel.queueDeclare(queueName, true, false, false, arguments);

        //一般不用代码绑定,在管理界面手动绑定
        channel.queueBind(queueName, exchangeName, routingKey);


        //声明死信队列
        channel.exchangeDeclare("dlx.exchange", "topic", true, false, null);
        channel.queueDeclare("dlx.queue", true, false, false, null);
        //路由键为 # 代表可以路由到所有消息
        channel.queueBind("dlx.queue", "dlx.exchange", "#");

        Consumer consumer = new DefaultConsumer(channel) {
            @Override
            public void handleDelivery(String consumerTag, Envelope envelope,
                                       AMQP.BasicProperties properties, byte[] body)
                    throws IOException {

                String message = new String(body, "UTF-8");
                System.out.println(" [x] Received '" + message + "'");

            }
        };

        //6. 设置 Channel 消费者绑定队列
        channel.basicConsume(queueName, true, consumer);
    }
}
总结
评论