
保姆级教程:深度学习环境配置指南!(Windows、Mac、Ubuntu全讲解)
点击上方“小白学视觉”,选择加"星标"或“置顶”
重磅干货,第一时间送达

一、Windows系统深度学习环境配置
1.1 打开Anaconda Prompt


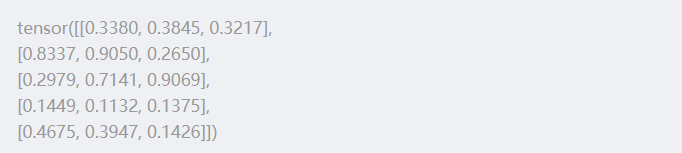
from future import print_functionimport torchx = torch.rand(5, 3)print(x)
import torchtorch.cuda.is_available()
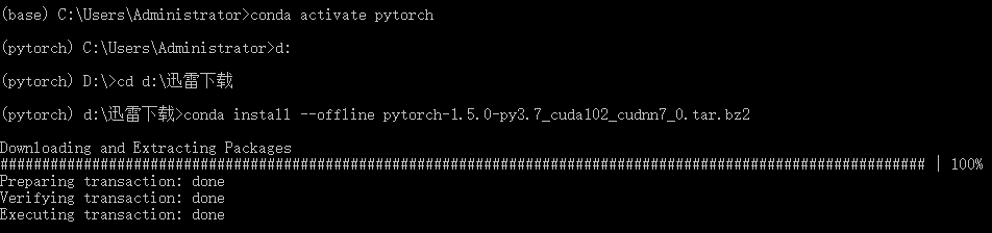
用下面命令创建虚拟环境报错
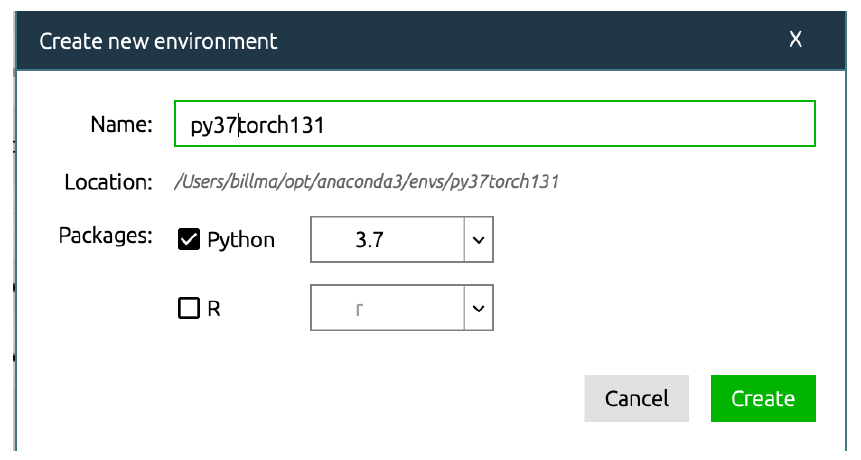
conda create -n py37_torch131 python=3.7
PackagesNotFoundError: The following packages are not available from current channels
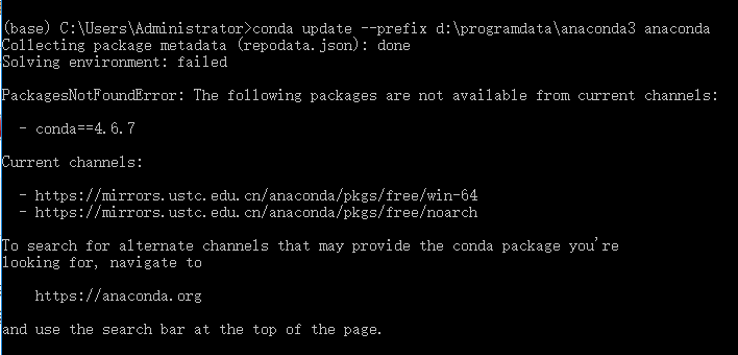
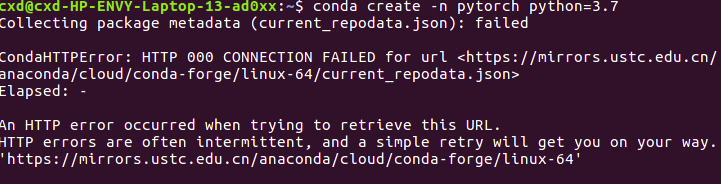
conda下载太慢问题
cuda安装
pytorch安装
conda install pytorch torchvision cudatoolkit=10.0 -c pytorch
jupyter note如何进入虚拟环境
python -m ipykernel install --user --name py27-caffe-notebook
jupyter kernelspec list
jupyter kernelspec remove kernelnamepython -m ipykernel install --name kernelname
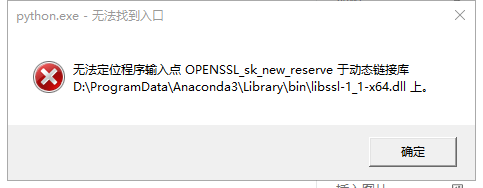
conda安装一半总失败
conda install --offline 包名
二、Mac深度学习环境配置
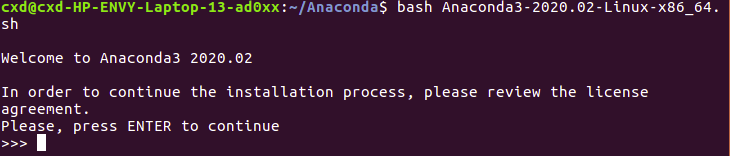
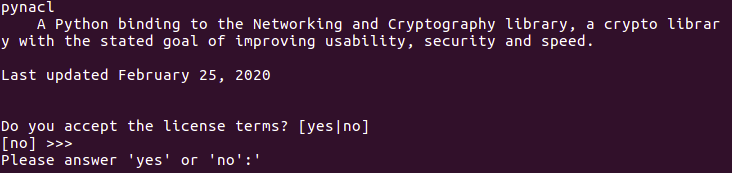
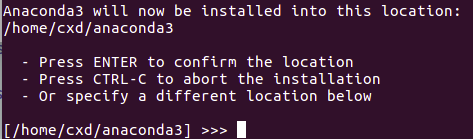
2.1 安装Anaconda

2.2 确认下载情况

python --version
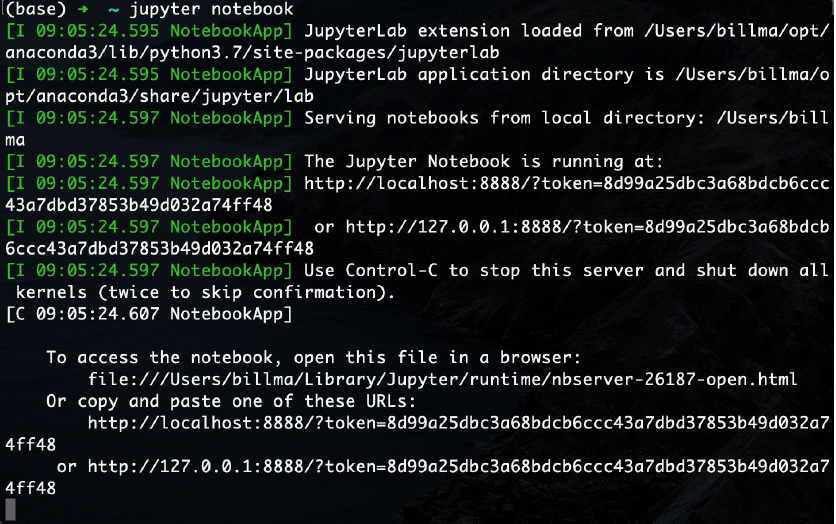
jupyter notebook

2.2.1 常见问题
cd ~
cat .bash_profile
export PATH= ...
2.3 虚拟环境和包的下载

conda create --name env_name
conda env list
conda activate env_name
conda deactivate
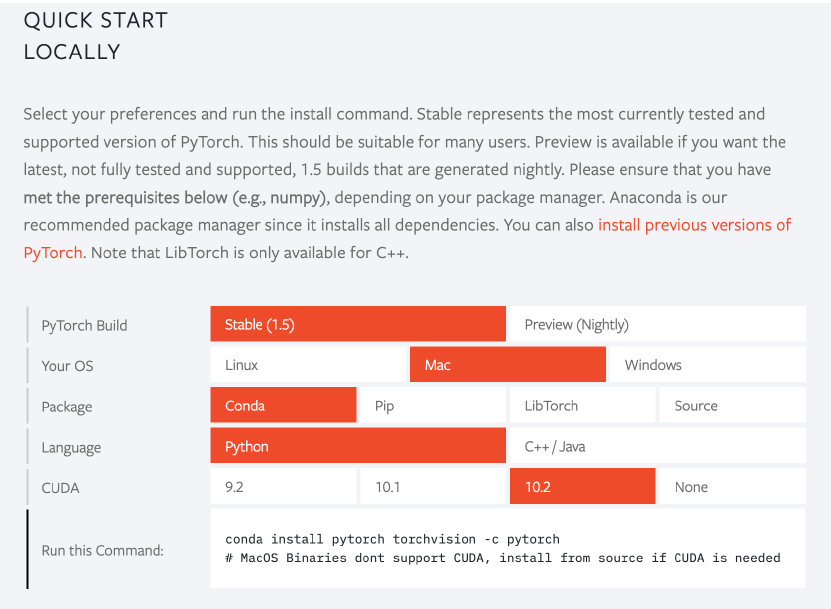
conda install pytorch torchvision -c pytorch
python3
import torchimport torchvisionprint(torch.__version__)print(torchvision.__version__)
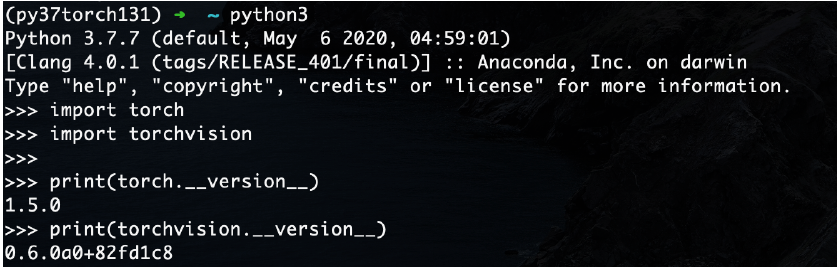
quit()
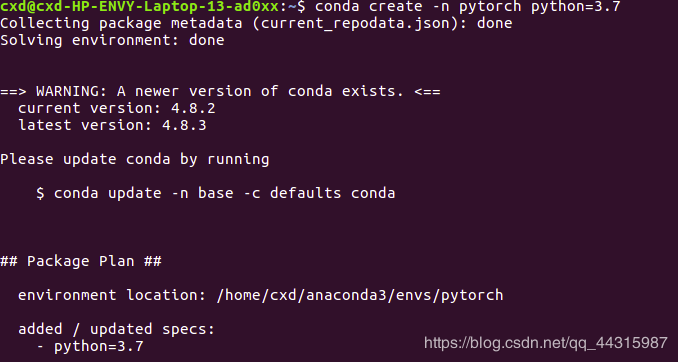
三、Ubuntu深度学习环境配置


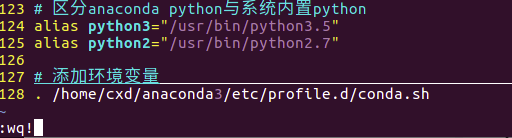
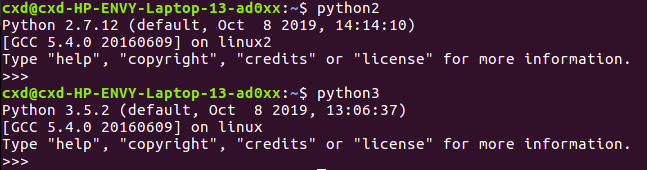
# 区分anaconda python与系统内置pythonalias python3="/usr/bin/python3.5"alias python2="/usr/bin/python2.7". /home/cxd/anaconda3/etc/profile.d/conda.sh


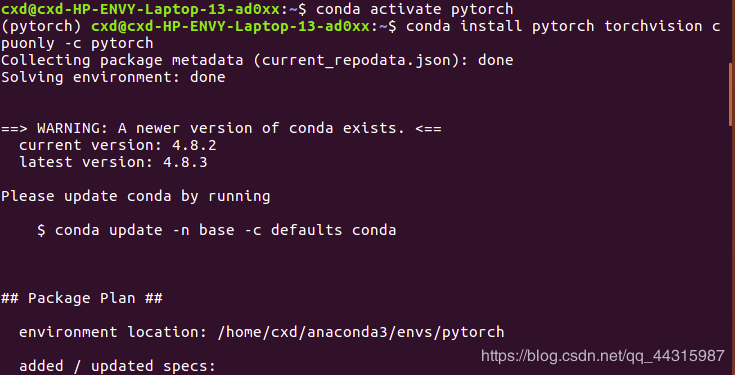
3.2 pytorch cpu版本安装
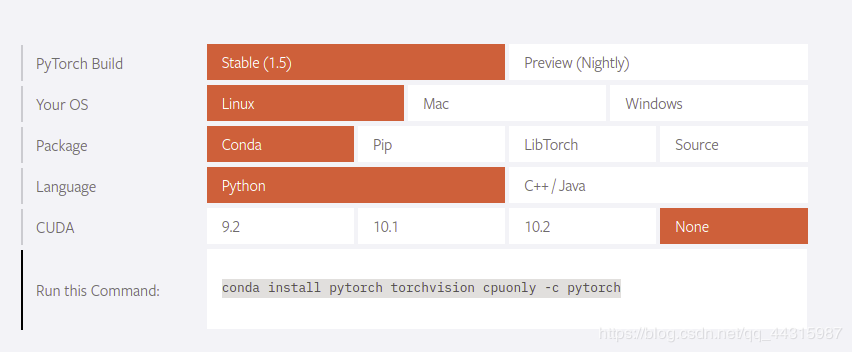
conda config --add channels https://mirrors.tuna.tsinghua.edu.cn/anaconda/cloud/pytorch
conda install pytorch torchvision cpuonly -c pytorch
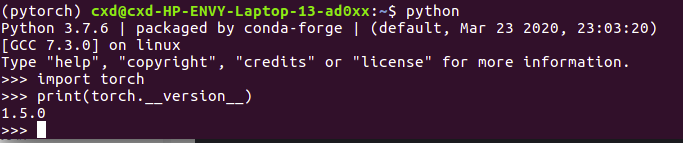
import torchprint(torch.__version__)
3.3 pytorch-gpu安装
3.3.1 GPU驱动安装
检测显卡类型
== /sys/devices/pci0000:00/0000:00:01.0/0000:01:00.0 ==modalias : pci:v000010DEd00001C8Dsv00001028sd0000086Fbc03sc02i00vendor : NVIDIA Corporationmodel : GP107M [GeForce GTX 1050 Mobile]driver : nvidia-driver-390 - distro non-freedriver : nvidia-driver-435 - distro non-freedriver : nvidia-driver-440 - distro non-free recommendeddriver : xserver-xorg-video-nouveau - distro free builtin== /sys/devices/pci0000:00/0000:00:14.3 ==modalias : pci:v00008086d0000A370sv00008086sd000042A4bc02sc80i00vendor : Intel Corporationmodel : Wireless-AC 9560 [Jefferson Peak]manual_install: Truedriver : backport-iwlwifi-dkms - distro free
安装驱动
sudo ubuntu-drivers autoinstall
sudo apt install nvidia-4403.3.2 安装cuda
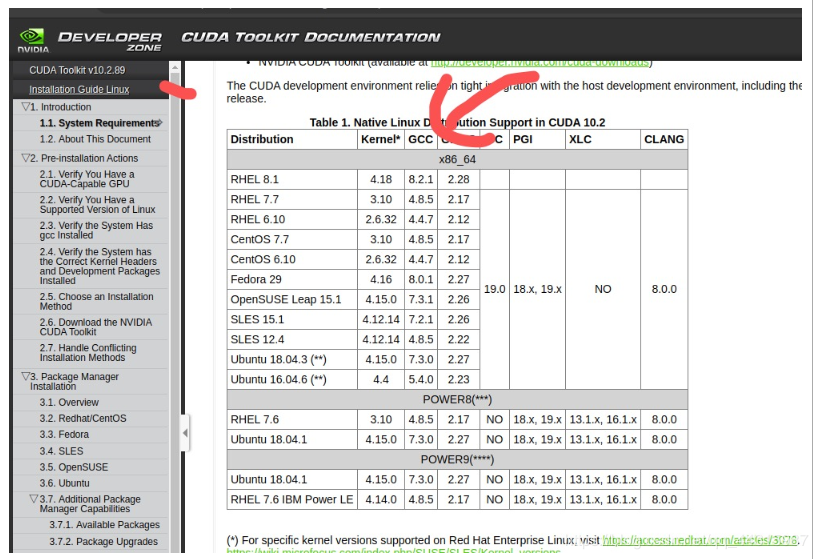
Table 1. CUDA Toolkit and Compatible Driver VersionsCUDA Toolkit Linux x86_64 Driver Version Windows x86_64 Driver VersionCUDA 10.2.89 >= 440.33 >= 441.22CUDA 10.1 (10.1.105 general release, and updates) >= 418.39 >= 418.96CUDA 10.0.130 >= 410.48 >= 411.31CUDA 9.2 (9.2.148 Update 1) >= 396.37 >= 398.26CUDA 9.2 (9.2.88) >= 396.26 >= 397.44CUDA 9.1 (9.1.85) >= 390.46 >= 391.29CUDA 9.0 (9.0.76) >= 384.81 >= 385.54CUDA 8.0 (8.0.61 GA2) >= 375.26 >= 376.51CUDA 8.0 (8.0.44) >= 367.48 >= 369.30CUDA 7.5 (7.5.16) >= 352.31 >= 353.66CUDA 7.0 (7.0.28) >= 346.46 >= 347.62
安装gcc
gcc --version
sudo apt-get install gcc-7.0sudo apt-get install g++-7.0
sudo update-alternatives --install /usr/bin/gcc gcc /usr/bin/gcc-7 50sudo update-alternatives --install /usr/bin/g++ g++ /usr/bin/g++-7 50
sudo update-alternatives --config gcc选择 路径 优先级 状态------------------------------------------------------------* 0 /usr/bin/gcc-9 50 自动模式1 /usr/bin/g++-9 50 手动模式2 /usr/bin/gcc-7 50 手动模式
安装cuda
sudo sh cuda_你的版本_linux.run
配置环境变量
sudo vim ~/.bashrc
export PATH=/usr/local/cuda-10.2/bin${PATH:+:$PATH}}export LD_LIBRARY_PATH=/usr/local/cuda-10.2/lib64${LD_LIBRARY_PATH:+:${LD_LIBRARY_PATH}}
nvcc -V
3.3.3 安装cudnn
sudo cp cuda/include/cudnn.h /usr/local/cuda-10.2/include #解压后的文件夹名字为cuda-10.2sudo cp cuda/lib64/libcudnn* /usr/local/cuda-10.2/lib64sudo chmod a+r /usr/local/cuda-10.2/include/cudnn.h /usr/local/cuda-10.2/lib64/libcudnn*
3.3.4 安装pytorch-gpu
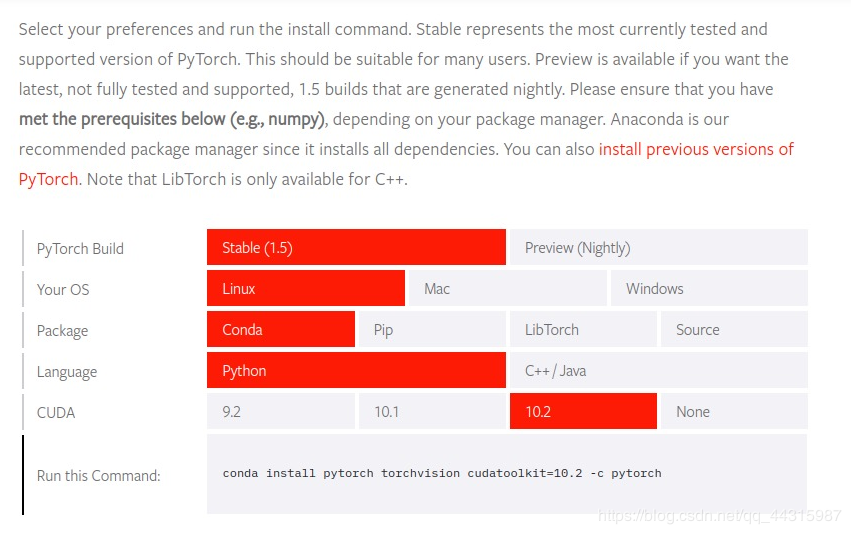
# 选择自己对应的cuda版本conda install pytorch torchvision cudatoolkit=10.2
pip install torch torchvision -i https://pypi.mirrors.ustc.edu.cn/simple
小白团队出品:零基础精通语义分割↓↓↓
下载1:OpenCV-Contrib扩展模块中文版教程 在「小白学视觉」公众号后台回复:扩展模块中文教程,即可下载全网第一份OpenCV扩展模块教程中文版,涵盖扩展模块安装、SFM算法、立体视觉、目标跟踪、生物视觉、超分辨率处理等二十多章内容。 下载2:Python视觉实战项目52讲 在「小白学视觉」公众号后台回复:Python视觉实战项目,即可下载包括图像分割、口罩检测、车道线检测、车辆计数、添加眼线、车牌识别、字符识别、情绪检测、文本内容提取、面部识别等31个视觉实战项目,助力快速学校计算机视觉。 下载3:OpenCV实战项目20讲 在「小白学视觉」公众号后台回复:OpenCV实战项目20讲,即可下载含有20个基于OpenCV实现20个实战项目,实现OpenCV学习进阶。 交流群
欢迎加入公众号读者群一起和同行交流,目前有SLAM、三维视觉、传感器、自动驾驶、计算摄影、检测、分割、识别、医学影像、GAN、算法竞赛等微信群(以后会逐渐细分),请扫描下面微信号加群,备注:”昵称+学校/公司+研究方向“,例如:”张三 + 上海交大 + 视觉SLAM“。请按照格式备注,否则不予通过。添加成功后会根据研究方向邀请进入相关微信群。请勿在群内发送广告,否则会请出群,谢谢理解~

评论