
前端架构探索与实践
前文
从思考、到探索、到脚手架的产生,后面经过一系列的项目开发,不断优化和改良。目前已经成功应用到房产中间页(改名天猫房产)中。这里,做一下总结。
❝「仅为抛砖,希望看完这个系列的同学可以相互探讨学习一下」
❞
为什么使用源码
目前,我们大多数页面,包括搜索页、频道页都是大黄蜂搭建的页面。至于搭建的优点,这里就不多赘述了。而我们使用源码编写,主要是基于以下几点思考:
稳定性要求高 页面模块多而不定 快速回滚方案 模块通信复杂
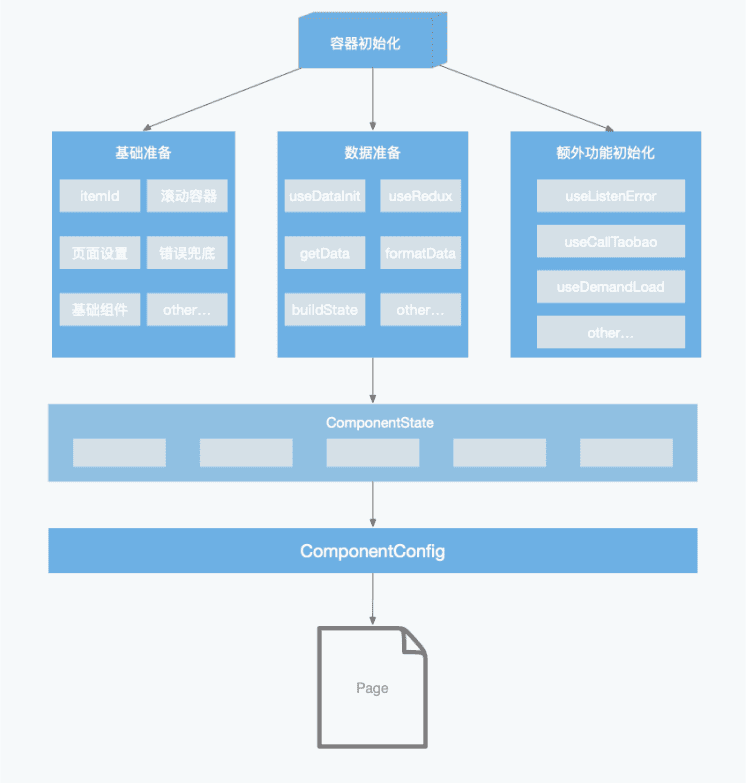
源码架构

❝架构图需要调整。此为稿图,位置放的有些不合理,表述不清
❞
底层技术支撑主要采用 Rax1.0 + TypeScript + Jest 编码。通过 pmcli生成项目脚手架。脚手架提供基础的文件代码组织和组件。包括 Components,commonUtils,document,modules等。当然,这些组件最终会被抽离到 puicom group 下。
再往上,是容器层。容器提供一些可插拔的 hooks 能力。并且根据 component 的配置来渲染不同的组件到页面中,首屏组件和按需加载组件。最后,支撑到每一个对应的页面里面。
分工组织
对于一个页面,无论是 react 还是 rax,其实都是 fn(x)=>UI 的过程。所以整理流程无非就是拿到接口属于渲染到 UI 中。所以对于中间页的架构而言也是如此。
首先拿到基本的接口数据,通过自定义的状态管理,挂载到全局 state 对应的组件名下。容器层通过组件的配置文件,渲染对应的组件。最终呈现出完成的一个页面。当然,其中会有一些额外的容器附属功能,比如唤起手淘、监听键盘弹起等这个按需插入对应 hooks 即可。属于业务层逻辑。
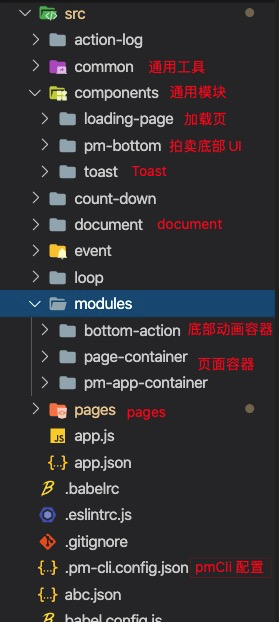
工程目录
工程结构
页面结构
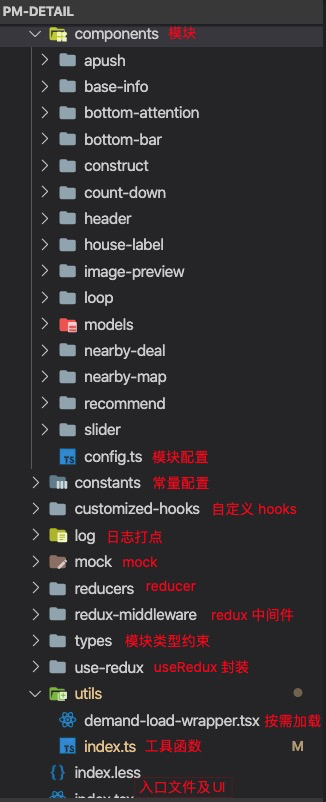
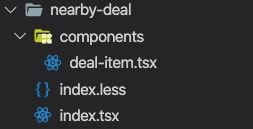
模块结构

❝以上结构在之前文章中都有介绍到
❞
补充
❝这里补充下动态加载,以及入口 index 的写法。理论上这部分,在使用这套架构的同学,无需关心
❞
index.tsx
return (
    <H5PageContainer
      title={PAGE_TITLE}
      showPlaceHolder={isLoading}
      renderPlaceHolder={renderLoadingPage}
      renderHeader={renderHeader}
      renderFooter={renderFooter}
      toTopProps={{
        threshold: 400,
        bottom: 203,
      }}
      customStyles={{
        headWrapStyles: {
          zIndex: 6,
        },
      }}
    >
      {renderSyncCom(
        asyncComConfig,
        dao,
        dispatch,
        reloadPageNotRefresh,
        reloadTick
      )}
      {renderDemandCom(
        demandComConfig,
        offsetBottom,
        dao,
        dispatch,
        reloadPageNotRefresh,
        reloadTick
      )}
      <BottomAttention />
    H5PageContainer>
  );
模块动态加载
/**
* 按需按需加载容器组件
*
* @export
* @param {*} props 按需加载的组件 props+path
* @returns 需按需加载的子组件
*/
export default function(props: IWrapperProps) {
const placeHolderRef: any = useRef(null);
const { offsetBottom, ...otherProps } = props;
const canLoad = useDemandLoad(offsetBottom, placeHolderRef);
const [comLoaded, setComLoaded] = useState(false);
// 加入 hasLoaded 回调
const wrapProps = {
...otherProps,
hasLoaded: setComLoaded,
};
return (
x-if={!comLoaded}
ref={placeHolderRef}
style={{ width: 750, height: 500, marginTop: 20 }}
source={{ uri: PLACEHOLDER_PIC }}
resizeMode={"contain"}
/>
);
}
/**
* 动态加载
* @param props
*/
function ImportWrap(props: IWrapperProps) {
const { path, ...otherProps } = props;
const [Com, error] = useImport(path);
if (Com) {
return
} else if (error) {
console.error(error);
return null;
} else {
return null;
}
}
use-demand-load.ts
import { useState, useEffect } from 'rax';
import { px2rem } from '@ali/puicom-universal-common-unit';

/**
 * 判断组件按需加载,即将进去可视区
 */
export function useDemandLoad(offsetBottom, comRef): boolean {
    const [canLoad, setCanLoad] = useState(false);
    const comOffsetTop = px2rem(comRef?.current?.offsetTop || 0);

    useEffect(() => {
        if (canLoad) return;
        if (offsetBottom > comOffsetTop && !canLoad) {
            setCanLoad(true);
        }
    }, [offsetBottom]);

    useEffect(() => {
        setCanLoad(comRef?.current?.offsetTop < (screen.height || screen.availHeight || 0));
    }, [comRef]);

    return canLoad;
}
模块编写与状态分发
模块编写
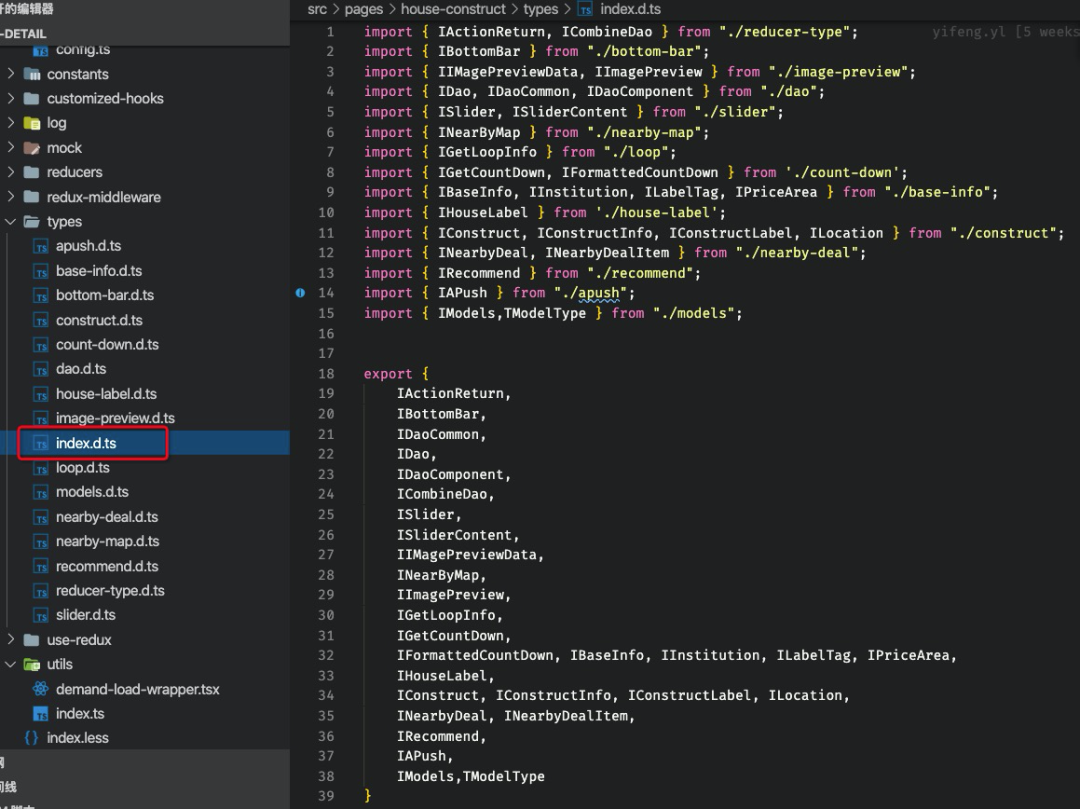
types
编写模块数据类型
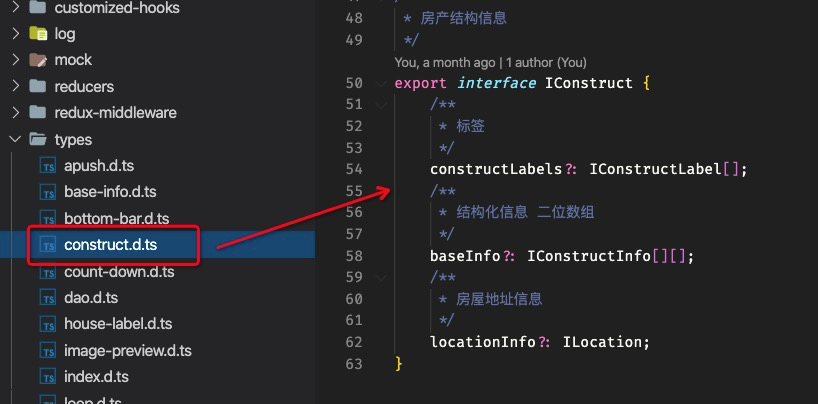
挂载到 dao(dataAccessObject) 下
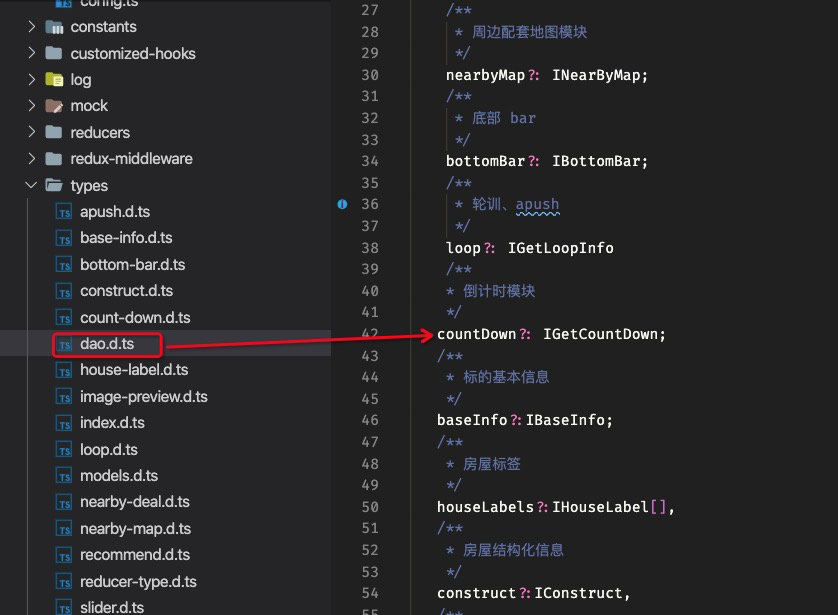
统一导出
❝避免文件引入过多过杂
❞
type/index.d.ts
reducers
编写模块对应reducer
在 daoReducer 中统一挂载
数据分发
componentConfig
❝此处 keyName 是 type/dao.d.ts 下声明的值。会进行强校验。填错则分发不到对应的组件中
❞
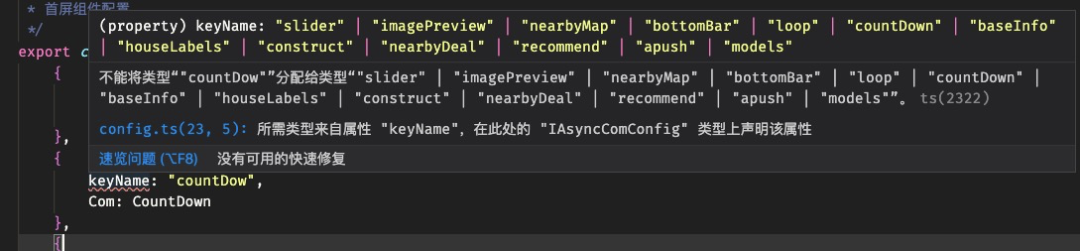
component

数据在 props.dataSource 中
状态分发
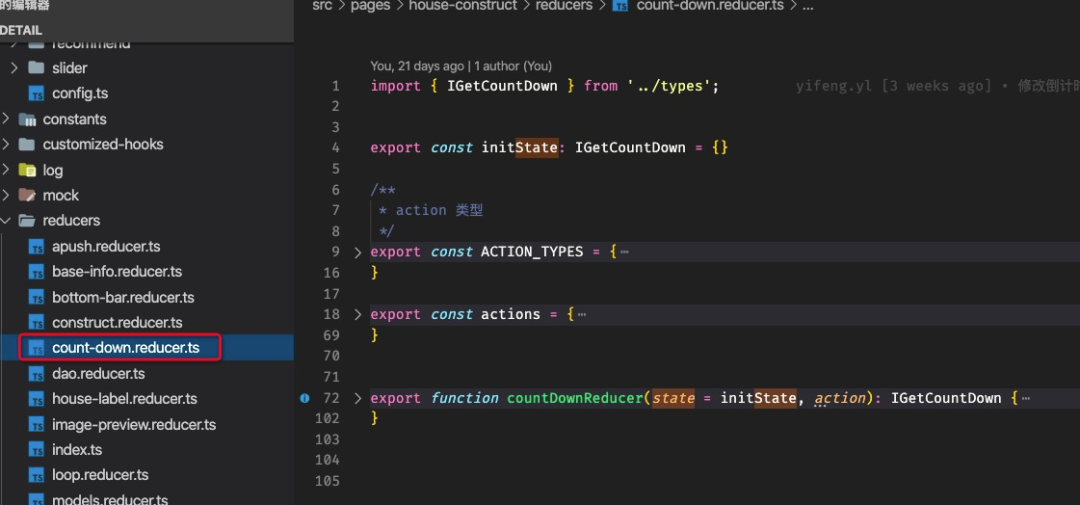
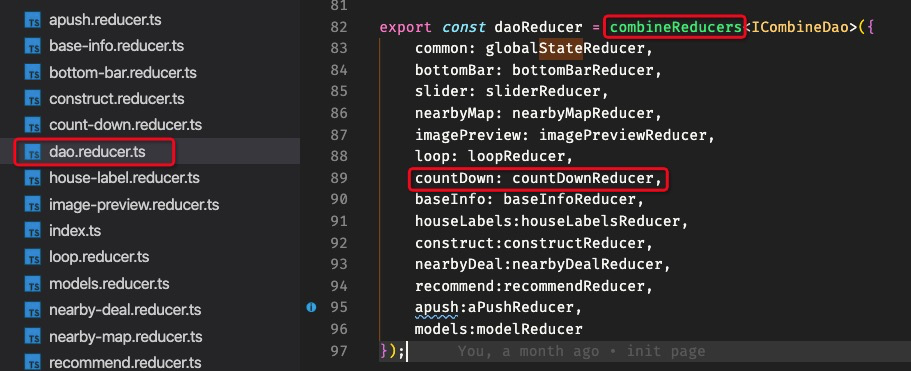
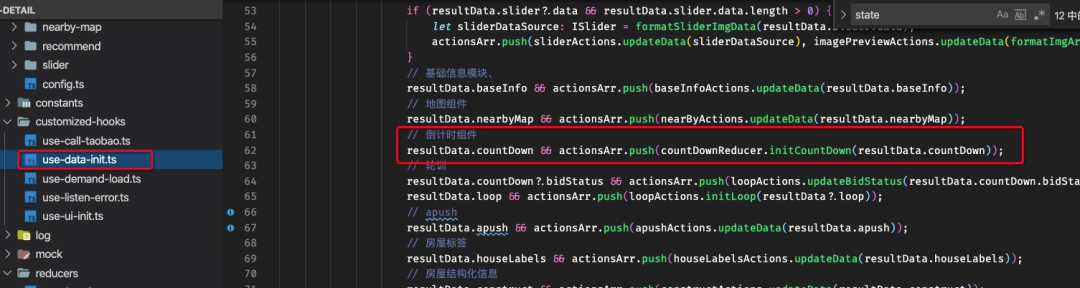
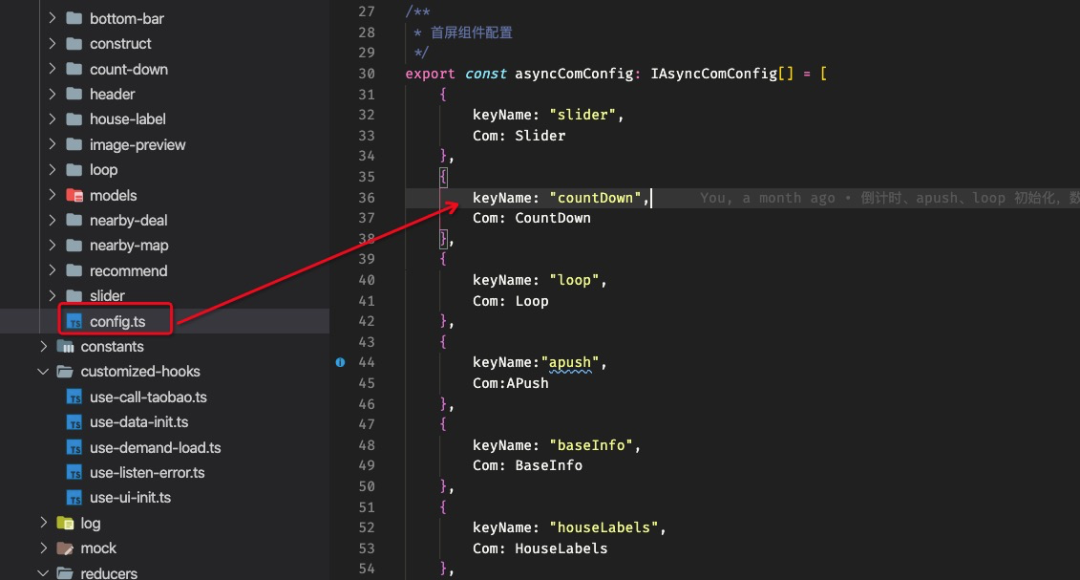
模块声明需要挂载到 type/dao.d.ts中reducer需要combine到dao.reduer.ts中在 useDataInit中dispatch对应Action在 config中配置 (才会被渲染到 UI)
Demo 演示
❝以弹层为例
❞
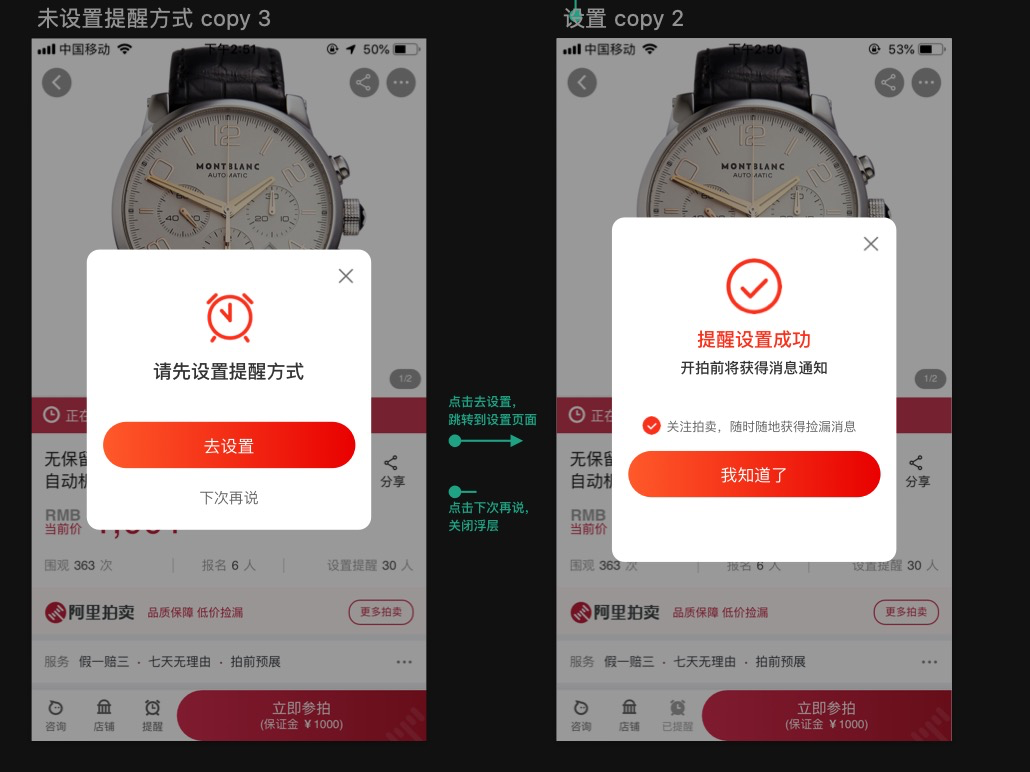
将所有弹层看做为一个模块,只是内容不同而已。而内容,即为我们之前说的组件目录结构中的 components 内容
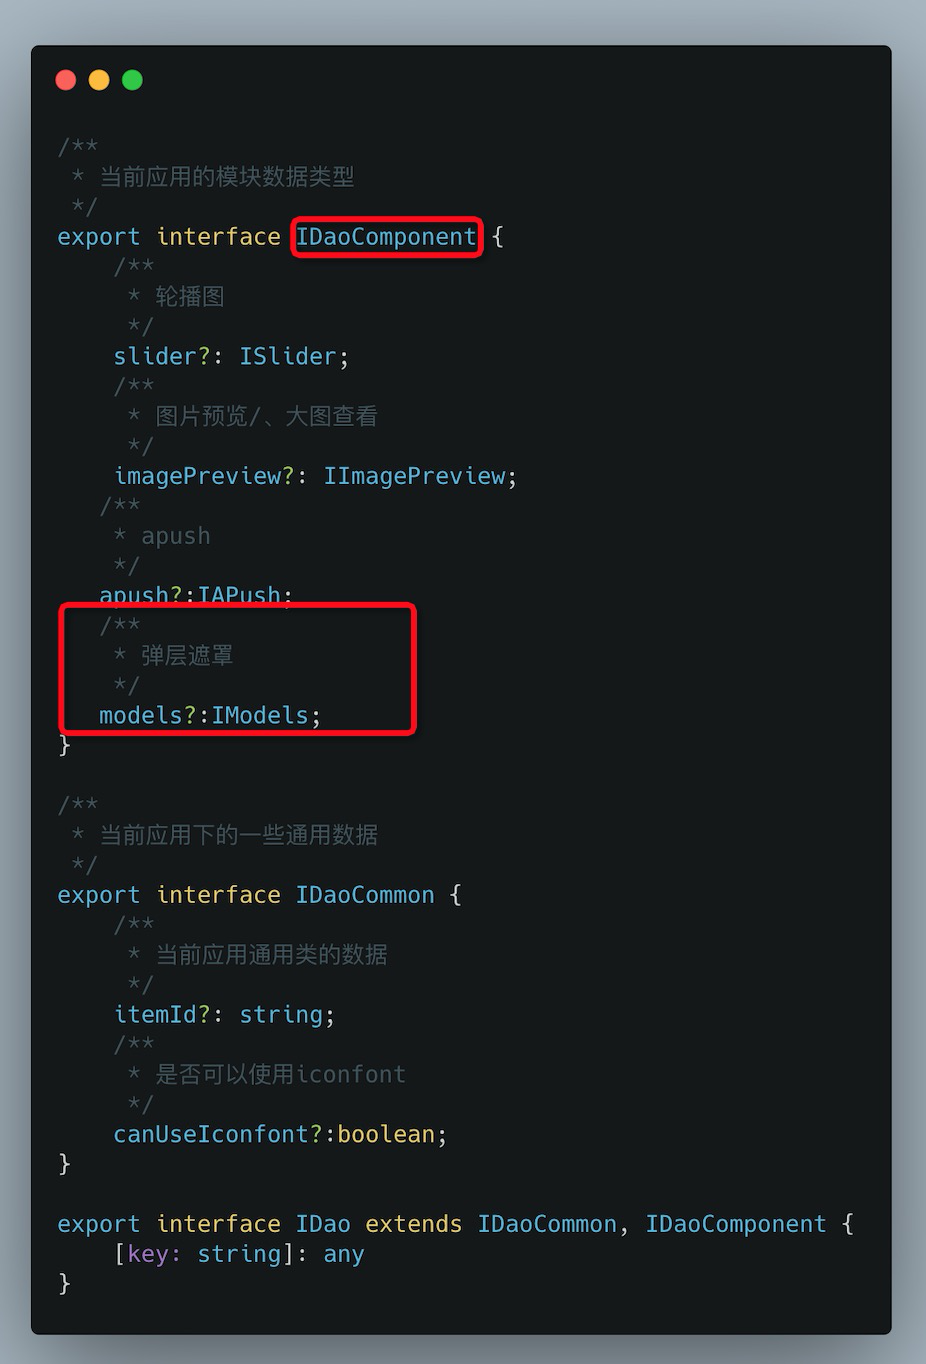
定义模块 Models
定义模块类型
编写模块属于类型
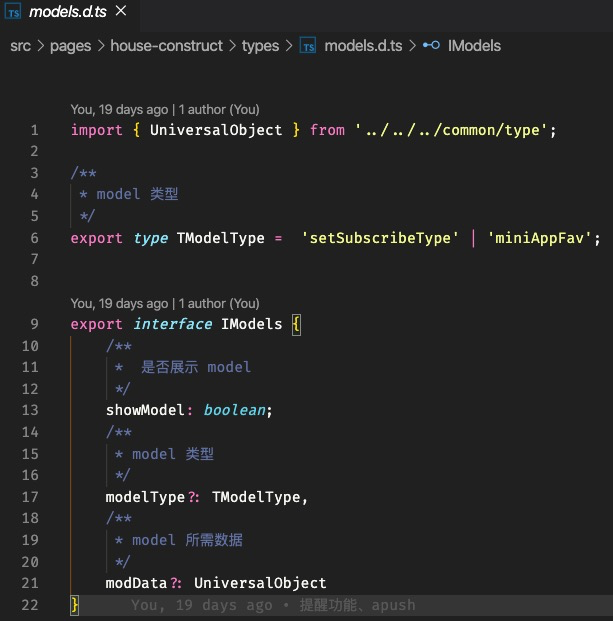
挂载到 dao 中
reducer
编写组件所需的 reducer
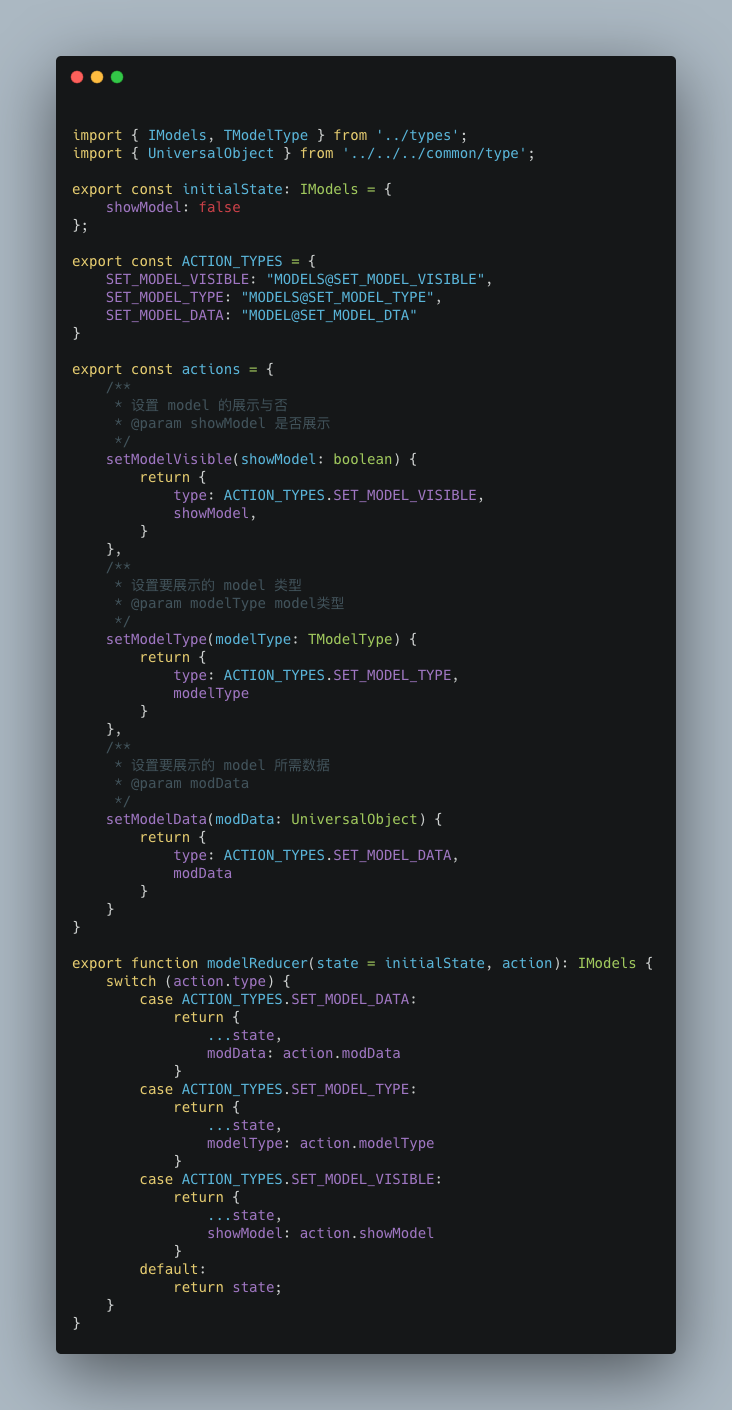
❝actions 的注释非常有必要
❞
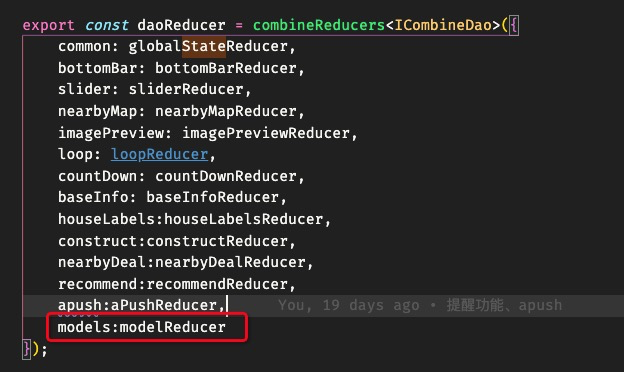
combine 到 dao 中
编写组件


组件编写
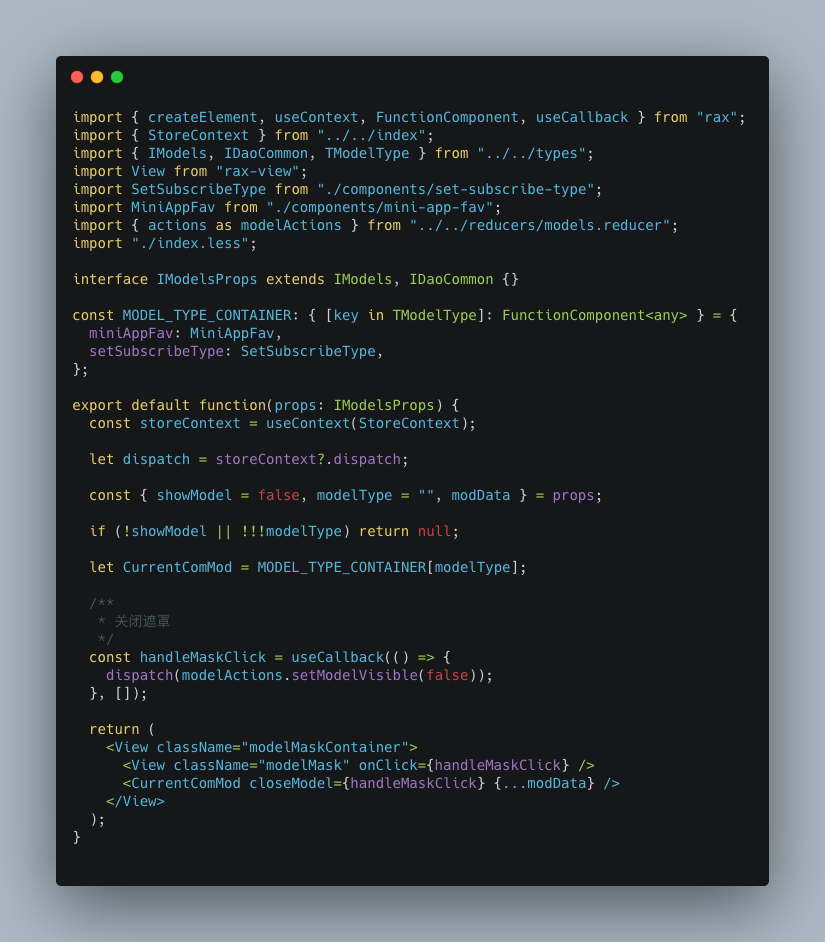
通信
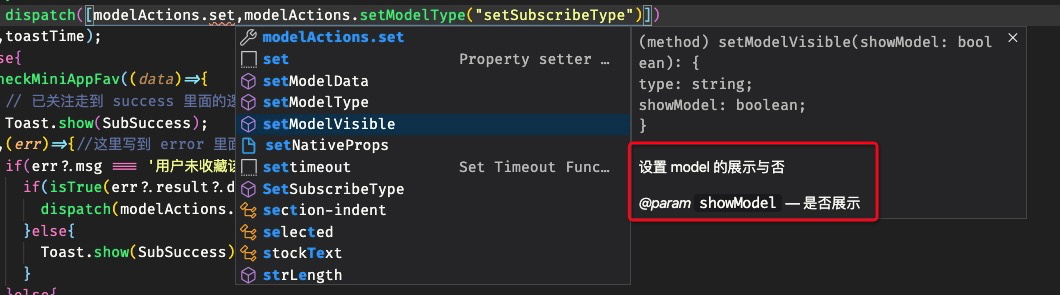
导入对应 action
import { actions as modelActions } from "../../../reducers/models.reducer";
dispatch
dispatch([modelActions.setModelVisible(true),modelActions.setModelType("setSubscribeType")])
❝触发 ts 校验
❞


效果
页面容器
❝基于拍卖通用容器组件改造
❞
改造点:「基于 body 滚动」。
因为我们目前页面都是 h5 页面了,之前则是 weex 的。所以对于容器的底层,之前使用的 RecycleView :固定 div 高度,基于 overflow 来实现滚动的。
虽然,在 h5 里面这种滚动机制有些”难受“,但是罪不至”换“。但是尴尬至于在于,iOS 的橡皮筋想过,在页面滚动到顶部以后,如果页面有频繁的动画或者 setState 的时候,会导致页面重绘,重新回到顶部。与手动下拉页面容器的橡皮筋效果冲突,而「倒是页面疯狂抖动」。所以。。。。重构。
旧版容器功能点
❝源码页面中使用的部分
❞

重构后的使用
❝基本没有太大改变
❞
简单拆解实现
type
import { FunctionComponent, RaxChild, RaxChildren, RaxNode, CSSProperties } from 'rax';

export interface IHeadFootWrapperProps {
    /**
     * 需要渲染的子组件
     */
    comFunc?: () => FunctionComponent | JSX.Element;
    /**
     * 组件类型
     */
    type: "head" | "foot",
    /**
     * 容器样式
     */
    wrapStyles?: CSSProperties;
}

/**
 * 滚动到顶部组件属性
 */
export interface IScrollToTopProps {
    /**
     * 距离底部距离
     */
    bottom?: number;
    /**
     * zIndex
     */
    zIndex?: number;
    /**
     * icon 图片地址
     */
    icon?: string;
    /**
     * 暗黑模式的 icon 图片地址
     */
    darkModeIcon?: string;
    /**
     * icon宽度
     */
    iconWidth?: number;
    /**
     * icon 高度
     */
    iconHeight?: number;
    /**
     * 滚动距离(滚动多少触发)
     */
    threshold?: number;
    /**
     * 点击回滚到顶部是否有动画
     */
    animated?: boolean;
    /**
     * 距离容器右侧距离
     */
    right?: number;
    /**
     * 展示回调
     */
    onShow?: (...args) => void;
    /**
     * 消失回调
     */
    onHide?: (...args) => void;
}
/**
 * 内容容器
 */
export interface IContentWrapProps{
    /**
     * children
     */
    children:RaxNode;
    /**
     * 隐藏滚动到顶部
     */
    hiddenScrollToTop?:boolean;
     /**
     * 返回顶部组件 Props
     */
    toTopProps?: IScrollToTopProps;
    /**
     * 渲染头部
     */
    renderHeader?: () => FunctionComponent | JSX.Element;
    /**
     * 渲染底部
     */
    renderFooter?: () => FunctionComponent | JSX.Element;
    /**
     * 自定义容器样式
     */
    customStyles?: {
        /**
         * body 容器样式
         */
        contentWrapStyles?: CSSProperties;
        /**
         * 头部容器样式
         */
        headWrapStyles?: CSSProperties;
        /**
         * 底部容器样式
         */
        bottomWrapStyle?: CSSProperties;
    };
    /**
     * 距离底部多少距离开始触发 endReached
     */
    onEndReachedThreshold?: number;
}

export interface IContainerProps extends IContentWrapProps {
    /**
     * 页面标题
     */
    title: string;
    /**
     * 页面 placeHolder
     */
    renderPlaceHolder?: () => FunctionComponent | JSX.Element;
    /**
     * 是否展示 placeH
     */
    showPlaceHolder?: boolean;
}
index.tsx
const isDebug = isTrue(getUrlParam('pm-debug'));
export default function({
  children,
  renderFooter,
  renderHeader,
  title,
  onEndReachedThreshold = 0,
  customStyles = {},
  toTopProps = {},
  showPlaceHolder,
  renderPlaceHolder,
  hiddenScrollToTop=false
}: IContainerProps) {
  if (!isWeb) return null;

  // 监听滚动
  useListenScroll();
  // 设置标题
  useSetTitle(title);
  // 监听 error 界面触发
  const { errorType } = useListenError();

  return (

              x-if={errorType === "" && !showPlaceHolder}
        renderFooter={renderFooter}
        customStyles={customStyles}
        renderHeader={renderHeader}
        onEndReachedThreshold={onEndReachedThreshold}
        toTopProps={toTopProps}
        hiddenScrollToTop={hiddenScrollToTop}
      >
        {children}

      {renderPlaceHolder && showPlaceHolder && renderPlaceHolder()}


  );
}

export { APP_CONTAINER_EVENTS };
通过 Fragment 包裹,主题是 ContentWrap,ErrorPage、VConsole、Holder放置主体以外。
❝相关 hooks 功能点完全区分开来
❞
广播事件
/**
 * Events 以页面为单位
 */
export const APP_CONTAINER_EVENTS = {
    SCROLL: 'H5_PAGE_CONTAINER:SCROLL',
    TRIGGER_ERROR: 'H5_PAGE_CONTAINER:TRIGGER_ERROR',
    END_REACHED: 'H5_PAGE_CONTAINER:END_REACHED',
    HIDE_TO_TOP: 'H5_PAGE_CONTAINER:HIDE_TO_TOP',
    RESET_SCROLL: 'H5_PAGE_CONTAINER:RESET_SCROLL',
    ENABLE_SCROLL:"H5_PAGE_CONTAINER:H5_PAGE_CONTAINER"
}
pm-cli
安装:tnpm install -g @ali/pmcli
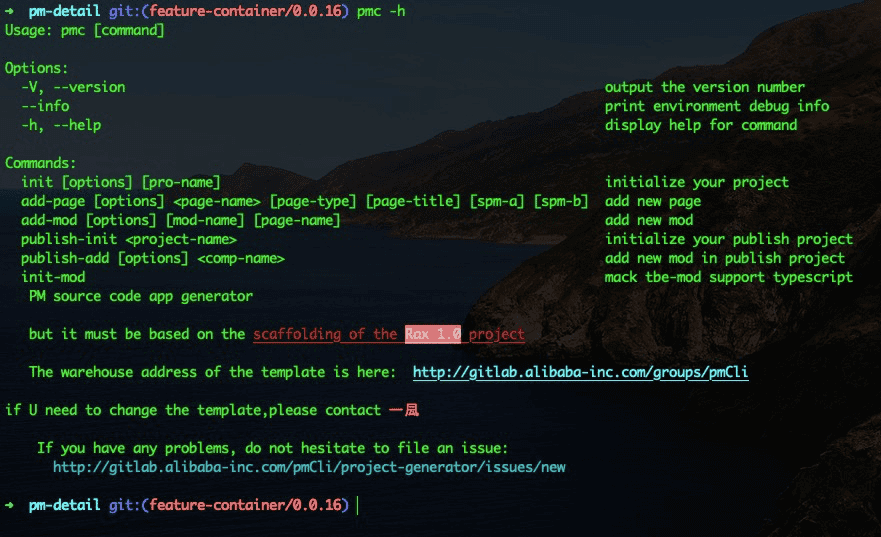
这里在介绍下命令:
基本使用
pmc init
在空目录中调用,则分两步工作: 首先调用 tnpm init rax初始化出来 rax 官方脚手架目录修改 package.json中name为当前所在文件夹的文件夹名称升级为拍卖源码架构,下载对应脚手架模板:init-project 在已 init rax后的项目中调用升级为拍卖源码架构,下载对应脚手架模板:init-project
❝注意:经过 pmc 初始化的项目,在项目根目录下回存有
❞.pm-cli.config.json配置文件
pmc add-page
在当前 项目中新增页面,选择三种页面类型

推荐使用 simpleSource、customStateManage
页面模板地址:add-page
pmc add-mod
根据所选择页面,初始化不同类型的模块
模块模板地址为:add-mod
pmc init-mod
调用def init tbe-mod,并且将仓库升级为支持 ts 开发模式
pmc publish-init
发布端架构初始化,基于 react 应用
发布端架构模板地址:publish-project
pmc publish-add
添加发布端模块
模块模板地址:publish-mod
pmc init-mod
调用 def init tbe-mod 命令,并同时升级为 ts 编码环境。
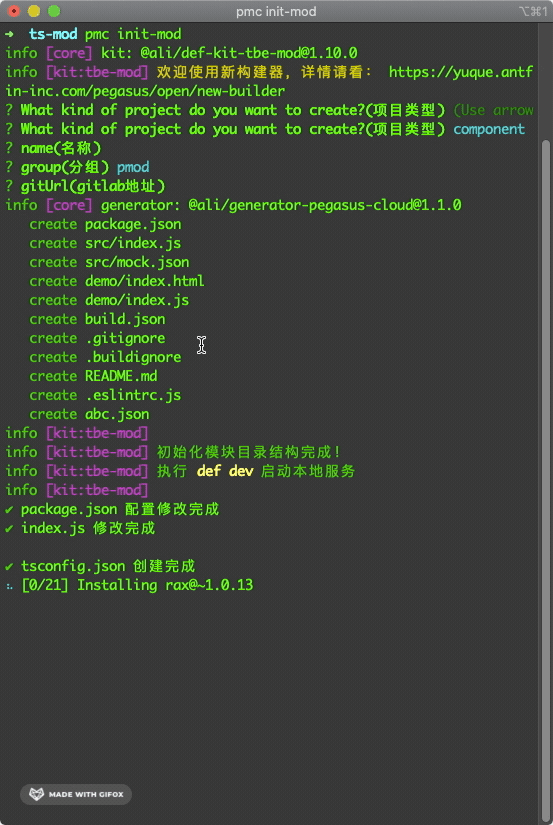
❝配置环境、安装依赖、直接运行
❞
相关体验地址(部分无法访问)
阿里房产 底层容器 (单独抽离组件ing) pmCli ts tbeMod