【Python】4500字、10个案例分享几个Python可视化小技巧,助你绘制高质量图表
Python当中,我们用于绘制图表的模块最基础的可能就是matplotlib了,今天小编分享几个用该模块进行可视化制作的技巧,帮助你绘制出更加高质量的图表。Python来制作可视化动图,让你更加清楚的了解到数据的走势数据集的导入
最开始,我们先导入数据集,并且导入我们需要用到的库
import pandas as pd
import matplotlib.pyplot as plt
plt.style.use("seaborn-darkgrid")

# 读取数据
aapl = pd.read_csv("AAPL.csv")
print(aapl.head())
output
        Date        Open        High  ...       Close   Adj Close    Volume
0  2021-9-30  143.660004  144.380005  ...  141.500000  141.293793  88934200
1  2021-10-1  141.899994  142.919998  ...  142.649994  142.442108  94639600
2  2021-10-4  141.759995  142.210007  ...  139.139999  138.937225  98322000
3  2021-10-5  139.490005  142.240005  ...  141.110001  140.904358  80861100
4  2021-10-6  139.470001  142.149994  ...  142.000000  141.793060  83221100
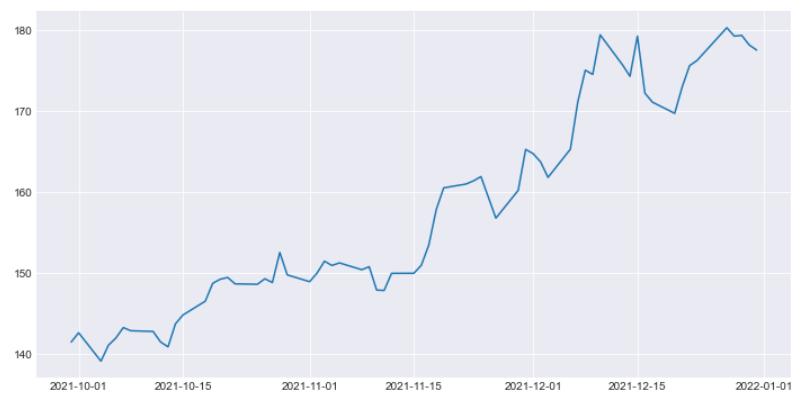
简单的折线图
plt.figure(figsize=(12,6))
plt.plot(aapl["Close"])
output
添加标题以及设置Y轴标签
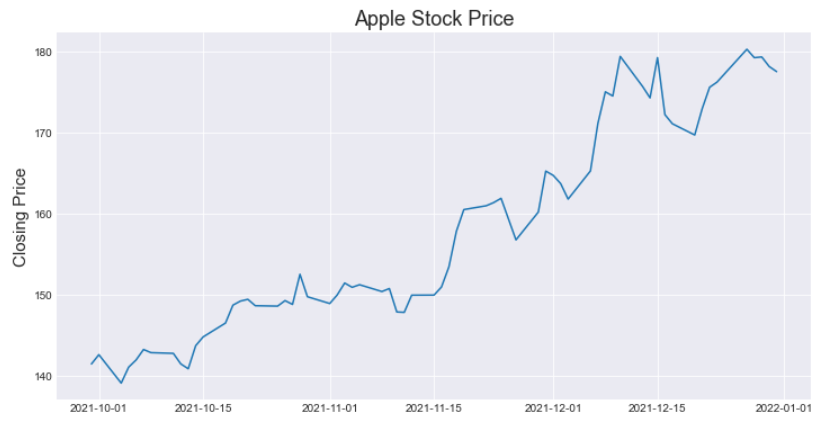
第一步我们先给图表添加标题以及给X轴、Y轴设置标签,代码如下
plt.figure(figsize=(12,6))
plt.plot(aapl["Close"])

# 添加标题和给Y轴打上标记
plt.ylabel("Closing Price", fontsize=15)  ## 收盘价
plt.title("Apple Stock Price", fontsize=18) ## 标题:苹果公司股价
output
再添加一个Y轴
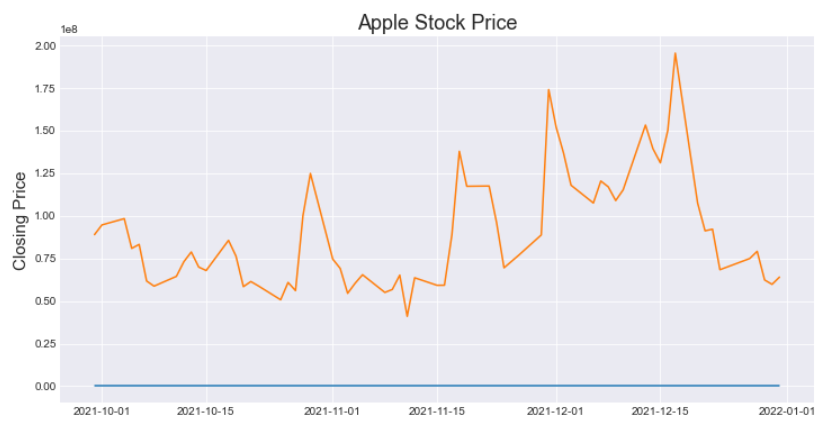
现有的这个Y轴代表的是收盘价,要是我们还想再往图表当中添加另外一列的数据,该数据的数值范围和已有的收盘价的数值范围不同,如果放在一起,绘制出来的图表可不好看,如下
plt.figure(figsize=(12,6))
plt.plot(aapl["Close"])

# 第二根折线图
plt.plot(aapl["Volume"])

# Y轴的名称和标记
plt.ylabel("Closing Price", fontsize=15)
plt.title("Apple Stock Price", fontsize=18)
output
fig, ax1 = plt.subplots(figsize=(12,6))

# 第二个Y轴的标记
ax2 = ax1.twinx()
ax1.plot(aapl["Close"])
ax2.plot(aapl["Volume"], color="r")

# 添加标题和Y轴的名称,有两个Y轴
ax1.set_ylabel("Closing Price", fontsize=15)
ax2.set_ylabel("Volume", fontsize=15)
plt.title("Apple Stock Price", fontsize=18)
output
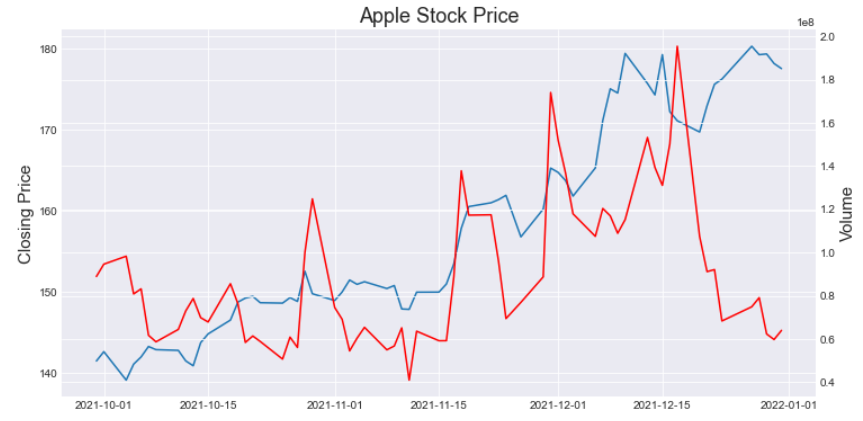
twinx()方法再来新建一个Y轴对象,然后对应的数据是Volume这一列当中的数据,而给Y轴标记的方式也从上面的plt.ylabel()变成了ax.set_ylabel()添加图例
fig, ax1 = plt.subplots(figsize=(12,6))
# 第二个Y轴
ax2 = ax1.twinx()
ax1.plot(aapl["Close"])
ax2.plot(aapl["Volume"], color="r")
# 设置Y轴标签和标题
ax1.set_ylabel("Closing Price", fontsize=15)
ax2.set_ylabel("Volume", fontsize=15)
plt.title("Apple Stock Price", fontsize=18)
# 添加图例
ax1.legend(["Closing price"], loc=2, fontsize=12)
ax2.legend(["Volume"], loc=2, bbox_to_anchor=(0, 0.9), fontsize=12)
output
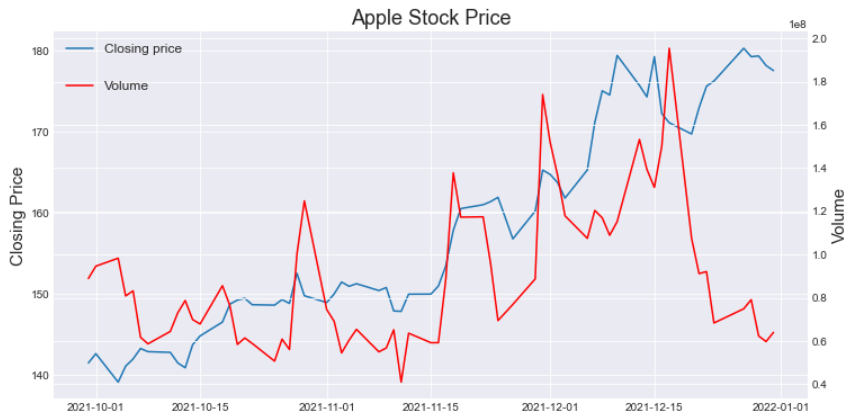
plt.legend()方法当中的loc参数代表的是图例的位置,2代表的是左上方,具体的大家可以通过下面的链接来查阅https://matplotlib.org/stable/api/_as_gen/matplotlib.pyplot.legend.html
将网格线去除掉
有时候我们感觉图表当中的网格线有点碍眼,就可以将其去掉,代码如下
fig, ax1 = plt.subplots(figsize=(12,6))
# 第二个Y轴
ax2 = ax1.twinx()
ax1.plot(aapl["Close"])
ax2.plot(aapl["Volume"], color="r")
# 设置Y轴标签和标题
ax1.set_ylabel("Closing Price", fontsize=15)
ax2.set_ylabel("Volume", fontsize=15)
plt.title("Apple Stock Price", fontsize=18)
# 添加图例
ax1.legend(["Closing price"], loc=2, fontsize=12)
ax2.legend(["Volume"], loc=2, bbox_to_anchor=(0, 0.9), fontsize=12)
# 去掉网格线
ax1.grid(False)
ax2.grid(False)
output
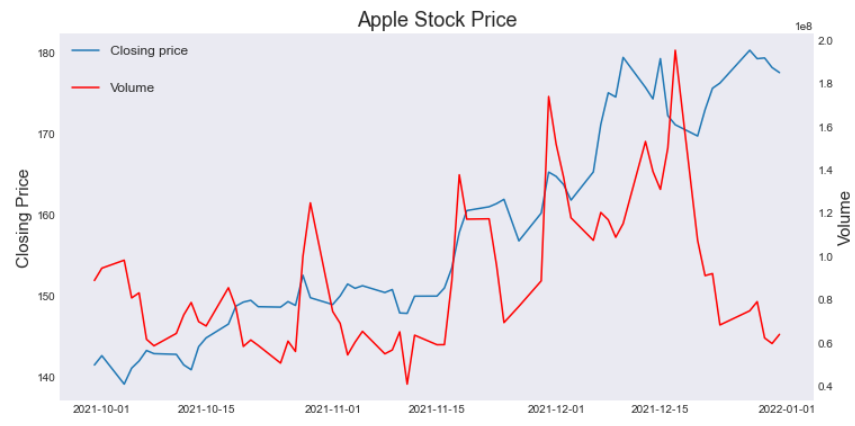
这样出来的图表是不是看着顺眼多了呢?!
在图表当中添加一些文字
fig, ax1 = plt.subplots(figsize=(12,6))
# 第二个Y轴
ax2 = ax1.twinx()
ax1.plot(aapl["Close"])
ax2.plot(aapl["Volume"], color="r")
# 设置Y轴标签和标题
ax1.set_ylabel("Closing Price", fontsize=15)
ax2.set_ylabel("Volume", fontsize=15)
plt.title("Apple Stock Price", fontsize=18)
# 添加图例
ax1.legend(["Closing price"], loc=2, fontsize=12)
ax2.legend(["Volume"], loc=2, bbox_to_anchor=(0, 0.9), fontsize=12)
# 去掉网格线
ax1.grid(False)
ax2.grid(False)

date_string = datetime.strptime("2021-10-31", "%Y-%m-%d")

# 添加文字
ax1.text(
    date_string, ## 代表的是添加的文字的位置
    170,
    "Nice plot!", ## 添加的文字的内容
    fontsize=18, ## 文字的大小
    color="green" ## 颜色
)
output
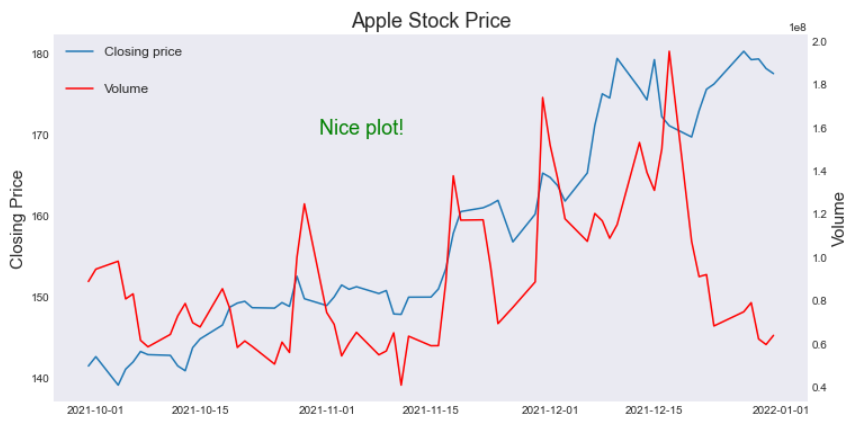
图表当中的中文显示
在上面的图表当中,无论是标题还是注释或者是图例,都是英文的,我们需要往里面添加中文的内容时候,还需要添加下面的代码
plt.rcParams['font.sans-serif'] = ['SimHei']

fig, ax1 = plt.subplots(figsize=(12,6))
# 第二个Y轴
ax2 = ax1.twinx()
ax1.plot(aapl["Close"])
ax2.plot(aapl["Volume"], color="r")
# 设置Y轴标签和标题
ax1.set_ylabel("收盘价", fontsize=15)
ax2.set_ylabel("成交量", fontsize=15)
plt.title("苹果公司股价走势", fontsize=18)
# 添加图例
ax1.legend(["Closing price"], loc=2, fontsize=12)
ax2.legend(["Volume"], loc=2, bbox_to_anchor=(0, 0.9), fontsize=12)
# 去掉网格线
ax1.grid(False)
ax2.grid(False)
# 添加文字
ax1.text(
    date_string,
    170,
    "画的漂亮",
    fontsize=18,
    color="green"
)
output
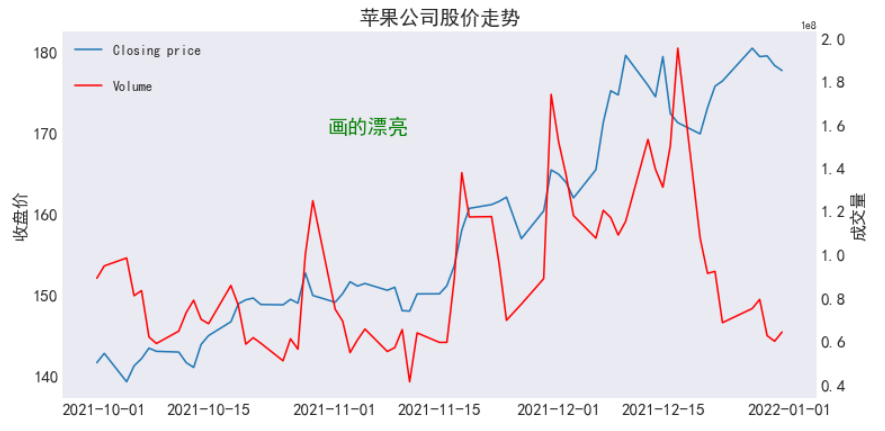
这样全局的字体都被设置成了“黑体”,文本内容都是用中文来显示
X轴/Y轴上刻度字体的大小
plt.rcParams["axes.edgecolor"] = "black"
plt.rcParams["axes.linewidth"] = 2
# tick size
ax1.tick_params(axis='both', which='major', labelsize=13)
ax2.tick_params(axis='both', which='major', labelsize=13)
output
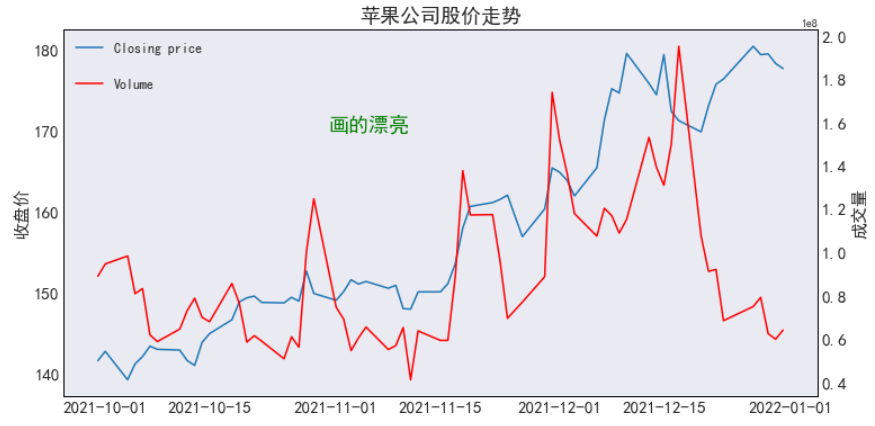
出来的图表是不是比一开始的要好很多呢?
制作动图
Python库,bar_chart_race,只需要简单的几行代码,就可以制作出随着时间变化的直方图动图,代码如下import bar_chart_race as bcr
import pandas as pd
# 生成GIF图像
df = pd.read_csv('covid19_tutorial.csv', index_col=index_col,
parse_dates=parse_dates)
bcr.bar_chart_race(df, 'covid19_tutorial_horiz.gif')
output
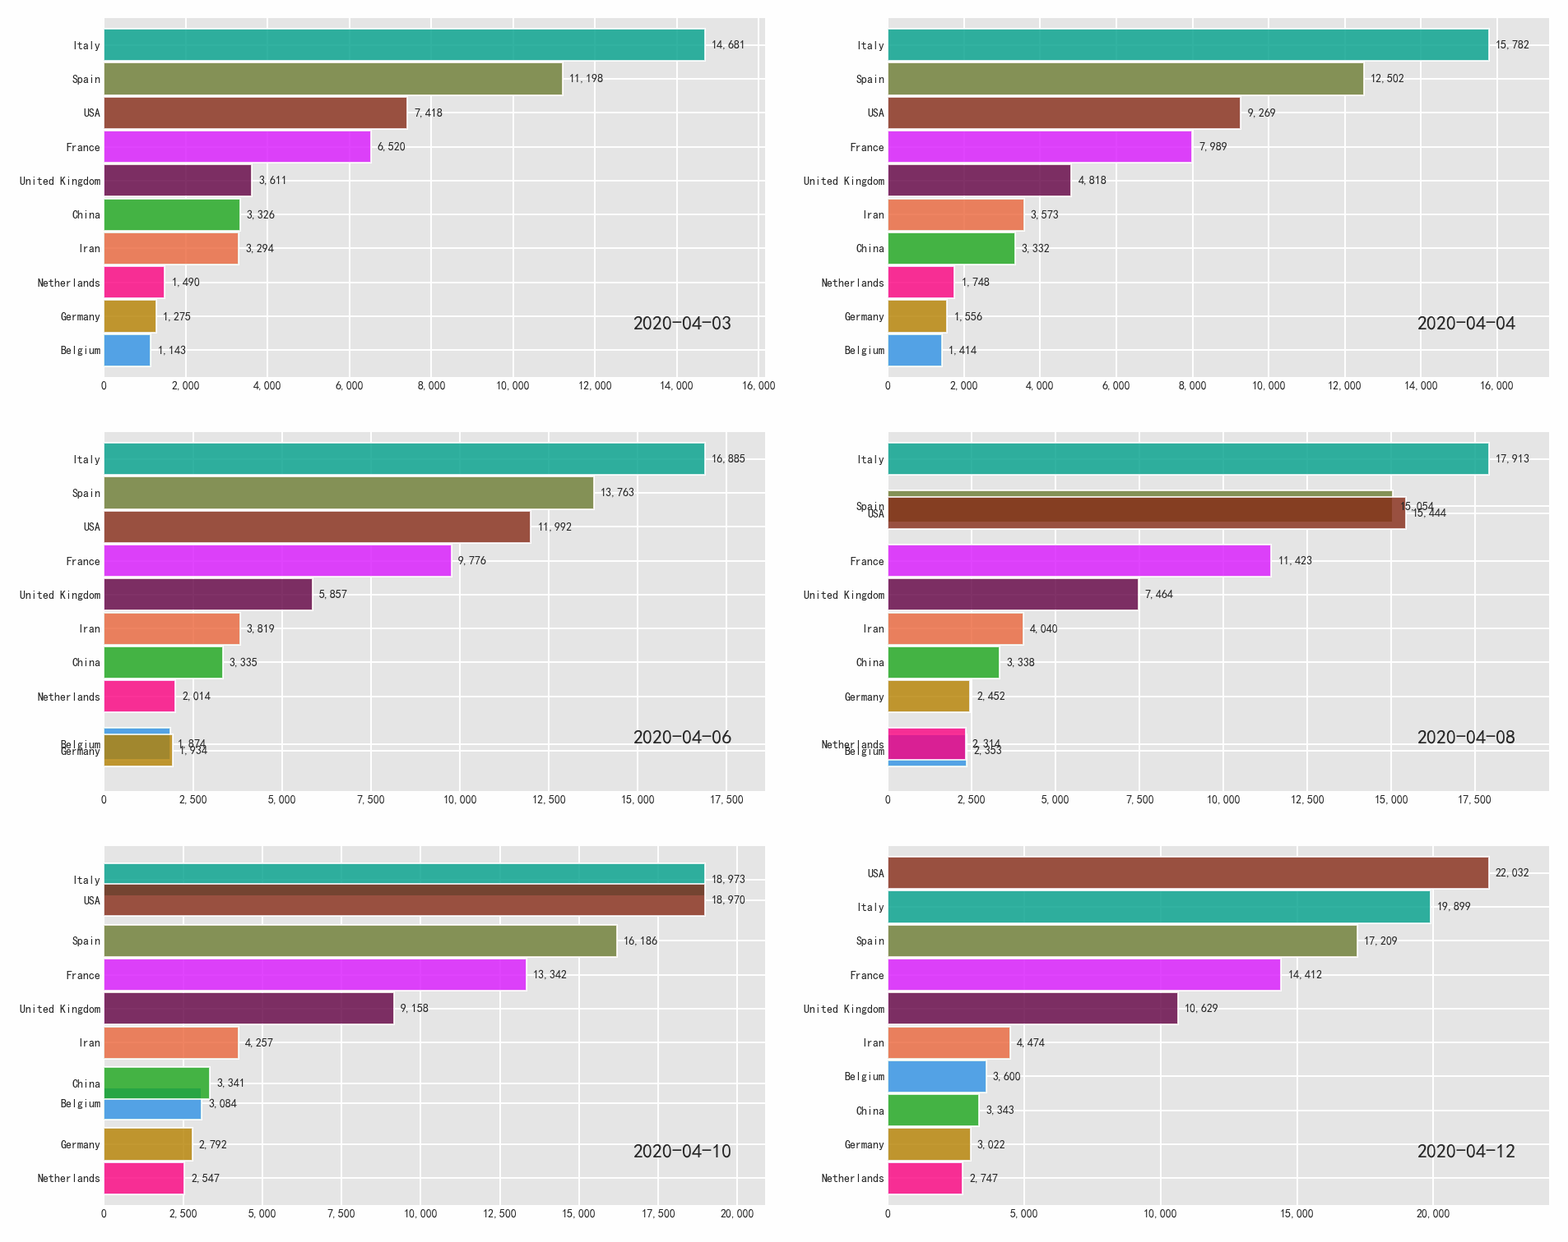
大家若是感兴趣,可以登上它的官网
https://www.dexplo.org/bar_chart_race/
来了解更多如何使用该模块来制作Python可视化动图的案例
往期精彩回顾
适合初学者入门人工智能的路线及资料下载 中国大学慕课《机器学习》(黄海广主讲) 机器学习及深度学习笔记等资料打印 机器学习在线手册 深度学习笔记专辑 《统计学习方法》的代码复现专辑 AI基础下载 本站qq群955171419,加入微信群请扫码:
评论
