
高性能 Go 代码工坊(Part5)
共 11568字,需浏览 24分钟
· 2021-04-21
5. 执行追踪器
执行追踪程序是由 Dmitry Vyukov[1] 为 GO 1.5 开发的,多年来一直没有得到充分的记录和利用。
与基于样本的分析不同,执行跟踪器集成到 Go runtime 中,因此它只知道 Go 程序在特定时间点在做什么。but why.
5.1. 什么是执行跟踪器,为什么需要它?
我认为最简单的解释是执行跟踪器做了什么,以及为什么它很重要,来看一段代码中 pprof, go tool pprof 性能较差。examples/mandelbrot 目录包含一个简单的 mandelbrot 生成器。此代码源自 Francesc Campoy’s mandelbrot package[1].
cd examples/mandelbrot
go build && ./mandelbrot
如果我们 build,然后 run ,它会产生这样的东西
5.1.1. 需要多长时间?
那么,这个程序生成 1024 x 1024 像素的图像需要多长时间?
我知道的最简单的方法就是 time(1)。
% time ./mandelbrot
real    0m1.654s
user    0m1.630s
sys     0m0.015s
不要使用
time go run mandebrot.go,这样会包含编译和运行程序所需的时间。
5.1.2. 程序正在做什么?
因此,在本例中,程序用了 1.6 秒生成 mandelbrot 并写入图片。
这样可以了吗?我们可以让它更快吗?
解决这个问题的一种方法是使用 Go 内置的 pprof 支持来分析程序。
5.2. 生成分析文件
要生成分析文件,我们需要
直接使用
runtime/pprofpackage使用像
github.com/pkg/profile这样的装饰器来实现自动化。
5.3. 使用 runtime/pprof 生成分析文件
让我们修改程序,向 os.Stdout 写一个 CPU 分析文件。
import "runtime/pprof"

func main() {
	pprof.StartCPUProfile(os.Stdout)
	defer pprof.StopCPUProfile()
通过将此代码添加到 main 函数的顶部,这个程序会向 os.Stdout 写入分析文件。
cd examples/mandelbrot-runtime-pprof
go run mandelbrot.go > cpu.pprof
在这种情况下,我们可以使用
go run,因为 cpu 分析文件只包括mandelbrot.go的执行,而不包括它的编译。
5.3.1. 利用 github.com/pkg/profile 生成分析文件
前一种方法很方便,但是它有一些问题。
如果忘记将输出重定向到文件,则会终止该终端会话。😞(提示:
reset(1)将帮助你)如果你在
os.Stdout上写其他东西,例如fmt.Println,你会破坏跟踪。
建议使用 runtime/pprof 的方法是将跟踪写入文件。但是,必须确保跟踪已停止,并且在程序停止之前,包括如果有人 `^ C 的情况下,文件是关闭的。
所以,几年前我写了一个 package [1] 来处理它。
import "github.com/pkg/profile"

func main() {
	defer profile.Start(profile.CPUProfile, profile.ProfilePath(".")).Stop()
如果我们运行这个版本中,我们得到写入到当前工作目录中的分析文件
% go run mandelbrot.go
2017/09/17 12:22:06 profile: cpu profiling enabled, cpu.pprof
2017/09/17 12:22:08 profile: cpu profiling disabled, cpu.pprof
是否使用
pkg/profile并不是强制性的,但是它会处理收集和记录跟踪的许多模板,所以我们将在本工作坊的其余部分使用它。
5.3.2. 分析文件
现在我们有一个分析文件,我们可以使用 go tool pprof 来分析它。
% go tool pprof -http=:8080 cpu.pprof
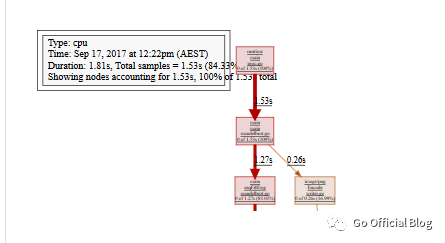
在这次运行中,我们看到程序运行了 1.81 秒(分析会增加一点开销)。我们还可以看到 pprof 只捕获了 1.53 秒的数据,因为 pprof 是基于样本的,依赖于操作系统的 SIGPROF 计时器。
由于 Go 1.9
pprof跟踪包含分析跟踪所需的所有信息。你不再需要有产生跟踪的匹配二进制文件。🎉
我们可以用 top pprof 函数对跟踪记录的函数进行排序。
% go tool pprof cpu.pprof
Type: cpu
Time: Mar 24, 2019 at 5:18pm (CET)
Duration: 2.16s, Total samples = 1.91s (88.51%)
Entering interactive mode (type "help" for commands, "o" for options)
(pprof) top
Showing nodes accounting for 1.90s, 99.48% of 1.91s total
Showing top 10 nodes out of 35
      flat  flat%   sum%        cum   cum%
     0.82s 42.93% 42.93%      1.63s 85.34%  main.fillPixel
     0.81s 42.41% 85.34%      0.81s 42.41%  main.paint
     0.11s  5.76% 91.10%      0.12s  6.28%  runtime.mallocgc
     0.04s  2.09% 93.19%      0.04s  2.09%  runtime.memmove
     0.04s  2.09% 95.29%      0.04s  2.09%  runtime.nanotime
     0.03s  1.57% 96.86%      0.03s  1.57%  runtime.pthread_cond_signal
     0.02s  1.05% 97.91%      0.04s  2.09%  compress/flate.(*compressor).deflate
     0.01s  0.52% 98.43%      0.01s  0.52%  compress/flate.(*compressor).findMatch
     0.01s  0.52% 98.95%      0.01s  0.52%  compress/flate.hash4
     0.01s  0.52% 99.48%      0.01s  0.52%  image/png.filter
我们看到,当 pprof 捕获堆栈时,main.fillPixel 函数在 CPU 上占有率最高。
在堆栈上找到 main.paint 并不奇怪,这是程序的工作;它负责绘制像素。但是是什么导致 paint 花了这么多时间?我们可以用 cummulative 命令 top 来检查。
(pprof) top --cum
Showing nodes accounting for 1630ms, 85.34% of 1910ms total
Showing top 10 nodes out of 35
      flat  flat%   sum%        cum   cum%
         0     0%     0%     1840ms 96.34%  main.main
         0     0%     0%     1840ms 96.34%  runtime.main
     820ms 42.93% 42.93%     1630ms 85.34%  main.fillPixel
         0     0% 42.93%     1630ms 85.34%  main.seqFillImg
     810ms 42.41% 85.34%      810ms 42.41%  main.paint
         0     0% 85.34%      210ms 10.99%  image/png.(*Encoder).Encode
         0     0% 85.34%      210ms 10.99%  image/png.Encode
         0     0% 85.34%      160ms  8.38%  main.(*img).At
         0     0% 85.34%      160ms  8.38%  runtime.convT2Inoptr
         0     0% 85.34%      150ms  7.85%  image/png.(*encoder).writeIDATs
这表明 main.fillPixed 实际上在做大部分工作。
你还可以使用
web命令可视化分析文件,如下所示:
图片.png
5.4. 跟踪 VS 分析
希望这个例子展示了分析的局限性。分析告诉我们分析器看到了什么;fillPixel 做了所有的工作。看起来没有什么可以做的。
所以现在是介绍执行跟踪器的好时机,它提供了对同一个程序的不同观测。
5.4.1. 使用执行跟踪器
使用跟踪器就像请求 profile.TraceProfile 一样简单,没有其他的变化。
import "github.com/pkg/profile"

func main() {
	defer profile.Start(profile.TraceProfile, profile.ProfilePath(".")).Stop()
当我们运行程序时,会在当前工作目录下得到一个 trace.out 文件。
% go build mandelbrot.go
% % time ./mandelbrot
2017/09/17 13:19:10 profile: trace enabled, trace.out
2017/09/17 13:19:12 profile: trace disabled, trace.out
real    0m1.740s
user    0m1.707s
sys     0m0.020s
与 pprof 一样,go 命令中也有一个分析跟踪的工具。
% go tool trace trace.out
2017/09/17 12:41:39 Parsing trace...
2017/09/17 12:41:40 Serializing trace...
2017/09/17 12:41:40 Splitting trace...
2017/09/17 12:41:40 Opening browser. Trace viewer s listening on http://127.0.0.1:57842
这个工具和 go tool pprof 有点不同。执行跟踪器重用了很多 Chrome 浏览器中内置的配置文件可视化基础架构,因此 go tool trace 作为一个服务器,将原始执行跟踪转换为 Chrome 可以原生显示的数据。
5.4.2. 分析跟踪
从跟踪中我们可以看出,这个程序只使用了一个 CPU。
func seqFillImg(m *img) {
	for i, row := range m.m {
		for j := range row {
			fillPixel(m, i, j)
		}
	}
}
这并不奇怪,默认情况下 mandelbrot.go 会按顺序为每一行中的每个像素依次调用 fillPixel 。
绘制图像后,请参阅执行切换到写入 .png 文件。这会在堆上产生垃圾,因此跟踪在这一点上发生变化,我们可以看到垃圾收集堆的典型锯齿模式。
跟踪分析文件提供了低至微秒级的时间分辨率。这是外部分析无法获得的。
go tool trace
在我们继续之前,我们应该谈谈跟踪工具的使用。
该工具使用内置在 Chrome 中的 JavaScript 调试支持。跟踪分析文件只能在 Chrome 中查看,在 Firefox、Safari、IE/Edge 中不起作用。
因为这是一个 Google 产品,它支持键盘快捷键;使用
WASD导航,使用?得到一份清单。
查看跟踪会占用大量内存。说真的,4GB 不够用,8GB 估计勉强,上更高的内存肯定更好。
如果你是从 Fedora 之类的 OS 发行版中安装 Go 的,那么跟踪查看器的支持文件可能不是
golangdeb/rpm main 程序的一部分,它们可能在某个-extra包中。
5.5. 使用多个 CPU
我们从前面的跟踪中看到,程序按顺序运行,没有利用这台机器上的其他的 CPU。
Mandelbrot generation 被称为 embarassingly_parallel(令人尴尬的并行)。每个像素都是独立的,可以并行计算。所以,让我们试试。
% go build mandelbrot.go
% time ./mandelbrot -mode px
2017/09/17 13:19:48 profile: trace enabled, trace.out
2017/09/17 13:19:50 profile: trace disabled, trace.out
real    0m1.764s
user    0m4.031s
sys     0m0.865s
所以运行时间基本相同。用户时间较多,这很合理,我们使用了所有的 CPU,但实际(wall clock)时间差不多。
让我们看看跟踪。
正如所看到的,这个跟踪生成了更多的数据。
看上去有很多工作正在进行,但如果你直接放大,就会出现空白。这就是调度器的问题。
当我们使用所有四个核心时,因为每个
fillPixel的工作量相对较小,所以我们在调度开销上花费了大量时间。
5.6. 分批工作
每像素使用一个 goroutine 太细粒度了。没有足够的工作来证明 goroutine 的开销是合理的。
让我们尝试每个 goroutine 处理一行。
% go build mandelbrot.go
% time ./mandelbrot -mode row
2017/09/17 13:41:55 profile: trace enabled, trace.out
2017/09/17 13:41:55 profile: trace disabled, trace.out
real    0m0.764s
user    0m1.907s
sys     0m0.025s
这看起来是一个很好的改进,我们几乎把程序的运行时间减少了一半。让我们看看跟踪。
正如所看到的,跟踪现在更小,更容易使用。我们可以在 span 中看到整个轨迹。
在程序开始时,我们看到 goroutines 的数量增加到 1000 个左右。这比我们在上一次跟踪中看到的 1 << 20 更好。
放大来看,我们会看到一个
onePerRowFillImg运行更长时间,由于产生工作的 goroutine 很早就完成了,调度器有效地处理了剩余的可运行 goroutine。
5.7. 使用 workers
mandelbrot.go 支持另外一个模式。
% go build mandelbrot.go
% time ./mandelbrot -mode workers
2017/09/17 13:49:46 profile: trace enabled, trace.out
2017/09/17 13:49:50 profile: trace disabled, trace.out

real    0m4.207s
user    0m4.459s
sys     0m1.284s
所以,运行时间比之前的任何一次都要差很多。让我们来看看跟踪,看看我们是否能弄清楚发生了什么。
查看跟踪可以看到,只有一个 worker 进程,生产者和消费者倾向于交替进行,因为只有一个生产者和一个消费者。让我们增加 worker 的数量
% go build mandelbrot.go
% time ./mandelbrot -mode workers -workers 4
2017/09/17 13:52:51 profile: trace enabled, trace.out
2017/09/17 13:52:57 profile: trace disabled, trace.out

real    0m5.528s
user    0m7.307s
sys     0m4.311s
更糟了!消耗更多的运行时间,更多的 CPU 时间。让我们看看跟踪发生了什么。
跟踪一团糟。因为有更多的 worker 可供选择,但他们似乎把所有的时间都花在争夺 work 上 。
这是因为该信道是无缓冲的。一个无缓冲的信道不能发送,直到有人准备接收。
在一个消费者准备好接收内容之前,生产者不能发送消息。
消费者们只有等到有人准备好了才可以接受消息,所以他们在等待的时候互相竞争。
发送方没有特权,它不能比已经运行的消费者享有优先权。
我们在这里看到的是未缓冲信道引入的延迟。调度器里有很多停止和启动,还有可能在等待工作的时候出现 locks 和 mutexes,这就是为什么我们看到 sys 消耗的时间更多的原因。
5.8. 使用缓冲信道
import "github.com/pkg/profile"

func main() {
	defer profile.Start(profile.TraceProfile, profile.ProfilePath(".")).Stop()
% go build mandelbrot.go
% time ./mandelbrot -mode workers -workers 4
2017/09/17 14:23:56 profile: trace enabled, trace.out
2017/09/17 14:23:57 profile: trace disabled, trace.out

real    0m0.905s
user    0m2.150s
sys     0m0.121s
这与上面的每行模式非常接近。
使用缓冲信道跟踪显示:
生产者不必等消费者来,它可以很快填满信道。
消费者可以快速地从信道获取下一个消息,而无需在消息生产时睡眠。
使用这种方法,我们使用一个信道来分配每一个像素的工作,其速度几乎与之前在每行 goroutine 上调度的速度相同。
将
nWorkersFillImg修改为每行工作。对结果进行时间分析并分析跟踪。
5.9. Mandelbrot 微服务
在 2019 年,除非你可以将 Internet 作为无服务器微服务提供,否则生成 Mandelbrots 毫无意义。因此,我向你介绍_ Mandelweb_
% go run examples/mandelweb/mandelweb.go
2017/09/17 15:29:21 listening on http://127.0.0.1:8080/
http://127.0.0.1:8080/mandelbrot
5.9.1. 跟踪运行的应用程序
在前面的例子中,我们对整个程序运行了跟踪。
如你所见,即使是少量的时间,跟踪数据也会非常大,因此连续收集跟踪数据会产生太多的数据。此外,跟踪还会对程序的速度产生影响,特别是在有大量活动的情况下。
我们需要的是一种从正在运行的程序中收集短跟踪的方法。
好在 net/http/pprof 包就是这样一个工具。
5.9.2. 通过 http 收集跟踪
希望大家都知道 net/http/pprof 包。
import _ "net/http/pprof"
导入时,net/http/pprof 将使用 http.DefaultServeMux 注册跟踪和分析路由。从 Go 1.5 开始,这包括跟踪分析器。
net/http/pprof向http.DefaultServeMux注册。如果你正在隐式或显式地使用该ServeMux,则可能会无意中将 pprof 端点公开到网络上。这可能导致源代码泄露。你可能不想这么做。
我们可以使用 curl (或 wget) 从 mandelweb 获取五秒钟的跟踪数据。
% curl -o trace.out http://127.0.0.1:8080/debug/pprof/trace?seconds=5
5.9.3. 产生一些负载
前面的例子很有意思,但是一个空闲的 web 服务器,按理说是没有性能问题的。我们需要产生一些负荷。因此我用的是 JBD[1] 的 hey。
% go get -u github.com/rakyll/hey
让我们从每秒一个请求开始。
% hey -c 1 -n 1000 -q 1 http://127.0.0.1:8080/mandelbrot
运行之后,在另一个窗口中收集跟踪
% curl -o trace.out http://127.0.0.1:8080/debug/pprof/trace?seconds=5
  % Total    % Received % Xferd  Average Speed   Time    Time     Time  Current
                                 Dload  Upload   Total   Spent    Left  Speed
100 66169    0 66169    0     0  13233      0 --:--:--  0:00:05 --:--:-- 17390
% go tool trace trace.out
2017/09/17 16:09:30 Parsing trace...
2017/09/17 16:09:30 Serializing trace...
2017/09/17 16:09:30 Splitting trace...
2017/09/17 16:09:30 Opening browser.
Trace viewer is listening on http://127.0.0.1:60301
5.9.4. 模拟过载
让我们将请求速率增加到每秒 5 个请求。
% hey -c 5 -n 1000 -q 5 http://127.0.0.1:8080/mandelbrot
然后在另一个窗口收集
% curl -o trace.out http://127.0.0.1:8080/debug/pprof/trace?seconds=5
  % Total    % Received % Xferd  Average Speed   Time    Time     Time  Current
                                Dload  Upload   Total   Spent    Left  Speed
100 66169    0 66169    0     0  13233      0 --:--:--  0:00:05 --:--:-- 17390
% go tool trace trace.out
2017/09/17 16:09:30 Parsing trace...
2017/09/17 16:09:30 Serializing trace...
2017/09/17 16:09:30 Splitting trace...
2017/09/17 16:09:30 Opening browser. Trace viewer is listening on http://127.0.0.1:60301
5.9.5. Extra credit, the Sieve of Eratosthenes
并发筛选质数[1] 是最早编写的 Go 程序之一。
Ivan Daniluk 写了一篇关于可视化的文章[1]。
让我们使用执行跟踪器来查看它的操作。
5.9.6. 更多资料
Rhys Hiltner, Go’s execution tracer[1] (dotGo 2016)
Rhys Hiltner, An Introduction to "go tool trace"[1] (GopherCon 2017)
Dave Cheney, Seven ways to profile Go programs[1] (GolangUK 2016)
Dave Cheney, High performance Go workshop[1]]
Ivan Daniluk, Visualizing Concurrency in Go[1] (GopherCon 2016)
Kavya Joshi, Understanding Channels[1] (GopherCon 2017)
Francesc Campoy, Using the Go execution tracer[1]
Dmitry Vyukov: https://github.com/dvyukov↩
Francesc Campoy’s mandelbrot package: https://github.com/campoy/mandelbrot↩
package : https://godoc.org/github.gom/pkg/profile↩
JBD: https://github.com/rakyll/hey↩
并发筛选质数: https://github.com/golang/go/blob/master/doc/play/sieve.go↩
文章: https://sectionan.dev/posts/go_concurrency_visualize/↩
Go’s execution tracer: https://www.youtube.com/watch?v=mmqDlbWk_XA↩
An Introduction to "go tool trace": https://www.youtube.com/watch?v=V74JnrGTwKA↩
Seven ways to profile Go programs: https://www.youtube.com/watch?v=2h_NFBFrciI↩
High performance Go workshop: https://dave.cheney.net/training#high-performance-go↩
Visualizing Concurrency in Go: https://www.youtube.com/watch?v=KyuFeiG3Y60↩
Understanding Channels: https://www.youtube.com/watch?v=KBZlN0izeiY↩
Using the Go execution tracer: https://www.youtube.com/watch?v=ySy3sR1LFCQ↩