
基于 SpringBoot + MyBatis 前后端分离实现的在线办公系统
点击关注公众号
1.开发环境的搭建及项目介绍
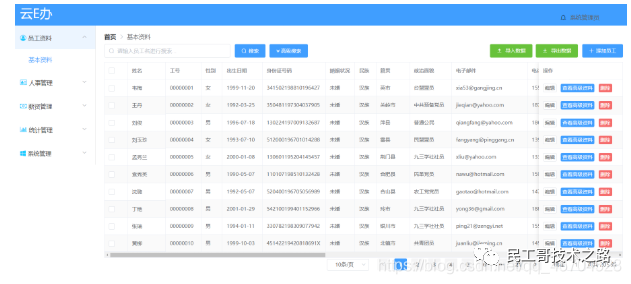
本项目目的是实现中小型企业的在线办公系统,云E办在线办公系统是一个用来管理日常的办公事务的一个系统。
使用SpringSecurity做安全认证及权限管理,Redis做缓存,RabbitMq做邮件的发送,使用EasyPOI实现对员工数据的导入和导出,使用WebSocket做在线聊天。
使用验证码登录

页面展示:
添加依赖 使用MyBatis的AutoGenerator自动生成mapper,service,Controller
2.登录模块及配置框架搭建
<1>Jwt工具类及对Token的处理
根据用户信息生成Token
定义JWT负载中用户名的Key以及创建时间的Key
//用户名的key
private static final String CLAIM_KEY_USERNAME="sub";
//签名的时间
private static final String CLAIM_KEY_CREATED="created";
从配置文件中拿到Jwt的密钥和失效时间
/**
 * @Value的值有两类:
 * ① ${ property : default_value }
 * ② #{ obj.property? :default_value }
 * 第一个注入的是外部配置文件对应的property,第二个则是SpEL表达式对应的内容。 那个
 * default_value,就是前面的值为空时的默认值。注意二者的不同,#{}里面那个obj代表对象。
 */
//JWT密钥
@Value("${jwt.secret}")
private  String secret;

//JWT失效时间
@Value("${jwt.expiration}")
private Long expiration;
根据用户信息UserDetials生成Token
/**
 * 根据用户信息生成Token
 * @param userDetails
 * @return
 */
public String generateToken(UserDetails userDetails){
    //荷载
    Map claim=new HashMap<>();
    claim.put(CLAIM_KEY_USERNAME,userDetails.getUsername());
    claim.put(CLAIM_KEY_CREATED,new Date());
    return generateToken(claim);
}

/**
 * 根据负载生成JWT Token
 * @param claims
 * @return
 */
private String generateToken(Map claims) {
    return Jwts.builder()
            .setClaims(claims)
            .setExpiration(generateExpirationDate())//添加失效时间
            .signWith(SignatureAlgorithm.HS512,secret)//添加密钥以及加密方式
            .compact();
}

/**
 * 生成Token失效时间  当前时间+配置的失效时间
 * @return
 */
private Date generateExpirationDate() {
    return new Date(System.currentTimeMillis()+expiration*1000);
}
根据Token生成用户名
/**
 * 根据Token生成用户名
 * @param token
 * @return
 */
public String getUsernameFormToken(String token){
    String username;
    //根据Token去拿荷载
    try {
        Claims claim=getClaimFromToken(token);
        username=claim.getSubject();//获取用户名
    } catch (Exception e) {
        e.printStackTrace();
        username=null;
    }
    return username;
}

/**
 * 从Token中获取荷载
 * @param token
 * @return
 */
private Claims getClaimFromToken(String token) {
    Claims claims=null;
    try {
        claims=Jwts.parser()
                .setSigningKey(secret)
                .parseClaimsJws(token)
                .getBody();
    } catch (Exception e) {
        e.printStackTrace();
    }
    return claims;
}
判断Token是否有效
/**
 * 判断Token是否有效
 * Token是否过期
 * Token中的username和UserDetails中的username是否一致
 * @param token
 * @param userDetails
 * @return
 */
public boolean TokenIsValid(String token,UserDetails userDetails){
    String username = getUsernameFormToken(token);
    return username.equals(userDetails.getUsername()) && !isTokenExpired(token);
}

/**
 * 判断Token是否过期
 * @param token
 * @return
 */
private boolean isTokenExpired(String token) {
    //获取Token的失效时间
    Date expireDate=getExpiredDateFromToken(token);
    //在当前时间之前,则失效
    return expireDate.before(new Date());
}

/**
 * 获取Token的失效时间
 * @param token
 * @return
 */
private Date getExpiredDateFromToken(String token) {
    Claims claims = getClaimFromToken(token);
    return claims.getExpiration();
}
判断Token是否可以被刷新
/**
 * 判断token是否可用被刷新
 * 如果已经过期了,则可用被刷新,未过期,则不可用被刷新
 * @param token
 * @return
 */
public boolean canRefresh(String token){
    return !isTokenExpired(token);
}
刷新Token,获取新的Token
/**
 * 刷新Token
 * @param token
 * @return
 */
public String refreshToken(String token){
    Claims claims=getClaimFromToken(token);
    claims.put(CLAIM_KEY_CREATED,new Date());
    return generateToken(claims);
}
<2>登录功能的实现
Controller层
@ApiOperation(value = "登录之后返回token")
@PostMapping("/login")
//AdminLoginParam 自定义登录时传入的对象,包含账号,密码,验证码
public RespBean login(@RequestBody AdminLoginParam adminLoginParam, HttpServletRequest request){
    return adminService.login(adminLoginParam.getUsername(),adminLoginParam.getPassword(),adminLoginParam.getCode(),request);
}
Service层
/**
 * 登录之后返回token
 * @param username
 * @param password
 * @param request
 * @return
 */
@Override
public RespBean login(String username, String password,String code, HttpServletRequest request) {
    String captcha = (String)request.getSession().getAttribute("captcha");//验证码功能,后面提到
    //验证码为空或匹配不上
    if((code == null || code.length()==0) || !captcha.equalsIgnoreCase(code)){
        return RespBean.error("验证码错误,请重新输入");
    }

    //通过username在数据库查出这个对象
    //在SecurityConfig配置文件中,重写了loadUserByUsername方法,返回了userDetailsService Bean对象,使用我们自己的登录逻辑
    UserDetails userDetails = userDetailsService.loadUserByUsername(username);
    //如果userDetails为空或userDetails中的密码和传入的密码不相同
    if (userDetails == null||!passwordEncoder.matches(password,userDetails.getPassword())){
        return RespBean.error("用户名或密码不正确");
    }
    //判断账号是否可用
    if(!userDetails.isEnabled()){
        return RespBean.error("该账号已经被禁用,请联系管理员");
    }

    //更新登录用户对象,放入security全局中,密码不放
    UsernamePasswordAuthenticationToken authenticationToken=new UsernamePasswordAuthenticationToken(userDetails,null,userDetails.getAuthorities());
    SecurityContextHolder.getContext().setAuthentication(authenticationToken);

    //生成token
    String token = jwtTokenUtil.generateToken(userDetails);
    Map tokenMap=new HashMap<>();
    tokenMap.put("token",token);
    tokenMap.put("tokenHead",tokenHead);//tokenHead,从配置文件yml中拿到的token的请求头 == Authorization
    return RespBean.success("登陆成功",tokenMap);//将Token返回
}
<3>退出登录
退出登录功能由前端实现,我们只需要返回一个成功信息即可
@ApiOperation(value = "退出登录")
@PostMapping("/logout")
/**
 * 退出登录
 */
public RespBean logout(){
    return RespBean.success("注销成功");
}
<4>获取当前登录用户信息
Controller层
 @ApiOperation(value = "获取当前登录用户的信息")
    @GetMapping("/admin/info")
    public Admin getAdminInfo(Principal principal){
        //可通过principal对象获取当前登录对象
        if(principal == null){
            return null;
        }
        //当前用户的用户名
        String username = principal.getName();
        Admin admin= adminService.getAdminByUsername(username);
        //不能返回前端用户密码,设置为空
        admin.setPassword(null);
        //将用户角色返回
        admin.setRoles(adminService.getRoles(admin.getId()));
        return admin;
    }
<5>SpringSecurity的配置类SecurityConfig
覆盖SpringSecurity默认生成的账号密码,并让他走我们自定义的登录逻辑
//让SpringSecurity走我们自己登陆的UserDetailsService逻辑

//认证信息的管理 用户的存储 这里配置的用户信息会覆盖掉SpringSecurity默认生成的账号密码
@Override
protected void configure(AuthenticationManagerBuilder auth) throws Exception {
    auth.userDetailsService(userDetailsService()).passwordEncoder(passwordEncoder());
}
//密码加解密
@Bean
public PasswordEncoder passwordEncoder(){
    return new BCryptPasswordEncoder();
}
@Override
@Bean  //注入到IOC中,在登录时使用到的userDetailsService就是这个Bean,loadUserByUsername方法是这里重写过的
public UserDetailsService userDetailsService(){
    return username->{
        Admin admin=adminService.getAdminByUsername(username);
        if(admin != null){
            admin.setRoles(adminService.getRoles(admin.getId()));
            return admin;
        }
        throw new UsernameNotFoundException("用户名或密码错误");
    };
}
登录功能中使用的userDetailsService对象由这里注入,重写loadUserByUsername方法实现自定义登录逻辑。
进行资源的拦截,权限设置,登录过滤器设置。
@Override
protected void configure(HttpSecurity http) throws Exception {
    //使用Jwt不需要csrf
    http.csrf().disable()
            //基于token,不需要Session
            .sessionManagement()
            .sessionCreationPolicy(SessionCreationPolicy.STATELESS)
            .and()
            //授权认证
            .authorizeRequests()
            .antMatchers("/doc.html").permitAll()
            //除了上面,所有的请求都要认证
            .anyRequest()
            .authenticated()
            .withObjectPostProcessor(new ObjectPostProcessor() {
                //动态权限配置
                @Override
                public  O postProcess(O o) {
                    o.setAccessDecisionManager(customUrlDecisionManager);
                    o.setSecurityMetadataSource(customFilter);
                    return o;
                }
            })
            .and()
            //禁用缓存
            .headers()
            .cacheControl();

    //添加jwt登录授权过滤器  判断是否登录
    http.addFilterBefore(jwtAuthencationTokenFilter(), UsernamePasswordAuthenticationFilter.class);
    //添加自定义未授权和未登录结果返回
    http.exceptionHandling()
        //权限不足
            .accessDeniedHandler(restfulAccessDeniedHandler)
        //未登录
            .authenticationEntryPoint(restAuthorizationEntryPoint);

}

//将登录过滤器注入
@Bean
public JwtAuthencationTokenFilter jwtAuthencationTokenFilter(){
    return new JwtAuthencationTokenFilter();
}

//需要放行的资源
@Override
public void configure(WebSecurity web) throws Exception {
    web.ignoring().antMatchers(
            "/login",
            "/logout",
            "/css/**",
            "/js/**",
            //首页
            "/index.html",
            //网页图标
            "favicon.ico",
            //Swagger2
            "/doc.html",
            "/webjars/**",
            "/swagger-resources/**",
            "/v2/api-docs/**",
            //放行图像验证码
            "/captcha",
            //WebSocket
            "/ws/**"
    );
}
登录过滤器的配置
public class JwtAuthencationTokenFilter extends OncePerRequestFilter {
   //Jwt存储头
    @Value("${jwt.tokenHeader}")
    private String tokenHeader;

    //Jwt头部信息
    @Value("${jwt.tokenHead}")
    private String tokenHead;

    @Autowired
    private JwtTokenUtil jwtTokenUtil;

    @Autowired
    private UserDetailsService userDetailsService;

    @Override
    protected void doFilterInternal(HttpServletRequest httpServletRequest, HttpServletResponse httpServletResponse, FilterChain filterChain) throws ServletException, IOException {
        //token存储在Jwt的请求头中
        //通过key:tokenHeader拿到value:token

        //这里我们定义的token后期以:Bearer开头,空格分割,加上真正的jwt
        //通过tokenHeader(Authorization)拿到以Bearer开头 空格分割 加上真正的jwt的字符串
        String authHeader = httpServletRequest.getHeader(tokenHeader);

        //判断这个token的请求头是否为空且是以配置信息中要求的tokenHead开头
        if(authHeader != null && authHeader.startsWith(tokenHead)){
            //截取真正的jwt
            String authToken=authHeader.substring(tokenHead.length());
            String username=jwtTokenUtil.getUsernameFormToken(authToken);
            //token存在用户名但是未登录
            if(username != null && SecurityContextHolder.getContext().getAuthentication() == null){
                //登录
                UserDetails userDetails = userDetailsService.loadUserByUsername(username);
                //验证token是否有效,重新设置用户对象
                if(jwtTokenUtil.TokenIsValid(authToken,userDetails)){
                    //把对象放到Security的全局中
                    UsernamePasswordAuthenticationToken authenticationToken=new UsernamePasswordAuthenticationToken(userDetails,null,userDetails.getAuthorities());
                    //将请求中的Session等信息放入Details,再放入Security全局中
                authenticationToken.setDetails(new WebAuthenticationDetailsSource().buildDetails(httpServletRequest));
                SecurityContextHolder.getContext().setAuthentication(authenticationToken);
                }

            }
        }
        //放行
        filterChain.doFilter(httpServletRequest,httpServletResponse);
    }
}
添加未登录结果处理器
当未登录或者Token失效时访问未放行的接口时,自定义返回的结果
@Component
public class RestAuthorizationEntryPoint implements AuthenticationEntryPoint {
    @Override
    public void commence(HttpServletRequest httpServletRequest, HttpServletResponse httpServletResponse, AuthenticationException e) throws IOException, ServletException {
        httpServletResponse.setCharacterEncoding("UTF-8");
        httpServletResponse.setContentType("application/json");
        PrintWriter out = httpServletResponse.getWriter();
        RespBean bean=RespBean.error("尚未登录,请登录");
        bean.setCode(401);
        out.write(new ObjectMapper().writeValueAsString(bean));
        out.flush();
        out.close();
    }
}
添加权限不足结果处理器
当访问接口没有权限时,自定义返回结果
@Component
public class RestfulAccessDeniedHandler implements AccessDeniedHandler {
    @Override
    public void handle(HttpServletRequest httpServletRequest, HttpServletResponse httpServletResponse, AccessDeniedException e) throws IOException, ServletException {
        httpServletResponse.setCharacterEncoding("UTF-8");
        httpServletResponse.setContentType("application/json");
        PrintWriter out = httpServletResponse.getWriter();
        RespBean bean=RespBean.success("权限不足,请联系管理员");
        bean.setCode(401);
        out.write(new ObjectMapper().writeValueAsString(bean));
        out.flush();
        out.close();
    }
}
添加权限控制器,根据请求的URL确定访问该URL需要什么角色
@Component
public class CustomFilter implements FilterInvocationSecurityMetadataSource {
@Autowired
private IMenuService menuService;
AntPathMatcher antPathMatcher=new AntPathMatcher();
@Override
public Collection getAttributes(Object o) throws IllegalArgumentException {
//获取请求的URL
String requestUrl = ((FilterInvocation) o).getRequestUrl();
List添加权限控制器,对角色信息进行处理,是否可用访问URL
@Component
public class CustomUrlDecisionManager implements AccessDecisionManager {
    @Autowired
    private CustomFilter customFilter;
    @Override
    public void decide(Authentication authentication, Object o, Collection collection) throws AccessDeniedException, InsufficientAuthenticationException {
        for (ConfigAttribute configAttribute: collection) {
            // 当前url所需要的角色
            List list= (List) customFilter.getAttributes(o);
            String[] needRoles=new String[list.size()];
            for (int i = 0; i                 needRoles[i]=list.get(i).getAttribute();
            }
            //判断角色是否登录即可访问的角色,此角色在CustomFilter中设置

            for (String needRole:needRoles) {
                if ("ROLE_LOGIN".equals((needRole))) {
                    //判断是否已经登录
                    if(authentication instanceof AnonymousAuthenticationToken){
                        throw new AccessDeniedException("尚未登录,请登录");
                    }else {
                        return;
                    }
                }
            }
            //判断用户角色是否为url所需要的角色
            //得到用户拥有的角色  这里在Admin类中已经将用户的角色放入了
            Collection authorities = authentication.getAuthorities();
            for (String needRole:needRoles) {
                for (GrantedAuthority authority: authorities) {
                    if(authority.getAuthority().equals(needRole)){
                        return;
                    }
                }
            }
            throw new AccessDeniedException("权限不足,请联系管理员");
        }
    }

    @Override
    public boolean supports(ConfigAttribute configAttribute) {
        return false;
    }

    @Override
    public boolean supports(Class aClass) {
        return false;
    }
}
<6>Swagger2的配置
@Configuration
@EnableSwagger2
public class Swagger2Config {
@Bean
public Docket createRestApi(){
return new Docket(DocumentationType.SWAGGER_2)
//基础设置
.apiInfo(apiInfo())
//扫描哪个包
.select()
.apis(RequestHandlerSelectors.basePackage("org.example.server.controller"))
//任何路径都可以
.paths(PathSelectors.any())
.build()
.securityContexts(securityContexts())
.securitySchemes(securitySchemes());
}
private ApiInfo apiInfo(){
return new ApiInfoBuilder()
.title("云E办接口文档")
.description("云E办接口文档")
.contact(new Contact("朱云飞", "http:localhost:8081/doc.html","2690534598@qq.com"))
.version("1.0")
.build();
}
private List securitySchemes() {
//设置请求头信息
List result=new ArrayList<>();
ApiKey apiKey=new ApiKey("Authorization", "Authorization","Header");
result.add(apiKey);
return result;
}
private List securityContexts() {
//设置需要登录认证的路径
List result=new ArrayList<>();
result.add(getContextByPath("/hello/.*"));
return result;
}
private SecurityContext getContextByPath(String pathRegex) {
return SecurityContext.builder()
.securityReferences(defaultAuth())//添加全局认证
.forPaths(PathSelectors.regex(pathRegex)) //带有pathRegex字段的接口访问不带添加的Authorization全局变量
.build();
}
//添加Swagger全局的Authorization 全局认证 固定的代码
private List defaultAuth() {
List result=new ArrayList<>();
//设置范围为全局
AuthorizationScope authorizationScope=new AuthorizationScope("global","accessEeverything");
AuthorizationScope[]authorizationScopes=new AuthorizationScope[1];
authorizationScopes[0]=authorizationScope;
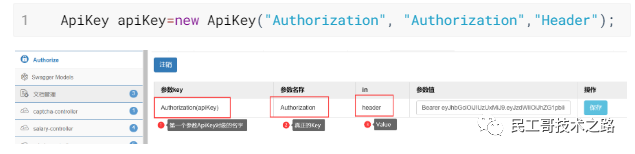
result.add((new SecurityReference("Authorization",authorizationScopes)));//这里的Authorization和上文ApiKey第二个参数一致
return result;
}
}
注意:
ApiKey apiKey=new ApiKey("Authorization", "Authorization","Header");
<7>验证码功能(这里使用谷歌的验证码Captcha)
验证码的配置类
@Component
public class CaptchaConfig {
    @Bean
    public DefaultKaptcha defaultKaptcha(){
        //验证码生成器
        DefaultKaptcha defaultKaptcha=new DefaultKaptcha();
        //配置
        Properties properties = new Properties();
        //是否有边框
        properties.setProperty("kaptcha.border", "yes");
        //设置边框颜色
        properties.setProperty("kaptcha.border.color", "105,179,90");
        //边框粗细度,默认为1
        // properties.setProperty("kaptcha.border.thickness","1");
        //验证码
        properties.setProperty("kaptcha.session.key","code");
        //验证码文本字符颜色 默认为黑色
        properties.setProperty("kaptcha.textproducer.font.color", "blue");
        //设置字体样式
        properties.setProperty("kaptcha.textproducer.font.names", "宋体,楷体,微软雅黑");
        //字体大小,默认40
        properties.setProperty("kaptcha.textproducer.font.size", "30");
        //验证码文本字符内容范围 默认为abced2345678gfynmnpwx
        // properties.setProperty("kaptcha.textproducer.char.string", "");
        //字符长度,默认为5
        properties.setProperty("kaptcha.textproducer.char.length", "4");
        //字符间距 默认为2
        properties.setProperty("kaptcha.textproducer.char.space", "4");
        //验证码图片宽度 默认为200
        properties.setProperty("kaptcha.image.width", "100");
        //验证码图片高度 默认为40
        properties.setProperty("kaptcha.image.height", "40");
        Config config = new Config(properties);
        defaultKaptcha.setConfig(config);
        return defaultKaptcha;
    }
}
验证码的控制器
@RestController
public class CaptchaController {
    @Autowired
    private DefaultKaptcha defaultKaptcha;
    @ApiOperation(value = "验证码")
    @GetMapping(value = "/captcha",produces = "image/jpeg")
    public void captcha(HttpServletRequest request, HttpServletResponse response){
        // 定义response输出类型为image/jpeg类型
        response.setDateHeader("Expires", 0);
        // Set standard HTTP/1.1 no-cache headers.
        response.setHeader("Cache-Control", "no-store, no-cache, must-revalidate");
        // Set IE extended HTTP/1.1 no-cache headers (use addHeader).
        response.addHeader("Cache-Control", "post-check=0, pre-check=0");
        // Set standard HTTP/1.0 no-cache header.
        response.setHeader("Pragma", "no-cache");
        // return a jpeg
        response.setContentType("image/jpeg");
        //-------------------生成验证码 begin --------------------------
        //获取验证码文本内容
        String text=defaultKaptcha.createText();
        System.out.println("验证码内容"+text);
        //将验证码文本内容放入Session
        request.getSession().setAttribute("captcha",text);
        //根据文本验证码内容创建图形验证码
        BufferedImage image = defaultKaptcha.createImage(text);
        ServletOutputStream outputStream=null;
        try {
             outputStream = response.getOutputStream();
             //输出流输出图片,格式为jpg
            ImageIO.write(image, "jpg",outputStream);
            outputStream.flush();
        } catch (IOException e) {
            e.printStackTrace();
        }finally {
            if(outputStream !=null){
                try {
                    outputStream.close();
                } catch (IOException e) {
                    e.printStackTrace();
                }
            }
        }
        //-------------------生成验证码 end --------------------------
    }
}
<8>根据用户ID查询用户所拥有操控权限的菜单列表
Controller层
@ApiOperation(value = "通过用户ID查询菜单列表")
@GetMapping("/menu")
public List{
return menuService.getMenuByAdminId();
}
Service层
@Override
public List{
//从Security全局上下文中获取当前登录用户Admin
Admin admin= AdminUtil.getCurrentAdmin();
Integer adminId=admin.getId();
ValueOperations valueOperations = redisTemplate.opsForValue();
//从Redis获取菜单数据
List Mapper层
-- 根据用户id查询菜单列表  -->
<select id="getMenuByAdminId" resultMap="Menus">
    SELECT DISTINCT
        m1.*,
        m2.id AS id2,
        m2.url AS url2,
        m2.path AS path2,
        m2.component AS component2,
        m2.`name` AS name2,
        m2.iconCls AS iconCls2,
        m2.keepAlive AS keepAlive2,
        m2.requireAuth AS requireAuth2,
        m2.parentId AS parentId2,
        m2.enabled AS enabled2
    FROM
        t_menu m1,
        t_menu m2,
        t_admin_role ar,
        t_menu_role mr
    WHERE
        m1.id = m2.parentId
        AND m2.id = mr.mid
        AND mr.rid = ar.rid
        AND ar.adminId = #{id}
        AND m2.enabled = TRUE
    ORDER BY
        m2.id
select>
<9>使用Redis缓存根据用户ID查出来的菜单信息
Redis的配置类
@Configuration
public class RedisConfig {
@Bean
public RedisTemplate redisTemplate(RedisConnectionFactory redisConnectionFactory) {
RedisTemplate redisTemplate=new RedisTemplate<>();
//String类型Key序列器
redisTemplate.setKeySerializer(new StringRedisSerializer());
//String类型Value序列器
redisTemplate.setValueSerializer(new GenericJackson2JsonRedisSerializer());
//Hash类型的key序列器
redisTemplate.setHashKeySerializer(new StringRedisSerializer());
//Hash类型的Value序列器
redisTemplate.setHashValueSerializer(new GenericJackson2JsonRedisSerializer());
redisTemplate.setConnectionFactory(redisConnectionFactory);
return redisTemplate;
}
}
<10>全局异常的统一处理
@RestControllerAdvice
public class GlobalException {
    @ExceptionHandler(SQLException.class)
    public RespBean respBeanMysqlException(SQLException e){
        if(e instanceof SQLIntegrityConstraintViolationException){
            return RespBean.error("该数据有关联数据,操作失败");
        }
        e.printStackTrace();
        return RespBean.error("数据库异常,操作失败");
    }

    @ExceptionHandler(DateException.class)
    public RespBean respBeanDateException(DateException e){
        e.printStackTrace();
        return RespBean.error(e.getMessage());
    }

    @ExceptionHandler(Exception.class)
    public RespBean respBeanException(Exception e){
        e.printStackTrace();
        return RespBean.error("未知错误,请联系管理员");
    }
}
3.基础信息设置模块
职位,职称,权限组管理仅涉及单表的增删查改,这里不多写
<1>部门管理
获取所有部门
Mapper层:涉及父子类,递归查找
"getAllDepartments" resultMap="DepartmentWithChildren">
    select
    "Base_Column_List"/>
    from t_department
    where parentId=#{parentId}


    "BaseResultMap" type="org.example.server.pojo.Department">
        "id" property="id" />
        "name" property="name" />
        "parentId" property="parentId" />
        "depPath" property="depPath" />
        "enabled" property="enabled" />
        "isParent" property="isParent" />


    "DepartmentWithChildren" type="org.example.server.pojo.Department" extends="BaseResultMap">
        "children" ofType="org.example.server.pojo.Department" select="org.example.server.mapper.DepartmentMapper.getAllDepartments"
        column="id">


    "Base_Column_List">
        id, name, parentId, depPath, enabled, isParent
添加部门
addDep" statementType="CALLABLE">
    call addDep(#{name,mode=IN,jdbcType=VARCHAR},#{parentId,mode=IN,jdbcType=INTEGER},#{enabled,mode=IN,jdbcType=BOOLEAN},#{result,mode=OUT,jdbcType=INTEGER},#{id,mode=OUT,jdbcType=INTEGER})
删除部门
addDep" statementType="CALLABLE">
    call addDep(#{name,mode=IN,jdbcType=VARCHAR},#{parentId,mode=IN,jdbcType=INTEGER},#{enabled,mode=IN,jdbcType=BOOLEAN},#{result,mode=OUT,jdbcType=INTEGER},#{id,mode=OUT,jdbcType=INTEGER})
4.薪资模块及薪资管理模块
这里仅介绍获取全部操作员及操作员角色的更新,其他功能都是单表简单的增删查改
<1>获取全部操作员
Controller层
@ApiOperation(value = "获取所有操作员")
@GetMapping("/")
public List getAllAdmins(String keywords) {
return adminService.getAllAdmins(keywords);
}
Service层
/**
 * 获取所有操作员
 * @param keywords
 */
@Override
public List getAllAdmins(String keywords) {
    //要传当前登录的Id,当前操作员不用查
    return adminMapper.getAllAdmins(AdminUtil.getCurrentAdmin().getId(),keywords);
}
Mapper层
"getAllAdmins" resultMap="AdminWithRole">
    SELECT
    a.*,
    r.id AS rid,
    r.`name` AS rname,
    r.nameZh AS rnameZh
    FROM
    t_admin a
    LEFT JOIN t_admin_role ar ON a.id = ar.adminId
    LEFT JOIN t_role r ON r.id = ar.rid
    WHERE
    a.id != #{id}
    <if test="null!=keywords and ''!=keywords">
        AND a.`name` LIKE CONCAT( '%', #{keywords}, '%' )
    if>
    ORDER BY
    a.id
涉及操作员角色的查询
<2>操作员角色的修改
Service层:
/**
 * 更新操作员角色
 * @param adminId
 * @param rids
 * @return
 */
@Override
@Transactional
public RespBean updateAdminRole(Integer adminId, Integer[] rids) {
    //先将已经拥有的角色全部删除
    adminRoleMapper.delete(new QueryWrapper().eq("adminId",adminId));
    //再将传过来的所有角色添加
    Integer result = adminRoleMapper.addAdminRole(adminId, rids);
    if(result == rids.length){
        return RespBean.success("修改角色成功");
    }
    return RespBean.error("更新角色失败");
}
思想:先将操作员所有的角色都删除,再将前端闯入的角色全部添加
5.员工模块管理
<1>分页获取全部员工信息
Controller
@ApiOperation(value = "查询所有的员工(分页)")
@GetMapping("/")
//beginDateScope入职的日期范围
public RespPageBean getEmployee(@RequestParam(defaultValue = "1") Integer currentPage,
                                @RequestParam(defaultValue = "10") Integer size,
                                Employee employee,
                                LocalDate[] beginDateScope){


    return employeeService.getEmployeeByPage(currentPage,size,employee,beginDateScope);
}
Service层
@Override
public RespPageBean getEmployeeByPage(Integer currentPage, Integer size, Employee employee, LocalDate[] beginDateScope) {
    Page page=new Page<>(currentPage,size);
    IPage iPage=employeeMapper.getEmployeeByPage(page,employee,beginDateScope);
    RespPageBean respPageBean=new RespPageBean();
    respPageBean.setTotal(iPage.getTotal());
    respPageBean.setData(iPage.getRecords());
    return respPageBean;
}
Mapper层
"EmployeeInfo" type="org.example.server.pojo.Employee" extends="BaseResultMap">
        "nation" javaType="org.example.server.pojo.Nation">
            "nid" property="id" />
            "nname" property="name" />

        "politicsStatus" javaType="org.example.server.pojo.PoliticsStatus">
            "pid" property="id" />
            "pname" property="name" />

        "department" javaType="org.example.server.pojo.Department">
            "did" property="id" />
            "dname" property="name" />

        "joblevel" javaType="org.example.server.pojo.Joblevel">
            "jid" property="id" />
            "jname" property="name" />

        "position" javaType="org.example.server.pojo.Position">
            "posid" property="id" />
            "posname" property="name" />


"getEmployeeByPage" resultMap="EmployeeInfo">
    SELECT
    e.*,
    n.id AS nid,
    n.`name` AS nname,
    p.id AS pid,
    p.`name` AS pname,
    d.id AS did,
    d.`name` AS dname,
    j.id AS jid,
    j.`name` AS jname,
    pos.id AS posid,
    pos.`name` AS posname
    FROM
    t_employee e,
    t_nation n,
    t_politics_status p,
    t_department d,
    t_joblevel j,
    t_position pos
    WHERE
    e.nationId = n.id
    AND e.politicId = p.id
    AND e.departmentId = d.id
    AND e.jobLevelId = j.id
    AND e.posId = pos.id
    <if test="null!=employee.name and ''!=employee.name">
        AND e.`name` LIKE CONCAT( '%', #{employee.name}, '%' )
    if>
    <if test="null!=employee.politicId">
        AND e.politicId = #{employee.politicId}
    if>
    <if test="null!=employee.nationId">
        AND e.nationId = #{employee.nationId}
    if>
    <if test="null!=employee.jobLevelId">
        AND e.jobLevelId = #{employee.jobLevelId}
    if>
    <if test="null!=employee.posId">
        AND e.posId = #{employee.posId}
    if>
    <if test="null!=employee.engageForm and ''!=employee.engageForm">
        AND e.engageForm = #{employee.engageForm}
    if>
    <if test="null!=employee.departmentId">
        AND e.departmentId = #{employee.departmentId}
    if>
    <if test="null!=beginDateScope and 2==beginDateScope.length">
        AND e.beginDate BETWEEN #{beginDateScope[0]} AND #{beginDateScope[1]}
    if>
    ORDER BY
    e.id
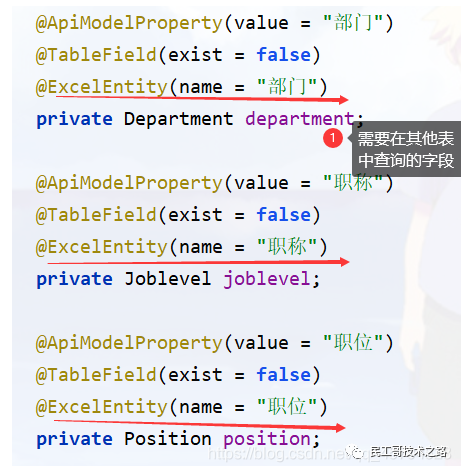
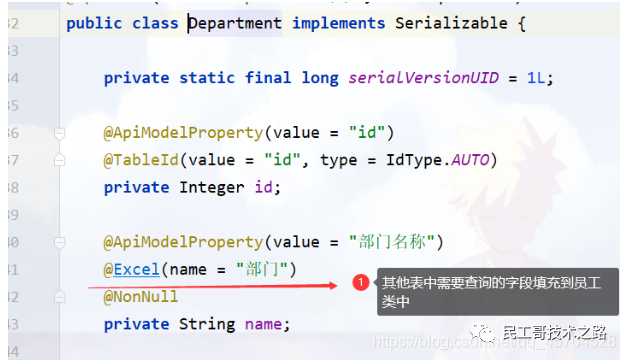
<2>使用EasyPOI对员工信息进行导入和导出
EasyPOI注解的使用
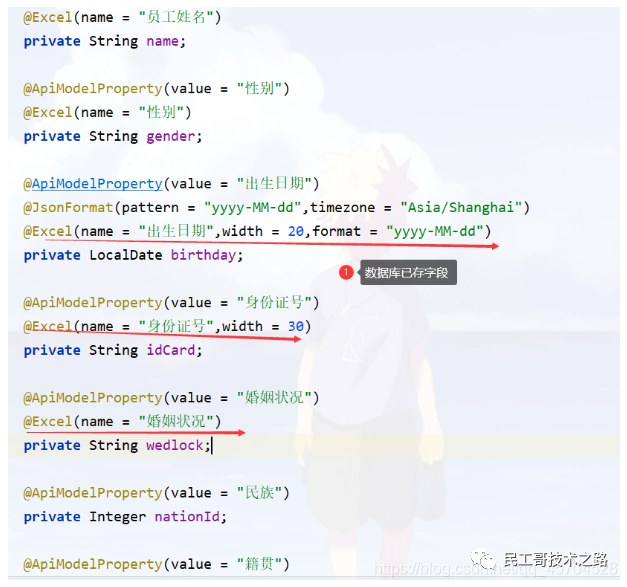
用于员工数据导入:Excel表中的部门,职称等字段在数据库员工表中找不到字段,数据库中是以id外键字段存储
员工数据的导出
@ApiOperation(value = "导出员工数据")
@GetMapping(value = "/export",produces = "application/octet-stream")
public void exportEmployee(HttpServletResponse response){
    List list = employeeService.getEmployee(null);
    //参数:文件名,表名,导出的Excel的类型(03版本)
    ExportParams params=new ExportParams("员工表","员工表", ExcelType.HSSF);
    Workbook workbook = ExcelExportUtil.exportExcel(params, Employee.class, list);
    //输入workbook
    ServletOutputStream out=null;
    try{
        //流形式
        response.setHeader("content-type","application/octet-stream");
        //防止中文乱码
        response.setHeader("content-disposition","attachment;filename="+ URLEncoder.encode("员工表.xls","UTF-8"));
        out = response.getOutputStream();
        workbook.write(out);
    }catch (IOException e){
        e.printStackTrace();
    }finally {
        if(out != null){
            try {
                out.close();
            } catch (IOException e) {
                e.printStackTrace();
            }
        }
    }
}
员工数据的导入
@ApiOperation(value = "导入员工数据")
@PostMapping("/import")
public RespBean importEmployee(MultipartFile file){
    //准备导入的数据表
    ImportParams params=new ImportParams();
    //去掉第一行:标题行
    params.setTitleRows(1);
    List nationList = nationService.list();
    List politicsStatusList=politicsStatusService.list();
    List departmentList=departmentService.list();
    List joblevelList=joblevelService.list();
    List positionList=positionService.list();
    try {
        //将Excel表变为List
        List list = ExcelImportUtil.importExcel(file.getInputStream(), Employee.class, params);
        list.forEach(employee -> {
            //获取民族ID
            Integer nationId = nationList.get(nationList.indexOf(new Nation(employee.getNation().getName()))).getId();
            employee.setNationId(nationId);

            //获取政治面貌Id
            Integer politicsStatusId=politicsStatusList.get(politicsStatusList.indexOf(new PoliticsStatus(employee.getPoliticsStatus().getName()))).getId();
            employee.setPoliticId(politicsStatusId);

            //获取部门Id
            Integer departmentId=departmentList.get(departmentList.indexOf(new Department(employee.getDepartment().getName()))).getId();
            employee.setDepartmentId(departmentId);

            //获取职称Id
            Integer joblevelId=joblevelList.get(joblevelList.indexOf(new Joblevel(employee.getJoblevel().getName()))).getId();
            employee.setJobLevelId(joblevelId);

            //获取职位Id
            Integer positionId=positionList.get(positionList.indexOf(new Position(employee.getPosition().getName()))).getId();
            employee.setPosId(positionId);
        });

        if(employeeService.saveBatch(list)){
            return RespBean.success("导入成功");
        }
    } catch (Exception e) {
        e.printStackTrace();
    }
    return RespBean.error("导入失败");
}
<3>使用RabbitMQ对新入职的员工发送欢迎邮件
这里使用SMTP:需要先去邮箱开通SMTP服务
RabbitMQ消息发送的可靠性
消息落库,对消息状态进行标记

步骤:
发送消息时,将当前消息数据存入数据库,投递状态为消息投递中 开启消息确认回调机制。确认成功,更新投递状态为消息投递成功 开启定时任务,重新投递失败的消息。重试超过3次,更新投递状态为投递失败
消息延迟投递,做二次确认,回调检查
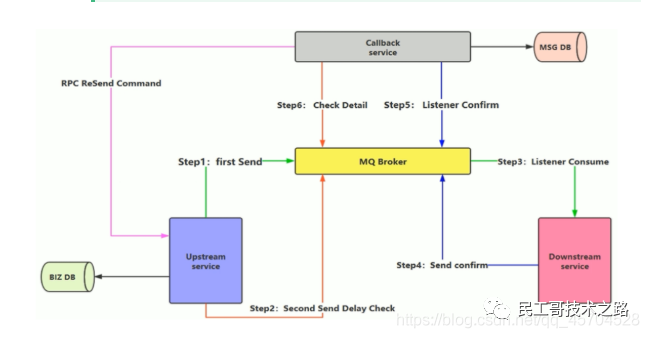
步骤:
发送消息时,将当前消息存入数据库,消息状态为消息投递
过一段时间进行第二次的消息发送
开启消息回调机制,当第一次发送的消息被成功消费时,消费端的确认会被MQ Broker监听,成功则将消息队列中的状态变为投递成功
如果消息投递没有成功,则过一段时间第二次发送的消息也会被MQ Broker监听到,会根据这条消息的ID去消息数据库查找,如果发现消息数据库中的状态为投递中而不是投递成功,则会通知消息放松端重新进行步骤一
消息功能的实现
在进行新员工插入成功后,对新员工发出邮件,并将发送的邮件保存到数据库中
    //获取合同开始和结束的时间
    LocalDate beginContact=employee.getBeginContract();
    LocalDate endContact=employee.getEndContract();
    long days = beginContact.until(endContact, ChronoUnit.DAYS);
    //保留两位小数
    DecimalFormat decimalFormat=new DecimalFormat("##.00");
    employee.setContractTerm(Double.parseDouble(decimalFormat.format(days/365.00)));
    if(employeeMapper.insert(employee) == 1){
        //获取新插入的员工对象
        Employee emp=employeeMapper.getEmployee(employee.getId()).get(0);
        //数据库记录发送的消息
        String msgId = UUID.randomUUID().toString();
        MailLog mailLog=new MailLog();
        mailLog.setMsgId(msgId);
        mailLog.setEid(employee.getId());
        mailLog.setStatus(0);
        //消息的状态保存在Model中
        mailLog.setRouteKey(MailConstants.MAIL_ROUTING_KEY_NAME);
        mailLog.setExchange(MailConstants.MAIL_EXCHANGE_NAME);
        mailLog.setCount(MailConstants.MAX_TRY_COUNT);
        mailLog.setTryTime(LocalDateTime.now().plusMinutes(MailConstants.MAX_TRY_COUNT));
        mailLog.setCreateTime(LocalDateTime.now());
        mailLog.setUpdateTime(LocalDateTime.now());
        mailLogMapper.insert(mailLog);

        //发送信息
        //发送交换机,路由键,用户对象和消息ID
        rabbitTemplate.convertAndSend(MailConstants.MAIL_EXCHANGE_NAME,
                MailConstants.MAIL_ROUTING_KEY_NAME,
                emp,
                new CorrelationData(msgId));
        return RespBean.success("添加成功");
    }
    return RespBean.error("添加失败");
}
消费端的处理,这里我们使用上述第一种方式,—>消息落库,对消息状态进行标记. 为保证消费者不重复消费同一消息,采取 消息序号+我们传入的消息msgId来识别每一个消息
@Component
public class MailReceiver {

    //日志
    private static final Logger LOGGER = LoggerFactory.getLogger(MailReceiver.class);

    @Autowired
    private JavaMailSender javaMailSender;
    @Autowired
    private MailProperties mailProperties;
    @Autowired
    private TemplateEngine templateEngine;
    @Autowired
    private RedisTemplate redisTemplate;

    @RabbitListener(queues = MailConstants.MAIL_QUEUE_NAME)
    //拿取Message 和 channel 可以拿到 消息序号鉴别消息是否统一个消息多收    通过消息序号+msgId两个来鉴别
    public void handler(Message message, Channel channel) {
        Employee employee = (Employee) message.getPayload();
        MessageHeaders headers = message.getHeaders();
        //消息序号
        long tag = (long) headers.get(AmqpHeaders.DELIVERY_TAG);
        //拿到存取的UUID
        String msgId = (String) headers.get("spring_returned_message_correlation");//这个key固定
        HashOperations hashOperations = redisTemplate.opsForHash();
        try {
            //从Redis中拿取,如果存在,说明消息已经发送成功了,这里直接确认返回
            if (hashOperations.entries("mail_log").containsKey(msgId)){
                LOGGER.error("消息已经被消费=============>{}",msgId);
                /**
                 * 手动确认消息
                 * tag:消息序号
                 * multiple:是否确认多条
                 */
                channel.basicAck(tag,false);
                return;
            }
            MimeMessage msg = javaMailSender.createMimeMessage();
            MimeMessageHelper helper = new MimeMessageHelper(msg);
            //发件人
            helper.setFrom(mailProperties.getUsername());
            //收件人
            helper.setTo(employee.getEmail());
            //主题
            helper.setSubject("入职欢迎邮件");
            //发送日期
            helper.setSentDate(new Date());
            //邮件内容
            Context context = new Context();
            //用于theymeleaf获取
            context.setVariable("name", employee.getName());
            context.setVariable("posName", employee.getPosition().getName());
            context.setVariable("joblevelName", employee.getJoblevel().getName());
            context.setVariable("departmentName", employee.getDepartment().getName());
            //将准备好的theymeleaf模板中的信息转为String
            String mail = templateEngine.process("mail", context);
            helper.setText(mail, true);
            //发送邮件
            javaMailSender.send(msg);
            LOGGER.info("邮件发送成功");
            //将消息id存入redis
            //mail_log是Redis  hash的key   msgId是真正的key  "OK"是Value,主要是拿到msgId,"OK"没啥用
            hashOperations.put("mail_log", msgId, "OK");
            //手动确认消息
            channel.basicAck(tag, false);
        } catch (Exception e) {
            /**
             * 手动确认消息
             * tag:消息序号
             * multiple:是否确认多条
             * requeue:是否退回到队列
             */
            try {
                channel.basicNack(tag,false,true);
            } catch (IOException ex) {
                LOGGER.error("邮件发送失败=========>{}", e.getMessage());
            }
            LOGGER.error("邮件发送失败=========>{}", e.getMessage());
        }
    }
}
消息的配置类,确认应答等
@Configuration
public class RabbitMQConfig {
    private static final Logger LOGGER = LoggerFactory.getLogger(RabbitMQConfig.class);
    @Autowired
    private CachingConnectionFactory cachingConnectionFactory;

    @Autowired
    private IMailLogService mailLogService;

    @Bean
    public RabbitTemplate rabbitTemplate(){
        RabbitTemplate rabbitTemplate = new RabbitTemplate(cachingConnectionFactory);

        /**
         * 消息确认回调,确认消息是否到达broker
         * data:消息的唯一标识
         * ack:确认结果
         * cause:失败原因
         */
        rabbitTemplate.setConfirmCallback((data,ack,cause)->{
            String msgId = data.getId();
            if(ack){
                LOGGER.info("{}======>消息发送成功",msgId);
                mailLogService.update(new UpdateWrapper().set("status",1 ).eq("msgId",msgId));
            }else {
                LOGGER.error("{}=====>消息发送失败",msgId);
            }
        });

        /**
         * 消息失败回调,比如router不到queue时回调
         * msg:消息的主题
         * repCode:响应码
         * repText:响应描述
         * exchange:交换机
         * routingkey:路由键
         */
        rabbitTemplate.setReturnCallback((msg,repCode,repText,exchange,routingkey)->{
            LOGGER.error("{}=====>消息发送queue时失败",msg.getBody());
        });
        return rabbitTemplate;
    }

    @Bean
    public Queue queue(){
        return new Queue(MailConstants.MAIL_QUEUE_NAME);
    }

    @Bean
    public DirectExchange directExchange(){
        return new DirectExchange(MailConstants.MAIL_EXCHANGE_NAME);
    }

    @Bean
    public Binding binding(){
        return BindingBuilder.bind(queue()).to(directExchange()).with(MailConstants.MAIL_ROUTING_KEY_NAME);
    }
6.在线聊天功能的实现
这里使用WebSocket
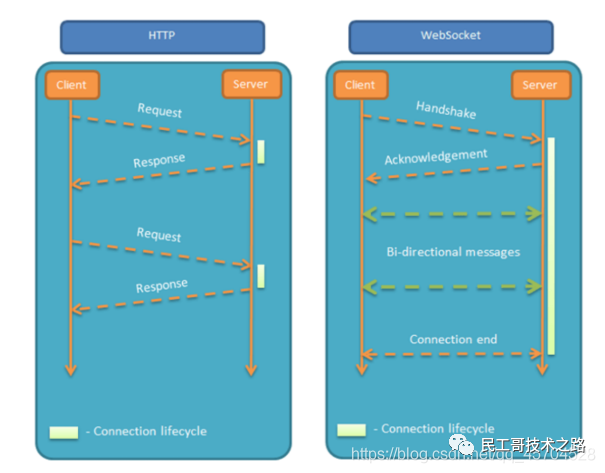
WebSocket 是 HTML5 开始提供的一种在单个 TCP 连接上进行全双工通讯的协议。
WebSocket 使得客户端和服务器之间的数据交换变得更加简单,允许服务端主动向客户端推送数据。
在 WebSocket API 中,浏览器和服务器只需要完成一次握手,两者之间就直接可以创建持久性的连接,并进行双向数据传输。
它的最大特点就是,服务器可以主动向客户端推送信息,客户端也可以主动向服务器发送信息,是真正的双向平等对话,属于服务器推送技术的一种。
WebSocket的配置
这里主要是前端实现,后端只是增加一些配置
@Configuration
@EnableWebSocketMessageBroker
public class WebSocketConfig implements WebSocketMessageBrokerConfigurer {
    @Value("${jwt.tokenHead}")
    private String tokenHead;
    @Autowired
    private JwtTokenUtil jwtTokenUtil;
    @Autowired
    private UserDetailsService userDetailsService;


    /**
     * 添加这个Endpoint,这样在网页可以通过websocket连接上服务
     * 也就是我们配置websocket的服务地址,并且可以指定是否使用socketJS
     * @param registry
     */
    @Override
    public void registerStompEndpoints(StompEndpointRegistry registry) {
        /**
         * 1.将ws/ep路径注册为stomp的端点,用户连接了这个端点就可以进行websocket通讯,支持socketJS
         * 2.setAllowedOrigins("*"):允许跨域
         * 3.withSockJS():支持socketJS访问
         */
        registry.addEndpoint("/ws/ep").setAllowedOrigins("*").withSockJS();
    }


    /**
     * 输入通道参数配置  JWT配置
     * @param registration
     */
    @Override
    public void configureClientInboundChannel(ChannelRegistration registration) {
        registration.interceptors(new ChannelInterceptor() {
            @Override
            public Message preSend(Message message, MessageChannel channel) {
                StompHeaderAccessor accessor = MessageHeaderAccessor.getAccessor(message, StompHeaderAccessor.class);
                //判断是否为连接,如果是,需要获取token,并且设置用户对象
                if (StompCommand.CONNECT.equals(accessor.getCommand())){
                    //拿取Token
                    String token = accessor.getFirstNativeHeader("Auth-Token");//参数前端已经固定
                    if (!StringUtils.isEmpty(token)){
                        String authToken = token.substring(tokenHead.length());
                        String username = jwtTokenUtil.getUsernameFormToken(authToken);
                        //token中存在用户名
                        if (!StringUtils.isEmpty(username)){
                            //登录
                            UserDetails userDetails = userDetailsService.loadUserByUsername(username);
                            //验证token是否有效,重新设置用户对象
                            if (jwtTokenUtil.TokenIsValid(authToken,userDetails)){
                                UsernamePasswordAuthenticationToken authenticationToken =
                                        new UsernamePasswordAuthenticationToken(userDetails, null,
                                                userDetails.getAuthorities());
                                SecurityContextHolder.getContext().setAuthentication(authenticationToken);
                                accessor.setUser(authenticationToken);
                            }
                        }
                    }
                }
                return message;
            }
        });
    }

    /**
     * 配置消息代理
     * @param registry
     */
    @Override
    public void configureMessageBroker(MessageBrokerRegistry registry) {
        //配置代理域,可以配置多个,配置代理目的地前缀为/queue,可以在配置域上向客户端推送消息
        registry.enableSimpleBroker("/queue");
    }
}
作者:Serendipity sn
链接:blog.csdn.net/qq_45704528/article/details/119699269
怎么接私活?这个渠道你100%有用!请收藏!
喜欢文章,点个在看

