
xxl-job的设计超惊艳!
你知道的越多,不知道的就越多,业余的像一棵小草!
你来,我们一起精进!你不来,我和你的竞争对手一起精进!
编辑:业余草
推荐:https://www.xttblog.com/?p=5347
多看别人的代码,是一种享受,慢慢的影响自己,写出超预期的代码和设计实现!今天我给大家推荐一下 xxl-job 中的优秀代码实践!
通信底层介绍
xxl-job 使用 netty http 的方式进行通信,虽然也支持 Mina,jetty,netty tcp 等方式,但是代码里面固定写死的是 netty http。
通信整体流程
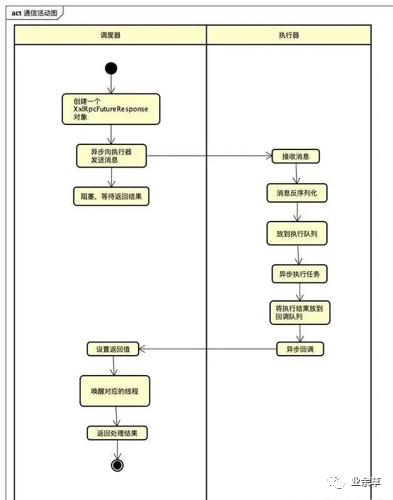
我以调度器通知执行器执行任务为例,绘制的活动图:
惊艳的设计
看完了整个处理流程代码,设计上可以说独具匠心,将 netty,多线程的知识运用得行云流水。我现在就将这些设计上出彩的点总结如下:
使用动态代理模式,隐藏通信细节
xxl-job 定义了两个接口 ExecutorBiz,AdminBiz,ExecutorBiz 接口中封装了向心跳,暂停,触发执行等操作,AdminBiz 封装了回调,注册,取消注册操作,接口的实现类中,并没有通信相关的处理。XxlRpcReferenceBean 类的 getObject() 方法会生成一个代理类,这个代理类会进行远程通信。
全异步处理
执行器收到消息进行反序列化,并没有同步执行任务代码,而是将任务信息存储在 LinkedBlockingQueue 中,异步线程从这个队列中获取任务信息,然后执行。而任务的处理结果,也不是说处理完之后,同步返回的,也是放到回调线程的阻塞队列中,异步的将处理结果返回回去。这样处理的好处就是减少了 netty 工作线程的处理时间,提升了吞吐量。
对异步处理的包装
对异步处理进行了包装,代码看起来是同步调用的。我们看下调度器,XxlJobTrigger 类触发任务执行的代码:
public static ReturnT runExecutor(TriggerParam triggerParam, String address) {
ReturnT runResult = null;
try {
ExecutorBiz executorBiz = XxlJobScheduler.getExecutorBiz(address);
//这里面做了很多异步处理,最终同步得到处理结果
runResult = executorBiz.run(triggerParam);
} catch (Exception e) {
logger.error(">>>>>>>>>>> xxl-job trigger error, please check if the executor[{}] is running.", address, e);
runResult = new ReturnT(ReturnT.FAIL_CODE, ThrowableUtil.toString(e));
}
StringBuffer runResultSB = new StringBuffer(I18nUtil.getString("jobconf_trigger_run") + ":");
runResultSB.append("
address:").append(address);
runResultSB.append("
code:").append(runResult.getCode());
runResultSB.append("
msg:").append(runResult.getMsg());
runResult.setMsg(runResultSB.toString());
return runResult;
}
ExecutorBiz.run 方法我们说过了,是走的动态代理,和执行器进行通信,执行器执行结果也是异步处理完,才返回的,而这里看到的 run 方法是同步等待处理结果返回。我们看下xxl-job是如何同步获取处理结果的:调度器向执行器发出消息后,该线程阻塞。等到执行器处理完毕后,将处理结果返回,唤醒被阻塞的线程,调用处拿到返回值。动态代理代码如下:
//代理类中的触发调用
if (CallType.SYNC == callType) {
   // future-response set
   XxlRpcFutureResponse futureResponse = new XxlRpcFutureResponse(invokerFactory, xxlRpcRequest, null);
   try {
      // do invoke
      client.asyncSend(finalAddress, xxlRpcRequest);

      // future get
      XxlRpcResponse xxlRpcResponse = futureResponse.get(timeout, TimeUnit.MILLISECONDS);
      if (xxlRpcResponse.getErrorMsg() != null) {
         throw new XxlRpcException(xxlRpcResponse.getErrorMsg());
      }
      return xxlRpcResponse.getResult();
   } catch (Exception e) {
      logger.info(">>>>>>>>>>> xxl-rpc, invoke error, address:{}, XxlRpcRequest{}", finalAddress, xxlRpcRequest);

      throw (e instanceof XxlRpcException)?e:new XxlRpcException(e);
   } finally{
      // future-response remove
      futureResponse.removeInvokerFuture();
   }
}
XxlRpcFutureResponse 类中实现了线程的等待,和线程唤醒的处理:
//返回结果,唤醒线程
public void setResponse(XxlRpcResponse response) {
   this.response = response;
   synchronized (lock) {
      done = true;
      lock.notifyAll();
   }
}

@Override
public XxlRpcResponse get(long timeout, TimeUnit unit) throws InterruptedException, ExecutionException, TimeoutException {
    if (!done) {
        synchronized (lock) {
            try {
                if (timeout < 0) {
        //线程阻塞
                    lock.wait();
                } else {
                    long timeoutMillis = (TimeUnit.MILLISECONDS==unit)?timeout:TimeUnit.MILLISECONDS.convert(timeout , unit);
                    lock.wait(timeoutMillis);
                }
            } catch (InterruptedException e) {
                throw e;
            }
        }
    }

    if (!done) {
        throw new XxlRpcException("xxl-rpc, request timeout at:"+ System.currentTimeMillis() +", request:" + request.toString());
    }
    return response;
}
有的同学可能会问了,调度器接收到返回结果,怎么确定唤醒哪个线程呢?每一次远程调用,都会生成 uuid 的请求 id,这个 id 是在整个调用过程中一直传递的,就像一把钥匙,在你回家的的时候,拿着它就带开门。这里拿着请求 id 这把钥匙,就能找到对应的 XxlRpcFutureResponse,然后调用 setResponse 方法,设置返回值,唤醒线程。
public void notifyInvokerFuture(String requestId, final XxlRpcResponse xxlRpcResponse){

    // 通过requestId找到XxlRpcFutureResponse,
    final XxlRpcFutureResponse futureResponse = futureResponsePool.get(requestId);
    if (futureResponse == null) {
        return;
    }
    if (futureResponse.getInvokeCallback()!=null) {

        // callback type
        try {
            executeResponseCallback(new Runnable() {
                @Override
                public void run() {
                    if (xxlRpcResponse.getErrorMsg() != null) {
                        futureResponse.getInvokeCallback().onFailure(new XxlRpcException(xxlRpcResponse.getErrorMsg()));
                    } else {
                        futureResponse.getInvokeCallback().onSuccess(xxlRpcResponse.getResult());
                    }
                }
            });
        }catch (Exception e) {
            logger.error(e.getMessage(), e);
        }
    } else {
        // 里面调用lock的notify方法
        futureResponse.setResponse(xxlRpcResponse);
    }

    // do remove
    futureResponsePool.remove(requestId);

}