面试官问如何构建动态线程池应对流量洪峰,我们聊了三十分钟
JAVA前线
欢迎大家关注公众号「JAVA前线」查看更多精彩分享,主要包括源码分析、实际应用、架构思维、职场分享、产品思考等等,同时也非常欢迎大家加我微信「java_front」一起交流学习
0 文章概述
流量洪峰是互联网生产环境经常遇到的场景,例如某个时间点进行商品抢购活动,或者某个时间点集中触发定时任务,这些场景都有可能引发流量洪峰,所以如何应对流量洪峰是我们必须面对的问题。
纵向维度我们可以从代理层、WEB层、服务层、缓存层、数据层进行思考,横向维度我们可以从高频检测、缓存前置、节点冗余、服务降级等方向进行思考。本文我们从服务层动态调节线程数这个角度进行思考。
动态线程池是指我们可以根据流量的不同调节线程池某些参数,例如可以在业务低峰期调低线程数,在业务高峰期调高线程数增加处理线程从而应对流量洪峰。本文我们结合Apollo和线程池实现一个动态线程池。
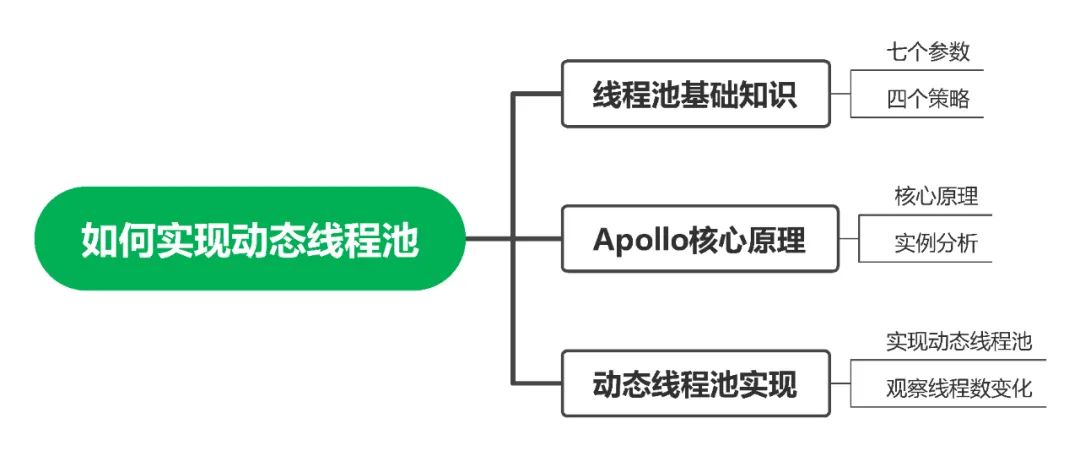
1 线程池基础
1.1 七个参数
我们首先回顾一下Java线程池七大参数,查看源码ThreadPoolExecutor构造函数如下:
public class ThreadPoolExecutor extends AbstractExecutorService {
    public ThreadPoolExecutor(int corePoolSize,
                              int maximumPoolSize,
                              long keepAliveTime,
                              TimeUnit unit,
                              BlockingQueue<Runnable> workQueue,
                              ThreadFactory threadFactory,
                              RejectedExecutionHandler handler) {
        if (corePoolSize < 0 ||
                maximumPoolSize <= 0 ||
                maximumPoolSize < corePoolSize ||
                keepAliveTime < 0)
            throw new IllegalArgumentException();
        if (workQueue == null || threadFactory == null || handler == null)
            throw new NullPointerException();
        this.acc = System.getSecurityManager() == null ?
                   null :
                   AccessController.getContext();
        this.corePoolSize = corePoolSize;
        this.maximumPoolSize = maximumPoolSize;
        this.workQueue = workQueue;
        this.keepAliveTime = unit.toNanos(keepAliveTime);
        this.threadFactory = threadFactory;
        this.handler = handler;
    }
}
(1) corePoolSize
线程池核心线程数,类比业务大厅开设的固定窗口。例如业务大厅开设2个固定窗口,那么这两个窗口不会关闭,全天都会进行业务办理
(2) workQueue
存储已提交但尚未执行的任务,类比业务大厅等候区。例如业务大厅一开门进来很多顾客,2个固定窗口进行业务办理,其他顾客到等候区等待
(3) maximumPoolSize
线程池可以容纳同时执行最大线程数,类比业务大厅最大窗口数。例如业务大厅最大窗口数是5个,业务员看到2个固定窗口和等候区都满了,可以临时增加3个窗口
(4) keepAliveTime
非核心线程数存活时间。当业务不忙时刚才新增的3个窗口需要关闭,空闲时间超过keepAliveTime空闲会被关闭
(5) unit
keepAliveTime存活时间单位
(6) threadFactory
线程工厂可以用来指定线程名
(7) handler
线程池线程数已达到maximumPoolSize且队列已满时执行拒绝策略。例如业务大厅5个窗口全部处于忙碌状态且等候区已满,业务员根据实际情况选择拒绝策略
1.2 四种拒绝策略
(1) AbortPolicy
默认策略直接抛出RejectExecutionException阻止系统正常运行
/**
 * AbortPolicy
 *
 * @author 微信公众号「JAVA前线」
 *
 */
public class AbortPolicyTest {
    public static void main(String[] args) {
        int coreSize = 1;
        int maxSize = 2;
        int queueSize = 1;
        AbortPolicy abortPolicy = new ThreadPoolExecutor.AbortPolicy();
        ThreadPoolExecutor executor = new ThreadPoolExecutor(coreSize, maxSize, 1, TimeUnit.SECONDS, new LinkedBlockingQueue<Runnable>(queueSize), Executors.defaultThreadFactory(), abortPolicy);
        for (int i = 0; i < 100; i++) {
            executor.execute(new Runnable() {
                @Override
                public void run() {
                    System.out.println(Thread.currentThread().getName() + " -> run");
                }
            });
        }
    }
}
程序执行结果:
pool-1-thread-1 -> run
pool-1-thread-2 -> run
pool-1-thread-1 -> run
Exception in thread "main" java.util.concurrent.RejectedExecutionException: Task com.xy.juc.threadpool.reject.AbortPolicyTest$1@70dea4e rejected from java.util.concurrent.ThreadPoolExecutor@5c647e05[Running, pool size = 2, active threads = 0, queued tasks = 0, completed tasks = 2]
at java.util.concurrent.ThreadPoolExecutor$AbortPolicy.rejectedExecution(ThreadPoolExecutor.java:2063)
at java.util.concurrent.ThreadPoolExecutor.reject(ThreadPoolExecutor.java:830)
at java.util.concurrent.ThreadPoolExecutor.execute(ThreadPoolExecutor.java:1379)
at com.xy.juc.threadpool.reject.AbortPolicyTest.main(AbortPolicyTest.java:21)
(2) CallerRunsPolicy
任务交给调用者自己运行
/**
 * CallerRunsPolicy
 *
 * @author 微信公众号「JAVA前线」
 *
 */
public class CallerRunsPolicyTest {
    public static void main(String[] args) {
        int coreSize = 1;
        int maxSize = 2;
        int queueSize = 1;
        CallerRunsPolicy callerRunsPolicy = new ThreadPoolExecutor.CallerRunsPolicy();
        ThreadPoolExecutor executor = new ThreadPoolExecutor(coreSize, maxSize, 1, TimeUnit.SECONDS, new LinkedBlockingQueue<Runnable>(queueSize), Executors.defaultThreadFactory(), callerRunsPolicy);
        for (int i = 0; i < 10; i++) {
            executor.execute(new Runnable() {
                @Override
                public void run() {
                    System.out.println(Thread.currentThread().getName() + " -> run");
                }
            });
        }
    }
}
程序执行结果:
main -> run
pool-1-thread-1 -> run
pool-1-thread-2 -> run
pool-1-thread-1 -> run
main -> run
main -> run
pool-1-thread-2 -> run
pool-1-thread-1 -> run
main -> run
pool-1-thread-2 -> run
(3) DiscardOldestPolicy
抛弃队列中等待最久的任务不会抛出异常
/**
 * DiscardOldestPolicy
 *
 * @author 微信公众号「JAVA前线」
 *
 */
public class DiscardOldestPolicyTest {
    public static void main(String[] args) {
        int coreSize = 1;
        int maxSize = 2;
        int queueSize = 1;
        DiscardOldestPolicy discardOldestPolicy = new ThreadPoolExecutor.DiscardOldestPolicy();
        ThreadPoolExecutor executor = new ThreadPoolExecutor(coreSize, maxSize, 1, TimeUnit.SECONDS, new LinkedBlockingQueue<Runnable>(queueSize), Executors.defaultThreadFactory(), discardOldestPolicy);
        for (int i = 0; i < 10; i++) {
            executor.execute(new Runnable() {
                @Override
                public void run() {
                    System.out.println(Thread.currentThread().getName() + " -> run");
                }
            });
        }
    }
}
程序执行结果:
pool-1-thread-1 -> run
pool-1-thread-2 -> run
pool-1-thread-1 -> run
(4) DiscardPolicy
直接丢弃任务不会抛出异常
/**
 * DiscardPolicy
 *
 * @author 微信公众号「JAVA前线」
 *
 */
public class DiscardPolicyTest {
    public static void main(String[] args) {
        int coreSize = 1;
        int maxSize = 2;
        int queueSize = 1;
        DiscardPolicy discardPolicy = new ThreadPoolExecutor.DiscardPolicy();
        ThreadPoolExecutor executor = new ThreadPoolExecutor(coreSize, maxSize, 1, TimeUnit.SECONDS, new LinkedBlockingQueue<Runnable>(queueSize), Executors.defaultThreadFactory(), discardPolicy);
        for (int i = 0; i < 10; i++) {
            executor.execute(new Runnable() {
                @Override
                public void run() {
                    System.out.println(Thread.currentThread().getName() + " -> run");
                }
            });
        }
    }
}
程序执行结果:
pool-1-thread-1 -> run
pool-1-thread-2 -> run
pool-1-thread-1 -> run
1.3 修改参数
如果初始化线程池完成后,我们是否可以修改线程池某些参数呢?答案是可以。我们选择线程池提供的四个修改方法进行源码分析。
(1) setCorePoolSize
public class ThreadPoolExecutor extends AbstractExecutorService {
    public void setCorePoolSize(int corePoolSize) {
        if (corePoolSize < 0)
            throw new IllegalArgumentException();
        // 新核心线程数减去原核心线程数
        int delta = corePoolSize - this.corePoolSize;
        // 新核心线程数赋值
        this.corePoolSize = corePoolSize;
        // 如果当前线程数大于新核心线程数
        if (workerCountOf(ctl.get()) > corePoolSize)
            // 中断空闲线程
            interruptIdleWorkers();
        // 如果需要新增线程则通过addWorker增加工作线程
        else if (delta > 0) {
            int k = Math.min(delta, workQueue.size());
            while (k-- > 0 && addWorker(null, true)) {
                if (workQueue.isEmpty())
                    break;
            }
        }
    }
}
(2) setMaximumPoolSize
public class ThreadPoolExecutor extends AbstractExecutorService {
    public void setMaximumPoolSize(int maximumPoolSize) {
        if (maximumPoolSize <= 0 || maximumPoolSize < corePoolSize)
            throw new IllegalArgumentException();
        this.maximumPoolSize = maximumPoolSize;
        // 如果当前线程数量大于新最大线程数量
        if (workerCountOf(ctl.get()) > maximumPoolSize)
            // 中断空闲线程
            interruptIdleWorkers();
    }
}
(3) setKeepAliveTime
public class ThreadPoolExecutor extends AbstractExecutorService {
    public void setKeepAliveTime(long time, TimeUnit unit) {
        if (time < 0)
            throw new IllegalArgumentException();
        if (time == 0 && allowsCoreThreadTimeOut())
            throw new IllegalArgumentException("Core threads must have nonzero keep alive times");
        long keepAliveTime = unit.toNanos(time);
        // 新超时时间减去原超时时间
        long delta = keepAliveTime - this.keepAliveTime;
        this.keepAliveTime = keepAliveTime;
        // 如果新超时时间小于原超时时间
        if (delta < 0)
            // 中断空闲线程
            interruptIdleWorkers();
    }
}
(4) setRejectedExecutionHandler
public class ThreadPoolExecutor extends AbstractExecutorService {
    public void setRejectedExecutionHandler(RejectedExecutionHandler handler) {
        if (handler == null)
            throw new NullPointerException();
        // 设置拒绝策略
        this.handler = handler;
    }
}
现在我们知道上述线程池调整参数的方法,但仅仅分析到此是不够的,因为如果没有动态调整参数的方法,那么每次修改必须重新发布才可以生效,那么有没有方法不用发布就可以动态调整线程池参数呢?
2 Apollo配置中心
2.1 核心原理
Apollo是携程框架部门研发的分布式配置中心,能够集中化管理应用不同环境、不同集群的配置,配置修改后能够实时推送到应用端,并且具备规范的权限、流程治理等特性,适用于微服务配置管理场景,开源地址如下:
https://github.com/ctripcorp/apollo
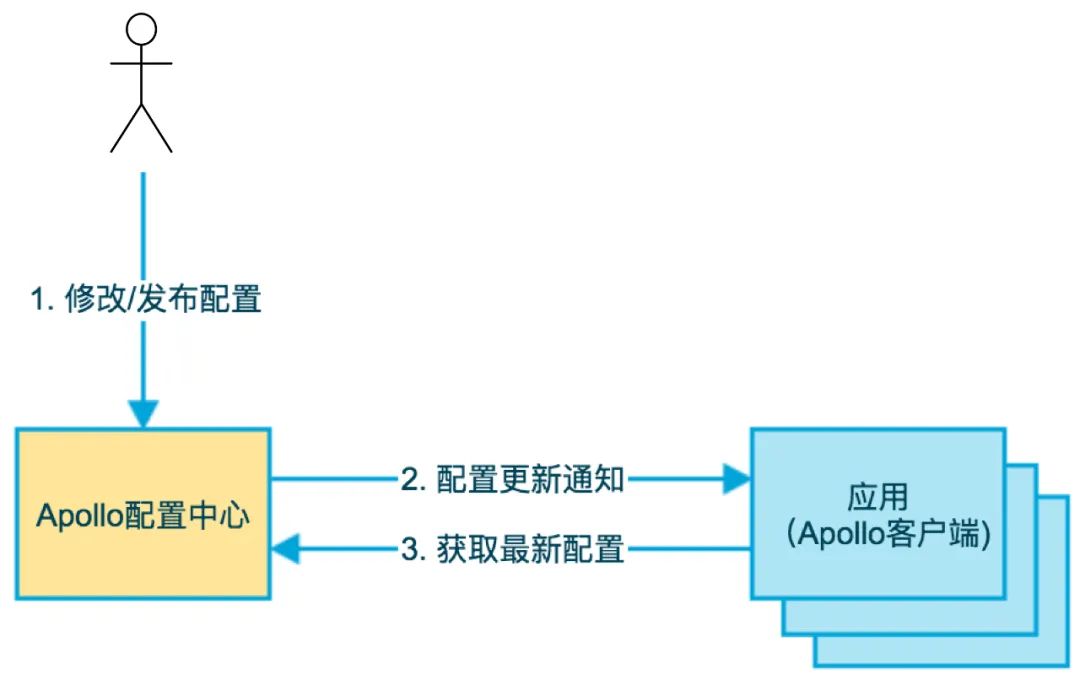
第一步用户在配置中心修改配置项,第二步配置中心通知Apollo客户端有配置更新,第三步Apollo客户端从配置中心拉取最新配置,更新本地配置并通知到应用,官网基础模型图如下:
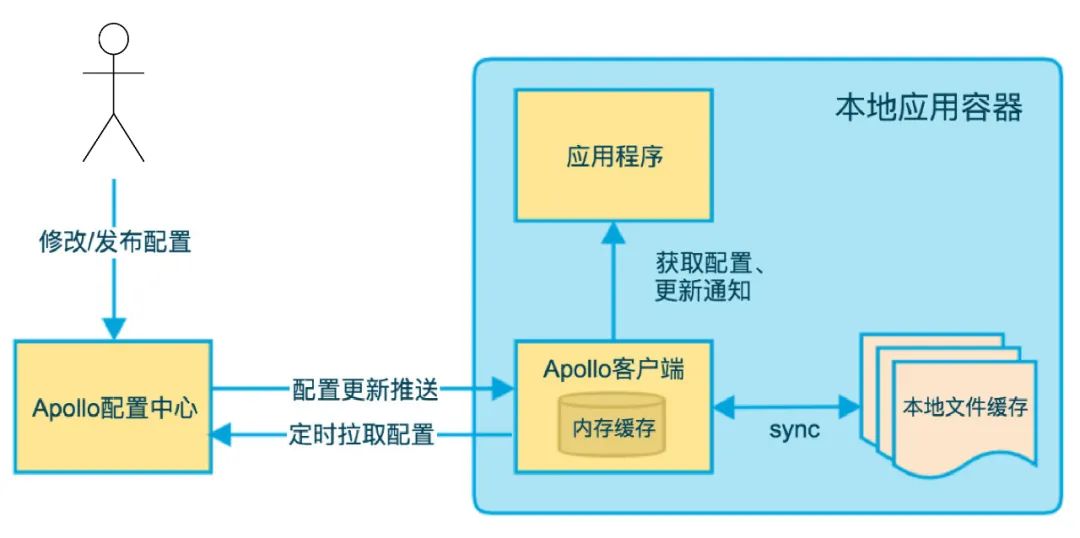
配置中心配置项发生变化客户端如何感知呢?分为推和拉两种方式。推依赖客户端和服务端保持了一个长连接,发生数据变化时服务端推送信息给客户端,这就是长轮询机制。拉依赖客户端定时从配置中心服务端拉取应用最新配置,这是一个fallback机制。官网客户端设计图如下:
本文重点分析配置更新推送方式,我们首先看官网服务端设计图:
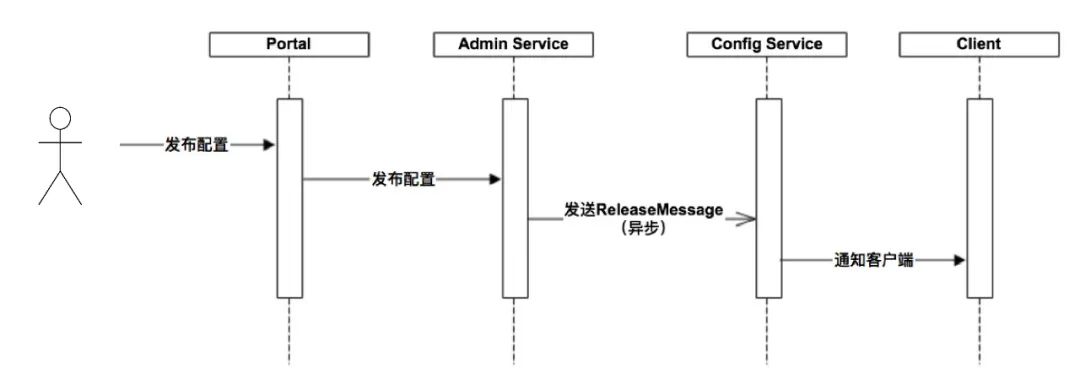
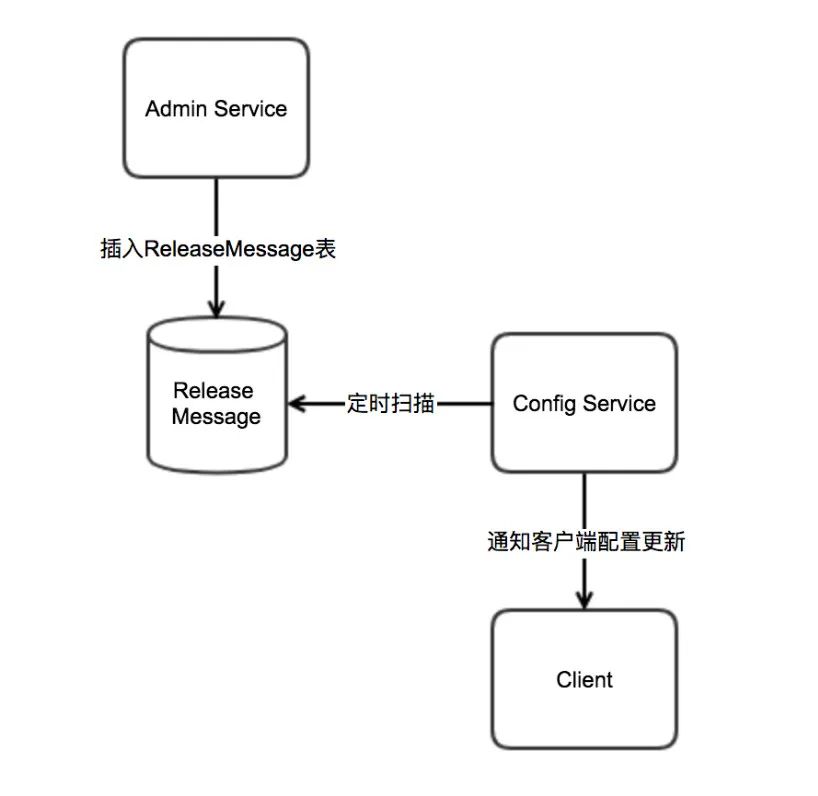
ConfigService模块提供配置的读取推送等功能,服务对象是Apollo客户端。AdminService模块提供配置的修改发布等功能,服务对象是Portal模块即管理界面。需要说明Apollo并没有引用消息中间件,发送异步消息是指ConfigService定时扫描异步消息数据表:
消息数据保存在MySQL消息表:
CREATE TABLE `releasemessage` (
  `Id` int(11) unsigned NOT NULL AUTO_INCREMENT COMMENT '自增主键',
  `Message` varchar(1024) NOT NULL DEFAULT '' COMMENT '发布的消息内容',
  `DataChange_LastTime` timestamp NOT NULL DEFAULT CURRENT_TIMESTAMP ON UPDATE CURRENT_TIMESTAMP COMMENT '最后修改时间',
  PRIMARY KEY (`Id`),
  KEY `DataChange_LastTime` (`DataChange_LastTime`),
  KEY `IX_Message` (`Message`(191))
) ENGINE=InnoDB AUTO_INCREMENT=1 DEFAULT CHARSET=utf8mb4 COMMENT='发布消息'
Apollo核心原理本文暂时分析到这里,后续我将写文章通过源码分析Apollo长轮询机制工作原理请继续关注。
2.2 实例分析
2.2.1 服务端安装
服务端关键步骤是导入数据库和修改端口号,具体步骤请参看官方网站:
https://ctripcorp.github.io/apollo/#/zh/deployment/quick-start
启动成功后访问地址:
http://localhost:8070
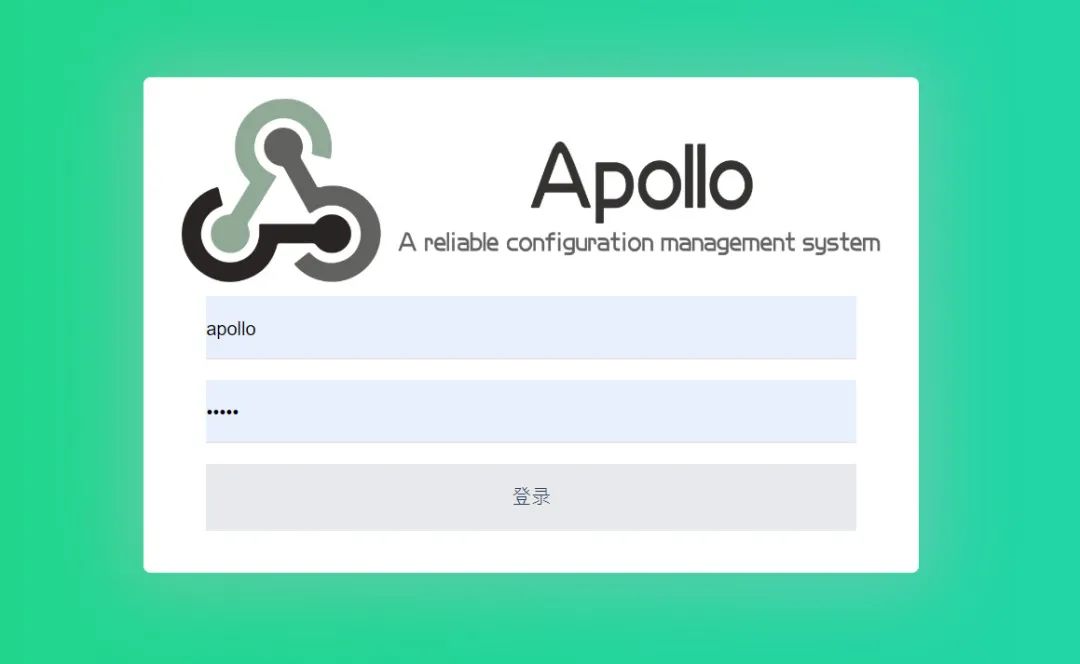
输入用户名apollo、密码admin:

进入我之前创建的myApp项目,我们看到在DEV环境、default集群、application命名空间包含一个timeout配置项:

2.2.2 应用程序
(1) 引入依赖
<dependencies>
  <dependency>
    <groupId>com.ctrip.framework.apollo</groupId>
    <artifactId>apollo-client</artifactId>
    <version>1.7.0</version>
  </dependency>
</dependencies>
(2) 简单实例
public class GetApolloConfigTest extends BaseTest {

    /**
     * -Dapp.id=myApp -Denv=DEV -Dapollo.cluster=default -Ddev_meta=http://localhost:8080
     *
     * myApp+DEV+default+application
     */
    @Test
    public void testGet() throws InterruptedException {
        Config appConfig = ConfigService.getAppConfig();
        while (true) {
            String value = appConfig.getProperty("timeout", "200");
            System.out.println("timeout=" + value);
            TimeUnit.SECONDS.sleep(1);
        }
    }
}
因为上述程序是通过while(true)不断读取配置项的值,所以程序输出结果如下:
timeout=100
timeout=100
timeout=100
timeout=100
timeout=100
timeout=100
现在把配置项的值改为200程序输出结果如下:
timeout=100
timeout=100
timeout=100
timeout=100
timeout=200
timeout=200
timeout=200
(3) 监听实例
生产环境我们一般不用while(true)监听变化,而是通过注册监听器方式感知变化信息:
public class GetApolloConfigTest extends BaseTest {

    /**
     * 监听命名空间变化
     *
     * -Dapp.id=myApp -Denv=DEV -Dapollo.cluster=default -Ddev_meta=http://localhost:8080
     *
     * myApp+DEV+default+application
     */
    @Test
    public void testListen() throws InterruptedException {
        Config config = ConfigService.getConfig("application");
        config.addChangeListener(new ConfigChangeListener() {
            @Override
            public void onChange(ConfigChangeEvent changeEvent) {
                System.out.println("发生变化命名空间=" + changeEvent.getNamespace());
                for (String key : changeEvent.changedKeys()) {
                    ConfigChange change = changeEvent.getChange(key);
                    System.out.println(String.format("发生变化key=%s,oldValue=%s,newValue=%s,changeType=%s", change.getPropertyName(), change.getOldValue(), change.getNewValue(), change.getChangeType()));
                }
            }
        });
        Thread.sleep(1000000L);
    }
}
我们把timeout值从200改为300,客户端可以监听到这个变化,程序输出结果如下:
发生变化命名空间=application
发生变化key=timeout,oldValue=200,newValue=300,changeType=MODIFIED
3 动态线程池
现在我们可以把线程池和Apollo结合起来构建动态线程池。首先我们用默认值构建一个线程池,然后线程池会监听Apollo相关配置项,如果相关配置有变化则刷新相关线程池参数。第一步在Apollo配置中心设置三个线程池参数(本文省略拒绝策略设置):

第二步编写核心代码:
/**
 * 动态线程池工厂
 *
 * @author 微信公众号「JAVA前线」
 *
 */
@Slf4j
@Component
public class DynamicThreadPoolFactory {
    private static final String NAME_SPACE = "threadpool-config";

    /** 线程执行器 **/
    private volatile ThreadPoolExecutor executor;

    /** 核心线程数 **/
    private Integer CORE_SIZE = 10;

    /** 最大值线程数 **/
    private Integer MAX_SIZE = 20;

    /** 等待队列长度 **/
    private Integer QUEUE_SIZE = 2000;

    /** 线程存活时间 **/
    private Long KEEP_ALIVE_TIME = 1000L;

    /** 线程名 **/
    private String threadName;

    public DynamicThreadPoolFactory() {
        Config config = ConfigService.getConfig(NAME_SPACE);
        init(config);
        listen(config);
    }

    /**
     * 初始化
     */
    private void init(Config config) {
        if (executor == null) {
            synchronized (DynamicThreadPoolFactory.class) {
                if (executor == null) {
                    String coreSize = config.getProperty(KeysEnum.CORE_SIZE.getNodeKey(), CORE_SIZE.toString());
                    String maxSize = config.getProperty(KeysEnum.MAX_SIZE.getNodeKey(), MAX_SIZE.toString());
                    String keepAliveTIme = config.getProperty(KeysEnum.KEEP_ALIVE_TIME.getNodeKey(), KEEP_ALIVE_TIME.toString());
                    BlockingQueue<Runnable> queueToUse = new LinkedBlockingQueue<Runnable>(QUEUE_SIZE);
                    executor = new ThreadPoolExecutor(Integer.valueOf(coreSize), Integer.valueOf(maxSize), Long.valueOf(keepAliveTIme), TimeUnit.MILLISECONDS, queueToUse, new NamedThreadFactory(threadName, true), new AbortPolicyDoReport(threadName));
                }
            }
        }
    }

    /**
     * 监听器
     */
    private void listen(Config config) {
        config.addChangeListener(new ConfigChangeListener() {
            @Override
            public void onChange(ConfigChangeEvent changeEvent) {
                log.info("命名空间发生变化={}", changeEvent.getNamespace());
                for (String key : changeEvent.changedKeys()) {
                    ConfigChange change = changeEvent.getChange(key);
                    String newValue = change.getNewValue();
                    refreshThreadPool(key, newValue);
                    log.info("发生变化key={},oldValue={},newValue={},changeType={}", change.getPropertyName(), change.getOldValue(), change.getNewValue(), change.getChangeType());
                }
            }
        });
    }

    /**
     * 刷新线程池
     */
    private void refreshThreadPool(String key, String newValue) {
        if (executor == null) {
            return;
        }
        if (KeysEnum.CORE_SIZE.getNodeKey().equals(key)) {
            executor.setCorePoolSize(Integer.valueOf(newValue));
            log.info("修改核心线程数key={},value={}", key, newValue);
        }
        if (KeysEnum.MAX_SIZE.getNodeKey().equals(key)) {
            executor.setMaximumPoolSize(Integer.valueOf(newValue));
            log.info("修改最大线程数key={},value={}", key, newValue);
        }
        if (KeysEnum.KEEP_ALIVE_TIME.getNodeKey().equals(key)) {
            executor.setKeepAliveTime(Integer.valueOf(newValue), TimeUnit.MILLISECONDS);
            log.info("修改活跃时间key={},value={}", key, newValue);
        }
    }

    public ThreadPoolExecutor getExecutor(String threadName) {
        return executor;
    }

    enum KeysEnum {

        CORE_SIZE("coreSize", "核心线程数"),

        MAX_SIZE("maxSize", "最大线程数"),

        KEEP_ALIVE_TIME("keepAliveTime", "线程活跃时间")

        ;

        private String nodeKey;
        private String desc;

        KeysEnum(String nodeKey, String desc) {
            this.nodeKey = nodeKey;
            this.desc = desc;
        }

        public String getNodeKey() {
            return nodeKey;
        }

        public void setNodeKey(String nodeKey) {
            this.nodeKey = nodeKey;
        }

        public String getDesc() {
            return desc;
        }

        public void setDesc(String desc) {
            this.desc = desc;
        }
    }
}

/**
 * 动态线程池执行器
 *
 * @author 微信公众号「JAVA前线」
 *
 */
@Component
public class DynamicThreadExecutor {

    @Resource
    private DynamicThreadPoolFactory threadPoolFactory;

    public void execute(String bizName, Runnable job) {
        threadPoolFactory.getExecutor(bizName).execute(job);
    }

    public Future<?> sumbit(String bizName, Runnable job) {
        return threadPoolFactory.getExecutor(bizName).submit(job);
    }
}
第三步运行测试用例:
/**
 * 动态线程池测试
 *
 * @author 微信公众号「JAVA前线」
 *
 */
public class DynamicThreadExecutorTest extends BaseTest {

    @Resource
    private DynamicThreadExecutor dynamicThreadExecutor;

    /**
     * -Dapp.id=myApp -Denv=DEV -Dapollo.cluster=default -Ddev_meta=http://localhost:8080
     *
     * myApp+DEV+default+thread-pool
     */
    @Test
    public void testExecute() throws InterruptedException {
        while (true) {
            dynamicThreadExecutor.execute("bizName", new Runnable() {
                @Override
                public void run() {
                    System.out.println("bizInfo");
                }
            });
            TimeUnit.SECONDS.sleep(1);
        }
    }
}
第四步通过VisualVM观察线程数:
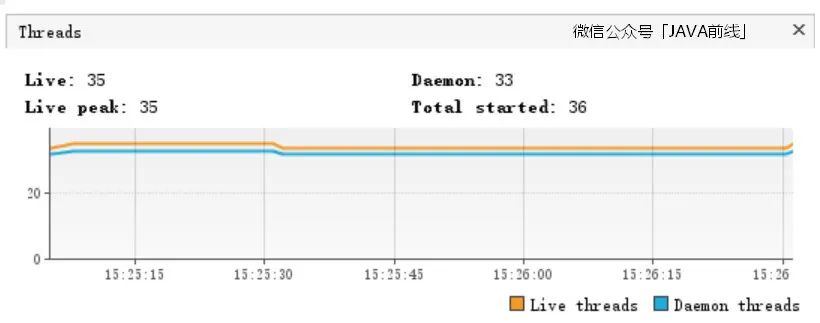
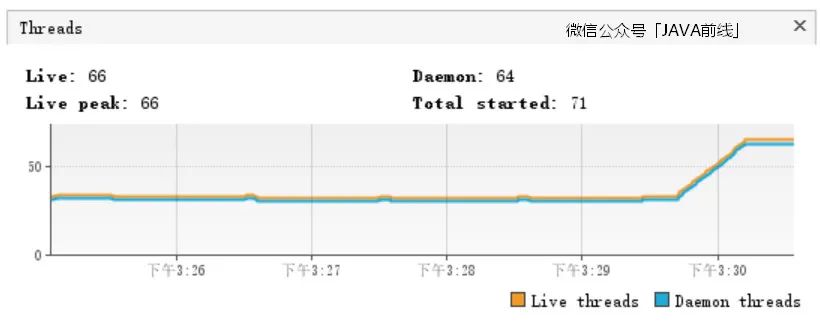
我们在配置中心修改配置项把核心线程数设置为50,最大线程数设置为100,通过VisualVM可以观察到线程数显著上升:

4 文章总结
本文我们首先介绍了线程池基础知识,包括七大参数和四个拒绝策略,随后我们介绍了Apollo配置中心的原理和应用,最后我们将线程池和配置中心相结合,实现了动态调整线程数的效果,希望本文对大家有所帮助。
JAVA前线
欢迎大家关注公众号「JAVA前线」查看更多精彩分享,主要包括源码分析、实际应用、架构思维、职场分享、产品思考等等,同时也非常欢迎大家加我微信「java_front」一起交流学习
