别让运维太忙,一文详解 Ansible 的自动化运维,提高工作效率
 文末有福利
文末有福利
一、Ansible 概述
1、Ansible 特点
Ansible 基于 Python 开发,运维工程师对其二次开发相对比较容易; Ansible 丰富的内置模块,几乎可以满足一切要求; 管理模式非常简单,一条命令可以影响上千台主机; 无客户端模式,底层通过 SSH 通信; Ansible发布后,也陆续被 AWS、Google Cloud Platform、Microsoft Azure、Cisco、HP、VMware、Twitter 等大公司接纳并投入使用;
二、Ansible的角色
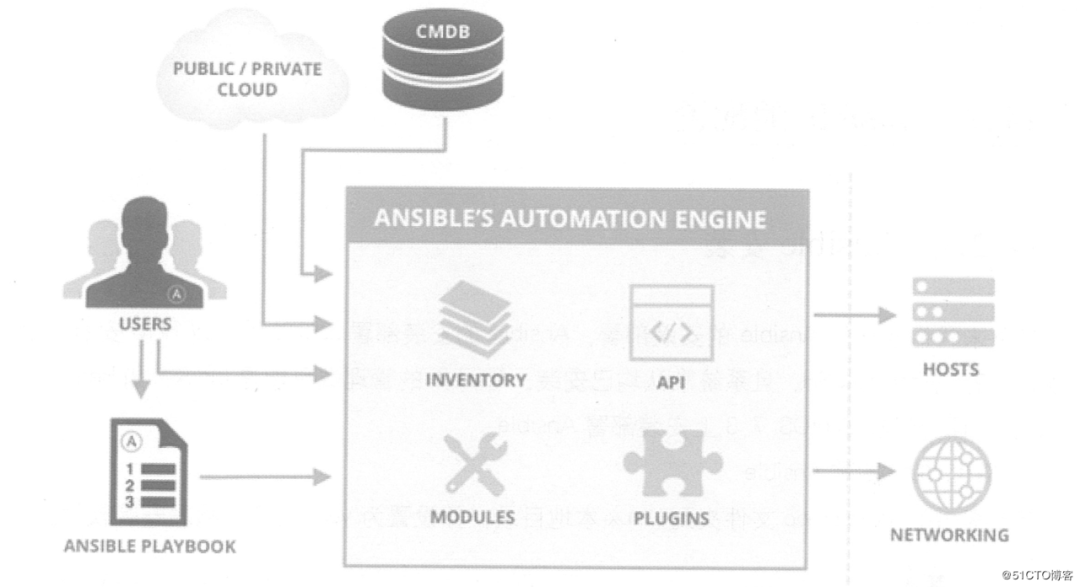
使用者:如何使用 Ansible 实现自动化运维? Ansible 工具集:Ansible 可以实现的功能? 作用对象:Ansible 可以影响哪些主机?
1、使用者
CMDB:CMDB 存储和管理者企业IT架构中的各项配置信息,是构建 ITIL 项目的核心工具,运维人员可以组合 CMDB 和 Ansible,通过 CMDB 直接下发指令调用Ansible 工具集完成操作者所希望达到的目标; PUBLIC/PRIVATE 方式:Ansible 除了丰富的内置模块外,同时还提供丰富的 API语言接口,如PHP、Python、PERL 等多种流行语言,基于 PUBLIC/PRIVATE,Ansible 以 API 调用的方式运行; Ad-Hoc 命令集:Users直接通过Ad-Hoc命令集调用Ansible工具集来完成任务; Playbooks:Users 预先编写好 Ansible Playbooks,通过执行 Playbooks 中预先编排好的任务集,按序执行任务;

2、Ansible 工具集
Ansible Playbooks:任务脚本,编排定义Ansible任务及的配置文件,由Ansible按序依次执行,通常是JSON格式的YML文件;
Inventory:Ansible 管理主机清单;
Modules:Ansible 执行命令功能模块,多数为内置的核心模块,也可自定义;
Plugins:模块功能的补充,如连接类型插件、循环插件、变量插件、过滤插件等,该功能不太常用;
API:供第三方程序调用的应用程序编程接口;
Ansible:该部分图中表现得不太明显,组合 Inventory、API、Modules、Plugins可以理解为是 Ansible 命令工具,其为核心执行工具;
3、作用对象
三、Ansible的配置
1、Ansible安装
1)通过YUM安装Ansible
[root@centos01 ~]# cd /mnt/ansiblerepo/ansiblerepo/repodata/
[root@centos01 ansiblerepo]# vim /etc/yum.repos.d/local.repo
[local]
name=centos
baseurl=file:///mnt/ansiblerepo/ansiblerepo
enabled=1
gpgcheck=0
[root@centos01 ~]# yum -y install ansible
2)验证安装结果
[root@centos01 ~]# ansible --version

ansible 2.3.1.0
  config file = /etc/ansible/ansible.cfg
  configured module search path = Default w/o overrides
  python version = 2.7.5 (default, Nov  6 2016, 00:28:07) [GCC 4.8.5 20150623 (Red Hat 4.8.5-11)]
3)创建 SSH 免交互登录
[root@centos01 ~]# ssh-keygen -t rsa
Generating public/private rsa key pair.
Enter file in which to save the key (/root/.ssh/id_rsa):
Created directory '/root/.ssh'.
Enter passphrase (empty for no passphrase):

Enter same passphrase again:
Your identification has been saved in /root/.ssh/id_rsa.
Your public key has been saved in /root/.ssh/id_rsa.pub.
The key fingerprint is:
SHA256:cJz6NRTrvMDxX+Jpce6LRnWI3vVEl/zvARL7D10q9WY root@centos01
The key's randomart image is:
+---[RSA 2048]----+
|          .   . .|
|       . . +   oo|
|      . = o o. oo|
|       = * o..+ *|
|      . S *.=+=*+|
|       . o =+XooE|
|        . ..=.++.|
|           ..o ..|
|           .. o. |
+----[SHA256]-----+
[root@centos01 ~]# ssh-copy-id -i .ssh/id_rsa.pub  root@192.168.100.20
[root@centos01 ~]# ssh-copy-id -i .ssh/id_rsa.pub root@192.168.100.30 2、Ansible 配置
-i或—inventory-file来指定 Inventory。[root@centos01 ~]# ansible -i /etc/ansible/hosts web -m ping[root@centos01 ~]# ansible web -m ping[root@centos01 ~]# vim /etc/ansible/hosts
............
[web]
192.168.100.20
192.168.100.30
[test]
www.benet.com:222
[mail]
yj1.kgc.cn
yj[2:5].kgc.cn
[root@centos01 ~]# ansible web -m command -a "systemctl status httpd" --limit "192.168.100.20"
192.168.100.20 | SUCCESS | rc=0 >>
[root@centos01 ~]# ansible 192.168.100.20 -m command -a "systemctl status httpd"
192.168.100.20 | SUCCESS | rc=0 >>[root@centos01 ~]# ansible 192.168.1.* -m command -a "systemctl status httpd"
192.168.100.20 | SUCCESS | rc=0 >>
.......
192.168.100.30 | SUCCESS | rc=0 >>
.......
3、Ansible 命令
[root@centos01 ~]# ansible
ansible               ansible-console-2     ansible-galaxy        ansible-playbook-2.7  ansible-vault-2
ansible-2             ansible-console-2.7   ansible-galaxy-2      ansible-pull          ansible-vault-2.7
ansible-2.7           ansible-doc           ansible-galaxy-2.7    ansible-pull-2
ansible-connection    ansible-doc-2         ansible-playbook      ansible-pull-2.7
ansible-console       ansible-doc-2.7       ansible-playbook-2    ansible-vault
1)ansible
非固化需求; 临时一次性操作; 二次开发接口调用;
Ansible [options] -v(—verbose):输出详细的执行过程信息,可以得到执行过程所有信息; -i PATH(—inventory=PATH):指定inventory信息,默认为/etc/ansible/hosts; -f NUM(—forks=NUM):并发线程数,默认为5个线程; —private-key=PRIVATE_KEY_FILE:指定密钥文件; -m NAME,—module-name=NAME:指定执行使用的模块; -M DIRECTORY(—module-path=DIRECTORY) :指定模块存放路径,默认为/usr/share/ansible; -a ARGUMENTS(—args=ARGUMENTS):指定模块参数; -u USERNAME(—user=USERNAME):指定远程主机以USERNAME运行命令; -l subset(—limit=SUBSET):限制运行主机;
[root@centos01 ~]# ansible all -f 5 -m ping

192.168.100.20 | SUCCESS => {
    "changed": false,
    "ping": "pong"
}
192.168.100.30 | SUCCESS => {
    "changed": false,
    "ping": "pong"
}[root@centos01 ~]# ansible web --list
hosts (2):
192.168.100.20
192.168.100.30[root@centos01 ~]# ansible web -m command -a "df -hT"
192.168.100.30 | SUCCESS | rc=0 >>
文件系统 类型 容量 已用 可用 已用% 挂载点
/dev/mapper/cl-root xfs 17G 4.4G 13G 26% /
devtmpfs devtmpfs 897M 0 897M 0% /dev
tmpfs tmpfs 912M 84K 912M 1% /dev/shm
tmpfs tmpfs 912M 0 912M 0% /sys/fs/cgroup
/dev/sda1 xfs 1014M 173M 842M 18% /boot
tmpfs tmpfs 183M 16K 183M 1% /run/user/42
tmpfs tmpfs 183M 0 183M 0% /run/user/0
192.168.100.20 | SUCCESS | rc=0 >>
文件系统 类型 容量 已用 可用 已用% 挂载点
/dev/mapper/cl-root xfs 17G 4.3G 13G 26% /
devtmpfs devtmpfs 897M 0 897M 0% /dev
tmpfs tmpfs 912M 84K 912M 1% /dev/shm
tmpfs tmpfs 912M 0 912M 0% /sys/fs/cgroup
/dev/sda1 xfs 1014M 173M 842M 18% /boot
tmpfs tmpfs 183M 16K 183M 1% /run/user/42
tmpfs tmpfs 183M 0 183M 0% /run/user/0
/dev/sr0 iso9660 4.1G 4.1G 0 100% /mnt红色:表示执行过程出现异常; 橘黄颜色:表示命令执行后目标有状态变化; 绿色:表示执行成功且没有目标机器做修改;
2)Ansible-doc
ansible-doc [options] [module……][root@centos01 ~]#ansible-doc -l[root@centos01 ~]# ansible-doc ping
> PING (/usr/lib/python2.7/site-packages/ansible/modules/system/ping.py)
A trivial test module, this module always returns `pong' on successful contact. It
does not make sense in playbooks, but it is useful from `/usr/bin/ansible' to verify
the ability to login and that a usable python is configured. This is NOT ICMP ping,
this is just a trivial test module.
EXAMPLES:
# Test we can logon to 'webservers' and execute python with json lib.
ansible webservers -m ping
MAINTAINERS: Ansible Core Team, Michael DeHaan
METADATA:
Status: ['stableinterface']
Supported_by: core3)Ansible-playbook
Ansible-playbook playbook.yml
4)Ansible-console
[root@centos01 ~]# ansible-console
Welcome to the ansible console.
Type help or ? to list commands.

root@all (2)[f:5]$ cd web
root@web (2)[f:5]$ list
192.168.100.20
192.168.100.30
4、Ansible模块
1)command模块
chdir:在远程主机上运行命令前要提前进入的目录; creates:在命令运行时创建一个文件,如果文件已存在,则不会执行创建任务; removes:在命令运行时移除一个文件,如果文件不存在,则不会执行移除任务; executeable:指明运行命令的shell程序;
[root@centos01 ~]# ansible web -m command -a "chdir=/ ls ./"2)shell模块
[root@centos01 ~]# ansible web -m shell -a "echo hello world "
192.168.100.20 | SUCCESS | rc=0 >>
hello world

192.168.100.30 | SUCCESS | rc=0 >>
hello world
[root@centos01 ~]# ansible web -m shell -a "echo hello world > /1.txt"
192.168.100.20 | SUCCESS | rc=0 >>

192.168.100.30 | SUCCESS | rc=0 >>
3)copy模块
dest:指出复制文件的目标目录位置,使用绝对路径。如果源是目录,则目标也要是目录,如果目标文件已存在,会覆盖原有内容; src:指出源文件的路径,可以使用相对路径和绝对路径,支持直接指定目录。如果源是目录,则目标也要是目录; mode:指出复制时,目标文件的权限,可选; owner:指出复制时,目标文件的属主,可选; group:指出复制时目标文件的属组,可选; content:指出复制到目标主机上的内容,不能和src一起使用,相当于复制content指明的数据到目标文件中;
[root@centos01 ~]# ansible web -m copy -a "src=/etc/hosts
dest=/root/a1.hosts mode=777 owner=root group=root"
4)hostname模块
name: 指明主机名;
[root@centos01 ~]# ansible 192.168.100.20 -m hostname -a "name=test"
5)yum模块
name:程序包名称,可以带上版本号。若不指明版本,则默认为最新版本; state=present|atest|absent:指明对程序包执行的操作:present表明安装程序包,latest表示安装最新版本的程序包,absent表示卸载程序包; disablerepo:在用yum安装时,临时禁用某个仓库的ID; enablerepo:在用yum安装时,临时启用某个仓库的ID; conf_file:yum运行时的配置文件,而不是使用默认的配置文件; disable_gpg_check=yes|no:是否启用完整性校验功能;
[root@centos01 ~]# ansible web -m shell -a "/usr/bin/rm -rf
/etc/yum.repos.d/CentOS-*"

[root@centos01 ~]# ansible web -m shell -a "/usr/bin/mount
/dev/cdrom /mnt"
 [WARNING]: Consider using mount module rather than running mount

192.168.100.20 | SUCCESS | rc=0 >>
mount: /dev/sr0 写保护,将以只读方式挂载

192.168.100.30 | SUCCESS | rc=0 >>
mount: /dev/sr0 写保护,将以只读方式挂载
[root@centos01 ~]# ansible web -m yum -a "name=httpd
state=present"
[root@centos01 ~]# ansible web -m shell -a "rpm -qa | grep httpd"

 [WARNING]: Consider using yum, dnf or zypper module rather than running rpm

192.168.100.20 | SUCCESS | rc=0 >>
httpd-2.4.6-67.el7.centos.x86_64
httpd-tools-2.4.6-67.el7.centos.x86_64

192.168.100.30 | SUCCESS | rc=0 >>
httpd-2.4.6-67.el7.centos.x86_64
httpd-tools-2.4.6-67.el7.centos.x86_64
[root@centos01 ~]# ansible web -m shell -a "systemctl start httpd"
[root@centos01 ~]# ansible web -m shell -a "netstat -anptu | grep httpd"
192.168.100.20 | SUCCESS | rc=0 >>
tcp6       0      0 :::80                   :::*                    LISTEN      2072/httpd

192.168.100.30 | SUCCESS | rc=0 >>
tcp6 0 0 :::80 :::* LISTEN 3098/httpd6)service模块
name:被管理的服务名称; state=started|stopped|restarted:动作包含启动,关闭或重启; enable=yes|no:表示是否设置该服务开机自启动; runlevel:如果设定了enabled开机自启动,则要定义在哪些运行目标下自动启动;
[root@centos01 ~]# ansible web -m service -a "name=httpd
enabled=yes state=restarted"
7)user模块
name:必选参数,账号名称; state=present|absent:创建账号或者删除账号,present表示创建,absent表示删除; system=yes|no:是否为系统账户; uid:用户UID; group:用户的基本组 groups:用户的附加组; shell:默认使用的shell; home:用户的家目录; mve_home=yes|no: 如果设置的家目录已经存在,是否将已存在的家目录进行移动; pssword:用户的密码,建议使用加密后的字符串; comment: 用户的注释信息; remore=yes|no: 当state=absent时,是否要删除用户的家目录;
[root@centos01 ~]# ansible web -m user -a "name=user01
system=yes uid=502 group=root groups=root shell=/etc/nologin
home=/home/user01 password=pwd@123"
四、playbook配置文件
1、执行配置文件
[root@centos01 ~]# grep -v ^# /etc/ansible/hosts | grep -v ^$
[web1]
192.168.100.20
[web2]
192.168.100.30
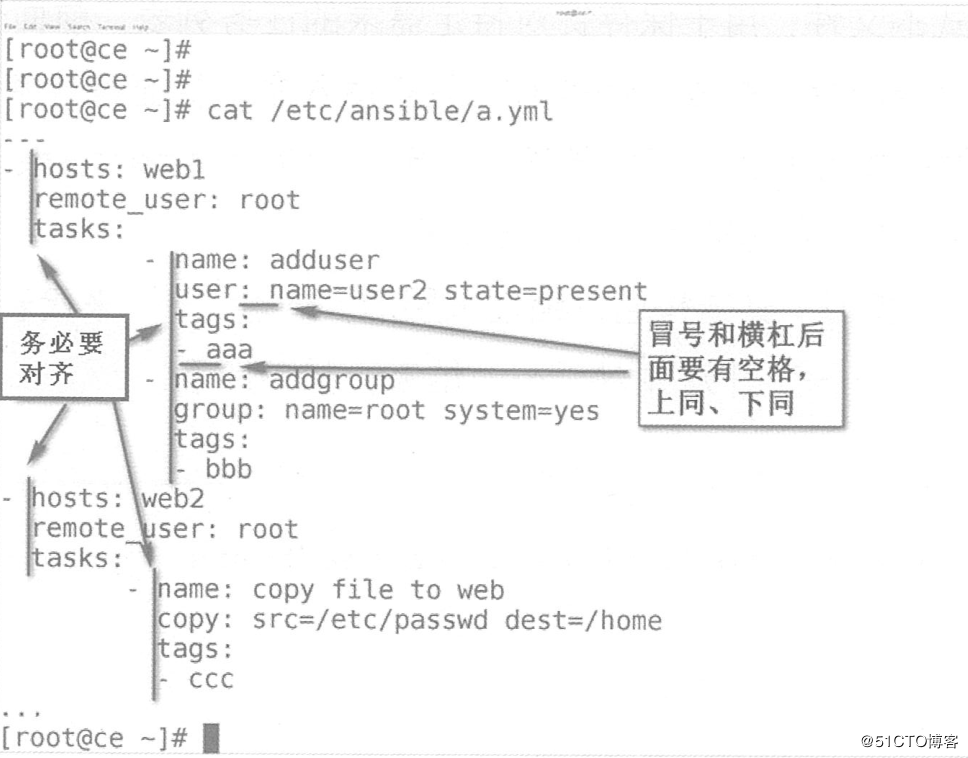
[root@centos01 ~]# vim /etc/ansible/a.yml

---
- hosts: web1
  remote_user: root
  tasks:
        - name: adduser
          user: name=user1 state=present
          tags:
          - aaa
        - name: addgroup
          group: name=root system=yes
          tags:
          - bbb
- hosts: web2
  remote_user: root
  tasks:
        - name: copy file to web
          copy: src=/etc/passwd dest=/home
          tags:
          - ccc
...
hosts:任务的目标主机,多个主机用冒号分隔,一般调用/etc/ansible/hosts中的分组信息; remote_user:远程主机上,运行此任务的默认身份为root; tasks:任务,即定义的具体任务,由模块定义的操作列表; handlers:触发器,类似tasks,只是在特定的条件下才会触发的任务。 某任务的状态在运行后为changed时,可通过“notify”通知给相应的handlers进行触发执行; roles:角色,将hosts剥离出去,由tasks、handlers等所组成的一种特定的结构集合;
ansible-playbook [option] /PATH/TO/PLAYBOOK.yaml—syntax-check:检测yaml文件的语法; -C(—check):预测试,不会改变目标主机的任何设置; —list-hosts:列出yaml文件影响的主机列表; —list-tasks:列出yaml文件的任务列表; —list-tags:列出yaml文件中的标签; -t TAGS(—tags=TAGS):表示只执行指定标签的任务; —skip-tags=SKIP_TAGS:表示除了指定标签的任务,执行其他任务; —start-at-task=START_AT:从指定的任务开始往下运行;
[root@centos01 ~]# ansible-playbook --syntax-check /etc/ansible/a.yml

playbook: /etc/ansible/a.yml
[root@centos01 ~]# ansible-playbook -C /etc/ansible/a.yml

    .................
192.168.100.20       : ok=3    changed=1    unreachable=0    failed=0
192.168.100.30       : ok=2    changed=1    unreachable=0    failed=0

[root@centos01 ~]# ansible-playbook --list-hosts /etc/ansible/a.yml

[root@centos01 ~]# ansible-playbook --list-tasks /etc/ansible/a.yml

[root@centos01 ~]# ansible-playbook --list-tags /etc/ansible/a.yml
[root@centos01 ~]# ansible-playbook /etc/ansible/a.yml
[root@centos01 ~]# ssh 192.168.100.20 tail -1 /etc/passwd
user1:x:1001:1001::/home/user1:/bin/bash
[root@centos01 ~]# ssh 192.168.100.30 ls -ld /home/passwd
-rw-r--r--. 1 root root 2342 7月  23 16:06 /home/passwd
2、触发器
handlers是Ansible提供的条件机制之一。
handlers和task很类似,但是它只在被task通知的时候才会触发执行。
handlers只会在所有任务执行完成后执行。
而且即使被通知了很多次,它也只会执行一次。
handlers按照定义的顺序依次执行。
[root@centos01 ~]# ssh 192.168.100.20 netstat -anpt | grep 80
tcp6       0      0 :::80         :::*          LISTEN      94858/httpd

[root@centos01 ~]# vim /etc/ansible/httpd.yml


---
- hosts: web1
  remote_user: root
  tasks:
        - name: change port
          command: sed -i 's/Listen\ 80/Listen\ 8080/g' /etc/httpd/conf/httpd.conf
          notify:
                - restart httpd server
  handlers:
        - name: restart httpd server
          service: name=httpd state=restarted
...

[root@centos01 ~]# ansible-playbook -C /etc/ansible/httpd.yml
[root@centos01 ~]# ansible-playbook  /etc/ansible/httpd.yml
[root@centos01 ~]# ssh 192.168.100.20 netstat -anpt | grep 8080
tcp6       0      0 :::8080        :::*         LISTEN      103594/httpd
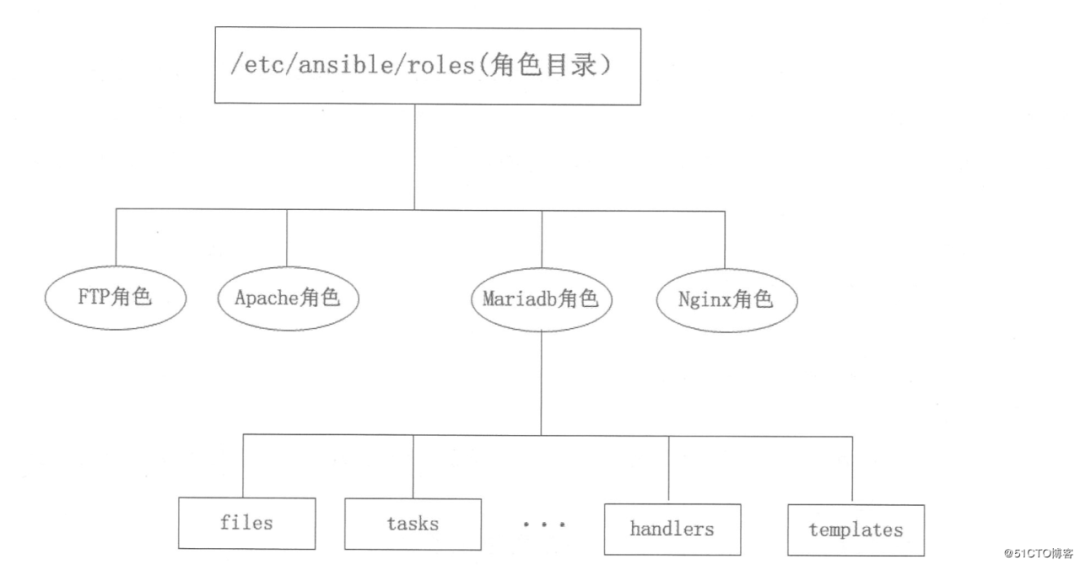
3、角色

mariadb:mysql角色; Apache:httpd角色; Nginx:Nginx角色;
files:存放由copy或script等模块调用的文件; templates:存放template模块查找所需要的模板文件的目录,如mysql配置文件模板; tasks:任务存放的目录; handlers:存放相关触发执行的目录; vars:变量存放的目录; meta:用于存放此角色元数据; default:默认变量存放的目录,文件中定义了此角色使用的默认变量;
- hosts: web
  remote_user: root
  roles:
  - mysql
- httpd 要求被管理主机上自动安装mariadb,安装完成后上传提前准备好的配置文件至远端主机,重启服务,然后新建testdb数据库,并允许test用户对其拥有所有权限。
被管理主机配置yum仓库,自行配置,若被管理端可以连接互联网,那么直接将yum仓库指向互联网即可
转自:51CTO博客-俊伟祺i
https://blog.51cto.com/14156658/2461907


年末福利

主讲老师:王晓春
首批红帽授权元老级认证Linux实战专家
拥有RHCl、RHCA、RHCVA、RHCE、CCNA、 OCP MCT、MCSE、MCDBA等几十种专业证书认证
十余年一线实战经验
课程大纲
Ansible 介绍和架构
Ansible安装
Ansible常用模块
Ansible Playbook介绍
Yaml语法
Ansible变量
Ansible的模版技术
Jinja2模板语法
Ansible Playbook条件判断和循环
Ansible Playbook其它高级用法
配套课件
