源码剖析sync.Cond(条件变量的实现机制)
前言
这是我并发编程系列的第三篇文章,这一篇我们一起来看看sync.Cond的使用与实现。之前写过java的朋友对等待/通知(wait/notify)机制一定很熟悉,可以利用等待/通知机制实现阻塞或者唤醒,在Go语言使用Cond也可以达到同样的效果,接下来我们一起来看看它的使用与实现。
sync.Cond的基本使用
Go标准库提供了Cond原语,为等待/通知场景下的并发问题提供支持。Cond他可以让一组的Goroutine都在满足特定条件(这个等待条件有很多,可以是某个时间点或者某个变量或一组变量达到了某个阈值,还可以是某个对象的状态满足了特定的条件)时被唤醒,Cond是和某个条件相关,这个条件需要一组goroutine协作共同完成,在条件还没有满足的时候,所有等待这个条件的goroutine都会被阻塞住,只有这一组goroutine通过协作达到了这个条件,等待的goroutine才可以继续进行下去。
先看这样一个例子:
var (
 done = false
 topic = "Golang梦工厂"
)

func main() {
 cond := sync.NewCond(&sync.Mutex{})
 go Consumer(topic,cond)
 go Consumer(topic,cond)
 go Consumer(topic,cond)
 Push(topic,cond)
 time.Sleep(5 * time.Second)

}

func Consumer(topic string,cond *sync.Cond)  {
 cond.L.Lock()
 for !done{
  cond.Wait()
 }
 fmt.Println("topic is ",topic," starts Consumer")
 cond.L.Unlock()
}

func Push(topic string,cond *sync.Cond)  {
 fmt.Println(topic,"starts Push")
 cond.L.Lock()
 done = true
 cond.L.Unlock()
 fmt.Println("topic is ",topic," wakes all")
 cond.Broadcast()
}
// 运行结果
Golang梦工厂 starts Push
topic is  Golang梦工厂  wakes all
topic is  Golang梦工厂  starts Consumer
topic is  Golang梦工厂  starts Consumer
topic is  Golang梦工厂  starts Consumer
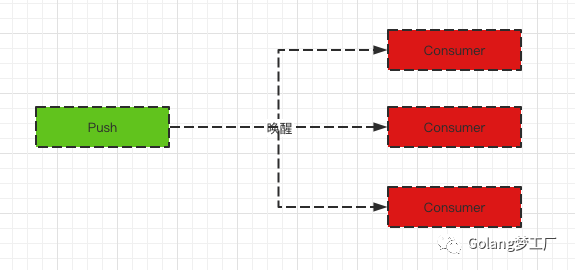
上述代码我们运行了4个Goroutine,其中三个Goroutine分别做了相同的事情,通过调用cond.Wait()等特定条件的满足,1个Goroutine会调用cond.Broadcast唤醒所用陷入等待的Goroutine。画个图看一下更清晰:
我们看上面这一段代码,Cond使用起来并不简单,使用不当就出现不可避免的问题,所以,有的开发者会认为,Cond是唯一难以掌握的Go并发原语。为了让大家能更好的理解Cond,接下来我们一起看看Cond的实现原理。
Cond实现原理
Cond的实现还是比较简单的,代码量比较少,复杂的逻辑已经被Locker或者runtime的等待队列实现了,所以我们来看这些源代码也会轻松一些。首先我们来看一下它的结构体:
type Cond struct {
 noCopy noCopy

 // L is held while observing or changing the condition
 L Locker

 notify  notifyList
 checker copyChecker
}
主要有4个字段:
nocopy:之前在讲waitGroup时介绍过,保证结构体不会在编译器期间拷贝,原因就不在这里说了,想了解的看这篇文章源码剖析sync.WaitGroup(文末思考题你能解释一下吗?)checker:用于禁止运行期间发生拷贝,双重检查(Double check)L:可以传入一个读写锁或互斥锁,当修改条件或者调用wait方法时需要加锁notify:通知链表,调用wait()方法的Goroutine会放到这个链表中,唤醒从这里取。我们可以看一下notifyList的结构:
type notifyList struct {
 wait   uint32
 notify uint32
 lock   uintptr // key field of the mutex
 head   unsafe.Pointer
 tail   unsafe.Pointer
}
我们简单分析一下notifyList的各个字段:
wait:下一个等待唤醒Goroutine的索引,他是在锁外自动递增的.notify:下一个要通知的Goroutine的索引,他可以在锁外读取,但是只能在锁持有的情况下写入.head:指向链表的头部tail:指向链表的尾部
基本结构我们都知道了,下面我就来看一看Cond提供的三种方法是如何实现的~。
wait
我们先来看一下wait方法源码部分:
func (c *Cond) Wait() {
 c.checker.check()
 t := runtime_notifyListAdd(&c.notify)
 c.L.Unlock()
 runtime_notifyListWait(&c.notify, t)
 c.L.Lock()
}
代码量不多,执行步骤如下:
执行运行期间拷贝检查,如果发生了拷贝,则直接 panic程序调用 runtime_notifyListAdd将等待计数器加一并解锁;调用 runtime_notifyListWait等待其他Goroutine的唤醒并加锁
runtime_notifyListAdd的实现:
// See runtime/sema.go for documentation.
func notifyListAdd(l *notifyList) uint32 {
 // This may be called concurrently, for example, when called from
 // sync.Cond.Wait while holding a RWMutex in read mode.
 return atomic.Xadd(&l.wait, 1) - 1
}
代码实现比较简单,原子操作将等待计数器加1,因为wait代表的是下一个等待唤醒Goroutine的索引,所以需要减1操作。
runtime_notifyListWait的实现:
// See runtime/sema.go for documentation.
func notifyListWait(l *notifyList, t uint32) {
 lockWithRank(&l.lock, lockRankNotifyList)

 // Return right away if this ticket has already been notified.
 if less(t, l.notify) {
  unlock(&l.lock)
  return
 }

 // Enqueue itself.
 s := acquireSudog()
 s.g = getg()
 s.ticket = t
 s.releasetime = 0
 t0 := int64(0)
 if blockprofilerate > 0 {
  t0 = cputicks()
  s.releasetime = -1
 }
 if l.tail == nil {
  l.head = s
 } else {
  l.tail.next = s
 }
 l.tail = s
 goparkunlock(&l.lock, waitReasonSyncCondWait, traceEvGoBlockCond, 3)
 if t0 != 0 {
  blockevent(s.releasetime-t0, 2)
 }
 releaseSudog(s)
}
这里主要执行步骤如下:
检查当前 wait与notify索引位置是否匹配,如果已经被通知了,便立即返回.获取当前 Goroutine,并将当前Goroutine追加到链表末端.调用 goparkunlock方法让当前Goroutine进入等待状态,也就是进入睡眠,等待唤醒被唤醒后,调用 releaseSudog释放当前等待列表中的Goroutine
看完源码我们来总结一下注意事项:
wait方法会把调用者放入Cond的等待队列中并阻塞,直到被唤醒,调用wait方法必须要持有c.L锁。
signal和Broadcast
signal和Broadcast都会唤醒等待队列,不过signal是唤醒链表最前面的Goroutine,Boradcast会唤醒队列中全部的Goroutine。下面我们分别来看一下signal和broadcast的源码:
signal
func (c *Cond) Signal() {
 c.checker.check()
 runtime_notifyListNotifyOne(&c.notify)
}
func notifyListNotifyOne(l *notifyList) {
 if atomic.Load(&l.wait) == atomic.Load(&l.notify) {
  return
 }
 lockWithRank(&l.lock, lockRankNotifyList)
 t := l.notify
 if t == atomic.Load(&l.wait) {
  unlock(&l.lock)
  return
 }

 atomic.Store(&l.notify, t+1)

 for p, s := (*sudog)(nil), l.head; s != nil; p, s = s, s.next {
  if s.ticket == t {
   n := s.next
   if p != nil {
    p.next = n
   } else {
    l.head = n
   }
   if n == nil {
    l.tail = p
   }
   unlock(&l.lock)
   s.next = nil
   readyWithTime(s, 4)
   return
  }
 }
 unlock(&l.lock)
}
上面我们看wait源代码时,每次都会调用都会原子递增wait,那么这个wait就代表当前最大的wait值,对应唤醒的时候,也就会对应一个notify属性,我们在notifyList链表中逐个检查,找到ticket对应相等的notify属性。这里大家肯定会有疑惑,我们为何不直接取链表头部唤醒呢?
notifyList并不是一直有序的,wait方法中调用runtime_notifyListAdd和runtime_notifyListWait完全是两个独立的行为,中间还有释放锁的行为,而当多个 goroutine 同时进行时,中间会产生进行并发操作,这样就会出现乱序,所以采用这种操作即使在 notifyList 乱序的情况下,也能取到最先Wait 的 goroutine。
broadcast
func (c *Cond) Broadcast() {
 c.checker.check()
 runtime_notifyListNotifyAll(&c.notify)
}
func notifyListNotifyAll(l *notifyList) {
 if atomic.Load(&l.wait) == atomic.Load(&l.notify) {
  return
 }

 lockWithRank(&l.lock, lockRankNotifyList)
 s := l.head
 l.head = nil
 l.tail = nil

 atomic.Store(&l.notify, atomic.Load(&l.wait))
 unlock(&l.lock)
 for s != nil {
  next := s.next
  s.next = nil
  readyWithTime(s, 4)
  s = next
 }
}
全部唤醒实现要简单一些,主要是通过调用readyWithTime方法唤醒链表中的goroutine,唤醒顺序也是按照加入队列的先后顺序,先加入的会先被唤醒,而后加入的可能 Goroutine 需要等待调度器的调度。
最后我们总结一下使用这两个方法要注意的问题:
Signal:允许调用者唤醒一个等待此Cond的Goroutine,如果此时没有等待的goroutine,显然无需通知waiter;如果Cond等待队列中有一个或者多个等待的goroutine,则需要从等待队列中移除第一个goroutine并把它唤醒。调用Signal方法时,不强求你一定要持有c.L的锁。broadcast:允许调用者唤醒所有等待此Cond的goroutine。如果此时没有等待的goroutine,显然无需通知 waiter;如果Cond等待队列中有一个或者多个等待的goroutine,则清空所有等待的goroutine,并全部唤醒,不强求你一定要持有c.L的锁。
注意事项
调用 wait方法的时候一定要加锁,否则会导致程序发生panic.wait调用时需要检查等待条件是否满足,也就说goroutine被唤醒了不等于等待条件被满足,等待者被唤醒,只是得到了一次检查的机会而已,推荐写法如下:
//    c.L.Lock()
//    for !condition() {
//        c.Wait()
//    }
//    ... make use of condition ...
//    c.L.Unlock()
Signal和Boardcast两个唤醒操作不需要加锁
总结
其实Cond在实际项目中被使用的机会比较少,Go特有的channel就可以代替它,暂时只在Kubernetes项目中看到了应用,使用场景是每次往队列中成功增加了元素后就需要调用 Broadcast 通知所有的等待者,使用Cond就很合适,相比channel减少了代码复杂性。
推荐阅读
