iOS 导航栏整体滑动解决方案(类似淘宝)
来源 | 简书
效果图
先上图为敬
原生效果
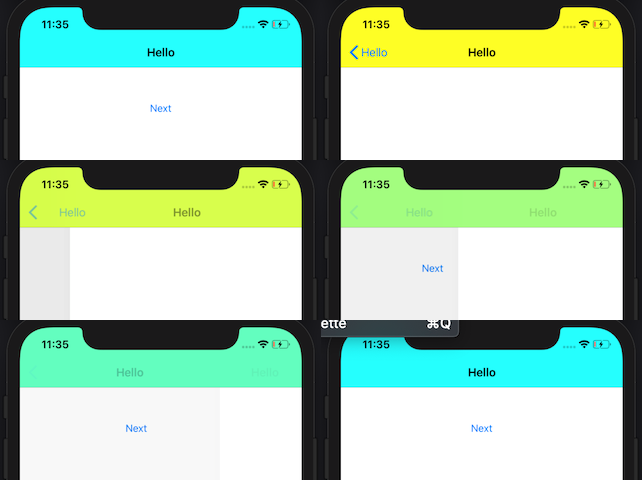
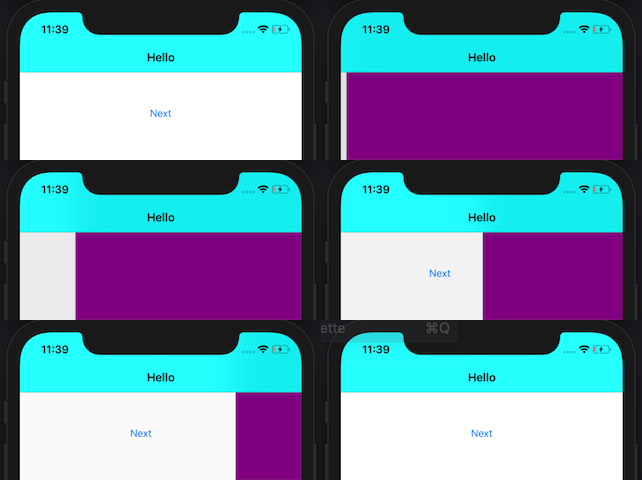
实现的效果
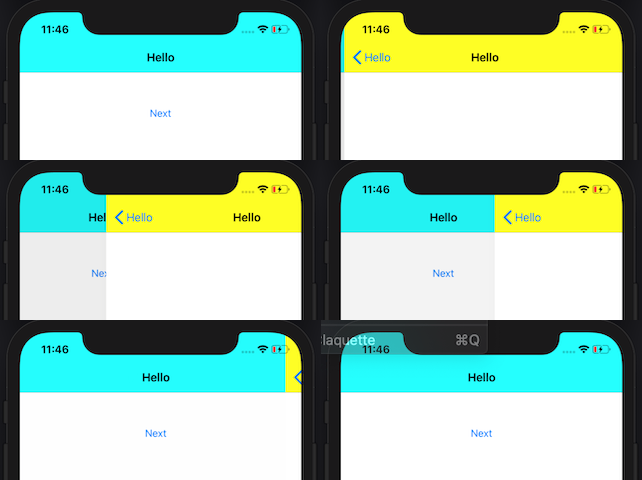
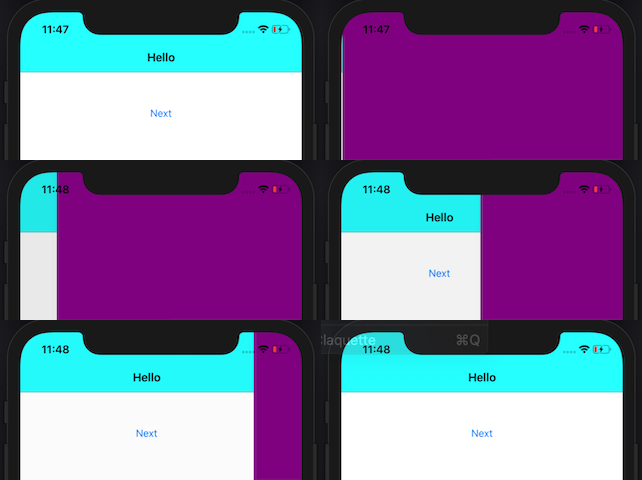
思路
UINavigationController的view视图结构:
-- UIView: frame = (0 0; 414 896);
    -- UINavigationTransitionView: frame = (0 0; 414 896);
    -- UINavigationBar: frame = (0 44; 414 44);
UINavigationTransitionView 是 UINavigationController 转场动画的容器视图。
UINavigationController 的所有子视图控制器 共用一个UINavigationbar,UINavigationbar 的转场效果由参与转场的两个视图控制器对导航栏的设置决定。
将 UINavigationbar 截图添加在 UIViewcontroller 上并隐藏UINavigationbar 可做到整体转场的效果。
UINavigationController的 view 调用 sendSubviewToBack: 将 UINavigationbar隐藏起来。
转场完成为避免有其他未知影响需调用 bringSubviewToFront:还原UINavigationbar的位置。
UIView 的截图由自身的属性设置和 bounds 大小决定。UINavigationController的根视图控制器没有转场效果,因此延迟截图到 viewDidAppear: ,可以保证此时导航栏截图的大小是正确的。
为了让该功能有全局效果,且简单易用,不需要额外的继承关系,可以使用 runtime 的方法交换对UIViewController的生命周期做功能的扩展。
Method-Swizzle 详细参考
为UIView新增一个分类方法实现截图
- (UIImage *)snapshotImage
{
        UIGraphicsBeginImageContextWithOptions(self.bounds.size, self.opaque, 0);
        [self.layer renderInContext:UIGraphicsGetCurrentContext()];
        UIImage *snap = UIGraphicsGetImageFromCurrentImageContext();
        UIGraphicsEndImageContext();
        return snap;
}
扩展 viewWillLayoutSubviews :
- (void)yr_viewWillLayoutSubviews
{
    [self yr_viewWillLayoutSubviews];

    if (!self.navigationController || self.navigationBarSnapshotView) {
        return;
    }

    UIViewController *rootViewController = self.navigationController.viewControllers.firstObject;
    if (self != rootViewController &&
        [self shouldGenerateNavigationBarImageView]) {
        UIImageView *navigationBarSnapshot = [[UIImageView alloc] initWithFrame:self.navigationController.navigationBar.visibleBoundry];
        navigationBarSnapshot.image = [self.navigationController.navigationBar snapshotImageClipsToBounds:NO];
        self.navigationBarSnapshotView = navigationBarSnapshot;
    }

    if (self.navigationBarSnapshotView &&
        !self.navigationBarSnapshotView.superview) {
        [self.view addSubview:self.navigationBarSnapshotView];
    }
}
根视图控制器不需要转场效果且为了得到正确的bounds大小,延迟截图到 viewDidAppear: :
- (void)yr_viewDidAppear:(BOOL)animated
{
    [self yr_viewDidAppear:animated];

    if (!self.navigationController) {
        return;
    }

    if ([self shouldGenerateNavigationBarImageView] &&
        !self.navigationBarSnapshotView) {
        UIImageView *navigationBarSnapshot = [[UIImageView alloc] initWithFrame:self.navigationController.navigationBar.visibleBoundry];
        navigationBarSnapshot.image = [self.navigationController.navigationBar snapshotImageClipsToBounds:NO];
        self.navigationBarSnapshotView = navigationBarSnapshot;
    }

    if (self.navigationBarSnapshotView.superview) {
        [self.navigationBarSnapshotView removeFromSuperview];
    }

    [self.navigationController.view bringSubviewToFront:self.navigationController.navigationBar];
}
Run起来看一下效果。

效果不正确,侧滑返回的时候,截图上面有一块留白。
查看UINavigationbar的结构:
UINavigationbar: frame = (0 44; 414 44);
    _UIBarBackground: frame = (0 -44; 414 88);
    _UINavigationBarContentView: frame = (0 0; 414 44);
    UIView: frame = (0 0; 0 0);
我们设置的 barTintColor 会作用在 _UIBarBackground。
可以看到UINavigationbar的frame是在状态栏之下,但_UIBarBackground的高度包含了导航栏与状态栏,超出了UINavigationbar的frame。
CALayer的 renderInContext: 只会绘制自身 size 大小的内容。
现在要解决的问题是绘制UIView时要包含超出自身 size 的内容。
为UIView扩展一个属性 visibleBoundry 返回视图的可视frame(包含子视图超出自身frame的内容)。
如图视图A包含一个子视图B,视图B的内容超出了A,视图A的 visibleBoundry 就为虚线框起来的大小。
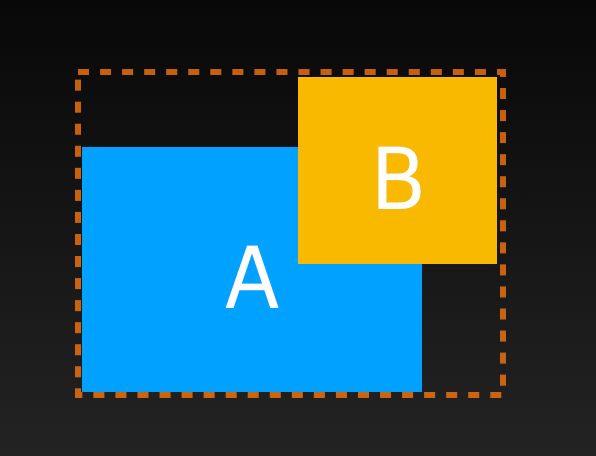
递归遍历视图的 subviews 得到子视图相对自身父视图的 frame 并取两个frame的合集就就得到 visibleBoundry。
- (void)_caculateVisibleBoundry:(UIView *)view
{
    if (view.subviews.count == 0) {
        CGRect subRect = [self.superview convertRect:view.bounds fromView:view];
        self.p_visibleBoundry = CGRectUnion(self.p_visibleBoundry, subRect);
    }
    for (UIView *subView in view.subviews) {
        [self _caculateVisibleBoundry:subView];
    }
}
得到 visibleBoundry 后由于绘制区域大小的变化还需要对绘制坐标做个平移才能得到正确的绘制内容。
更改截图方法为 - (UIImage *)snapshotImageClipsToBounds:(BOOL)clipsToBounds。
clipsToBounds 传 YES绘制自身 bounds 大小的内容,clipsToBounds传NO保留超出自身 bounds内容。代码如下:
- (UIImage *)snapshotImageClipsToBounds:(BOOL)clipsToBounds
{
    if (clipsToBounds) {
        UIGraphicsBeginImageContextWithOptions(self.bounds.size, self.opaque, 0);
        [self.layer renderInContext:UIGraphicsGetCurrentContext()];
        UIImage *snap = UIGraphicsGetImageFromCurrentImageContext();
        UIGraphicsEndImageContext();
        return snap;
    } else {
        UIGraphicsBeginImageContextWithOptions(self.visibleBoundry.size, self.opaque, 0);
        CGContextRef context = UIGraphicsGetCurrentContext();
        self.p_visibleBoundry = self.frame;
        [self _caculateVisibleBoundry:self];
        CGContextTranslateCTM(context, self.frame.origin.x - self.p_visibleBoundry.origin.x, self.frame.origin.y - self.p_visibleBoundry.origin.y);
        [self.layer renderInContext:UIGraphicsGetCurrentContext()];
        UIImage *snap = UIGraphicsGetImageFromCurrentImageContext();
        UIGraphicsEndImageContext();
        return snap;
    }
}
导航栏隐藏后系统侧滑返回手势将不可用,为UINavigationController添加 UIPanGestureRecognizer来处理侧滑,代码如下:
最终效果:
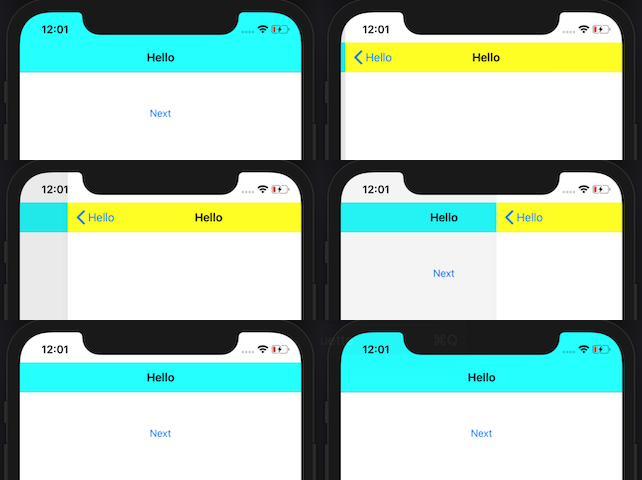
iOS导航栏整体侧滑我已经做成了pod库。可以直接导入使用 YRNavigationBarPure https://github.com/zongmumask/YRNavigationBarPure
目前已经有其他iOS导航栏整体侧滑的方案,但看过实现后,这种实现是最轻量级的,无需继承,处理逻辑比较简单,不容易出现bug。
YRNavigationBarPure为UIViewController和UINavigationController新增了扩展属性。通过 runtime做到了无感知,无需继承,使用方便。
点赞+在看,小编感恩大家❤️
